
Loading...
Loading...
Loading...
Loading...
Loading...
Loading...
Loading...
Loading...
Loading...
Loading...
Document Information
Issued Date: 2025-03-31 Software Version: Zetadata v.7.2.3 Document Version: v1.0.0
This guide is intended for database administrators who install and operate Tibero ZetaData (hereafter ZetaData).
Database
RDBMS
Tibero
Operating systems and system environments
UNIX and Linux
This copyright notice applies to the TmaxTibero ZetaData manual.
45, Jeongjail-ro, Bundang-gu, Seongnam-si, Gyeonggi-do, Republic of Korea
Tel : +82-1544-8629
E-Mail :
The contents of this software (ZetaData) manual and the program are protected by copyright laws and international convention. The contents of this manual and the programs described herein are available only under a license agreement with TmaxTibero Co., Ltd. and may be distributed or reproduced only within the scope of the license agreement.
No part of this document may be transmitted, copied, deployed, or reproduced in any form or by any means, electronic, mechanical, or optical, without the prior written consent of TmaxTibero Co., Ltd. Nothing in this software document and agreement constitutes a transfer of intellectual property rights regardless of whether or not such rights are registered) or any rights to TmaxTibero trademarks, logos, or any other brand features.
This document is for information purposes only. The company assumes no direct or indirect responsibilities for the contents of this document, and does not guarantee that the information contained in this document satisfies certain legal or commercial conditions. The information contained in this document is subject to change without prior notice due to product upgrades or updates. The company assumes no liability for any errors in this document.
TiberoZetaData is a registered trademark of TmaxData Co., Ltd. Other products, titles or services may be registered trademarks of their respective companies.
Some modules or files of this product are subject to the terms of the following licenses:
OpenSSL
RSA Data Security, Inc.,
Apache Foundation
Jean-loup Gailly and Mark Adler
Detailed Information related to the license can be found in the following directory:
${INSTALL_PATH}/license/oss_li censes
The guide contains 9 chapters.
This chapter describes Function Offloading, a key feature of ZetaData.
In Tibero Active Cluster (TAC) configurations that do not use storage nodes, the bandwidth limitations of the SAN switches become a bottleneck when performing large amounts of I/O. To solve this problem, ZetaData uses high-bandwidth InfiniBand instead of SAN switches. However, it doesn't change the fact that it needs to transfer large amounts of data over the network.
ZetaData's Function Offloading function serves to significantly reduce the amount of data transmitted over the network by offloading tasks such as raw filtering and column filtering and projection that were previously performed on TAC instances to SSVR instances.
In addition, tasks that use a lot of CPU resources, such as decompression, can also be transferred to SSVR instances to utilize the CPU resources of storage nodes, which are significantly less utilized than the CPU resources of DB nodes.
Function Offloading basically operates only when querying data through Table Full Scan.
Since this function is developed to reduce data transmission in a network, it does not operate when there is not a lot of I/O such as table queries with indexes.
To efficiently use Function Offloading, do not create indexes when storing massive data in a ZetaData configuration. If you unavoidably include indexed columns in the WHERE clause to view data, you can give the query a Full Scan hint (/+full_storage(t1)/) to avoid viewing through the index. Conversely, if you do not want to use Function Offloading, you can force it with a hint (/+no_full_storage(t1)/). Another limitation is that this feature is not available for LOB columns that are stored in separate LOB segments.
Function offloading is most effective when a lot of data can be filtered out at the WHERE clause processing stage. This is because the amount of data that needs to be sent to the TAC instance can be greatly reduced by the work of the SSVR instance.
Also, because the prefetch management is done within the SSVR instance, the I/O is more efficient compared to block requests that do not use functions. However, the SSVR instance is not responsible for the number of buffer cache overflows on the TAC instance. That is, using this function is not efficient for OLTP jobs.
The SSVR instance cannot handle tables with frequent modifications because it doesn't know about the static operations. This means that the effectiveness of this feature is minimal for OLTP operations.
Data for tables viewed through the Function Offloading feature may not be kept in the buffer cache of the TAC instance. This is because it is delivered to the TAC instance in a pre-processed form from the SSVR instance and is not delivered in blocks of data. For the same reason, the effectiveness of the feature is most noticeable when working with tables that are too large to fit all the data in the buffer cache. Conversely, you should not use the feature if the data you want to view is small enough to fit in the buffer cache, or if you expect frequent views and modifications to that data so that it is already in the buffer cache.
If ZetaData is configured with TCP, not InfiniBand, SGA must be sufficient because Function Offloading results are transferred through TCP and temporarily stored in the SGA. Because the TAC instance requests as many I/Os as the number of Grid Disks in the SSVR instance at a time, it uses much more SGA space than when the function is not used.
To configure TAC instances for SGA, refer to the Tibero's configuration.
The following describes each initialization parameter for the Function Offloading function.
다음은 Function Offloading 기능과 관련한 초기화 파라미터에 대한 설명입니다.
The following is a list of functions that support Function Offloading.
Constraint: lob cannot be an input to the TO_CHAR function.
STORAGE_PROCESSING
This is a session parameter of the DB instance that specifies whether to read data using the Function Offloading function.
Set to "Y" or "N" before executing the query to specify whether to run the feature for each query. (Default: Y only if USE_ZETA=Y)
ABS, ADD_MONTHS, ASCII, ASCIISTR, BETWEEN, BITAND, CASE, CEIL, CHR, COALESCE, DECODE, DUMP, EXP, EXTRACT, FLOOR, FROM_TZ
HEXTORAW, INITCAP, INSTR, INSTRB, ISSEQUENCEWORDS,
LAST_DAY, LENGTH, LENGTHB, LENGTHC, LIKE, LNNVL, LOG, LOWER, LPAD, LTRIM, MOD, MONTHS_BETWEEN, NEW_TIME, NEXT_DAY, NULLIF, NUMTODSINTERVAL, NUMTOYMINTERVAL, NVL, NVL2, OVERLAPS, RAWTOHEX, REVERSE, ROUND, ROWIDTOCHAR,
RPAD, RTRIM, SIGN, SQRT, SUBSTR, SUBSTRB, SYS_EXTRACT_UTC,
TO_CHAR(Lob type is not available), TO_DATE, TO_DSINTERVAL, TO_MULTI_BYTE, TO_NCHAR, TO_NUMBER, TO_SINGLE_BYTE, TO_TIME, TO_TIMESTAMP, TO_TIMESTAMP_TZ, TO_YMINTERVAL, TRANSLATE, TRIM, TRUNC, UPPER, VSIZEThis chapter describes how to backup and recover ZetaData data.
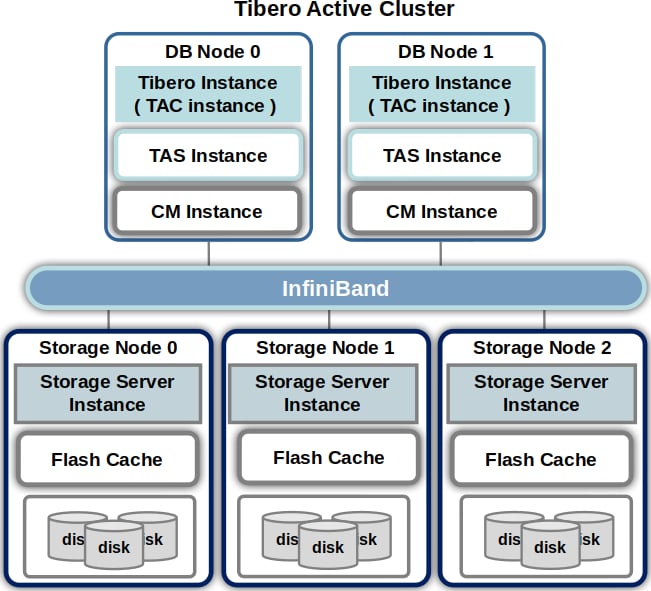
ZetaData consists of SSVR instance, TAS instance, and TAC instance.
SSVR instances can be configured on multiple servers and are managed by TAS instances to provide volumes to TAC instances. TAS instances are also configured as clusters to match the TAC instances. We do not provide backup capabilities for SSVR and TAS . Typical TAC backups are the same as those done using a storage-agnostic database solution.
There are the following three methods for ZetaData data backup and recovery.
Same as a general backup method. Backed up files can be loaded with tbimport.
Physically backs up files managed by a database.
If a database is configured with TAS, a database file cannot be accessed with an OS utility but can be accessed with RMGR.
RMGR supports backup when a database's storage is a local disk, SAN disk, SAN disk that uses TAS, or ZetaData. If RMGR is used, backup and recovery are performed in a database node. A user does not need to perform additional tasks for backup and recovery.
Copies TAS files saved in disk spaces to a local directory by using tbascmd to execute the cptolocal command in a command line tool of TAS. It backs up all files for Tibero operation to a local file system by using the cptolocal command while only TAS instance operates after ending a Tibero instance.
Before performing recovery, perform checkpoint to save data located only in memory to flash and disk as follows:
Before performing backup, check the file type and block size as follows:
Backup all necessary files such as control, redo, and data files as follows.
TBASCMD can be accessed through tbascmd (port number). The port number is set in LISTNER_PORT of the TAS tip file.
The following is an example of backing up the c1.ctl control file locally on a TAS instance using port 9120.
The result of executing the above command shows that a backup file and a rollback script file using the cpfromlocal command have been created.
User can back up all files managed by the DB using the cptolocal command of tbascmd and then transfer and restore them to the TAS disk space of another node.
Transfer the backup files to the local directory of the node you want to migrate to and use the cpfromlocal command to copy the backup files from the local file system to the disk space of TAS. At this time, specify the file type (file type '-t') and block size (block size '-b') that were checked while backing up as arguments. There are five types of file types: CTRL, REDO, DATA, TEMP, and ARCH.
The following is an example of copying a backup file to disk space DS0 on node #1 TAS.
SQL> alter system checkpointSQL> select a.type, a.block_size, b.name from v$as_file a, v$as_alias b
where a.file_number = b.file_number;$ tbascmd 9120
ASCMD> cptolocal +DS0/c1.ctl /home/node0/c1.ctl$ ls /home/node0
c1.ctl c1.ctl_rollback.shcpfromlocal /home/node1/c1.ctl +DS0/c1.ctl -b 16384 -t CTRL
cpfromlocal /home/node1/log001.log +DS0/log001.log -b 512 -t REDO
cpfromlocal /home/node1/usr001.tdf +DS0/usr001.dtf -b 32768 -t DATA
cpfromlocal /home/node1/temp001.dtf +DS0/temp001.dtf -b 32768 -t TEMP
cpfromlocal /home/node1/log-t0-r0-s1.arc +DS0/ARCH/log-t0-r0-s1.arc -b 512 -t ARCHThis chapter describes the Storage Data Map, a key feature of ZetaData.
The Storage Data Map feature is a technology that allows for efficient use of disk bandwidth by reducing the amount of disk reads performed.
ZetaData automatically calculates the statistics (e.g.: maximum and minimum values of each column) for disks and preserves them in memory. This avoids reading disks that do not contain the data that do not satisfy the filtering conditions. Since the disk read size is decreased, the disk bandwidth can be used more efficiently as well as greatly reducing the amount of time consumed in disk I/O.
When querying data through Table Full Scan, physically contiguous disk areas are read. Here, the storage server calculates each column's maximum and minimum values for the disk area to configure a storage data map. When reading a specific disk block such as with table queries using indexes, the entire contiguous areas of disk are not read, so a storage data map is not created. Therefore, to increase performance, it is important to perform a Table Full Scan by not creating an index just like Function Offloading, or by using query hints.
Columns used to create a storage data map are limited to the columns that are contained in the WHERE clause of the view query amongst all columns in a table, as well as the columns that have not been preprocessed such as by functions or formulas.
The types of columns to be applied are not only NUMBER, CHAR, and VARCHAR but also most basic types that can be included in the WHERE clause without conversion. However, an LOB column is stored in a separate LOB segment, so this function cannot be used when a LOB column is included.
Since Function Offloading does not operate for LONG, RAW, and XML types, Storage Data Map is not available.
When the column is used in a WHERE clause, size comparison such as "large and small", as well as "same, different, NULL, and not NULL" can be expressed. If there is a large number columns, then storage data maps are created for up to eight columns, and then columns queried after are ignored.
When querying data stored for the first time after starting a storage server, there is no existing storage data map, which means no performance gain. As well, using a WHERE clause to repeatedly view a same column increases the performance. The WHERE clause used here does not need to be completely the same as the WHERE clause used when creating a storage data map, and performance increases as long as the columns used are the same.
A storage data map includes the maximum and minimum values of the columns for each disk area. If a condition of the WHERE clause is outside of the range of the minimum and maximum values, a read task may not be performed for the disk area.
Therefore, the lower the view query's selectivity is (in other words, the lower the number of data that meets the condition), the range of performance improvement becomes larger. As well, by storing data in the sorted format for the columns used in the WHERE clause, the difference between the column's maximum and minimum values becomes smaller, which means the impact of storage data map can be maximized.
A created storage data map is immediately removed from memory the moment in which a write request for the area is executed. This is because if data is modified, then the existing statistical value may be changed. Therefore, it is not recommended to use the storage data map in OLTP systems with a lot of data changes.
Since Storage Data Map operates when Function Offloading is enabled, disable Function Offloading by using its initialization parameter.
This chapter describes Tibero Columnar Compression (TCC), a key feature of ZetaData.
TCC is a data storage method that can improve compression and reduce disk I/O.
TCC collects and stores each column of a table individually and stores them consecutively instead of the traditional method of placing columns in a row.
If columns are placed in a row like this, the same data pattern will iterate, which is very effective for compression techniques like RLE (Run-Length Encoding), LZ4 (Lempel-Ziv 4), gzip (GNU zip), and bzip2 (block zip version 2).
Compression rate is greatly improved. The amount of improvement varies depending on a data pattern, but a user can expect an improvement of 4:1 - 10:1 in compression rate in a general OLAP business environment.
As the compression rate is improved, the number of I/O operations is decreased. This means that if the number of I/O operations is a cause of a performance bottleneck, then performance can be improved. Furthermore, ZetaData performs decompression in a SSVR instance, so it does not consume a DB server's resources. CPU resources on the storage nodes are usually spare.
As data is placed by columns, unnecessary columns are not read. If the number of columns that are necessary is less than the number of all columns, then the amount of I/O operations can be greatly reduced.
The following is a list of situations where using TCC can provide benefits
As described above, if an update is made for a table configured using TCC, it will lead to performance degradation. As a result, TCC is suitable for loading large amounts of data through DPL/DPI. As well, it is suitable for storing or deleting an entire table depending on the table data's lifecycle.
TCC is recommended when a full table scan is frequently used. The uses of a full table scan can be determined by selectivity or the use of aggregation.
TCC provides a high compression rate when performing directory compression, RLE, LZ4, gzip, bzip2, and differential compression. Also, if a compression rate is mostly constant, the number of recompressions will be decreased when loading data, which improves loading speed.
TCC provides benefits when only some columns of a table are needed. Compression units that correspond to unneeded columns are not read. However, if data is stored as row-oriented, then all the columns of a row must be read regardless of the number of columns needed. This results in a relatively large number of blocks to be read.
The following describes the initialization parameters related to TCC. CC_CU_BLKCNT is a system parameter and the rest of the parameters are session parameters.
CC_CU_BLKCNT
The maximum number of blocks a compression unit (CU) can have.
A large CU is usually beneficial for compression, but beyond a certain point it becomes too full to be useful. An unnecessarily large CU can also be detrimental if there is iterative decompression.
It is recommended to set it less than DB_FILE_MULTIBLOCK_READ_COUNT. (default: 4, range: 1 - 32)
CC_CU_PCTUSE
The minimum percentage of capacity that will fit in the CU.
When configuring CUs, try to fill at least this percentage. While a large value can prevent wasted space, it can also reduce performance due to more recompression when loading . (Default: 95, range: 0 - 99)
CC_TYPICAL_ROW_SIZE
When executing a CREATE TABLE command, the following options can be used to create a TCC table
This is the level that maximizes performance losses during column compression due to OLTP-like operations.
This is a medium compression level. The performance of compression/decompression is also medium.
This is a higher compression level. The performance of compression/decompression is somewhat worse.
This is the maximum compression level. It also has the lowest compression/decompression performance.
The following is an example of using the option.
While TCC offers many benefits in comparison with the row-oriented storage structure, it also has its downsides. Improper use can result in significant damage to performance.
Use caution in the following situations.
When an update is made in a table stored using TCC, the table is decompressed and its rows become row-oriented. Furthermore, more blocks must be read than compared with reading blocks in row units. For example, when executing UPDATE SET A=1, B=2 WHERE C=3, if a table is stored in a row-oriented method, then only one block needs to be read. However, if a table is stored using TCC, then three compression units must be read.
If CC_CU_BLKCNT is large, the performance is even more damaged. Each CU will need as many block I/Os as CC_CU_BLKCNT to process a single row. Therefore, if there isn't much of a difference in compression rates, it is recommended to use an appropriate size for CC_CU_BLKCNT.
When a table is accessed using an index, it must be decompressed in CU units every time. (However, this does not mean every row is decompressed. Decompressed data is reused for sequential rowids.) Therefore, when a table is accessed by using an index, it may be decompressed, which leads to performance degradation. If a table is accessed in row units, it is disadvantageous to use the TCC storage method. As with indexed access, the TCC storage is inefficient in all cases where access is row-by-row.
CREATE TABLE {table-name} COMPRESS FOR QUERY LOWCREATE TABLE {table-name} COMPRESS FOR QUERY HIGHCREATE TABLE {table-name} COMPRESS FOR ARCHIVE LOWCREATE TABLE {table-name} COMPRESS FOR ARCHIVE HIGHCREATE TABLE T(A NUMBER) COMPRESS FOR QUERY HIGHThe typical row size of the data to be compressed.
It is used as a hint when compression is first started. This value and CC_EXPECT ED_RATE can be used to estimate how many rows will fit in a CU to make compression go faster. (Default: 100, range: 3 - 1000)
CC_EXPECTED_RATE
The general compression ratio of the data to be compressed (hint).
Used in conjunction with CC_TYPICAL_ROW_SIZE during the initial CU configuration. Predictions for subsequent CUs use the results of the previous CU.
(default: 25, range: 1 - 100)
CC_CU_WRITEOUT_THRESH OLD
CC_CU_WRITEOUT_THRESHOLD is a setting that specifies the minimum fill percentage that a single block must meet in order for a write operation to proceed. This means that the block is written to disk only when the data in the block is at least the set percentage full.
(default: 85, range: 0 - 99)
This chapter describes failover methods for each of ZetaData's configurations.
If an SSVR instance fails, the TAS instance automatically detects the status of the corresponding disk and performs I/O Fail-over. If each SSVR instance is configured with a FAILGROUP of 1:1, and the redundancy level of the disk space is NORMAL or higher, all loads performed on the DB will run normally regardless of the failure of one SSVR instance.
If a sSSVR instance recovers from a failure, then the TAS instance automatically detects the SSVR instance's status to synchronize all the disks in the SSVR instance . If it is impossible to perform a failover on a SSVR instance , then that SSVR instance can be removed from the disk space. To remove the SSVR instance, connect to the TAS instance to remove the FAILGROUP that corresponds to the storage server that is to be removed.
The following is an example of removing from a TAS disk space when the failed SSVR instance is in a FAILGROUP named FG0.
$ tbsql sys/tibero@tas0
SQL> alter diskspace DS0 drop disks in failgroup FG0 rebalance wait;
There must be enough free disk space left to store the data on all the disks you want to remove.
To add the newly configured SSVR instance, add FAILGROUP using the ALTER DISKSPACE syntax in TAS.
The following is an example of adding the grid disk of a newly configured SSVR instance to a FAILGROUP named FG0 in a disk space.
If a TAC instance fails, sessions are recovered through the Fail-over feature of Tibero Active Cluster.
For more information, refer to the "Tibero Administrator's Guide".
$ tbsql sys/tibero@tas0
SQL> alter diskspace DS0 add failgroup FG0
disk '-10.10.10.11/GD0' name DISK0 size 64G,
     '-10.10.10.11/GD1' name DISK1 size 64G
rebalance wait;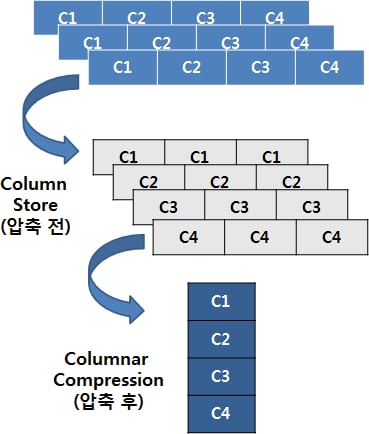
This chapter describes how to configure the network of ZetaData's DB nodes and Storage nodes.
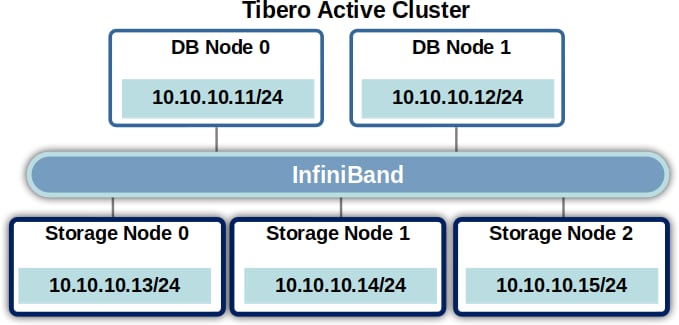
ZetaData uses InfiniBand for fast network communication between DB nodes and Storage nodes. Follow the steps below to set up a ZetaData network using InfiniBand.
Install the InfiniBand driver.
Verify the operation of the InfiniBand driver.
Configure kernel parameters.
Configure a network (refer to the network configuration manual of each InfiniBand manufacturer).
The figure below shows the IP address configuration for InfiniBand on the ZetaData node that will be used in the examples going forward.
To use InfiniBand, install a driver and library appropriate for the OS. Check the library by using each OS command and install it first.
The following is an example of installing a library for each OS.
Ubuntu
Install the package 'Development files for the libibverbs library' searched with the above command.
RedHat series (RHEL, CentOS, Fedora)
The following is an example of installing the InfiniBand driver on Red Hat 7,8 and 9 provided by Mellanox.
1. Install the Melanox driver.
Create a network configuration file for InfiniBand. Below is an example of the configuration file on DB node 0.
Execute the opensmd service for switches that do not support the subnet manager function.
Restart the server.
The following is an example of verifying the operation of the InfiniBand driver provided by Mellanox.
This chapter describes how to configure a flash cache for SSVR instances using flash devices on storage nodes and use it efficiently.
SSVR instances support flash devices as caches.
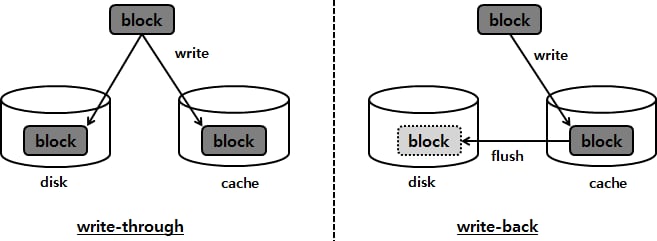
Flash devices provide fast I/O performance and non-volatile low storage space. There are two ways to write data to the cache: write-through and write-back, as shown in the figure.
This operation is completed by storing data in both disk and cache.
The operation is completed by storing the data only in the cache.
ZetaData's flash cache uses a write-back method to enhancing the write I/O speed.
Using the write-back caching algorithm may result in inconsistency between the cache data and the disk data.
Blocks that contain data are called dirty blocks. Dirty blocks are synchronized to disk by the cache exchange algorithm in order of oldest dirty blocks at the time the cache runs out. The operation of synchronizing dirty blocks to disk is called a checkpoint. Synchronized dirty blocks become clean blocks.
If the percentage of free blocks is insufficient, old blocks among the clean blocks are selected to become free blocks and can be used to cache new I/O requests. Checkpoints are usually performed automatically by the cache replacement policy. Admin can also manually direct checkpoints.
The following is a DDL to manually checkpoint the flash cache.
A flash cache must be removed when a user does not want to use it.
To maintain consistency of a flash cache, there must not be a dirty block. Executing a flash cache removal command performs a checkpoint. After checkpointing is completed, the flash cache is normally removed.
The following is a DDL to remove the flash cache.
The following describes the parameters related to flash cache performance.
SSVR_FC_WS_CNTs. It is recommended to set the number of working sets to the same number of CPUs.
Defines the number of working sets. If not set, it will be the same as the number of CPUs, so it is not necessary to set it. It is recommended to set the number of in the working set to be the same as the number of CPUs.
SSVR_FC_FREE_BIN_RATIO
Flash cache changes cache blocks that have not been accessed for a long time to free blocks.
parameter defines the percentage of free blocks that should be freed. A large value has the advantage of reducing the latency of obtaining free blocks by freeing them in advance, but has the disadvantage of truncating the number of cached blocks . (Default: 10%)
SSVR_FC_DIRTY_BIN_RA TIO_MAX
The following is to verify the creation information for your flash cache.
$ tbsql sys/tibero

tbSQL 7

TmaxTibero Corporation Copyright (c) 2020-. All rights reserved.

Connected to Tibero.

SQL> alter flashcache checkpoint;

altered.

SQL>$ tbsql sys/tibero
tbSQL 7
TmaxTibero Corporation Copyright (c) 2020-. All rights reserved.
Connected to Tibero.
SQL> drop flashcache flash0;
dropped.
SQL>$ tbsql sys/tibero
tbSQL 7
TmaxTibero Corporation Copyright (c) 2020-. All rights reserved.
Connected to Tibero.
SQL> select * from V$SSVR_FLASHCACHE;
FLASHCACHE_NUMBER NAME PATH OS_BYTES
----------------- ----------------------- -------------------------- -----------
0 FLASH1 /dev/zeta-flash1 5.3687E+10
1 FLASH2 /dev/zeta-flash2 5.3687E+10
2 FLASH3 /dev/zeta-flash3 5.3687E+10
3 rows selected.
SQL>
$ sudo apt-cache search libibverb$ sudo apt-get install libibverbs-dev$ yum install libibverbs-devel libibverbs-devel-static$ ./mlnxofedinstall$ echo "CONNECTED_MODE=yes
> TYPE=InfiniBand
> BOOTPROTO=none
> DEFROUTE=yes
> #IPV4_FAILURE_FATAL=no
> #IPV6INIT=yes
> #IPV6_AUTOCONF=yes
> #IPV6_DEFROUTE=yes
> #IPV6_FAILURE_FATAL=no
> NAME=ib0
> #UUID=6842318b-35d2-475a-8ae2-b3f9ec6b787a
> DEVICE=ib0
> ONBOOT=yes
> IPADDR=10.10.10.11
> NETMASK=255.255.255.0
> #PREFIX=32
> #IPV6_PEERDNS=yes
> #IPV6_PEERROUTES=yes" > /etc/sysconfig/network-scripts/ifcfg-ib0$ systemctl enable opensmd.service
$ service opensmd start$ ip addr show ib0
8: ib0: <BROADCAST,MULTICAST,UP,LOWER_UP> mtu 65520 qdisc pfifo_fast \
state UP qlen 1024
link/infiniband 80:00:00:2c:fe:80:00:00:00:00:00:00:50:65:f3:ff:ff:88:81:d0 \
brd 00:ff:ff:ff:ff:12:40:1b:ff:ff:00:00:00:00:00:00:ff:ff:ff:ff
inet 10.10.10.11/24 brd 10.10.10.255 scope global ib0
valid_lft forever preferred_lft forever
inet6 fe80::5265:f3ff:ff88:81d0/64 scope link
valid_lft forever preferred_lft forever
$ ibv_rc_pingpong
local address: LID 0x0006, QPN 0x008382, PSN 0xc85390, GID ::
remote address: LID 0x0002, QPN 0x02e388, PSN 0xb0671b, GID ::
8192000 bytes in 0.01 seconds = 10726.02 Mbit/sec
1000 iters in 0.01 seconds = 6.11 usec/iter$ ip addr show ib0
8: ib0: <BROADCAST,MULTICAST,UP,LOWER_UP> mtu 65520 qdisc pfifo_fast \
state UP qlen 1024
link/infiniband 80:00:00:2c:fe:80:00:00:00:00:00:00:50:65:f3:ff:ff:88:71:40 \
brd 00:ff:ff:ff:ff:12:40:1b:ff:ff:00:00:00:00:00:00:ff:ff:ff:ff
inet 10.10.10.12/24 brd 10.10.10.255 scope global ib0
valid_lft forever preferred_lft forever
inet6 fe80::5265:f3ff:ff88:7140/64 scope link
valid_lft forever preferred_lft forever
$ ibv_rc_pingpong 10.10.10.11
local address: LID 0x0002, QPN 0x02e388, PSN 0xb0671b, GID ::
remote address: LID 0x0006, QPN 0x008382, PSN 0xc85390, GID ::
8192000 bytes in 0.00 seconds = 13317.62 Mbit/sec
1000 iters in 0.00 seconds = 4.92 usec/iterDefines the maximum percentage (%) of dirty blocks to keep in the flash cache.
If more than this percentage of dirty blocks are present, the Background Thread performs checkpoints to maintain the defined maximum percentage of dirty blocks. (Default: 80%)
This chapter describes the basic concepts and features of ZetaData.
The current data warehouse market has reached its limits due to the explosion of data. The size of data is expanding beyond terabytes to petabytes, and the size of a single data warehouse will further increase the amount of data across the enterprise. This data growth eventually creates performance and cost issues.
In a data warehouse configured in a traditional storage area network (SAN) environment, the bottleneck is I/O performance. Typical storage I/O performance growth rates do not keep pace with data growth.
In addition, scalability is limited in a SAN environment. To solve this problem, you need to purchase more expensive equipment to reinstall DBs and migrate data. At some point, it will no longer be possible to scale-up and the existing data will need to be backed up externally or deleted. In other words, to address future data growth trends, horizontal scalability and high-speed access to large amounts of data are required.
One solution to this problem is Hadoop, which is open source in the "big data" market. Hadoop provides HDFS, an infinitely scalable file system, and the MapReduce framework for analyzing it. However, it is not as easy to use Hadoop to perform high-level analytics as a general-purpose RDBMS.
Hadoop has the following problems
MapReduce makes it difficult to write and utilize simple queries like SQL.
It doesn't have strict consistency.
Another solution is found in the appliance market. These are commonly used by large enterprises and include Oracle's Exadata, EMC's Greenplum, and MS's PDW. They offer storage database integration solutions that support hundreds of terabytes to petabytes. They also provide both hardware (H/W) and software (S/W). Most of them are optimized for analytics and comply with SQL standards, making it easy to write consistent queries in various environments. The problem with this Appliance DW approach is dependencies. Because you have to adopt an all-in-one H/W and S/W solution, you are locked into a specific vendor in every way. For example, Exadata requires Exadata S/W and Sun H/W. Different customers may want different H/W, but you must always use the same H/W.
Another issue is cost. The above appliances are very expensive equipment, with H/W and S/W prices ranging from hundreds of millions to billions of won. Therefore, it is difficult to adopt them unless you are a company of a certain size. To solve all of these problems, TmaxTibero released ZetaData.
ZetaData provides the following key features.
ZetaData consists of a DB and storage software to support it. The storage software is installed on servers with multiple local disks, which are called storage servers. Each of these storage servers is an independent component, so adding more storage servers does not affect the other storage servers. It just makes them appear as one volume in the TAS layer. This provides a storage structure that can scale to large volumes.
If you have flash devices in your H/W, you can use them to perform I/O Cache Tiering, which means that you can use flash devices as I/O caches to provide very fast response speeds even in OLTP environments. If you need to, you can use the flash device as a disk instead of an I/O cache.
ZetaData uses InfiniBand as its primary network interconnect. InfiniBand has much higher bandwidth than traditional network technologies, providing several times the bandwidth of SAN environments built with Fiber Channel.
ZetaData basically uses the RDMA (Remote Direct Memory Access) protocol to exchange data between nodes. By using the RDMA protocol, communication delay time and CPU utilization are greatly reduced.
It is possible to obtain maximized compression efficiency by changing the existing row-direction data storage structure into a column direction and then compressing it. In addition, by applying different compression methods according to the access frequency of data, it is possible to increase a query speed for frequently used data and increase a compression rate for frequently used data.
Tibero 7 is a RDBMS that has been verified in real environments for more than 10 years, and has proven excellent performance in BMT (Bench Marking Test) with other DBMS, and has been applied in various fields such as the public, finance, and companies. By adopting a resource-efficient architecture that takes into account core and analytic tasks, it effectively responds to large-scale data processing and cloud environment demands, and ensures stability, high performance, compatibility, and convenience.
The Tibero offers the following advanced features:
Distributed database links
Data Replication
Database clustering
Parallel query processing
ZetaData provides TAS to unify multiple distributed storage servers and perform volume management. Using TAS, you can use features such as striping, mirroring, and logical volume management like a general storage solution. For a detailed description of other features, see "Tibero Active Storage Guide". Cluster Manager (CM) enables reliable clustering operations.
SSVR instances are independently configured to manage local disks and perform in-process I/O operations for the DBMS. You can access and manage SSVR instances using tbSQL in the same way as you access TAC instances. It provides information for managing local disks and checking statistical information. The binaries for installing SSVR instances are provided in the same form as the existing Tibero binaries.
The following processes are created in an SSVR instance.
The following processes are additionally created on the TAS and TAC instances in order for the TAS and TAC instances to send I/O requests to the SSVR instance and receive the results.
MGWP
This process is used to manage the system. It basically performs the same role as the worker process, but handles connections directly through a special port without going through a listener. Only SYS accounts are allowed to access it.
FGWP0000
This is the process that actually communicates with the client and handles the user's needs. Specifically, it manages local disks, provides information for checking statistics, etc.
SSVR
SSIO
SSIO is created in the ZetaData environment for TAS instances and TAC instances to exchange I/O request messages with SSVR instances.
I/O request messages with the SSVR instance in a ZetaData environment.
This is the process that receives and processes actual input and output requests.
It also manages the flash cache and the storage data map. Most of the work is done by the SSVR process.
This chapter describes how to install a storage server, and register disks and flash devices. It also explains how to create disk space, table space and install DB using SSVR instance on TAS instance.
All installation and configuration examples in this chapter are based on the specifications of the DB node and Storage node shown in the table below. The specifications of each node are the main factors that affect ZetaData configuration and system performance, so it is important to verify them before starting configuration.
Menory
There are several ways to check memory and disk capacity.
The following is an example of checking the physical memory capacity of nodes.
The following is an example of checking the memory capacity of a node.
It is assumed that a storage node has twelve 4 TB disks. The OS and the storage server's binary and control file are installed in 400 GB of space allocated to one of the disks.
If RAID is not used, then 3.6 TB of space (excluding the 400 GB where the OS is installed) is configured as a single partition. Therefore, the storage node can be configured by using the 3.6 TB partition of the disk in which the OS is installed, and eleven 4 TB disks.
It is assumed that a storage node has twelve 4 TB disks, and two of them are configured as RAID 1 mirroring. The OS and the storage server's binary and control file are installed in 400 GB of space allocated to the RAID1.
After installing the OS, divide the remaining 7.2 TB into two separate 3.6 TB disks, and configure RAID 0 for each one. Therefore, the storage node can be configured by using RAID 1 mirroring with two 3.6TB disks and ten 4TB disks, excluding the space where the OS is installed.
The following is the process of preparing shared disks for installation. The process must be performed on all nodes.
Storage node disks can be used by modifying their permission or ownership. However, this can cause the issue that a disk name is changed after OS rebooting. To prevent the issue, it is recommended to configure storage node disks by using udev.
The following briefly describes udev.
Like system software, udev provides device events, manages device node permission, and creates or renames a symbolic link for a network interface or /dev directory.
When a device is detected by the kernel, UDEV gathers properties such as the serial number or bus device number from the SYSFS directory to determine a unique name for the device. UDEV keeps track of devices in the /SYS file system based on their major and minor numbers, and utilizes system memory and SYSFS to manage device information.
When the kernel raises an event when a module is loaded or a device is added or removed, UDEV follows the rules to set the device filename, create symbolic links, set file permissions, and so on.
The following is an example of storage node disks configured using udev.
The links with /dev/ in the above example are symbolic links created according to the udev rules.
The following is an example of the udev rules file for configuring disks.
The udev rules file must be saved with the .rules extension in the /etc/udev/rules.d folder.
The rule shown with the example means that the user should find the device that matches the specified SCSI_ID(RESULT=="SCSI_ID") among the block device (SUBSYSTEM=="block") nodes with the kernel name (KERNEL=="sda") expressed as sda, and then set the owner and user privileges and then create the given symbolic link.
The device SCSI_ID can be checked by executing /lib/udev/scsi_id (for RHEL 7).
Depending on the OS versions, execute /sbin/scsi_id. This program must be executed with admin privileges, and the following is an example of checking scsi_id.
For proper operation of ZetaData, several kernel parameters must be configured. The location of the kernel parameter configuration file is as follows.
The following is an example of configuring kernel parameters.
It refers to the maximum value in bytes that can be allocated to a single shared memory segment.
The value should be more generous than the size of the total shared memory to be allocated to the SSVR instance.
It refers to the total number of pages of shared memory available system-wide.
The value should be set based on the SSVR instance divided by the page size (reason: SSVR instance uses most of the system's shared memory resources generally.)
The following is the command to check the page size of the system.
It refers to the maximum number of asynchronous I/O requests that the system can handle simultaneously.
The value should be set to an appropriate value that monitors actual usage.
It refers to the the maximum number of file descriptors that can be open simultaneously on the system.
The value should be adjusted according to the scale of the system.
It refers to the maximum number of memory mappings a process can have.
When using RDMA over InfiniBand, maps are frequently generated during the process of registering internal library resources and regions to RDMA, so the value should be set generously.
To use a TCP socket for storage and DB node communication, configure the maximum size of the socket buffer as follows.
The following is the the environment variables for using an SSVR instance.
The initialization parameters to install ZetaData are basically the same as Tibero, and the following parameters should be configured.
The following is an example of setting the SSVR instance initialization parameters for Storage Node #0.
MEMORY_TARGET parameter is the total amount of memory to be used by the SSVR instance.
Due to the high amount of external memory used for connections on InfiniBand libraries (4 MB per connection), it is recommended to set this after consulting with the lab.
The formula is as follows:
TOTAL_SHM_SIZE parameter is the total amount of shared memory to be used by the SSVR instance.
The minimum value can be calculated by first adding the 3 GB required by default to start the SSVR instance, plus 150 MB per 1 TB of disk, and then adding 1 GB to 2 GB of other allowance per 10 GB of disk to the result.
To connect to a storage server by using tbSQL, configure the connection information in the $TB_HOME/client/config/tbdsn.tbr file.
The configuration method is the same as in Tibero with the exception that DB_NAME is not required.
The following is an example of configuring the file, $TB_HOME/client/config/tbdsn.tbr.
To configure SSVR instance, follow the following steps.
In this example, three storage nodes and two DB nodes will be configured in the following steps.
Create and start an SSVR instance
Create a storage disk
Create a grid disk
Create a flash cache
Below is the process of creating an SSVR instance based on the settings in $TB_HOME/config/$TB_SID.tip.
Check the contents of the initialization parameters and create a control file accordingly. Start the SSVR instance in nomount mode and create an SSVR instance. After creation, the SSVR instance is automatically shut down.
Start it in mount mode to restart an SSVR instance.
Storage Disk is the physical disk that will be used by the SSVR instance.
To use the disks on the Storage node, each disk must be registered as a storage disk for the SSVR instance.
The following is the command registering a storage disk.
Configure the storage disk capacity to 4 TB minus 400 GB for the disk where the OS, SSVR binary files, and control files are installed. The examples below assume installation on the first disk.
Storage disk information can be viewed through the V$SSVR_STORAGE_DISK view.
A Grid Disk is a disk that is visible from the outside of an SSVR instance and must be included in a single storage disk.
The following registers a grid disks.
The following is an example of creating a grid disk using the maximum available capacity of a registered storage disk by omitting the size option.
Grid disk information can be viewed through the V$SSVR_GRID_DISK view.
To improve I/O performance, register a flash device as a cache by using the following command.
The following is an example of creating a flash cache that has a path of "/dev/flash", a start number of 0, 1490GB of a flash device, and four devices. A flash cache cannot be used until a storage server is restarted after a flash cache is created. To use a flash cache, a storage server must be restarted.
Flash cache information can be checked through the V$SSVR_FLASHCACHE view
This section describes how to use SSVR instances on TAS and TAC to create disk space, tablespace, and install the DB.
To use SSVR instance in TAS and TAC instance, SSVR connection information must be configured.
In the "$TB_HOME/client/config/ssdsn.tbr" file, configure the network IP address of the storage node to be used for communication and the port information of the SSVR instance. This SSVR instance connection information needs to be set on all nodes where TAS and TAC instances are installed.
The following is a sample of the $TB_HOME/client/config/ssdsn.tbr file.
The next step is to configure the TAS instance and configure DiskSpace with the grid disks of SSVR.
Configure CM instances and use them with TAS instances for cluster configuration of TAC instances.
Configuring connection information for using TBSQL
Configuring TAS instance on DB node #0 and creating disk space
Configuring CM instance on DB node #0
Staring CM and TAS instance on DB node #0
The following is an example of a $TB_HOME/client/con fig/tbdsn.tbr file for connecting to SSVR instances, TAS, and TAC instances using tbSQL.
The TAS instance connects to the SSVR instance through the SSVR instance's connection information recorded in the $TB_HOME/client/config/ssdsn.tbr file, and identifies each disk by the grid disk name created in the SSVR. The TAS instance recognizes file paths that start with "-" as grid disks in SSVR and can use them in all cases, including creating disk space and adding/deleting disks.
The following is an example initialization parameters and configuration for a TAS instance.
The following is an example of the process of creating disk space using a grid disk in an SSVR instance.
AU (Allocation Unit) is a value that indicates the unit of allocation, and the size of the allocation unit that can be set is 4 MB. The striping units and the striping units of the TAS must be multiples of each other to ensure that the array fits and improve performance.
Disk space information can be checked through V$AS_DISKSPACE view.
The CM instance registers the network and cluster and registers TAS and TAC as services to help ensure reliable cluster operations.
The following is an example of setting initialization parameters for CM. For more information, refer to the "Tibero Administrator's Guide".
The following is an example of the process of registering a network with CM, registering a cluster, starting a cluster, registering a TAS service, registering a TAS instance, and starting a TAS instance after starting a CM instance.
The following is an example of the process of adding DB node #1 TAS from DB node #0 TAS instance.
The following is an example of setting TAS instance initialization parameters for DB Node #1.
The following is an example of initialization parameter settings for CM instance on DB node #1.
The following is an example of starting a CM instance on DB node #1 and going through the process of network registration, cluster registration, cluster startup, TAS service registration, TAS instance registration, and TAS instance startup.
The TAC instance connects to the SSVR instance through the SSVR instance connection information recorded in the $TB_HOME/client/config/ssdsn.tbr file. The TAC instance recognizes file paths that start with a "+" as virtual files managed by the TAS instance. This path can be used for the path of any file, including control files and CM files.
The following is an example of initialization parameters for the configuration of DB node #0 TAC instance as a cluster using TAS. Do not modify the 'DB_BLOCK_SIZE=32K' parameter.
The MEMORY_TARGET parameter is the total amount of memory to be used by the TAC instance.
Due to the high amount of external memory used for connections in InfiniBand libraries (4 MB per connection), it is recommended that you consult your lab before setting this parameter.
The formula is as follows:
The following is an example of the process of registering the TAC service and registering the TAC instance on the CM instance of DB node #0 that was started in the previous step.
The following is an example of the process of creating a melt database by starting the TAC instance on DB node #0 in nomount mode and using the disk space of the TAS instance. It will automatically shut down after creation, so restart it.
The following is an example of adding additional configuration on DB Node #0 TAC instance to start DB Node #1 TAC instance.
The following is an example of setting the initialization parameters for DB Node #1 TAC instance. Do not modify 'DB_BLOCK_SIZE=32K'.
The MEMORY_TARGET parameter is the total amount of memory to be used by the TAC instance.
Due to the high amount of external memory used for connections in InfiniBand libraries (4 MB per connection), it is recommended that user consults tech service team before setting this parameter.
The formula is as follows:
The following is an example of registering and starting a TAC instance on the DB Node #1 CM instance that was started in the previous step.
Through the above process, configure SSVR instances, TAS instances, and TAC instances on three SSVR nodes and two DB nodes respectively.
The following views display SSVR instance information. They can be retrieved only in a SSVR instance.
The V$SSVR_CLIENT view shows information about all clients that the SSVR instance has connections to.
The following is an example of V$SSVR_CLIENT.
The V$SSVR_FLASHCACHE view shows information about all flash caches connected to an SSVR instance.
The V$SSVR_GRID_DISK view shows information about all grid disks attached to an SSVR instance.
The V$SSVR_STORAGE_DISK view shows information about all storage disks attached to an SSVR instance.
The V$SSVR_SLAB_STAT view shows the SLAB information that the SSVR instance is currently using.
The following is an example of V$SSVR_SLAB_STAT.
The V$SSVR_MEMSTAT view shows memory usage information for an SSVR instance. The units are expressed in MB.
The following is an example of V$SSVR_MEMSTAT.
Adding TAS on DB Node #1 from TAS instance on DB Node #0
Configuring and starting TAS, CM instance on DB node #1
Configuring and starting TAS instance on DB node #0
Adding TAC on DB Node #1 from TAC instance on DB Node #0
Staring TAC instance on DB node #1
256GB
96GB
Disk configuration
2TB NVMe x 4
4TB HDD x 12, 2TB NVMe x 4
$ grep MemTotal /proc/meminfo
MemTotal: 98707668 kB// Some code$ fdisk -l
Disk /dev/sdd: 4000.8 GB, 4000753475584 bytes, 7813971632 sectors
Units = sectors of 1 * 512 = 512 bytes
Sector size (logical/physical): 512 bytes / 4096 bytes
I/O size (minimum/optimal): 262144 bytes / 262144 bytes
Disk label type: dos
Disk identifier: 0x00000000
...$ ls -al /dev
lrwxrwxrwx. 1 root root 3 Aug 13 19:50 /dev/disk0 -> sda
lrwxrwxrwx. 1 root root 3 Aug 13 19:50 /dev/disk1 -> sdb
lrwxrwxrwx. 1 root root 3 Aug 13 19:50 /dev/disk2 -> sdc
lrwxrwxrwx. 1 root root 3 Aug 13 19:50 /dev/disk3 -> sdd
lrwxrwxrwx. 1 root root 3 Aug 13 19:50 /dev/disk4 -> sde
lrwxrwxrwx. 1 root root 3 Aug 13 19:50 /dev/disk5 -> sdf
lrwxrwxrwx. 1 root root 3 Aug 13 19:50 /dev/disk6 -> sdg
lrwxrwxrwx. 1 root root 3 Aug 13 19:50 /dev/disk7 -> sdh
lrwxrwxrwx. 1 root root 3 Aug 13 19:50 /dev/disk8 -> sdi
lrwxrwxrwx. 1 root root 3 Aug 13 19:50 /dev/disk9 -> sdj
lrwxrwxrwx. 1 root root 3 Aug 13 19:50 /dev/disk10 -> sdk
lrwxrwxrwx. 1 root root 3 Aug 13 19:50 /dev/disk11 -> sdl
lrwxrwxrwx. 1 root root 3 Aug 13 19:50 /dev/flash0 -> nvme0n1
lrwxrwxrwx. 1 root root 3 Aug 13 19:50 /dev/flash1 -> nvme1n1
lrwxrwxrwx. 1 root root 3 Aug 13 19:50 /dev/flash2 -> nvme2n1
lrwxrwxrwx. 1 root root 3 Aug 13 19:50 /dev/flash3 -> nvme3n1
$ cat /etc/udev/rules.d/zetadisk.rules
KERNEL=="sdb", SUBSYSTEM=="block", \
ENV{ID_SERIAL}=="3600508b1001cdc32750", \
SYMLINK+="disk0", OWNER="zeta", MODE="0600"

KERNEL=="sdc", SUBSYSTEM=="block", \
ENV{ID_SERIAL}=="3600508b1001cdc32751", \
SYMLINK+="disk1", OWNER="zeta", MODE="0600"

KERNEL=="sdd", SUBSYSTEM=="block", \
ENV{ID_SERIAL}=="3600508b1001cdc32752", \
SYMLINK+="disk2", OWNER="zeta", MODE="0600"

KERNEL=="sde", SUBSYSTEM=="block", \
ENV{ID_SERIAL}=="3600508b1001cdc32753", \
SYMLINK+="disk3", OWNER="zeta", MODE="0600"

KERNEL=="sdf", SUBSYSTEM=="block", \
ENV{ID_SERIAL}=="3600508b1001cdc32754", \
SYMLINK+="disk4", OWNER="zeta", MODE="0600"

KERNEL=="sdg", SUBSYSTEM=="block", \
ENV{ID_SERIAL}=="3600508b1001cdc32755", \
SYMLINK+="disk5", OWNER="zeta", MODE="0600"

KERNEL=="sdh", SUBSYSTEM=="block", \
ENV{ID_SERIAL}=="3600508b1001cdc32756", \
SYMLINK+="disk6", OWNER="zeta", MODE="0600"

KERNEL=="sdi", SUBSYSTEM=="block", \
ENV{ID_SERIAL}=="3600508b1001cdc32757", \
SYMLINK+="disk7", OWNER="zeta", MODE="0600"

KERNEL=="sdj", SUBSYSTEM=="block", \
ENV{ID_SERIAL}=="3600508b1001cdc32758", \
SYMLINK+="disk8", OWNER="zeta", MODE="0600"

KERNEL=="sdk", SUBSYSTEM=="block", \
ENV{ID_SERIAL}=="3600508b1001cdc32759", \
SYMLINK+="disk9", OWNER="zeta", MODE="0600"

KERNEL=="sdl", SUBSYSTEM=="block", \
ENV{ID_SERIAL}=="3600508b1001cdc32710", \
SYMLINK+="disk10", OWNER="zeta", MODE="0600"

KERNEL=="nvme0n1", SYMLINK+="flash0", OWNER="zeta", MODE="0600"
KERNEL=="nvme1n1", SYMLINK+="flash1", OWNER="zeta", MODE="0600"
KERNEL=="nvme2n1", SYMLINK+="flash2", OWNER="zeta", MODE="0600"
KERNEL=="nvme3n1", SYMLINK+="flash3", OWNER="zeta", MODE="0600"
$ /usr/lib/udev/scsi_id --whitelisted --device=/dev/sda
3600508b1001cdc32750/etc/sysctl.confkernel.sem = 100000 100000 100000 100000
kernel.shmmax = 17179869184
kernel.shmall = 24718805
fs.aio-max-nr = 4194304
fs.file-max = 8388608
vm.max_map_count = 262144$ getconf PAGE_SIZE
4096net.core.rmem_default = 4194304
net.core.wmem_default = 4194304
net.core.rmem_max = 67108864
net.core.wmem_max = 67108864$TB_HOME
Home directory where a storage server is installed.
$TB_SID
Service ID that identifies a storage server instance.
SSVR_RECV_PORT_START
Sets the starting port number used for a SSVR instance. (Range: 1024 - 65535)
SSVR_USE_TCP
Sets to "Y" to use TCP protocol instead of the RDMA protocol. Set the same for the initialization parameters of TAS and TAC instances. (Default: N)
SSVR_USE_IB
# ssvr0.tip
INSTANCE_TYPE=SSVR
LISTENER_PORT=9100
CONTROL_FILES="/home/tibero/zetadata/database/ssvr0/c1.ctl"

TOTAL_SHM_SIZE=15G
MEMORY_TARGET=70G

SSVR_RECV_PORT_START=9110SSVR Instance
MEMORY_TARGET = (Total memory )
- [(The number of DB node)
* {(Max Session Count in TAC instance)
+ (The total number of PEP thread in TAC instance)}] * 4MB
- 10GB(=Connection margin for OS and other threads)
** (he total number of PEP thread in TAC instance) = (The number of PEP Process in TAC instance)
* (The number of thread per PEP process)
** Calculating the total number of PEP threads for a TAC instance is based on one TAC instance..ssvr0=((INSTANCE=(HOST=10.10.10.13)(PORT=9100)))
ssvr1=((INSTANCE=(HOST=10.10.10.14)(PORT=9100)))
ssvr2=((INSTANCE=(HOST=10.10.10.15)(PORT=9100)))
tas0=((INSTANCE=(HOST=10.10.10.11)(PORT=9120)))
tas1=((INSTANCE=(HOST=10.10.10.12)(PORT=9120)))
tac0=((INSTANCE=(HOST=10.10.10.11)(PORT=9150)(DB_NAME=TAC)))
tac1=((INSTANCE=(HOST=10.10.10.12)(PORT=9150)(DB_NAME=TAC)))$ export TB_SID=ssvr0
$ tbboot -t nomount
Listener port = 9100
Tibero 7
TmaxTibero Corporation Copyright (c) 2020-. All rights reserved.
Tibero instance started up (NOMOUNT mode).
$ tbsql sys/tibero
tbSQL 7
TmaxTibero Corporation Copyright (c) 2020-. All rights reserved.
Connected to Tibero.
SQL> create storage server;
created.$ tbboot -t mount
Listener port = 9100
Tibero 7
TmaxTibero Corporation Copyright (c) 2020-. All rights reserved.
Tibero instance started up (MOUNT mode).create storage disk {storage-disk-name} path {path} size {storage-disk-size}storage disk
{storage-disk-name}
The name of the storage disk to register with the SSVR instance. It only needs to have a unique name within each SSVR instance.
path {path}
The path to the disk on the Storage node.
size {storage-disk-size}
$ tbsql sys/tibero
tbSQL 7
TmaxTibero Corporation Copyright (c) 2020-. All rights reserved.
Connected to Tibero.
SQL> create storage disk SD00 path '/dev/disk0' size 3350G;
created.
SQL> create storage disk SD01 path '/dev/disk1' size 3725G;
created.
SQL> create storage disk SD02 path '/dev/disk2' size 3725G;
created.
SQL> create storage disk SD03 path '/dev/disk3' size 3725G;
created.
SQL> create storage disk SD04 path '/dev/disk4' size 3725G;
created.
SQL> create storage disk SD05 path '/dev/disk5' size 3725G;
created.
SQL> create storage disk SD06 path '/dev/disk6' size 3725G;
created.
SQL> create storage disk SD07 path '/dev/disk7' size 3725G;
created.
SQL> create storage disk SD08 path '/dev/disk8' size 3725G;
created.
SQL> create storage disk SD09 path '/dev/disk9' size 3725G;
created.
SQL> create storage disk SD10 path '/dev/disk10' size 3725G;
created.
SQL> create storage disk SD11 path '/dev/disk11' size 3725G;
created.SQL> select * from v$ssvr_storage_disk;
STORAGE_DISK_NUMBER NAME PATH OS_BYTES
------------------- ------ ----------- ---------
0 SD00 /dev/disk0 4.000E+12
1 SD01 /dev/disk1 4.000E+12
2 SD02 /dev/disk2 4.000E+12
3 SD03 /dev/disk3 4.000E+12
4 SD04 /dev/disk4 4.000E+12
5 SD05 /dev/disk5 4.000E+12
6 SD06 /dev/disk6 4.000E+12
7 SD07 /dev/disk7 4.000E+12
8 SD08 /dev/disk8 4.000E+12
9 SD09 /dev/disk9 4.000E+12
10 SD10 /dev/disk10 4.000E+12
11 SD11 /dev/disk11 4.000E+12create grid disk {grid-disk-name} storage disk {storage-disk-name} \
offset {offset} size {grid-disk-size}grid disk {grid-disk-name}
The name of the grid disk to register with the SSVR instance. It only needs to have a unique name within each SSVR instance.
storage disk
{storage-disk-name}
The name of the storage disk registered with the SSVR instance. It is viewed the name through the V$SSVR_STOR AGE_DISK view.
offset {offset}
SQL> create grid disk GD00 storage disk SD00;
created.
SQL> create grid disk GD01 storage disk SD01;
created.
SQL> create grid disk GD02 storage disk SD02;
created.
SQL> create grid disk GD03 storage disk SD03;
created.
SQL> create grid disk GD04 storage disk SD04;
created.
SQL> create grid disk GD05 storage disk SD05;
created.
SQL> create grid disk GD06 storage disk SD06;
created.
SQL> create grid disk GD07 storage disk SD07;
created.
SQL> create grid disk GD08 storage disk SD08;
created.
SQL> create grid disk GD09 storage disk SD09;
created.
SQL> create grid disk GD10 storage disk SD10;
created.
SQL> create grid disk GD11 storage disk SD11;
created.SQL> select * from v$ssvr_grid_disk;
GRID_DISK_NUMBER NAME STORAGE_DISK_NUMBER STORAGE_DISK_OFFSET TOTAL_BYTES
---------------- ------ ------------------- ------------------- -----------
0 GD00 0 0 4.000E+12
1 GD01 1 0 4.000E+12
2 GD02 2 0 4.000E+12
3 GD03 3 0 4.000E+12
4 GD04 4 0 4.000E+12
5 GD05 5 0 4.000E+12
6 GD06 6 0 4.000E+12
7 GD07 7 0 4.000E+12
8 GD08 8 0 4.000E+12
9 GD09 9 0 4.000E+12
10 GD10 10 0 4.000E+12
11 GD11 11 0 4.000E+12create flashcache {name} path {path} size {flashcache-size}path {path}
The prefix of the flash device name.
For example, if there are four flash devices (/dev/flash0, /dev/flash1, /dev/flash2, and /dev/flash4), the value is '/dev/flash'
size {flashcache-size}
The size of flash devices. The capacity unit for flash devices is 1T (TiB) = 1024G (GiB). The capacity of the flash device checked with the fdisk command is calculated as 1TB=1000GB, the size of flash devices must be entered by calculating the capacity in the unit of 1TB (1024 GB). This is an optional parameter and will contain the total capacity of the device if not specified.
Currently, it supports flash devices of the same size. Note that the value must be set to the size of each flash device, not the total size of all flash devices.
SQL> create flashcache flash0 path '/dev/flash0' size 1490G;
created.
SQL> create flashcache flash1 path '/dev/flash1' size 1490G;
created.
SQL> create flashcache flash2 path '/dev/flash2' size 1490G;
created.
SQL> create flashcache flash3 path '/dev/flash3' size 1490G;
created.
SQL> quit
Disconnected.
$ tbdown
Tibero instance terminated (NORMAL mode).
$ tbboot -t mount
Listener port = 9100
Tibero 7
TmaxTibero Corporation Copyright (c) 2020-. All rights reserved.
Tibero instance started up (MOUNT mode).SQL> select * from v$ssvr_flashcache;
FLASHCACHE_NUMBER NAME PATH OS_BYTES
----------------- ------ ----------- ---------
0 FC0 /dev/flash0 1.600E+12
1 FC1 /dev/flash1 1.600E+12
2 FC2 /dev/flash2 1.600E+12
3 FC3 /dev/flash3 1.600E+12
# Example
# {storage node #0 IP}/{port}
# {storage node #1 IP}/{port}
# {storage node #2 IP}/{port}
10.10.10.13/9110
10.10.10.14/9110
10.10.10.15/9110{storage node IP}
Indicates the IP address of the Stoage node to use.
{port}
Indicates the port number of the SSVR instance to use, which corresponds to SSVR_RECV_PORT_START in the SSVR instance initialization parameters. Set the Storage node IP followed by a "/" separator.
ssvr0=((INSTANCE=(HOST=10.10.10.13)(PORT=9100)))
ssvr1=((INSTANCE=(HOST=10.10.10.14)(PORT=9100)))
ssvr2=((INSTANCE=(HOST=10.10.10.15)(PORT=9100)))
tas0=((INSTANCE=(HOST=10.10.10.11)(PORT=9120)))
tas1=((INSTANCE=(HOST=10.10.10.12)(PORT=9120)))
tac0=((INSTANCE=(HOST=10.10.10.11)(PORT=9150)(DB_NAME=TAC)))
tac1=((INSTANCE=(HOST=10.10.10.12)(PORT=9150)(DB_NAME=TAC)))AS_SCAN_SSVR_DISK
This is an initialization parameter written in the TAS tip, which indicates whether the SSVR instance uses the disk. If there is no change, it is set to "N", so it must be specified "Y" in the TAS tip to use ZetaData.
# tas0.tip
INSTANCE_TYPE=AS
LISTENER_PORT=9120

TOTAL_SHM_SIZE=4G
MEMORY_TARGET=5G

CLUSTER_DATABASE=Y
LOCAL_CLUSTER_ADDR=10.10.10.11
LOCAL_CLUSTER_PORT=9130
CM_PORT=9140

THREAD=0
DB_BLOCK_SIZE=4K

AS_SCAN_SSVR_DISK=Y
USE_ZETA=Y$ export TB_SID=tas0
$ tbboot -t nomount
Listener port = 9120
Tibero 7
TmaxTibero Corporation Copyright (c) 2020-. All rights reserved.
Tibero instance started up (NOMOUNT mode).
$ tbsql sys/tibero
tbSQL 7
TmaxTibero Corporation Copyright (c) 2020-. All rights reserved.
Connected to Tibero.
SQL> create diskspace DS0 normal redundancy
failgroup FG1 disk
'-10.10.10.13/GD00' name DISK00 size 3350G,
'-10.10.10.13/GD01' name DISK01 size 3725G,
'-10.10.10.13/GD02' name DISK02 size 3725G,
'-10.10.10.13/GD03' name DISK03 size 3725G,
'-10.10.10.13/GD04' name DISK04 size 3725G,
'-10.10.10.13/GD05' name DISK05 size 3725G,
'-10.10.10.13/GD06' name DISK06 size 3725G,
'-10.10.10.13/GD07' name DISK07 size 3725G,
'-10.10.10.13/GD08' name DISK08 size 3725G,
'-10.10.10.13/GD09' name DISK09 size 3725G,
'-10.10.10.13/GD10' name DISK10 size 3725G,
'-10.10.10.13/GD11' name DISK11 size 3725G
failgroup FG2 disk
'-10.10.10.14/GD00' name DISK20 size 3350G,
'-10.10.10.14/GD01' name DISK21 size 3725G,
'-10.10.10.14/GD02' name DISK22 size 3725G,
'-10.10.10.14/GD03' name DISK23 size 3725G,
'-10.10.10.14/GD04' name DISK24 size 3725G,
'-10.10.10.14/GD05' name DISK25 size 3725G,
'-10.10.10.14/GD06' name DISK26 size 3725G,
'-10.10.10.14/GD07' name DISK27 size 3725G,
'-10.10.10.14/GD08' name DISK28 size 3725G,
'-10.10.10.14/GD09' name DISK29 size 3725G,
'-10.10.10.14/GD10' name DISK30 size 3725G,
'-10.10.10.14/GD11' name DISK31 size 3725G
failgroup FG3 disk
'-10.10.10.15/GD00' name DISK40 size 3350G,
'-10.10.10.15/GD01' name DISK41 size 3725G,
'-10.10.10.15/GD02' name DISK42 size 3725G,
'-10.10.10.15/GD03' name DISK43 size 3725G,
'-10.10.10.15/GD04' name DISK44 size 3725G,
'-10.10.10.15/GD05' name DISK45 size 3725G,
'-10.10.10.15/GD06' name DISK46 size 3725G,
'-10.10.10.15/GD07' name DISK47 size 3725G,
'-10.10.10.15/GD08' name DISK48 size 3725G,
'-10.10.10.15/GD09' name DISK49 size 3725G,
'-10.10.10.15/GD10' name DISK50 size 3725G,
'-10.10.10.15/GD11' name DISK51 size 3725G
attribute 'AU_SIZE'= '4M';
created.SQL> select * from v$as_diskspace;
DISKSPACE_NUMBER NAME SECTOR_SIZE BLOCK_SIZE ALLOCATION_UNIT_SIZE
----------------- ------ ------------ ----------- ---------------------
0 DS0 512 4096 4194304
STATE TYPE TOTAL_MB FREE_MB REQUIRED_MIRROR_FREE_MB USABLE_FILE_MB
------- ------- --------- --------- ----------------------- --------------
MOUNT NORMAL 33666928 30482600 106152 14710574# cm0.tip
CM_NAME=cm0
CM_UI_PORT=9140
CM_RESOURCE_FILE="/home/tibero/zetadata/cm0_res.crf"$ export CM_HOME=$TB_HOME
$ export CM_SID=cm0
$ tbcm -b
CM Guard demon started up.
TBCM 7.1.1 (Build -)
TmaxTibero Corporation Copyright (c) 2020-. All rights reserved.
Tibero cluster manager started up.
Local node name is (cm0:9140).
$ cmrctl add network --name net0 --ipaddr 10.10.10.11 --portno 1000
Resource add success! (network, net0)
$ cmrctl add cluster --name cls --incnet net0 --cfile "-"
Resource add success! (cluster, cls)
$ cmrctl start cluster --name cls
MSG SENDING SUCCESS!
$ cmrctl add service --name TAS --type as --cname cls
Resource add success! (service, TAS)
$ cmrctl add as --name tas0 --svcname TAS --dbhome "$TB_HOME"
Resource add success! (as, tas0)
$ cmrctl start as --name tas0
Listener port = 9120
Tibero 7
TmaxTibero Corporation Copyright (c) 2020-. All rights reserved.
Tibero instance started up (NORMAL mode).
BOOT SUCCESS! (MODE : NORMAL)$ export TB_SID=tas0
$ tbsql sys/tibero
tbSQL 7
TmaxTibero Corporation Copyright (c) 2020-. All rights reserved.
Connected to Tibero.
SQL> alter diskspace DS0 add thread 1;
SQL> Disconnected.# tas1.tip
INSTANCE_TYPE=AS
LISTENER_PORT=9120
TOTAL_SHM_SIZE=4G
MEMORY_TARGET=5G
CLUSTER_DATABASE=Y
LOCAL_CLUSTER_ADDR=10.10.10.12
LOCAL_CLUSTER_PORT=9130
CM_PORT=9140
THREAD=1
DB_BLOCK_SIZE=4K
AS_SCAN_SSVR_DISK=Y
USE_ZETA=Y# cm1.tip
CM_NAME=1
CM_UI_PORT=9140
CM_RESOURCE_FILE="/home/tibero/zetadata/cm1_res.crf"$ export TB_SID=tas1
$ export CM_HOME=$TB_HOME
$ export CM_SID=cm1
$ tbcm -b
CM Guard demon started up.
TBCM 7.1.1 (Build -)
TmaxTibero Corporation Copyright (c) 2020-. All rights reserved.
Tibero cluster manager CM started up.
Local node name is (cm1:9140).
$ cmrctl add network --name net1 --ipaddr 10.10.10.12 --portno 1000
Resource add success! (network, net1)
$ cmrctl add cluster --name cls --incnet net1 --cfile "-"
Resource add success! (cluster, cls)
$ cmrctl start cluster --name cls
MSG SENDING SUCCESS!
$ cmrctl add as --name tas1 --svcname TAS --dbhome "$TB_HOME"
Resource add success! (as, tas1)
$ cmrctl start as --name tas1
Listener port = 9120
Tibero 7
TmaxTibero Corporation Copyright (c) 2020-. All rights reserved.
Tibero instance started up (NORMAL mode).
BOOT SUCCESS! (MODE : NORMAL)# tac0.tip
DB_NAME=TAC LISTENER_PORT=9150
CONTROL_FILES="+DS0/c1.ctl"
LOG_ARCHIVE_DEST="+DS0/ARCH"
MAX_SESSION_COUNT=300
TOTAL_SHM_SIZE=60G
MEMORY_TARGET=270G
CLUSTER_DATABASE=Y
LOCAL_CLUSTER_ADDR=10.10.10.11
LOCAL_CLUSTER_PORT=9160
CM_PORT=9140
THREAD=0
UNDO_TABLESPACE=UNDO0
DB_BLOCK_SIZE=32K
AS_PORT=9120
USE_ACTIVE_STORAGE=Y
_USE_O_DIRECT=Y
USE_ZETA=YTAC instance
MEMORY_TARGET = (total amount of memory)
- (Number of Storage nodes) * (Number of grid disks per SSVR instance)
* {(Max Session Count of TAC instances)
+ (total number of PEP threads in the TAC instance)} * 4MB
- (Memory Target of the TAS instance on the node)
- 10GB(=OS and allowance for connections from other threads)
** (total number of PEP threads on the TAC instance) = (number of PEP processes on the TAC instance)
* (number of threads per PEP process)
** The calculation of the total number of PEP threads in a TAC instance is based on the current TAC instance.$ export CM_HOME=$TB_HOME
$ export CM_SID=cm0
$ cmrctl add service --name TAC --type db --cname cls
Resource add success! (service, TAC)
$ cmrctl add db --name tac0 --svcname TAC --dbhome "$TB_HOME"
Resource add success! (db, tac0)$ export TB_SID=tac0
$ tbboot -t nomount
Listener port = 9150
Tibero 7
TmaxTibero Corporation Copyright (c) 2020-. All rights reserved.
Tibero instance started up (NOMOUNT mode).
$ tbsql sys/tibero
tbSQL 7
TmaxTibero Corporation Copyright (c) 2020-. All rights reserved.
Connected to Tibero.
SQL> create database "TAC"
user sys identified by tibero
maxinstances 32
maxdatafiles 2048
character set MSWIN949
logfile group 1 '+DS0/log0001.log' size 2G,
group 2 '+DS0/log0002.log' size 2G,
group 3 '+DS0/log0003.log' size 2G
maxloggroups 255
maxlogmembers 8
datafile '+DS0/system.dtf' size 4G
autoextend on next 64M maxsize 128G
syssub datafile '+DS0/syssub.dtf' size 4G
autoextend on next 64M maxsize 128G
default temporary tablespace TEMP
tempfile '+DS0/temp000.dtf' size 128G autoextend off,
tempfile '+DS0/temp001.dtf' size 128G autoextend off,
tempfile '+DS0/temp002.dtf' size 128G autoextend off,
tempfile '+DS0/temp003.dtf' size 128G autoextend off,
.
.
.
tempfile '+DS0/temp098.dtf' size 128G autoextend off,
tempfile '+DS0/temp099.dtf' size 128G autoextend off
undo tablespace UNDO0 datafile
'+DS0/undo00.dtf' size 128G autoextend off,
'+DS0/undo01.dtf' size 128G autoextend off,
'+DS0/undo02.dtf' size 128G autoextend off
default tablespace USR
datafile '+DS0/usr.dtf' size 32G
autoextend on next 64M maxsize unlimited;
Database created.
SQL> Disconnected.
$ tbboot
Listener port = 9150
Tibero 7
TmaxTibero Corporation Copyright (c) 2020-. All rights reserved.
Tibero instance started up (NORMAL mode).$ export TB_SID=tac0
$ tbsql sys/tibero
tbSQL 7
TmaxTibero Corporation Copyright (c) 2020-. All rights reserved.
Connected to Tibero.
SQL> create undo tablespace UNDO1 datafile
'+DS0/undo03.dtf' size 128G autoextend off,
'+DS0/undo04.dtf' size 128G autoextend off,
'+DS0/undo05.dtf' size 128G autoextend off;
SQL> alter database add logfile thread 1 group 4 '+DS0/log004.log' size 2G;
SQL> alter database add logfile thread 1 group 5 '+DS0/log005.log' size 2G;
SQL> alter database add logfile thread 1 group 6 '+DS0/log006.log' size 2G;
SQL> alter database enable public thread 1;
SQL> Disconnected.# tac1.tip
DB_NAME=TAC
LISTENER_PORT=9150
CONTROL_FILES="+DS0/c1.ctl"
LOG_ARCHIVE_DEST="+DS0/ARCH"
MAX_SESSION_COUNT=300
TOTAL_SHM_SIZE=60G
MEMORY_TARGET=270G
CLUSTER_DATABASE=Y
LOCAL_CLUSTER_ADDR=10.10.10.12
LOCAL_CLUSTER_PORT=9160
CM_PORT=9140
THREAD=1
UNDO_TABLESPACE=UNDO1
DB_BLOCK_SIZE=32K
AS_PORT=9120
USE_ACTIVE_STORAGE=Y
_USE_O_DIRECT=Y
USE_ZETA=YTAC instance
MEMORY_TARGET = (total amount of memory)
- (Number of Storage nodes) * (Number of grid disks per SSVR instance)
* {(Max Session Count of TAC instances)
+ (total number of PEP threads in the TAC instance)} * 4MB
- (Memory Target of the TAS instance on the node)
- 10GB(=OS and allowance for connections from other threads)
** (total number of PEP threads in the TAC instance) = (number of PEP processes in the TAC instance)
* (number of threads per PEP process)
** The calculation of the total number of PEP threads in a TAC instance is based on the current TAC instance.$ export TB_SID=tac1
$ export CM_HOME=$TB_HOME
$ export CM_SID=cm1
$ cmrctl add db --name tac1 --svcname TAC --dbhome "$TB_HOME
Resource add success! (db, tac1)
$ cmrctl start db --name tac1
Listener port = 9150
Tibero 7
TmaxTibero Corporation Copyright (c) 2020-. All rights reserved.
Tibero instance started up (NORMAL mode).
BOOT SUCCESS! (MODE : NORMAL)V$SSVR_CLIENT
View the clients that the SSVR instance has connections to.
V$SSVR_FLASHCACHE
View the Flash Cache information connected to the SSVR instance.
V$SSVR_GRID_DISK
ADDRESS
VARCHAR(20)
The address of the client.
PORT
NUMBER
SQL> select * from v$ssvr_client;

ADDRESS   PORT   NAME         TRHEAD_NUMBER
--------- ------ ---------- ----------------
127.0.0.1 36088   TAS                     0
127.0.0.1 36070   CLIENT_LIB              0
FLASHCACHE_NUMBER
NUMBER
The number of the flash cache.
NAME
VARCHAR(32)
GRID_DISK_NUMBER
NUMBER
The number of the grid disk.
NAME
VARCHAR(128)
STORAGE_DISK_NUMBER
NUMBER
The number of the storage disk.
NAME
VARCHAR(128)
SLAB_SIZE
NUMBER
The size of the SLAB.
SLAB_GET_CNT
NUMBER
SQL> select * from v$ssvr_slab_stat;

SLAB_SIZE SLAB_GET_CNT TOTAL_CHUNK_CNT MAX_CHUNK_CNT
---------- ------------ --------------- -------------
     32768        99838              48            48
   1048576          354              48            48
   4194304           72              48            48
     32768       112967              64            64
   4194304           25              16            16

5 rows selected.
TOTAL_PGA_MEMORY_MB
NUMBER
The total size of the process memory.
FIXED_PGA_MEMORY_MB
NUMBER
SQL> select * from v$ssvr_memstat;

TOTAL_PGA_MEMORY_MB FIXED_PGA_MEMORY_MB USED_PGA_MEMORY_MB
------------------- ------------------- ------------------
TOTAL_SHARED_MEMORY_MB FIXED_SHARED_MEMORY_MB USED_SHARED_MEMORY_MB
---------------------- ---------------------- ---------------------
                4092                  31              3466
                  2048                    714            1.7592E+13

1 row selected.
Sets to "Y" to use RDMA protocol and the value of the USE_ZETA parameter must be "Y". If it is not set, it is set to the opposite value of the SSVR_USE_TCP parameter.
SSVR_USE_FC
Indicates whether to use flash cache. (default: Y)
SSVR_USE_SDM
Indicates whether to use storage data maps. (default: Y)
SSVR_USE_AGNT
It indicates whether to enable the agent process. It is responsible for managing or assisting with internal tasks. It is also responsible for collecting and sending Tibero Performance Monitor (TPM) related performance metrics. (Default: N)
SSVR_USE_TPM
Indicates whether to enable the TPM (default: N).
SSVR_TPM_SENDER_INTERVAL
Sets the interval for checking sender connection status when TPM is enabled. (Default: 50)
SSVR_WTHR_CNT
Indicates the number of working threads that the SSVR instance will use to perform I/O. If not set, it is automatically proportional to the number of CPUs and does not need to be set.
(Range: SSVR_WTHR_CNT> 0)
INSTANCE_TYPE
Indicates the type of instance and is set for each instance.
TAS Instance: AS
SSVR Instance: SSVR
USE_ZETA
Configures for ZetaData. If not set otherwise, it is set to "Y" only when the IN STANCE_TYPE parameter value is
"SSVR".
The size of the storage disk to enroll in SSVR. The default unit is bytes, which can be further denominated as K (KiB), M (MiB), G (GiB), T (TiB), P (PiB), or E (EiB).
The unit of capacity for storage disks is 1T (TiB) = 1024G (GiB). The capacity of the disk checked by the fdisk command is calculated as 1TB=1000GB, so you need to set the size of the storage disks by calculating the capacity in units of 1T=1024G.
This is an optional parameter and will contain the total capacity of the device if not specified.
Enters an offset for the storage disk. This is an optional parameter and is not recommended. If used, it must be set to a multiple of 32 KB.
size {grid-disk-size}
The size of the grid disk to register with the SSVR instance. The default unit is bytes, which can be further denominated as K (KiB), M (MiB), G (GiB), T (TiB), P (PiB), or E (EiB). It must not be larger than the available capacity of the storage disk. This is an optional parameter, and if not specified, the maximum multiple of 32 KB below the total capacity of the specified storage disk
View the Grid Disk information connected to the SSVR instance.
V$SSVR_STORAGE_DISK
View the Storage Disk information connected to the SSVR instance.
V$SSVR_SLAB_STAT
View the SLAB information being used by the SSVR instance.
V$SSVR_MEMSTAT
View memory information used by the SSVR instance.
The port number that the client is connected to.
NAME
VARCHAR(128)
The name of the client.
THREAD_NUMBER
NUMBER
The thread number responsible for connecting to the client.
The name of the flash cache.
PATH
VARCHAR(256)
The path to the flash cache.
OS_BYTES
NUMBER
The size of the flash cache as recognized by the OS.
The name of the grid disk.
STORAGE_DISK_NUMBER
NUMBER
The number of the storage disk that is mapped to the grid disk.
STORAGE_DISK_OFFSET
NUMBER
The offset of the storage disk that is mapped to the grid disk.
TOTAL_BYTES
NUMBER
The size of the grid disk.
The name of the storage disk.
PATH
VARCHAR(256)
The path of the storage disk.
OS_BYTES
NUMBER
The size of the storage disk as recognized by the OS.
The number of the SLAB.
TOTAL_CHUNK_CNT_NUMBER
NUMBER
The total amount of chunks.
MAX_CHUNK_CNT
NUMBER
The maximum possible number of chunks.
The size of the fixed process memory.
USED_PGA_MEMORY_MB
VARCHAR(128)
The amount of process memory used.
TOTAL_SHARED_MEMORY_MB
NUMBER
The total size of shared memory.
FIXED_SHARED_MEMORY_MB
NUMBER
The size of fixed shared memory.
USED_SHARED_MEMORY_MB
NUMBER
The amount of shared memory used.