Introduces new features and changes implemented to Tibero 7.
Development
Installation
This chapter explains how to install the Tibero client in manual mode.
Installation in manual mode
Prepare the installation file(tar.gz) and license file(license.xml).
Create client account.
Unzip the binary archive.
Configure the profile.
Modify the content to suit the environment and add it to the profile of the client server.
Copy the license file(license.xml) to the directory, $TB_HOME/license.
Execute gen_tip.sh.
Configure the network file (tbdsn).
tbdsn.tbr file configures the server connection path, and it is located in $TB_HOME/client/config.
Manually configure tbdsn.tbr as the following guide.
Access to Tibero Server with Tibero Client.
Considerations
This chapter explains the prerequisite and precautions before installing Tibero client, and considerations after installation.
Preparations before installing
1. Check available disk space
Before installing Tibero, a minimum of 2GB of free hard disk space is required, with slight differences depending on the install platform. This also includes the minimum hard disk space needed to create a database after installing Tibero.
2. Check JDK installation
To install using the Tibero Client Installer, a version of JDK 1.5.17 or higher must be installed.
[Figure 1] Check JDK installation
Currently, JDK 1.9 or higher is not supported.
IF JDK is not installed, it can be downloaded from the link below.
🔎
3. Preparing the installation file
Go to ‘TechNet’ of Tmax, create account and download the installation file.
🔎
When installing manually,
Category
File name
Considerations after installation
After installing Tibero, JDBC is provided to integrate with other solutions.
JDBC
When integrating JDBC, the required driver file can be found from the following paths on the Tibero DB server. The following is an explanation of the driver file’s path based on the server’s operating system. (File path for Unix environments.)
Category
Path
The following is a description of the driver file name for each version of TIbero.
Tibero version
File name
Pre-Migration Considerations
This section explains the pre-migration considerations.
Considerations for migration
Migration Procedure
The procedure for the database migration requires a database and application migration team and a testing team.
[Figure 1] Migration Procedure
Migration Complexity
When migrating from another database to Tibero, the complexity varies depending on the situation, and the migration method may differ on the level of complexity.
The following explains the scenarios for each complexity level.
Complexity
Senario
Pre-Migration Recommendations
To reduce the migration validation time, it is recommended that the client’s DB administrator clean up any INVALID objects in the Source DB before starting the migration.
If errors occur in the source DB, errors will also occur in Tibero
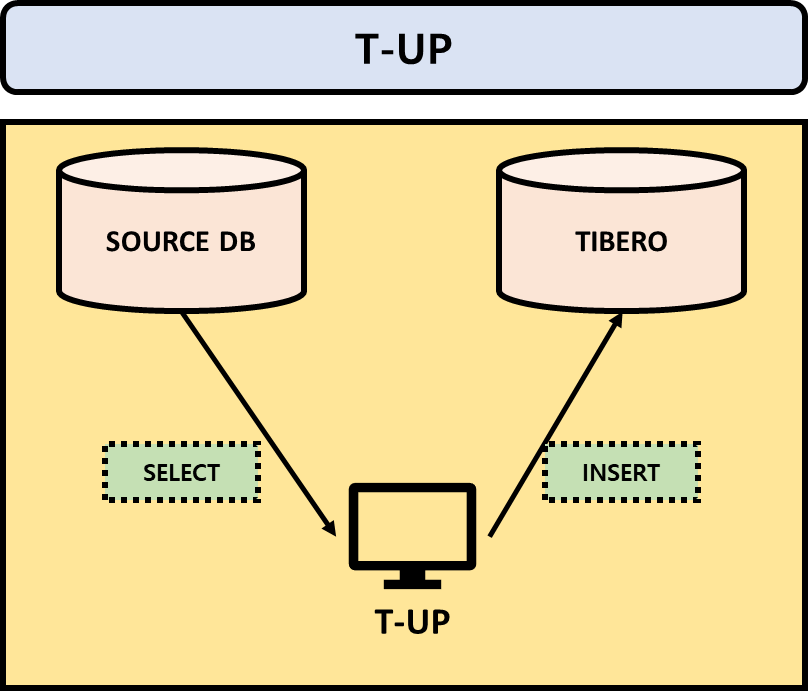
Pre-Migration Analysis
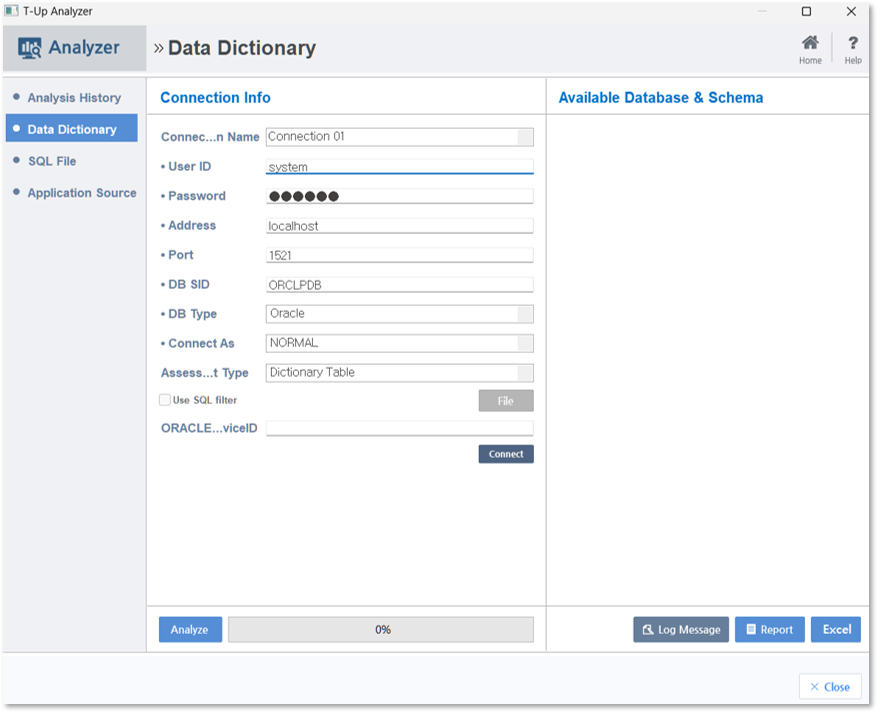
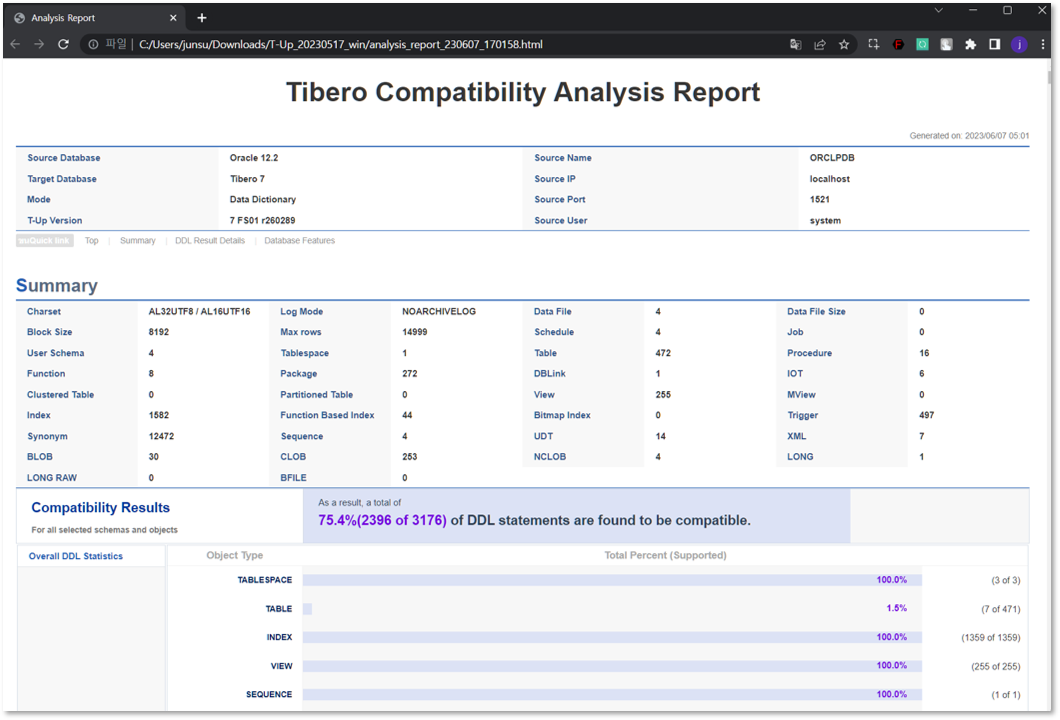
The compatibility validation is conducted before migration using the analysis feature of T-UP
[Figure 2.1 ] T-UP Analysis
[Figure 2.2 ] T-UP Analysis
[Figure 3.1] T-UP Analysis Report
[Figure 3.2] T-UP Analysis Report
Uninstallation
This chapter describes how to uninstall Tibero.
Uninstalling manually
Run $TB_HOME/.installation/Tibero_Uninstaller, which is supported for all platforms.
UNIX
The following is the Tibero manual uninstallation process in a Unix environment.
1. Shut down Tibero.
2. Delete the directory of Tibero as well as all the subdirectories by using the OS's command.
Migration
Overview
This guide describes database migration from other DBMS to Tibero.
Document Organization
The guide contains 4 chapters.
This section explains the pre-migration considerations.
🔎
This section explains the methods used for database migration.
🔎
This section explains the procedures and methods for migrating from other DBMS to Tibero.
🔎
Installation guide (for Client)
Overview
This chapter explains the prerequisite and precautions before installing Tibero client, considerations after installation and Tibero client installation methods on Windows.
Document Organization
The guide contains 2 chapters.
It describes the prerequisite and precautions before installing Tibero client, considerations after installation.
🔎
This chapter explains how to install the Tibero client in manual mode.
🔎
Hadoop Connector Guide
Overview
This guide is intended for database administrators (hereafter DBA) who want to use the Hadoop Connector in Tibero.
Required Knowledge
Databases
RDBMS
Operating systems and system environments
UNIX and Linux
Document Organization
The guide contains 2 chapters.
Describes how to use the Tibero Hadoop Connector.
🔎
Describes how to use the Tibero HDFS Connector.
🔎
Introduction
About Tibero DBMS
These days, corporate businesses are rapidly expanding amid increasing amounts of data and changing business environments. With the influx of new business environments, it has become a prerequisite for business success to provide more efficient and flexible data service, information processing, and data management techniques.
As an enterprise database management system, Tibero meets those changing needs by supporting the database infrastructure, which is a foundation for corporate businesses, to ensure high performance, availability, and scalability.
Introduction Guide
Overview
This guide describes how to manage Tibero.
This guide is intended for database administrators (DBA) who use Tibero®(hereafter Tibero) to create databases and ensure smooth operation of Tibero.
Introduction of Tibero Hadoop Connector
This chapter describes the concepts and features of the Tibero Hadoop Connector.
Hadoop is an open-source framework solution from Apache Software Foundation to facilitate storage, distribution, and parallel processing of large amounts of data.
Hadoop includes the following software stacks.
HDFS(Hadoop Distributed File System)
A distributed file system that provides failure recovery and high availability through data block redundancy in a distributed file system.
Validation
This chapter checks the Object Count and Constraint by comparing them with the Object and Constraint counts in the Target DB.
Compare the number of Objects and Constraints in the Target DB with Object Count Check and Check Constraint Check in '' described on the Source DB operations page.
If the number does not match, check the View as shown below.
When querying objects and constraints of the Target DB, refer to ‘’ and ‘’.
Additionally, separate verification is required if data other than unsupported lists has been transferred.
45, Jeongjail-ro, Bundang-gu, Seongnam-si, Gyeonggi-do, Republic of Korea
Website
Installation
Download documents
Backup and Recovery
This chapter describes how to use Tibero Recovery Manager (RMGR) to backup and recover Tibero database files stored in a TAS disk space.
Note
For more information about RMGR, refer to Tibero Administrator's Guide.
Tibero tbPSM Guide
Installation guide (for Client)
Overview
This chapter explains the prerequisite and precautions before installing Tibero client, considerations after installation and Tibero client installation methods on Linux.
Tibero SQL Reference Guide
Tibero adopted and implemented Tibero Thread Architecture as a unique technology to make up for the weak points of existing DBs.
Tibero enables cost-effective usage of system resources such as CPU and memory within limited server processes, by providing excellent performance, stability, and scalability, as well as an easy to use development environment and management tools.
Tibero has been developed to differentiate itself from other DBMSs in terms of large-scale user and data processing, improved stability, and enhanced compatibility.
In a nutshell, Tibero is a benchmark product that provides the ideal database environment for enterprises.
MapReduce
A distributed programming framework that automatically performs distributed parallel processing on tasks that are divided into Map and Reduce. It supports parallel and distributed processing using resources from multiple nodes and failure recovery function.
In summary, Hadoop is a system aimed at mass storage and fast processing of data.
The number of businesses using Hadoop is increasing rapidly as the amount of data is growing exponentially. However, Hadoop requires a MapReduce program for data processing which creates high programming burden to create various queries needed for data analysis. It lacks an interactive SQL interface with immediate feedback causing inconvenience in having to write code to achieve the desired results.
There are also many cases that require multiple types of data sources to store various data formats.
In such cases, unstructured data is stored in HDFS, and structured data in the existing RDBMS. Combining heterogeneous data sources to analyze legacy database and big data together dramatically increases data processing complexity.
Key Features
Tibero Hadoop Connector is a solution that satisfies big data processing requirements, and the need for heterogeneous data source integration and convenient interface.
The following Tibero Hadoop Connector features are provided to supplement Hadoop.
Provides Extern Table interface to process data stored in HDFS with data in RDBMS tables.
External Table interface reduces data migration inconvenience.
Supports all query functions of Tibero.
Supports data integration functions such as table joins between HBase and Tibero tables.
Data in Hadoop can be combined with data in Tibero in a query using Ansi-SQL. The access interface between Tibero and Hadoop HDFS is unified in SQL, which reduces the burden of using heterogeneous data sources. Using SQL to perform various queries according to the fast changing data analysis needs facilitates a fast data analysis process.
Tibero Hadoop Connector uses the External Table function to access data so that queries can be performed on various data formats as with structured data. Various functions including query processing functions provided by Tibero InfiniData can also be used with data in Hadoop.
In summary, Tibero Hadoop Connector enables easy integrated analysis of data in Hadoop and RDBMS. Such agile big data analysis functionality can help to quickly respond to the rapidly changing business environment.
All TmaxTibero Software (Tibero®) and documents are protected by copyright laws and international convention. TmaxTibero software and documents are made available under the terms of the TmaxTibero License Agreement and this document may only be distributed or copied in accordance with the terms of this agreement. No part of this document may be transmitted, copied, deployed, or reproduced in any form or by any means, electronic, mechanical, or optical, without the prior written consent of TmaxTibero Co., Ltd. Nothing in this software document and agreement constitutes a transfer of intellectual property rights regardless of whether or not such rights are registered) or any rights to TmaxTibero trademarks, logos, or any other brand features.
This document is for information purposes only. The company assumes no direct or indirect responsibilities for the contents of this document, and does not guarantee that the information contained in this document satisfies certain legal or commercial conditions. The information contained in this document is subject to change without prior notice due to product upgrades or updates. The company assumes no liability for any errors in this document.
Trademarks
Tibero® is a registered trademark of TmaxTibero Co., Ltd. Other products, titles or services may be registered trademarks of their respective companies.
Install Tibero 7 OCBC and OLE DB and change the existing drivers.
The ODBC Driver is used for the oracle to Tibero DB Link, so replacement is necessary.
Connection String(ODBC)
The DSN method is the same, and if it is a Windows-based IP/PORT connection method, changes are required as follows.
Tibero 6
Tibero 7
Add DB Name corresponding to clients as DB Name check is stricter in Tibero 6 .
It operates in DSN mode by referring the TB_SID environment variable on UNIX (including Linux) even when specifying the IP/PORT using SQL Driver Connect.
Connection String(OLE DB)
The DSN method is the same, and if it is a Windows-based IP/PORT connection method, changes are required as follows.
Tibero 6
Tibero 7
Add DB Name corresponding to clients as DB Name check is stricter in Tibero 6 .
Others (DB Link, EXTERNAL, etc.)
DB Link
If using Gateway, boot after changing to the Gateway provided by Tibero 7.
External Procedure
If using the Agent for JAVA External Procedure, boot after switching to the Agent provided by Tibero 7.
External Library (JAR) Reference
Open the following files of Tibero 6, apply the necessary settings for external library references to Tibero 7, and import the related libraries.
Tibero 6
Tibero 7
tbCLI Guide
Overview
This guide is intended for database administrators (DBA) who intend to use Tibero.
This guide describes the program structure and usage of tbCLI.
This guide does not contain all the information required to operate Tibero. For information about the installation, configuration, operation, and management, refer to each relevant guide.
For more information about Tibero installation and configuration, refer to .
Required Knowledge
Database
RDBMS
SQL
System Requirements
.
Requirements
Document Organization
The guide contains 5 chapters.
Describes the components and program structure of tbCLI.
🔎
Describes the data types used by tbCLI programs.
🔎
Describes the functions supported by tbCLI.
🔎
Performance
Overview
This document is intended for database administrators (DBA) and application developers who want to use the In-Memory Column Store (IMCS) function provided in Tibero
This guide does not contain all the information needed for the actual application or operation of Tibero. For installation, configuration or any other details about operation and maintenance of the system, you need to see each relevant guide.
For information about installation and configuration of Tibero, refer to "".
Required Knowledge
Database
RDBMS
SQL
Document Organization
This guide consists of 4 chapters.
Briefly introduces the concept and features of In-Memory Column Store.
🔎
Describes how to enable or disable In-Memory Column Store and setting objects for In-Memory population.
🔎
Describes high availability features supported with In-Memory Column Store.
🔎
HDFS Connector
This chapter describes how to use the Tibero HDFS Connector.
HDFS External Table Creation
The syntax for creating an external table using the HDFS Connector is the same as the general syntax for creating an external table.
In the previous syntax, Port is optional and 8020 is its default value.
The following is an example of defining an external table using the HDFS Connector.
The previous example creates three HDFS files for the external table. The host name of the HDFS Namenode is 'hadoop_name', and the port number defaults to 8020. Next, it reads the three files, 'f0.txt', 'f1.txt', and 'f2.txt', from the '/user/tibero' directory below HDFS.
The directory object is only needed for the DDL syntax to create the external table, and it has no effect on the HDFS file path. Local files as well as HDFS files can be used to create an external table, and all functions available to external tables can be used in the same way.
For more information about external table creation syntax, refer to "Tibero SQL Reference Guide".
Querying with HDFS Connector
To query with HDFS Connector, create an external table and execute queries against it.
External Table interface enables the use of all query functions provided by Tibero, join operations with a Tibero table, various aggregate functions and UDF.
The following is an example of using the HDFS Connector to execute a query.
The /*+ parallel */ hint can also be used for parallel execution as with general tables.
Parallel execution can enhance performance since it uses parallel table scans by dividing HDFS files into HDFS block units. However, DML cannot be executed against external tables of HDFS Connector.
Spatial Reference Guide
Overview
This guide is intended for database administrators (DBA) who intend to use Tibero to build and maintain spatial reference systems and developers who develop applications using the systems.
This guide does not contain all the information required to operate Tibero. For information about the installation, configuration, operation, and management, refer to each relevant guide.
For more information about Tibero installation and configuration, refer to .
Required Knowledge
Database
RDBMS
SQL
System Requirements
.
Requirements
Document Organization
The guide contains 5 chapters.
Describes basic concepts of Tibero Spatial.
🔎
Describes schema objects related to Tibero Spatial.
🔎
Describes spatial indexes provided by Tibero Spatial.
🔎
Introduction to IMCS
This chapter describes the concept and features of In-Memory Column Store.
Overview
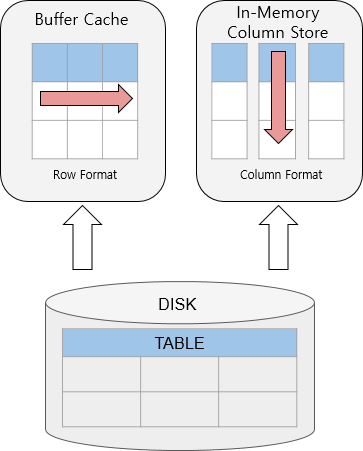
IIn-Memory Column Store (IMCS) is a memory storage architecture optimized for column scans, which stores and manages data copies in a columnar format.
The columnar storage format is supported in addition to the traditional row-oriented storage, to improve database performance in a mixed environment handling both OLTP and OLAP workloads.
[Figure 1] Row-based storage vs Column-based storage
Features of In-Memory Column Store
In-Memory Area
IMCS resides in the In-Memory Area, a component of the shared memory. The size of the In-Memory Area is allocated at startup of the database and remains fixed until the next startup.
Unlike the buffer cache, which discards unused data when filled up, IMCS keeps data permanently in the In-Memory Area unless manipulated through a command by the user. This eliminates additional I/O costs when reading data stored IMCS. (However, if no valid data is found through an in-memory scan, I/O costs may incur because the buffer cache needs to be additionally read).
Columnar Format
IMCS stores copies of data in a columnar format optimized for scans. Data stored in a columnar format has an internally fixed size, which enables efficient filter operation (ex. <, >, =) during a scan.
Compression
IMCS eliminates duplicate data by compressing each columnar data. This improves memory efficiency and scan performance by reducing the number of data to be scanned.
Data Pruning
IMCS manages each columnar data in a storage unit called In-Memory Compression Unit (IMCU). IMCU contains information about the minimum and maximum values of each columnar data. Based on these minimum and maximum values of data in each IMCU, the database performs IMCU pruning to eliminate unnecessary scans and improve thus the scanning performance.
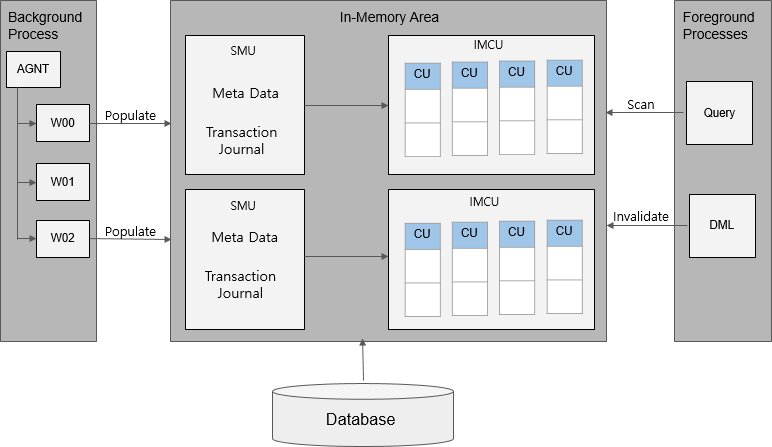
In-Memory Column Store Architecture
The In-Memory Area is allocated in a fixed location within the shared memory at startup of the database. The size of the In-Memory Area is set by the INMEMORY_SIZE initialization parameter.
The In-Memory Area is divided into two subpools: In-Memory Compression Unit (IMCU) for columnar data, and Snapshot Metadata Unit (SMU) for metadata of columnar data.
[Figure 2] In-Memory Column Store Architecture
In-Memory Compression Unit(IMCU)
An In-Memory Compression Unit (IMCU) is a storage unit of IMCS that contains data for one or more columns in a compressed format. The size of an IMCU is 1 MB, and IMCS stores data for a single object (ex. table, partition or subpartition) to multiple IMCUs in columnar format.
An IMCU stores columnar data for only one object, and every IMCU contains one or more
Column Compression Units (CU).
Column Compression Unit(CU)
A Column Compression Unit (CU) is a storage for a single column in an IMCU. A CU encodes the column value of each row in a 2-byte value, which is called a dictionary code. A CU contains a mapping table for each dictionary code corresponding to the actual column data.
Snapshot Metadata Unit (SMU)
A Snapshot Metadata Unit (SMU) stores metadata for an associated IMCU. In IMCS, each IMCU is mapped to a separate SMU. Every SMU contains information about the object and the address of a data block populated in each associated IMCU, as well as a transaction journal, which records rows modified with DML statements.
In-Memory Process Architecture
Population, which converts data into columnar format in IMCS, is performed by background processes. At startup of the database, agent processes initiate population of objects having In-Memory priority. When initially accessing objects with no priority, agent processes populate them by using queries.
Reading columnar data for objects populated in IMCS through queries, or recording transaction journals in SMUs using DML statements are performed by worker processes.
SIMD Vector Processing
SIMD (Single Instruction, Multiple Data) vector processing enhances performance of expressions in a WHERE clause, by scanning a set of column values in a single CPU instruction. For example, 8 values (2-byte data) from a CU are loaded into the CPU, to get 8 results in a single comparison instruction.
SIMD is used for comparing In-Memory columns to bind parameters or constant values. The following comparison operators are supported: >, >=, =, <, <=, AND
High Availability and IMCS
This chapter describes high availability features supported with IMCS.
IMCS in TAC
When using IMCS in Tibero Active Cluster (TAC), every running instance has its own IMCS area. By default, objects populated in a TAC environment are distributed across all nodes in the cluster.
In Tibero, the INMEMORY_SIZE parameter for every TAC node must be set to an equal value.
In-Memory Distribution
You can use DISTRIBUTE to specify how data of an In-Memory object is distributed to each TAC node. The following describes each DISTRIBUTE option.
DISTRIBUTE option
In-Memory Duplication
You can use DUPLICATE for an In-Memory object to specify whether and how each TAC node stores the copy of data.
DUPLICATE option
Parallelism in TAC
Since In-Memory data populated in a TAC environment is distributed across all TAC nodes by default, queries for In-Memory data are executed in parallel. For example, when you perform an In-Memory scan for a table populated in a 3-node TAC environment, the database reads data from every corresponding table stored in each TAC. This means that In-Memory scans in a TAC environment are performed in parallel, with the degree of parallelism (DOP) determined based on the number of nodes.
TEXT Reference
Overview
This guide is intended for developers who develop TEXT applications and administrators who maintain TEXT systems using Tibero® (hereafter Tibero).
This guide does not contain all the information required to operate Tibero.
For information related to installation, configuration, operation and management, refer to each relevant guide.
For more information about Tibero installation and configuration, refer to "Tibero Installation Guide".
Required Knowledge
Database
RDBMS
SQL
Document Organization
This guide consists of 4 chapters.
Describes how to create and manage TEXT indexes.
🔎
Describes queries that use the Tibero TEXT function.
🔎
Describes elements related to Tibero TEXT indexes.
🔎
Considerations
This chapter explains the prerequisite and precautions before installing Tibero client, and considerations after installation.
Preparations before installing
1. Check available disk space
Before installing Tibero, a minimum of 2GB of free hard disk space is required, with slight differences depending on the install platform. This also includes the minimum hard disk space needed to create a database after installing Tibero.
2. Check JDK installation
To install using the Tibero Client Installer, a version of JDK 1.5.17 or higher must be installed.
[Figure 1] Check JDK installation
Currently, JDK 1.9 or higher is not supported.
IF JDK is not installed, it can be downloaded from the link below.
🔎
3. Preparing the installation file
Go to ‘TechNet’ of Tmax, create account and download the installation file.
🔎
Considerations after installation
After installing Tibero, JDBC is provided to integrate with other solutions.
JDBC
When integrating JDBC, the required driver file can be found from the following paths on the Tibero DB server. The following is an explanation of the driver file’s path based on the server’s operating system. (File path for Unix environments.)
The following is a description of the driver file name for each version of TIbero.
Tibero version
File name
Mounting a CD-ROM
This chapter describes how to mount a CD-ROM for each platform.
AIX
The method for mounting a CD-ROM in AIX is as follows:
Log in as the root user.
Create a mount point to which a CD-ROM drive will be mounted.
Run the mount command.
Linux
The method for mounting a CD-ROM on Linux is as follows:
Check whether automounting is working.
Switch to a root user using the root account password.
Run the mount command
Run the unmount command.
Solaris
The method for mounting a CD-ROM in Solaris is as follows:
1. Check the volume manager to verify whether a CD is recognized automatically.
If there is an existing CD, eject the CD.
3. Insert a CD and mount it with the following commands.
Installation guide (for All)
Overview
This document is intended for all database users who want to install or uninstall Tibero®(Tibero).
Tibero Active Storage
Overview
This guide is intended for TAS administrators who want to manage Tibero® (hereafter Tibero) files by using Tibero® Active Storage (hereafter TAS).
This guide does not contain comprehensive information for installing or running TAS. For more information about installation, the environment, operation, and management of TAS, refer to the relevant guides.
system.sh
This chapter describes the options of system.sh (vbs).
The following are the options that can be used with system.sh(vbs).
The following describes each option.
Option
Description
Calculating the Undo Tablespace Size
This chapter describes how to calculate the size of the undo tablespace.
If data is updated frequently in a system, a large volume of I/O happens in the undo tablespace. In such systems, data needs to be distributed by creating the undo tablespace with multiple data files.
The undo tablespace is automatically managed, providing the following advantages.
Helps design and manage efficiently with rollback capability and segments
Upgrade
Overview
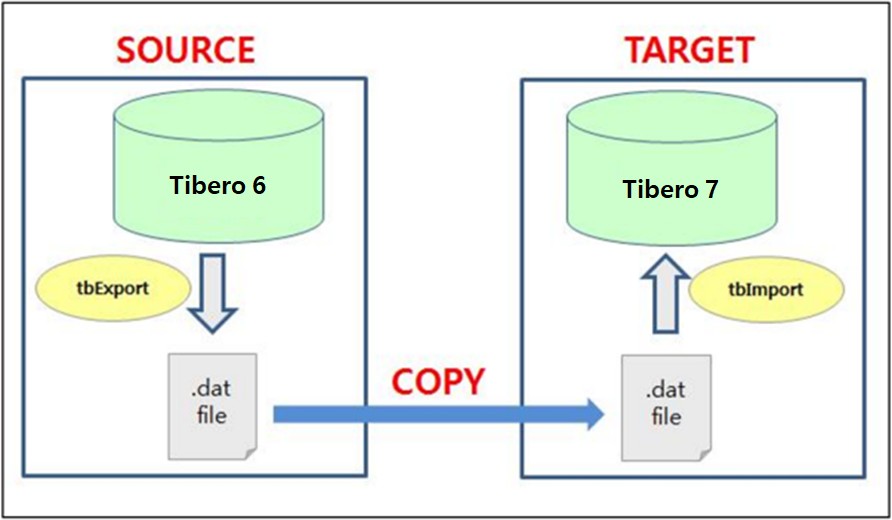
This guide describes how to upgrade from Tibero 6 to Tibero 7 using logical backup and recovery (exp and imp).
[Figure 1. Migration diagram]
Introduction to Spatial
This chapter describes basic concepts of Tibero Spatial.
Tibero Spatial provides functions to save and use spatial data in Geographic Information Systems (GIS) and circuit diagrams.
GEOMETRY Objects
Tibero Spatial supports seven types of GEOMETRY objects that comply with the SQL-MM standard.
The following table describes each type of GEOMETRY objects. The object is saved as binary in Well Known Binary (WKB) format. Coordinates of GEOMETRY objects in the WKB format are saved as floating point numbers. Therefore, the result of calculations on the numbers may have some errors, and the result values may be different depending on the floating point calculation method.
Release note
Overview
This guide introduces new features and changes implemented to Tibero 7.
hdfs://[HDFS Namenode IP 또는 hostname][:Port]/[File Path]
Required Knowledge
Database
RDBMS
OSs and system environments
Unix (including Linux)
Document Organization
The guide contains 6 chapters and 7 appendix.
Installation Overview
Briefly introduces Tibero and describes the system requirements for installation.
Distributes data equally to each node in accordance with Tibero internal rules. (Default)
By Rowid Range
Distributes data to each node by rowid range. Currently not supported in Tibero.
By Partition
Distributes data to each node by partition. Currently not supported in Tibero..
By Subpartition
Distributes data to each node by subpartition. Currently not supported in Tibero.
Option
Description
NO DUPLICATE
No data copy of In-Memory data. (Default)
DUPLICATE
One copy for each In-Memory object data. When populating an In-Memory object specified with the DUPLICATE option, the same data is stored in 2 TAC nodes. Currently not supported in Tibero.
DUPLICATE ALL
As many copies for each In-Memory data as the number of nodes. Every instance stores the copies of an In-Memory object in its own IMCS area.
Describes initialization parameters and dynamic performance views relevant for In-Memory Column Store.
The undo tablespace cannot be manually managed in Tibero.
Considerations
Consider the following when calculating the size of an undo tablespace.
Data file size, UNDO_RETENTION, and undo segments
Individual spaces in an undo segment are automatically managed, therefore you only need to set the minimum/maximum number of undo segments and the maximum size of a data file.
Set the minimum number of undo segments (USGMT_ONLINE_MIN) to 10 (default value). However, if there are too many concurrent transactions, overhead occurs to create additional undo segments. To decrease the overhead, set USGMT_ONLINE_MIN to the number of concurrent transactions.
If USGMT_ONLINE_MIN is greater than the number of existing undo segments, additional undo segments are created at boot time.
USGMT_ONLINE_MIN can be set by node in TAC. For example, USGMT_ONLINE_MIN can be set to 30 and 40 for NODE1 and NODE2 respectively.
Set the maximum number of undo segments (USGMT_ONLINE_MAX).
Tibero automatically creates additional undo segments to prevent multiple transactions from sharing a single undo segment. However, the number of undo segments cannot exceed USGMT_ONLINE_MAX.
In TAC, a total number of Undo segments in all nodes cannot exceed USGMT_ONLINE_MAX. For example, if USGMT_ONLINE_MAX is set to 300 and the numbers of undo segments are 100 and 200 in NODE1 and NODE2 respectively, additional undo segments cannot be created in both nodes. Therefore, it is recommended to set USGMT_ONLINE_MAX to the number of maximum concurrent transactions.
Calculating the Size
The minimum size, expected size (based on the expected concurrent transactions count), and actual size of an undo tablespace can be calculated as follows. The expected size is used when a database is installed for the first time, and then the size can be checked based on the number of Undo blocks per second under the heaviest TPR load.
The following are the formulas for calculating the size of an undo tablespace.
Minimum size
Expected size
Actual size
The following describes each item in the formulas.
Item
Description
The minimum number of undo segments for each undo tablespace
USGMT_ONLINE_MIN value for both single instance and TAC.
The maximum number of undo segments for each undo tablespace
Expected maximum number of concurrent transactions.
Single instance: USGMT_ONLINE_MAX value
TAC: USGMT_ONLINE_MAX / the number of nodes
_USGMT_UNIFORM_EXTSIZE
Size of an undo extent. An undo segment includes at least two undo extents.
Undo blocks per second
Number of undo blocks divided by a TPR interval (seconds). Use the value of undo blocks shown in Undo Statistic of TPR at the time under the heaviest load.
UNDO_RETENTION
Setting value in a tip file. (Default value: 900 seconds)
Margin
Preparative for irregularly long transactions (including INDEX rebuild). (Unit: KB)
Single : jdbc:tibero:thin:@192.168.11.49:8629:tibero
TAC : "jdbc:tibero:thin:@(description=
(failover=on)(load_balance=on)
(address_list=(address=(host=192.168.11.49)(port=8629))
(address=(host=192.168.11.50)(port=8629))
)(DATABASE_NAME=tibero7))”
This chapter explains I/F Driver change uisng JDBC, ODBC, DB Link, etc.
[Figure 1. Migration diagram]
Object Type
Description
POINT
Consists of one point. Zero-dimension.
LINESTRING
Consists of two or more points.
POLYGON
Consists of one external ring and zero or more internal rings.
A ring has the same start and end points, and it indicates a line string that has no internal intersecting point. Intersections of internal rings must be a point or there must be no intersection.
MULTIPOINT
Consists of one or more points. Zero-dimension.
MULTILINESTRING
Consists of one or more line strings.
MULTIPOLYGON
Consists of one or more polygons.
Spatial Referencing System(SRS)
Tibero Spatial supports the following coordinate systems that calculate coordinates for depicting real space by connecting them with real space. Depending on which coordinate system GEOMETRY belongs to, the result value of Spatial functions may vary.
Cartesian Coordinate
A coordinate system in which a position in space is expressed on a two-dimensional plane or a three-dimensional space. It is useful when depicting a local space where the curvature of the earth is not revealed. In Spatial, SRID is not specified. GEOMETRY is basically operated in the Cartesian coordinate system. GEOMETRY without a specified SRID is calculated in this Cartesian coordinate system by default.
Spherical Coordinate (Geography coordinate)
A coordinate system in which a position in space is expressed on a two-dimensional spherical or ellipsoidal surface (spheroid). This system approaches the actual location through latitude and longitude. It is useful when accurately depicting global space. In general, a sphere or spheroid is used to express the actual position on the earth. The radius, major radius, and minor radius information of a sphere or spheroid used in this system depends on SRID given to GEOMETRY. You cannot individually store different spheroids for each GEOMETRY.
SRID(Spatial Reference Identifier)
Spatial provides SRID, which is the identifier type of the coordinate system. SRID has information about a specific coordinate system, including whether the coordinate system for GEOMETRY is the Cartesian coordinate system or the spherical coordinate system.
[Figure 1] Row-based storage vs Column-based storage
[Figure 2] In-Memory Column Store Architecture
Release note_7.2.1
This chapter briefly describes newly added and updated features in Tibero 7.2.1.
New Features
This section lists and briefly describes newly added features.
DBMS Engine
TAC(Tibero Active Cluster)
Online Undo tablespace replacement
Undo Tablespace can be replaced during online on TAC environment.
TSC(Tibero Standby Cluster)
Non-stop standby deployment
– Added a function to build a standby DB using only archive logfiles without stopping the primary DB and backing up online redo logfiles.
Standby forced reverse synchronization
The existing primary can clear the logs with differences without rebuilding, receive the data block image accessed by the log from the primary (existing standby), force sync, and become a standby.
Online Undo tablespace replacement
Undo Tablespace can be replaced during online on TSC environment.
Restrict primary connection IP from standby
– Restricts connection from Standby to only specific IPs of the Primary.
Statistical information collection
[ DBA | ALL | USER ]_TAB_MODIFICATIONS
– Added view to check the amount of change in ROWS that has been DML proceeded to the table since the last statistical information collection.
[ DBA | ALL | USER ]_TAB_STATISTICS
– Added a view that provides statistical information about the table.
GRANULARITY
– Added GRANULARITY to DATABASE, DICTIONARY, SCHEMA, INDEX statistical information collection.
– Added TABLE statistics collection only on specified SubPartitions.
Statistical information collection performance
– Collects statistics information using TEMPORARY TABLE.
System Package
DBMS_PARALLEL_EXECUTE
– Added a package to provide the ability to update tables in parallel.
DBMS_XMLDOM
– Supports DBMS_XMLDOM package on Solaris 5.11.
TAS
– Added TAS begin/end backup to ensure the consistency of the TAS metafile.
Frame
– Added a feature to clean up the session if no request from client for a certain period of time in a session where an active transaction exists.
Utilities
tbImport
– Added option to set INDEX PARALLEL DEGREE when importing.
Updated Features
DBMS Engine
Data Definition Language (DDL)
– Improved Parallel INDEX build performance.
– Improved DD LOCK contention between sessions.
– Improved performance when using bulk SEQUENCE.
Optimizer
– Activated INDEX SKIP SCAN when using the LIKE conditional statement.
– Improved JOIN plan performance.
Executor
– Improved BLOCK SAMPLING performance during TABLE FULL SCAN.
– Improved Performance by performing a TABLE FULL SCAN of a size larger than a certain HRESHOLD using PGA.
CONTEXT INDEX
– Improved CONTEXT INDEX creation performance.
– Improved Search performance using CONTEXT INDEX.
Buffer Cache performance
– Improved Buffer cache bucket contention.
TAC(Tibero Active Cluster)
– Improved resource contention in the TAC environment.
– Improved FULL SCAN performance in the TAC environment.
– Stabilized the message processing logic between instances In the TAC environment.
TSC(Tibero Standby Cluster)
– Added ASYNC LNW to transmit logs by referring to LOG_ARCHIVE_DEST.
TAS
– Improved TAS to boot immediately without waiting for resync to complete If a new TAC Instance is booted while TAS is performing resync.
– skipped rebalance on necessary When adding a DISK in a TASK environment consisting of external redundancy disk space.
– Improved feature and stability of TBASCMD.
Controlfile
– Improved a stability of controlfile related I/O logic.
TPR
– Added SQL ID item output to the query unit information in the TPR report.
Label Security
Renamed the Label Security system user from SYS to LB
Added or improved packages and procedures
SA_POLICY_ADMIN
SA_USER_ADMIN
SA_AUDIT_ADMIN
Utilities
tbSQL
– Expanded a range of SET INTERVAL support from natural numbers to real numbers with 3 decimal places.
– Added a feature to specify the number of loops adding COUNT to LOOP.
Release note_7.2
This chapter briefly describes newly added and updated features in Tibero 7.2.
New Features
This section lists and briefly describes newly added features.
DBMS Engine
JSON Type
– Supports the JSON_MERGEPATCH and JSON_OBJECTAGG functions.
– Supports Function-based indexes for JSON_VALUE. (Options for JSON_VALUE must match.)
– Supports declaration of JSON type variables and an IN/OUT parameter in PSM.
SQL PROFILE
It allows SQL tuning when the user cannot modify an SQL query within an application.
For more information about how to use SQL profiles, refer to "DBMS_SQLTUNE" in Tibero tbPSM Reference Guide.
SQL PLAN BASELINE
– Stores SQL plans to be used by the user without choosing the Optimizer for optimized plans.
Patch and rollback tasks when TAS meta files are added or removed
– Added DDLs to support a patch implementation that requires adding or removing TAS meta files, without reconfiguring TAS.
Tibero Recovery Catalog
It supports metadata management for multiple databases.
Tibero Recovery Catalog stores metadata of different databases to physically separated locations. The database storing metadata is referred to as Catalog database (Catalog).
When a database is registered in the catalog, tbrmgr scans the database's control file and extracts metadata, which is sent and stored to the catalog.
It keeps data up-to-date.
For more information, refer to " in Tibero Administrator's Guide.
Copying files based on the redundancy number with ASCMD commands
– Added an option for the cp and cptolocal commands to specify a mirror of a target file through ascmd.
– The -redun option (set to a value between 0 and 2) copies a file according to the redundancy number.
[DBA|ALL|USER]_MVIEW_REFRESH_TIMES : displays refresh time of MVIEW.
CONTEXT INDEX
– Added views for CONTEXT INDEX.
CTX_PREFERENCES
CTX_PREFERENCE_VALUES
CTX_STOPLISTS
Utilities
SET MARKUP for tbSQL
– Displays output of tbsql in html.
Client Drivers
JDBC 4.1 Standards
It supports java.math.BigInteger and JDBC type BIGINT.
It supports disconnection using the connection.abort function.
It supports specifying schema using the connection.setSchema function.
JDBC 4.2 Standards
It supports java.time.LocalDate, LocalTime, LocalDateTime, OffsetTime, and OffsetDateTime types.
It supports specifying types using SQLType as the argument of the setObject and registerOutParameter functions.
It supports returning the affected row count value in the long data type using the Statement.executeLargeUpdate function.
For more information, refer to "" in Tibero JDBC Developer's Guide.
Updated Features
This section lists and briefly describes modified and improved key features.
DBMS Engine
DBMS_VERIFY
It supports DBMS_VERIFY for local partitioned indexes.
SYSTEM VIEW
– Added TYPE column for the following views.
[DBA|ALL|USER]_TAB_PRIVS
[DBA|ALL|USER]_TBL_PRIVS
[ALL|USER]_TAB_PRIVS_MADE
DBMS_UTILITY
– Added the MAXNAME_ARRAY type in the DBMS_UTILITY package.
DBMS_XMLGEN
– Added the SETBINDVALUE procedure in the DBMS_XMLGEN package.
Client Drivers
Default Character Set
– Changed the default character set for client environments from MSWIN949 to UTF8. (Set the TB_NLS_LANG environment variable.)
Utility Guide
Overview
This guide is intended for database users who use the various utilities provided by Tibero.
This guide does not contain all the information needed for the actual application or operation of Tibero. For installation, configuration or any other details about operation and maintenance of the system, you need to see each relevant guide.
For information about installation and configuration of Tibero, refer to "".
Required Knowledge
Database
RDBMS
SQL
Eclipse tools
For information about Eclipse tools and their usage, refer to the or related documents.
System Requirements
.
Requirements
Document Organization
This guide consists of 6 chapters.
Introduces tbSQL, which processes SQL commands interactively, and describes how to use it.
🔎
Introduces tbExport, which extracts part or all of database objects in Tibero, creates an extract file, and describes how to use it.
🔎
Introduces tbImport, which stores database objects extracted by tbExport in Tibero, and describes how to use it.
🔎
Installation
This chapter explains how to install and uninstall the Tibero client in manual mode.
Installation in manual mode
Prepare the installation file.
When you create a folder to install the Tibero client and unzip it, folders are created.
Configure the invironment variables.
(1) In Windows, select [Edit system environment variables] -> [Advanced] -> [Environment variables] and configure [System variables].
[Figure 2] Configuring system variables
(2) In the [Environment variable], select [System variables] -> [New] and configure TB_HOME and TB_SID.
[Figure 3] TB_HOME and TB_SID configuration
(3) Unzip the compressed binary executable file(tar.gz) in the directory ‘C:\Tibero'. Then, copy the license file(license.xml) into the subdirectory named “license’ under %TB_HOME%.
(4) After executing tbinstall.vbs, and check the registry registration.
[Figure 4] installation complete message
In the registry (regedit), check whether TB_HOME and TB_SID are registered in the HKEY_LOCAL_MACHINE\SOFTWARE\TmaxTibero\Tibero\tibero path.
[Figure 5] TB_HOME, TB_SID registration check
(5) Execute gen_tip.bat.
(6) Delete any unnecessary folders except ‘bin’ and ‘client’ folders.
If there is sufficient disk space, this step may be skipped.
(7) Configure the network file(tbdsn).
tbdsn.tbr file is used to set the connection path to the server, and located in “%TB_HOME%\client\config.”
(8) Access to Tibero Server with Tibero Client.
Uninstallation
Execute tbuninstall.vbs and remove it from the registry.
[Figure 6] Uninstallation complete message
Delete physical files. Uninstall the Tibero client by deleting the directory in the path set to %TB_HOME%.
tbdv
This chapter describes the tbdv utility and its usage.
Overview
tbdv is a utility that checks integrity of data files in a Tibero database. It can perform basic integrity checks on data files while the database is offline.
tbdv checks the following for each data block.
Multi-instance Installation and Uninstallation
This chapter describes how to install and uninstall multiple instances.
Installation
In Unix (Linux), multiple instances from different databases can be simultaneously installed.
These instances can share a single Tibero binary execution file and a Tibero license file, but their TB_SID and configuration file (.tip) must be separately configured.
Spatial Indexes
This chapter describes Spatial indexes provided by Tibero Spatial. The indexes are implemented in RTREE format and used to improve the performance of spatial queries. There are indexes for the planar
Creating Spatial Indexes
The following describes how to create a Spatial index.
Tibero tbESQL/COBOL Guide
$ system.sh -h
Usage: system.sh [option] [arg]
-h : dispaly usage
-p1 password : sys password
-p2 password : syscat password
-a1 Y/N : create default system users & roles
-a2 Y/N : create system tables related to profile
-a3 Y/N : register dbms stat job to Job Scheduler
-a4 Y/N : create TPR tables
pkgonly : create psm built-in packages only
-sod Y/N : separation of duties
error : print error whenever sql encounters error
– Improved usability by returning space in UNUSABLE INDEX.
– Added the UPDATE GLOBAL INDEXES.
(Default value: N, Not supported in Windows)
GEOMETRYCOLLECTION
Consists of one or more GEOMETRY objects.
Go to Release note 7.1
Go to Release note 7.2
Go to Release note 7.2.1
Go to Release note 7.2.2
It updates metadata when backups are created or deleted using the rmgr client, or when the administrator requests resynchronization.
It supports specifying a timeout using the connection.setNetworkTimeout function.
It supports closing statements upon the end of result sets using the statement.closeOnCompletion function.
It supports specifying return types using a class as the argument of the Resultset.getObject function.
Do the used and available spaces of a block add up to the total block size?
Do the row pieces of a block not overlap with other row pieces ?
If an integrity check discovers an error, it is assumed to be a media failure and a media recovery must be performed on the database.
Quick Start
tbdv is automatically installed and uninstalled along with Tibero.
The following shows how to execute tbdv at a command prompt.
To set the block size, use the -s option (default value: 8,192 bytes).
To check only the specified length ofa file from the beginning, use the CHECK_LENGTH option. If this option is not specified, the entire file is checked. To use a raw device, explicitly set the device size. If not set, an error occurs.
The following executes tbdv.
Executing tbdv
Usage Example
This section describes how tbdv checks integrity of data files.
If a block is marked with incorrect DBA, tbdv displays the following.
When a Block Is Marked with Incorrect DBA
If a fractured block is found in a data file, tbdv displays the following.
When a Fractured Block Is Found
If available and used spaces for data blocks does not sum up to the total block size, tbdv displays the following.
When the Available and Used Spaces in a Block Sums up Incorrectly
tbdv treats a zeroed out block as unformatted. When a block with data is zeroed out due to a disk error, it is treated as unformatted (unallocated space in the data file) and no error is generated.
Unix
The manual installation process of Tibero in a Unix environment is basically the same as in the single instance installation. The steps are as follows:
Install a Tibero instance by referring to “Unix” in installation page.
Note
This document assumes that the first instance contains the following environment variables.
Environment Variable
Value
TB_HOME
/home/tibero/Tibero/tibero7
TB_SID
tibero1
LD_LIBRARY_PATH
$TB_HOME/lib:$TB_HOME/client/lib
PATH
$PATH:$TB_HOME/bin:$TB_HOME/client/bin
Set another TB_SID variable for a second instance. It must be set to a value that is different from the first variable.
Enter the following command from the $TB_HOME/config directory.
This command creates a configuration file (.tip) as well as tbdsn.tbr and psm_commands files.
Open the configuration file created in the $TB_HOME/config directory, and set the LISTENER_PORT value differently from the first instance's setting.
Warning
The initialization parameters _LSNR_SPECIAL_PORT, _LSNR_SSL_PORT and CM_PORT are respectively set to LISTENER_PORT+1, LISTENER_PORT+2, LISTENER_PORT+3 by default.
Therefore, when setting LISTENER_PORT, the values of the initialization parameters LISTENER_PORT, _LSNR_SPECIAL_PORT, _LSNR_SSL_PORT and CM_PORT for the new instance must be set differently from the previously installed instance.
The subsequent steps are the same as in “Unix” in installation page from step 5.
In step 7 of “Unix”, however, when creating a database with the CREATE DATABASE statement, you need to modify the path of log files or data files in accordance with the new instance's TB_SID.
Uninstallation
This section describes the uninstallation process of existing multi-instances.
Unix
The manual uninstallation process of Tibero multi-instances for Unix is basically the same as in the single instance uninstallation.
This document assumes that the existing instances contain the following environment variables.
Environment Variable
Value
TB_HOME
/home/tibero/Tibero/tibero7
TB_SID
tibero1
tibero2
LD_LIBRARY_PATH
$TB_HOME/lib:$TB_HOME/client/lib
PATH
$PATH:$TB_HOME/bin:$TB_HOME/client/bin
Set the TB_SID environment variable of the first Tibero instance to delete, and then shut down the instance.
Set the TB_SID environment variable of another instance to delete, and then shut down the instance.
Delete the Tibero installation directory as well as all the subdirectories by using the OS's command.
Usage
Item
Description
index_name
Name of a Spatial index.
schema_name
Owner of a table for which an index is created.
table_name
Name of a table for which an index is created.
col_name
Name of a GEOMETRY type column for which an index is created.
RTREE
Indicates an RTREE index.
Example
Spatial Index Constraints
Spatial indexes have the following constraints.
A single index cannot be used for multiple columns.
A Spatial index cannot be partitioned.
A Spatial index cannot be created for non-GEOMETRY type columns.
A Spatial index can be used only when the following functions are implemented in a WHERE clause of SQL statements.
- ST_CONTAINS
- ST_COVEREDBY
- ST_COVERS
- ST_CROSSES
- ST_DWITHIN
- ST_EQUALS
- ST_INTERSECTS
- ST_OVERLAPS
- ST_TOUCHES
- ST_WITHIN
A Spatial index of the spheroid coordinate system can be created by adding a constraint to the GEOMETRY column of the table.
Usage
Example
In some cases, it is necessary to change the coordinate system of the existing GEOMETRY column and create a Spatial index. If there are existing constraints, delete them, change the SRID of GEOMETRY, and then add appropriate constraints for the SRID to create the Spatial index.
Usage
Example
Dropping Spatial Indexes
The following describes how to drop a Spatial index.
This chapter describes initialization parameters and dynamic performance views relevant for IMCS.
In-Memory Initialization Parameters
INMEMORY_SIZE
The INMEMORY_SIZE parameter specifies the size of IMCS in a database instance. The default value is 0, which allocates no memory for IMCS.
The minimum value that can be specified as INMEMORY_SIZE is 100 MB, and the value cannot be dynamically changed while the database is running. In a TAC environment, the INMEMORY_SIZE parameter must be set to an equal value for all TAC instances.
In-Memory Dynamic Performance Views
V$IM_COLUMN_LEVEL
V$IM_COLUMN_LEVEL presents the selective column compression levels and indicates whether a column is set as No Inmemory. There is no GV$ view for V$IM_COLUMN_LEVEL in TAC, since all TAC nodes have the same information.
V$IM_SEGMENTS
V$IM_SEGMENTS displays information about all segments existing in the In-Memory Area.
You can find any information about populated segments through this view.
Troubleshooting
This chapter describes how to solve problems that can occur after Tibero is installed.
User Configuration Files
TB_HOME
Issue
If the property TB_HOME is not set or is set improperly, or if the user configuration file is not applied after Tibero is installed, this message may be displayed when trying to connect to the tbSQL utility.
Solution
Check the TB_HOME property in the user configuration file, change the value if necessary, and then apply the file to the system.
LD_LIBRARY_PATH
Issue
If the property LD_LIBRARY_PATH is not set or is set improperly, or if the user configuration file is not applied after Tibero is installed, this message may be displayed when trying to connect to the tbSQL utility.
Solution
Check the LD_LIBRARY_PATH property in the user configuration file, change the value if necessary, and then apply the file to the system.
TB_SID
Issue
If TB_SID is not set, this message may be displayed when the tbboot or tbdown command is executed.
Solution
Check the TB_SID property in the user configuration file, change the value if necessary, and then apply the file to the system.
TAC Installation
The following describes how to resolve issues that can occur after Tibero is installed in a TAC environment.
Adding a Node
Accessing a tip File
Issue
If a configuration file (.tip) cannot be found when a node is added, this message may be displayed.
Solution
Check whether the Tibero instance's $TB_SID.tip exists in the corresponding path by referring to TB_HOME and TB_SID.
Accessing TAC
Issue
To add a node, an existing node's setting values are necessary. If trying to access an existing node fails, this message may be displayed.
Solution
Check that TB_HOME and TB_SID are set properly.
Check that the existing node can be accessed through tbsql.
If an existing node does not work, start the node with the tbcm, tbboot commands then try to add the node again.
Transferring an scp File
Issue
If transferring Tibero installation files to a new node fails, this message may be displayed.
Solution
Check whether the current node can access the node to be added using ping or ssh.
If the current node cannot access the node to be added, check the settings for account synchronization, networking, and any firewalls.
TPR-Related Error When Using a TAC Raw Device
Issue
The SYSSUB tablespace, which contains TPR-related tables, was added starting from Tibero 5.0 r61295. During the system schema configuration portion of installing and patching, the syssub001.dtf file is automatically created in the directory $TB_ HOME/database/$TB_SID. However, if the property DB_CREATE_FILE_DEST is set to a specific location, the file is created at that location.
However, in an environment using a TAC raw device, the file is created on the local disk of the node processing the system schema. This results in an error that prevents other nodes from accessing the SYSSUB tablespace. The same error occurs in a shared disk environment when the property, DB_CREATE_FILE_DEST, is not set correctly.
Solution
Recreate the SYSSUB tablespace as follows:
Delete the existing tablespace.
Create a new tablespace.
Execute the following script.
Miscellaneous
Port Number
Issue
This error occurs when the specified port number is already in use when executing the tbboot command.
Solution
Check whether the instance is already in use or modify the port number set in the $TB_SID.tip file in $TB_HOME/client/config.
dbtimezone
Recommendation
The dbtimezone is the reference timezone value used for storing the timestamp with local timezone data to database. Since this value is internally processed in the database, it is not recommended to modify it, because this requires unnecessary operations leading to performance degradation.
Tibero Guides
It describes Tibero guides briefly.
This chapter provides the list of Tibero guides and contents of them, and describes how each guide is related to one another. It helps the users understand Tibero guides in general, though it does not directly instruct how to use Tibero.
Tibero Guides
Tibero guides are as follows:
No.
Guide list
Description
Calculating the Shared Memory Size
This chapter describes how to calculate the size of the shared memory.
The shared memory in Tibero is divided into fixed memory and shared pool memory as follows:
Fixed Memory
Its size is fixed based on a parameter value set at database startup.
– Buffer cache (database buffer)
– Log buffer
– Others: space for global variables and managing working threads and session information.
Shared Pool Memory
It is dynamically allocated during database operation.
– DD cache
– PP cache (library cache)
– Others
Considerations
Consider the following when calculating the size of the shared memory.
The size of the shared memory cannot be increased dynamically while the database is running.
The size of the shared memory must be determined properly based on the usage patterns of the buffer cache and shared pool.
- Buffer Cache
Determine the size according to the Buffer Cache Hit rate in TPR after executing major workloads.
If the hit rate is lower than 90%, increase the buffer cache.
- Shared Pool Memory
Determine the size according to the SHARED POOL MEMORY item in v$sga after executing major workloads.
If the shared pool usage is too high (insufficient free area), increase the shared pool memory.
At least 1 MB of the shared pool memory is required for each session.
Calculating the Size
The size of each area in the shared memory can be checked with v$sga.
The size of the shared memory can be set and queried with the following initialization parameters.
Shared Memory
The following example queries the size with the TOTAL_SHM_SIZE parameter.
Buffer Cache
The following example queries the size with the DB_CACHE_SIZE parameter.
Single mode : ⅔ of TOTAL_SHM_SIZE
TAC mode : ½ of TOTAL_SHM_SIZE
Log Buffer
The following example queries the size with the LOG_BUFFER parameter.
(the default value of LOG_BUFFER is 10 MB.)
Shared Pool Memory
The size can be calculated by subtracting the fixed memory size from the total shared memory size as follows:
Single mode
The total shared pool size must be greater than _MIN_SHARED_POOL_SIZE.
TAC mode
Sufficient space for Cluster Cache Control (CCC) and Cluster Wait-lock Service (CWS) is required. About 25% of a total buffer cache size is used by shared pools.
The shared pool space excluding space for CCC and CWS must be greater than
_MIN_SHARED_POOL_SIZE.
The free shared pool size for PP and DD caches must be greater than CCC and CWS spaces.
Installation Overview
This chapter briefly introduces Tibero and describes the system requirements for installation.
Overview
The current enterprise business rapidly expands with the explosive increase of data and the advent of a variety of new environments and platforms. This new business environment requires more flexible and efficient data services, information handling, and data management functions.
Tibero is an enterprise database management system that supports building a database infrastructure on which enterprise business is implemented and provides high performance, high availability, and scalability.
To address limitations of existing databases, Tibero implemented its proprietary Tibero thread architecture. It also uses limited system resources such as CPU and memory efficiently, guarantees high performance and reliability, and provides a convenient development environment and management features.
Target DB Operations
The chapters in this part explain the procedures for installing target DB, Tibero 7.
The steps for the operations are as follows :
Installation
Execution of Import
Post-processing
Release note_7.2.2
This chapter briefly describes newly added and updated features in Tibero 7.2.2.
New Features
This section lists and briefly describes newly added features.
IMCS Configuration
This chapter describes how to enable or disable IMCS, and set individual object for population into IMCS.
Enabling and Disabling In-Memory Column Store
IMCS is enabled and disabled by specifying the value of the INMEMORY_SIZE parameter.
Appendix
This chapter alphabetically lists the default stopwords used by Tibero TEXT.
$ echo %TB_HOME% %TB_SID%
$ cd %TB_HOME%\bin
$ tbuninstall.vbs
a
did
in
only
then
where
all
do
into
onto
there
whether
almost
does
is
or
therefore
which
also
either
it
our
these
while
although
for
its
ours
they
who
an
from
just
s
this
whose
and
had
ll
shall
those
why
any
has
me
she
though
will
are
have
might
should
through
with
as
having
Mr
since
thus
would
at
he
Mrs
so
to
yet
be
her
Ms
some
too
you
because
here
my
still
until
your
been
hers
no
such
ve
yours
both
him
non
t
very
but
his
nor
than
was
by
how
not
that
we
can
however
of
the
were
could
i
on
their
what
d
if
one
them
when
Describes how to create various database application programs in the C programming language.
7
Tibero tbESQL/COBOL Guide
Describes how to create various database application programs in the COBOL programming language.
8
Tibero External Procedure Guide
Describes how to create and use external procedures.
9
Tibero Hadoop Connector Guide
Describes how to use the Hadoop Connector.
10
Tibero Installation Guide
Describes the system requirements and specific methods for installation and uninstallation.
11
Tibero JDBC Developer's Guide
Describes how to develop application programs by using the JDBC functions provided in Tibero.
12
Tibero tbPSM Reference Guide
Introduces the tbPSM package, a storage procedure module. This guide also describes the prototypes, parameters, and examples of each procedure and function included in this package.
13
Tibero tbPSM Guide
Introduces the concepts, syntax, and components of tbPSM (Procedure Storage Module). This guide also describes how to execute the control structure, complex type, sub programs, packages, and SQL statements required for creating a tbPSM program and to handle any errors.
14
Tibero Spatial Reference Guide
Describes the geometry type and spatial procedures and functions of Tibero and how to use them.
15
Tibero TAS Guide
Describes how to manage files in Tibero Active Storage (TAS).
16
Tibero TEXT Reference Guide
Describes how to create and use the text index provided by Tibero.
17
Tibero TDP.NET Guide
Describes the functions of Tibero Data Provider for .NET.
18
Tibero IMCS Guide
Describes functions of In-Memory Column Store (hereafter IMCS) provided by Tibero.
19
Tibero Utility Guide
Describes how to install, use, and configure the utilities that handle database related operations.
20
Tibero Error Reference Guide
Describes troubleshooting methods for various errors that may occur while using Tibero.
21
Tibero Reference Guide
Describes the initialization parameters, data dictionary, and static and dynamic views used by Tibero.
22
Tibero TEXT Reference Guide
Describes how to create and use the text index provided by Tibero.
23
Tibero Glossary
Describes terms used in Tibero guides.
1
Tibero Release Note
Describes main changes of the released versions.
2
Introduction to Tibero
Describes basic concepts and main functions of Tibero.
3
Tibero Administrator's Guide
Describes basic knowledge required for administrating Tibero.
4
Tibero tbCLI Guide
Describes the tbCLI (Call Level Interface) concepts, components and program structure, as well as data types, functions, and error messages needed to write tbCLI applications.
5
Tibero Application Developer's Guide
Describes how to develop application programs by using application libraries.
6
Tibero tbESQL/C Guide
1. Installation
The installation process for Tibero 7 is as follows:
1) Basic procedure
Refer to “Tibero Installation Guide” for basic procedure.
2) File configuration
Tibero Initial Parameter(tip file)
The TIP is under the file name $TB_SID.tip in $TB_HOME/config.
Some parameters used in Tibero 6 may have been changed or removed, so it is necessary to check their applicability in Tibero 7.
Additionally, if hidden parameters starting with _ are being used, their applicability in Tibero 7 should also be verified.
tbdsn.tbr
The basic syntax of tbdsn.tbr is the same as in Tibero 6, and previously used aliases should be added.
Additional files
If the following configuration files are used in the Source DB, they should also be applied to the corresponding configuration files in Tibero 7.
ESQL
C/JAVA External Procedure
DB Link related Gateway
External Procedure (Copy so or class file)
If the OS and BIT of the source DB and target DB are the same, copy them, and if they are different, recompile using the original source.
Directory related file
Copy the files from the query result of "Check Directory” in Checklist and Check Methods.
3) Creating Database
Modify settings to align with the settings of Tibero6 referring to "Checklist and Check Methods", and create database. Post-processing should be applied in Archivelog mode.
4) Executing system.sh
2. Import
The steps for importing is as follows.
1) Creating User Tablespace
Open the tibero6_exp.log file, which was generated from tbexport, and refer to CREATE TABLESPACE syntaxes to adjust the data file paths and size. However, the SYSTEM, UNDO, TEMP, USR parts created in CREATE DATABASE will not be created.
If you import without pre-creating the tablespace, it will generate data files with the source DB information as-is. In this case, it may create data files in unintended paths, leading to errors in creating data files, and unnecessary storage usage.
2) Creating User
Open the tibero6_exp.log file, which was generated from tbexport,, and refer to CREATE USER syntaxes to adjust the USER’s password, default_tablespace, and other settings.
When an export executed in Tibero6 is imported in Tibero7, the default encryption method of both versions changes. If the user has not been created in advance, user creation will fail.
3) Executing tbimport
Copy the exported data file, and import them in Database(FULL) mode of tbimport.
The following command is for using tbimport on Target DB server.
Category
Details
Username
The account for importing DB
(Choose one from Sys or DBA account.)
Password
The password for importing DB account
port
The port number for importing DB
sid
The name for importing DB
file
The name for imorted file in Tibero 6
log
The name for created log
The following is an example of tbimport usage for Tibero 7 on Source DB server.
3. Post-processing
1) Processing for Unsupported lists
Execute the following syntaxes in a form of Source DB script for unsupported lists.
JOB
DB LINK
External Procedure - Library
External Procedure – JAVA SOURCE
Wrapped PL/SQL
Change the path of the directory
2) Applying Archive mode
Apply this mode if the Tibero 6 was in Archive mode, or if Archive operation is required.
Exiting DB
Booting Mount mode
Changing mode
Exiting DB and booting DB
Confirming
INMEMORY_SIZE Parameter
The default value of the INMEMORY_SIZE parameter is 0, which means IMCS is disabled. To enable IMCS, you need to set the INMEMORY_SIZE parameter to at least 100 MB before starting the database. If the INMEMORY_SIZE parameter is set to a value that is smaller than 100 MB, it defaults to 0.
The INMEMORY_SIZE parameter cannot be dynamically modified. To modify the parameter, you need to restart the database.
Modify the INMEMORY_SIZE parameter value.
Change the value of INMEMORY_SIZE in the configuration file (tip file).
Shut down the database.
Restart the database.
Enabling In-Memory Column Store
To enable IMCS, you need to restart the database.
Set the INMEMORY_SIZE parameter.
Before starting the database, set INMEMORY_SIZE to at least 100M in the configuration file
(tip file).
If the database is running, shut it down.
Restart the database.
Disabling In-Memory Column Store
To disable IMCS, you need to restart the database.
Set the INMEMORY_SIZE parameter.
Before starting the database, set INMEMORY_SIZE to 0 in the configuration file (tip file) or delete the INMEMORY_SIZE parameter.
Shut down the database.
Restart the database.
Enabling Objects for Population into In-Memory Column Store
This section describes how to enable or disable individual objects for population into IMCS with priority and compression options.
In-Memory Population
In-Memory Population (Population) is a separate step that occurs when the database reads existing row format data from disk and converts it into columnar format, and then loads it into IMCS. Only tables, partitions and subpartitions can be populated in IMCS.
In-Memory Population Behaviour
Based on the priority option, population is enabled when starting up the database or when accessing an In-Memory object.
In-Memory Population Priority
Priority of population can be controlled by DDL statements that include an INMEMORY PRIORITY clause.
Population priority can be set for tables, partitions and subpartitions. Columns are not eligible for priority setting. Note that setting the In-Memory option for objects is just a pre-population task, and that it does not enable population by itself.
Any segment that is smaller than 64 KB cannot be populated. This means that there may exist some objects set as In-Memory that are still not eligible for population.
Behaviours of In-Memory population depending on the priority
Behaviour
Description
On-demand population
The default value of the INMEMORY PRIORITY option is NONE. In this case, population is enabled only when accessing the object through an In-Memory scan. Population is not possible if the object is not accessed, or accessed through an index scan or full table scan.
Priority-based population
If the INMEMORY PRIORITY option is set to a value other than NONE, population is enabled without access to the object. Population starts with the highest priority level. With the same priority level, the order is not assured. When there is no more space for IMCS, population stops.
PRIORITY Options
Options
Description
PRIORITY NONE
Population occurs only when accessing objects.
PRIORITY LOW
Population occurs whether or not objects are accessed. Objects with this level are populated after others with the following priority levels are completed.
MEDIUM
HIGH
CRITICAL
PRIORITY MEDIUM
Population occurs whether or not objects are accessed. Objects with this level are populated after others with the following priority levels are completed.
HIGH
CRITICAL
PRIORITY HIGH
Population occurs whether or not objects are accessed. Objects with this level are populated after others with the following priority levels are completed.
CRITICAL
PRIORITY CRITICAL
Population occurs whether or not objects are accessed. Objects with this level are populated first among all.
Example of PRIORITY Option setting
CREATE TABLE statement
ALTER TABLE statement
In-Memory Population Control
Using an INMEMORY clause in DDL statements, you can set the INMEMORY option for tablespaces, tables, partitions and subpartitions.
INMEMORY Clause
Basically, the INMEMORY clause can be specified only at the segment level. If it is specified at the column level, the range of available options will be limited. The column-level INMEMORY clause will be discussed later.
To set the INMEMORY option, specify an INMEMORY clause in the following statements.
CREATE TABLESPACE or ALTER TABLESPACE
If the INMEMORY option is specified on a tablespace, the option will apply to all tables created in the tablespace. If the INMEMORY option is specified on a table, it will be overridden by the tablespace.
The INMEMORY option specified for the tablespace has control over its new tables only. Therefore, even if you use the INMEMORY option through the ALTER TABLESPACE statement, the option does not apply to already existing tables. Likewise, If you change the option to NO INMEMORY through ALTER TABLESPACE, existing tables that are already set to INMEMORY cannot switch to NO INMEMORY.
CREATE TABLE or ALTER TABLE
If you use the INMEMORY option for a table, non-virtual columns become eligible for population by default. You can selectively make specific columns eligible for population by using the column-level INMEMORY clause. For partitioned tables, you can specify the INMEMORY option for individual partitions. If the INMEMORY option is not specified, the option is inherited from the table level. If the INMEMORY option is specified, it will be overridden at the table level.
Setting a Table for IMCS
CREATE TABLE statement
ALTER TABLE statement
Setting a Column for IMCS
You can make a specific column ineligible for In-Memory population by using the column-level INMEMORY clause.
CREATE TABLE statement
ALTER TABLE statement
Setting a Tablespace for IMCS
The INMEMORY clause at the tablespace level must be preceded by the DEFAULT clause.
CREATE TABLESPACE statement
ALTER TABLESPACE statement
TBR-2048 : Data source was not found.
tbsql: error while loading shared libraries: libtbcli.so:
cannot open shared object file: No such file or directory
ERROR: environment variable $TB_SID is not set
tbdown: environment variable TB_HOME or TB_SID is not set.
Tip file open failure.: No such file or directory
tbdown failed. proc info file is deleted.
tip file does not exist / reading tip file failed / malformed tip file
extracting information from the existing cluster failed
Remote file transfer failed! / Remote configuration export failed!
SQL> DROP TABLESPACE SYSSUB INCLUDING CONTENTS AND DATAFILES;
Listener port = 8629
bind() failed: Address already in use.
Error: Timedout while trying to open port 8629
Check if there are any Tibero instances running.
Tibero instance startup failed!
SQL> select * from v$sga;
NAME TOTAL USED
-------------------- --------- ---------
SHARED MEMORY 536870912 536870912
FIXED MEMORY 430875880 430875880
SHARED POOL MEMORY 105992872 40974968
SHARED POOL ALOCATORS 1 1
Database Buffers 357892096 357892096
Redo Buffers 10485760 10485760
SQL> show param total_shm_size
NAME TYPE VALUE
---------------- -------- ---------
TOTAL_SHM_SIZE INT64 536870912
SQL> show param db_cache_size
NAME TYPE VALUE
---------------- -------- ---------
DB_CACHE_SIZE UINT64 357892096
SQL> show param log_buffer
NAME TYPE VALUE
---------------- -------- ---------
LOG_BUFFER UINT32 10485760
TOTAL_SHM_SIZE - [Fixed Memory]
The default value of _MIN_SHARED_POOL_SIZE: 1MB * MAX_SESSION_COUNT
[Total shared pool size] = _MIN_SHARED_POOL_SIZE + [CCC space] + [CWS space]
+ [Free shared pool size]
[Free shared pool size] > ([Total shared pool size] - _MIN_SHARED_POOL_SIZE) / 2
create database
user sys identified by tibero
character set MSWIN949
national character set UTF16
logfile group 0 ('log001.log','log002.log') size 50M,
group 1 ('log011.log','log012.log') size 50M,
group 2 ('log021.log','log022.log') size 50M
maxdatafiles 8192
maxlogfiles 100
maxlogmembers 8
noarchivelog
datafile 'system001.dtf' size 1G autoextend on next 256M maxsize unlimited
default tablespace USR
datafile 'usr001.dtf' size 1G autoextend on next 256M maxsize unlimited
default temporary tablespace TEMP
tempfile 'temp001.dtf' size 1G autoextend off
undo tablespace UNDO
datafile 'undo001.dtf' size 1G autoextend off
SYSSUB datafile 'syssub001.dtf' size 1G autoextend on next 32M maxsize unlimited;
DECLARE
job_no number;
BEGIN
DBMS_JOB.SUBMIT(job_no,'dbms_output.put_line(''ok'');',SYSDATE,'SYSDATE+1');
END;
/
CREATE DATABASE LINK olink CONNECT TO scott IDENTIFIED BY 'tiger' USING 'oragw';
CREATE OR REPLACE LIBRARY extproc IS '/home/tibero/cepa/libextproc.so';
CREATE OR REPLACE AND RESOLVE JAVA SOURCE NAMED "JavaExtproc" AS
public class SimpleMath {
public static int findMax(int x, int y) {
if (x >= y) return x;
else return y;
}
}
/
CREATE OR REPLACE PROCEDURE wrap_test WRAPPING
IS
BEGIN
DBMS_OUTPUT.PUT_LINE('Hello World');
END;
/
CREATE OR REPLACE DIRECTORY dir_ext AS '/home/tibero/t7/work/external/external'
/
tbdown immediate
tbboot -t mount
tbsql sys/tibero
SQL> alter database archivelog;
tbdown immediate
tbboot
tbsql sys/tibero
SQL> SHOW PARAM LOG_ARCHIVE_DEST
NAME TYPE VALUE
----------------------- -------- --------------------------------------------
LOG_ARCHIVE_DEST DIRNAME /home/tibero/t7/tibero7/database/t7/archive/
SQL> alter system switch logfile;
System altered.
SQL> !ls -la /home/tibero/t7/tibero7/database/t7/archive/
total 23572
-rw-------. 1 tibero dba 24126976 Apr 4 22:40 log-t0-r0-s1.arc
SQL> select log_mode from v$database;
LOG_MODE
-------------- -
ARCHIVELOG
The ID of the container to which the data pertains
Number of bytes for the segment
BYTES_NOT_POPULATED
Size of the portion of the segment that is not populated In-Memory Area, in bytes
POPULATE_STATUS
Status of segment population
STARTED
COMPLETED
FAILED
INMEMORY_PRIORITY
Priority for segment population
LOW
MEDIUM
HIGH
INMEMORY_DISTRIBUTE
In-Memory DISTRIBUTE option specified for the segment
AUTO
BY ROWID RANGE
BY PARTITION
INMEMORY_DUPLICATE
In-Memory DUPLICATE option specified for the segment
NO DUPLICATE
DUPLICATE
DUPLICATE ALL
INMEMORY_COMPRESSION
In-Memory compression option specified for the segment
NO MEMCOMPRESS
FOR QUERY LOW
Option
Description
OWNER
Name of the table owner
OBJ_NUM
Table object ID
TABLE_NAME
Table name
SEGMENT_COLUMN_ID
Segment Column Number
COLUMN_NAME
Column name
INMEMORY_COMPRESSION
In-Memory compression option specified for a column, including No Inmemory setting
Option
Description
OWNER
Name of Segment Owner
SEGMENT_NAME
Name of Segment
PARTITION_NAME
Object partition name
Set to NULL for non-partitioned objects
SEGMENT_TYPE
Type of Segment
Table
Table Partition
Table Subpartition
TABLESPACE_NAME
Name of the tablespace containing the segment
INMEMORY_SIZE
Size of the in-memory version of the segment, in bytes
CON_ID
BYTES
Tibero, from its very earliest version, has been developed to handle a large number of users and large amounts of data while ensuring reliability and compatibility.
Tibero is a data management solution that manages large amounts of data and guarantees reliable business continuity. It has all of the features needed for an RDBMS environment such as distributed database links, data replication, data clustering, and parallel query processing. Tibero provides thereby an optimal database environment that perfectly meets enterprise needs.
Installation Components
Software Distribution Policy
Tibero software distribution policy is as follows:
Full Purchase Version: Licensed by the number of CPUs and features.
Evaluation Version: A license that restricts the trial period and the number of users.
You can download a demo license file from "TechNet".
System Requirements
This section describes supported platforms, operating systems, hardware and software requirements.
Supported Platforms and Operating Systems
Tibero supports the following platforms and operating systems.
H/W, S/W
CPU
OS
Binary Bits
SUN
SPARC
Solaris 11
64 bits
IBM
PPC
AIX 7.1
AIX 7.2
AIX 7.3
64 bits
GNU
X86
Red Hat Enterprise Linux 7
Red Hat Enterprise Linux 8.1
Red Hat Enterprise Linux 8.2
Red Hat Enterprise Linux 8.3
Red Hat Enterprise Linux 8.4
Red Hat Enterprise Linux 8.5
Red Hat Enterprise Linux 8.6
Red Hat Enterprise Linux 8.7
Hardware
Hardware requirements for installing Tibero are as follows:
Note
The following requirements are based on default parameters. Even if these requirements are met,
installation may still fail depending on the database parameter settings.
Platform
RAM
Swap Space
/tmp Directory Space
HDD Space (Full / Client Only)
LINUX/x86
1 GB
2 GB
500 MB
2.5 GB / 400 MB
Solaris
1 GB
2 GB
500 MB
2.5 GB / 400 MB
For Solaris platforms, refer to the following when setting swap space.
Recommended setting: twice the physical memory
User setting: (Background process count + Worker process count) * Swap usage per process(300 MB)
Software
Software requirements for installing Tibero are as follows:
Platform
OS
Compiler
JDK Version
LINUX/x86
Red Hat Enterprise Linux 7 kernel 3.10.0 or later
C99 compatible compiler,
gcc version 4.8.5 or later
JDK 1.5.17 or later
Solaris
Solaris 11 64-bit kernel
C99 compatible compiler, Sun C 5.8 2005/10/13
JDK 1.5.17 or later
AIX
AIX 7.1 64-bit kernel
AIX 7.2 64-bit kernel
AIX 7.3 64-bit kernel
C99 compatible compiler
For a binary compiled in AIX 7.1, AIX 7.1 Technology Level 4 or higher version is required for proper operation.
DBMS Engine
Database Replay
Added the program to validate the effects on applications when updating or patching Tibero DBMS.
This program captures the workload within the database at the message level to perform the same operations.
Database Replay captures the database itself and replays its operation to assess effects without downtime. This process simulates database operations precisely, allowing an accurate reflection of the operational workload.
This program is particularly effective for environments where procedures and functions are heavily used.
DBreplay is performed in the process of the following steps: Database workload capture, Preprocess, Replay, and Result (optional).
Note
For more information about Database Replay, refer to "DBReplay User Guide".
Data Definition Language (DDL)
Automates statistics collection for index creation
Automatically collects index statistics when executing CREATE INDEX.
Added the following ALTER TYPE statements
ALTER TYPE ADD METHOD
ALTER TYPE DROP METHOD
ALTER TYPE RENAME ATTRIBUTE
Utilities
gateway for oracle
– Added a memory allocator dump feature of the gateway used to link Tibero to Oracle database.
Updated Features
DBMS Engine
Data Definition Language (DDL)
Improved the performance of the tablespace creation statement when the number of tablespaces is high.
Improved the MOVE operation for LOB-type columns.
Optimizer
Improved the DISPLAY_CURSOR function in the DBMS_XPLAN package.
Executor
Executes DISTINCT AGGREGATION with less memory and at a faster speed.
Reduces memory usage when specifying a partition or subpartition of a partitioned table in a query.
PSM
Increases the maximum size of CHAR and VARCHAR data types used in PSM from 32767 to 65532.
Improved the RESULT_CACHE function in PSM.
Allows sequence in the RESULT_CACHE function.
Displays an error when using REF CURSOR in the RESULT_CACHE function.
Displays an error when using RESULT_CACHE in the nested function.
Displays an error when using RESULT_CACHE in a function in anonymous block.
Recovery
Modified to allow adding datafiles to a tablespace in hot backup status through BEGIN BACKUP.
Cache
Enables V$THRINFO to display buffer handle usage by session and across the entire database instance in real time.
Stability
Improved the stability of the logic related to CCC in a TAC environment.
Parameter
Modified Parameters
Parameter name
Default Value Before
Default Value After
DBWR_CNT
1
3
OPTIMIZER_LOG_OUTLINE
NO
YES
OPTIMIZER_USE_SQL_PROFILES
NO
YES
SQL_STAT_HISTORY_QSIZE
50
New Parameters
Parameter name
Default Value
DATABASE_REPLAY_CAPTURE_WORKLOAD
NO
DATABASE_REPLAY_CAPTURE_DEST
DATABASE_REPLAY_CAPTURE_FILE_SIZE
10485760
DATABASE_REPLAY_CAPTURE_DIR_LIMIT
(MAX_SESSION_COUNT * DATABASE_RE
PLAY_CAPTURE_FILE_SIZE) * 100
DATABASE_REPLAY_DUMP_MMAP_SIZE
65536
EXTRA_LISTENER_IPS
-1
Known Issue
This section briefly describes known issues of Tibero 7.2.2.
Missing statistics of a partition with no data when creating a partitioned index
Issue
When creating a partitioned index in parallel, the collected statistics do not include the block count value for the index segment of no-data partition, and '0' is entered instead.
Action
Recollect the index statistics by using EXEC DBMS_STATS.GATHER_INDEX_STATS.
Missing subpartition processing in the EXPORT/IMPORT_STATS function of the DBMS_STATS package
Issue
When migrating statistics, subpartitions are not processed for the EXPORT_TABLE/INDEX_STATS and IMPORT_TABLE/INDEX_STATS functions.
Action
None: Plans to provide a patch.
Error with the LAST_ELAPSED_TIME value in the DISPLAY_CURSOR function of the DBMS_XPLAN package
Issue
When displaying LAST_ELAPSED_TIME in the DISPLAY_CURSOR function of the DBMS_XPLAN package, the subquery execution time is double-counted.
Action
Refer to AVG_ELAPSED_TIME instead of LAST_ELAPSED_TIME, taking care to note that the two have different meanings.
Refer to TOT ELAPSED TIME after the query is hard-parsed and executed once.
Error with Wait Time items within Wait Events in TPR
Issue
Some Wait Time items, including TPR Wait Events by Wait Time, show values exceeding 100%.
Action
None: Plans to provide a patch.
Error caused by multi update on tables with LONG and LOB columns
Issue
Performing multiple updates on tables containing LONG and LOB columns causes an error due to missing row reset.
Action
Avoid using multiple operations.
(by setting _ENABLE_TDD_MU=N and _TDD_MU_ENABLE_ALL_COL=N)
Error caused when enabling standby REDO thread
Issue
Enabling the standby REDO thread causes TBR-2400 error if the number of standby log files exceeds that of online log files.
Action
Add the same number of standby log files as online log files.
Spatial Utilities
This chapter describes utilities provided by Tibero Spatial: gisLoader, tibero2shp, and shp2tibero.
gisLoader
Tibero Spatial provides gisLoader, an independent executable utility that loads shapefile format spatial data to Tibero.
The gisLoader utility reads data from a shapefile to create a data file that is used as an input file for tbLoader. That is, gisLoader converts a shapefile to a tbLoader input file, and then tbLoader loads the spatial data to Tibero.
Since .shx files are not interpreted by gisLoader, the shapefile information in .shx files is lost. Null, Point, Polyline, Polygon, and Multipoint are the shape types of a shapefile that can be interpreted by gisLoader. If a shapefile contains an unsupported shape type, gisLoader stops and outputs an error.
gisLoader generates only .ctl (control) and .dat (data) files, which are tbLoader input files. gisLoader does not generate schema scripts that can create tables. Therefore, a user must check the data in the generated control file to verify that data can be successfully loaded with tbLoader. For example, if a table does not exist, it must be created in advance to load data.
The following is a sample .ctl file created by gisLoader.
If a table that will be used to load data does not exist, use the "create table" statement to create a table in advance.
For more information about tbLoader, refer to "".
Usage
The following describes how to use gisLoader.
Usage
Item
Description
Example
tibero2shp
Tibero Spatial provides tibero2shp, an independent executable utility that directly accesses a database and saves tables' GEOMETRY in shapefile format.
The tibero2shp utility exports GEOMETRYs that are Tibero query results to create a shapefile. Query result GEOMETRY can be a return value of a GEOMETRY function that selects a table's GEOMETRY column or takes a column as an argument and returns GEOMETRY.
Since a shapefile can include only a single type of GEOMETRYs, query results to load must have the same type of GEOMETRYs.
GEOMETRY types that can be loaded in a shapefile are POINT, MULTIPOINT, LINESTRING, MULTILINESTRING, POLYGON, and MULTIPOLYGON. Note that the POINT type is distinguished from the MULTIPOINT type so that the two types cannot be loaded together. However, LINESTRING can be loaded along with MULTILINESTRING, and POLYGON can be loaded along with MULTIPOLYGON. LINESTRING GEOMETRYs are loaded to a shapefile as MULTILINESTRING, and POLYGON GEOMETRYs are loaded to a shapefile as MULTIPOLYGON.
Usage
The following describes how to use tibero2shp.
Usage
Item
Description
Options
Option
Description
Example
shp2tibero
Tibero Spatial provides shp2tibero, an independent executable utility that loads shapefile to a database table.
The shp2tibero utility creates a table that corresponds to a shapefile.
GEOMETRY types that can be saved in a shapefile are POINT, MULTIPOINT, LINESTRING, MULTILINESTRING, POLYGON, and MULTIPOLYGON.
Usage
The following describes how to use shp2tibero.
Usage
Item
Description
Options
Option
Description
Example
Data Types
This chapter describes data types used in tbCLI program and data type conversion.
A Data type is used to input values to SQL queries and to get the query result.
tbCLI supports the following two types.
Tibero data types
Used to access data stored in database.
tbCLI data types
Used to manipulate data from an application program.
Tibero Data Types
This section describes the default data types provided by Tibero. These data types are used to create schema objects of a database. Also within a tbESQL program, variables corresponding to all data types can be used.
Tibero data types
Classification
Data type
Description
For further information, refer to Tibero SQL Reference Guide.
The followings are detailed descriptions of each data type.
Data type
Description
tbCLI Data Type
This section describes tbCLI data type that application developers use to create a database program.
The following is a table that shows typedef names of C and its corresponding data types of C.
C's typedef
C's data type
The following are examples of using tbCLI data types, which corresponds to C's typedef name.
DATE_STRUCT, SQL_DATE_STRUCT
[Ex. 5] DATE_STRUCT, SQL_DATE_STRUCT
TIME_STRUCT, SQL_TIME_STRUCT
[Ex. 6] TIME_STRUCT, SQL_TIME_STRUCT
TIME_STAMP_STRUCT, SQL_TIMESTAMP_STRUCT
[Ex. 7] TIME_STAMP_STRUCT, SQL_TIMESTAMP_STRUCT
Data types
This section explains the comparison of column data types between Tibero and other DBMS.
ORACLE
The following is a comparison of data types between Oracle and Tibero.
Oracle
Tibero
CHAR
MS-SQL
The following is a comparison of data types between MS-SQL and Tibero.
MS-SQL
Tibero
Sybase
The following is a comparison of data types between Sybase and Tibero.
Sybase
Tibero
TAS Overview
This chapter describes the basic concepts and functions of Tibero Active Storage.
Overview
TAS manages disk devices without an external solution. TAS acts as a file system and a logical volume manager that stores the data files and log files required for running Tibero. TAS provides a clustering function that can use the Tibero Active Cluster (hereafter TAC) function when using a shared disk.
Tibero Active Storage (TAS) manages disk devices without an external solution. TAS acts as a file system and a logical volume manager that stores the data files and log files required for running Tibero. TAS provides a clustering function that can use the Tibero Active Cluster (TAC) function when using a shared disk.
Note
For more information about TAC, refer to "Tibero Administrator's Guide".
TAS manages multiple disks in a disk space. A disk space is similar to a file system on top of a logical volume, and Tibero stores files in such a disk space. Disks can be added or removed when using a disk space to run Tibero.
When adding or removing a disk, TAS automatically redistributes the stored data so that all disks in a disk space can be utilized evenly and no data is lost.
Note
For more information about disk space management, refer to “”.
TAS provides a mirroring function for data in Tibero. TAS supports two mirroring methods: the two-way method (NORMAL option) and the three-way method (HIGH option). If a separate mirroring solution is used, then the TAS mirroring function can be avoided (EXTERNAL option).
Concepts of TAS
This section describes the core concepts required for understanding TAS.
TAS Instance
TAS Disk Space
Mirroring and Failure Groups
TAS Disk
TAS Instance
TAS is based on Tibero. The running processes of a TAS instance are almost identical to those of Tibero's. However, TAS runs fewer tasks than a database and thus consumes fewer system resources.
Note
For more information about TAS instance management, refer to “”.
TAS stores and manages metadata, which records disk space and file information, in the first disk space. TAS metadata stores the following information.
Disks in a disk space.
Space available in a disk space.
File names in a disk space.
File extent information.
The following diagram shows the relationship of a TAS instance with Tibero and a disk.
Tibero does not read and write a file by using TAS. Instead, it directly reads and writes to the disk by using the file's metadata, which is retrieved from TAS.
TAS provides a clustering function for using a shared disk. Only one Tibero instance can use a disk space. In order for multiple Tibero instances to use a disk space, the instances must be configured in TAC.
The following describes the configuration of Tibero and TAS using the cluster function.
TAS Disk Space
A disk space is composed of multiple disks. Each disk space stores metadata (needed for managing the disk space) and the files used in the database.
Note
For more information about disk space management, refer to “”.
Mirroring and Failure Groups
TAS provides a mirroring function for data stored in a disk space. The function copies data and stores it in multiple disks and then protects it. To use the mirroring function, the following redundancy levels are available when creating a disk space.
Level
Description
Note
If a disk space is created at the EXTERNAL level, then the disk space cannot use any functions related to mirroring.
When TAS allocates an extent for a mirrored file, multiple extents (2 or 3) are allocated according to the file's redundancy level. The disk of each allocated extent is stored in a separate failure group. As a result, if an error occurs in a disk included in a failure group or in an entire failure group, no data is lost and continuous service for the disk space can be provided.
A failure group is defined when creating a disk space, and the redundancy level, which is set when a disk space is created, cannot be later modified. If a failure group is not defined, then each disk is automatically defined as a failure group. A disk space with redundancy level of NORMAL or HIGH, must define 2 or 3 failure groups. A disk space with a redundancy level of EXTERNAL does not use failure groups. To efficiently use disk space, set similar disk space for each failure group.
TAS Disk
TAS can use the following disk devices as a TAS disk.
Entire disk
Disk partition
Logical volume
Note
An OS sees these devices as an LUN with I/O capability.
All OSs support the three device types Active Storage only supports Linux and AIX.
The privilege issue for disks or physical volumes can be resolved by creating a device node with udev.
For disks partitioned into LUNs from scratch in SAN storage, you can configure a TAS cluster without clustering software and GFS2.
When configuring a TAS cluster, a disk set with a different name on each node can be used as a TAS disk. For example, a disk without CLVM can be seen as '/dev/hdisk1' on node 1 and '/dev/hdisk2' on node 2, and a database can be configured in a such environment as long as TAS is configured. Since disk string is used to search for a TAS disk, the 'disk/raw device' must be set so that it is visible to all the nodes in the cluster.
TAS distributes file information evenly across all disks in a disk space. This allocation method ensures equal usage of disk space and allows all disks in a disk space to have the same I/O load. TAS balances the load among all disks in a disk space. Therefore, different TAS disks must not share the same physical disk device.
When configuring a logical volume with RAID, it is recommended to set the striping size to a multiple of the AU size of TAS. This helps increase performance by aligning the disk's striping size with that of TAS.
Allocation Units
Each disk space is divided into allocation units. An allocation unit is the basic unit of allocation in a disk space. A file extent uses one or more allocation units, and a file uses one or more extents. The allocation unit size can be set in the AU_SIZE property when creating a disk space.
The configurable values are 1, 2, 4, 8, 16, 32, and 64MB.
TAS File
A file stored in a TAS disk space is called a TAS file. Tibero requests the file information from TAS, similar to the way Tibero uses files in a file system.
The name of a TAS file is in the "+{disk space name}/..."format. It is not included in the file information and is managed as an alias.
Extent
TAS files are stored in a disk space as a set of extents. Each extent is stored in each disk of a disk space, and each extent uses one or more allocation units. To support large-sized files, TAS uses variable size extents, which reduces the memory required for maintaining file extent information.
The extent size automatically increases when the file size increases. If the file size is small, the disk space's allocation unit (hereafter AU) matches the extent size. When the file size increases, the extent size increases to 4AU or 16AU.
The extent size varies as follows:
파일의 익스텐트 개수
Extent Size
The following shows the relationship between extents and allocation units.
TAS Process
Using TAS requires to execute the Active Storage Service Daemon (ASSD) process.
The ASSD process allows communication between TAC and TAS, and it has the following threads.
Tread
Description
TAC Installation and Uninstallation
This chapter describes how to install Tibero a TAC(Tibero Active Cluster) configuration.
Pre-Installation Tasks
Verify the following before configuring TAC.
System requirements
TFor more information about the system requirements for TAC, refer to "" in Installation Overview page.
Installation requirements
Verify the basic installation requirements in “” before configuring TAC.
IP address and port information
Socket buffer configuration
Shared disk type
Checking IP Address and Port Information
Before starting installation, check the external IP address and listener port number which are needed by an instance of Tibero.
In addition, the interconnect IP address, interconnect port number, and the CM port number are also required. When using VIP or IP filtering, make sure that IPs are assigned to the same subnet.
IP address
Classification
Description
Port number
Classification
Description
Socket Buffer Settings
Set the socket buffer values of the operating system.
AIX
Parameter
Recommended Value
Linux
Parameter
Recommended Value
Solaris
Parameter
Recommended Value
Note
The sb_max parameter is applicable only to AIX.
Checking Shared Disk Type
TAC requires shared disk space that all instances can access together.
Executing and operating TAC requires at least seven shared files. These files are created based on the parameter {SHARED_DISK_HOME} specified by the user during installation. If necessary,
{TAC_INSTANCE_ID} is attached to the name of the files. For example, if {SHARED_DISK_HOME} is "dev/tac" and {TAC_INSTANCE_ID} is 0, the path of an Undo log file is "dev/tac/UNDO0.dtf."
The following is the list of shared files and their paths required when initially installing nodes.
File
Path
Note
If these file names cannot be used due to the nature of the hardware, use symbolic links.
After the initial installation, additional nodes installation requires the following four shared files for each node. For information on each file's path, see the previous table.
3 redo log files
1 undo log file
Note
When using a raw device as the shared disk, each of these shared files is considered as a single individual raw device. Before installation, you need to request the raw device's administrator to create the respective files. Note that each file must have sufficient size with the block size set to 512 and the character type.
The name and path of control files, CM cluster files and resource files can be specified by the user.
Manual Installation
Note
For information about how to manually configure a TAC environment and install Tibero, refer to "Tibero Cluster Manager" and "Tibero Active Cluster" in Tibero Administrator's Guide.
Installation Verification
You can verify whether the installation is successful by running the tbcm command.
The command shows the CM configuration information.
Note
For more information about how to use the tbcm command, refer to "Tibero Cluster Manager" in Tibero Administrator's Guide.
Uninstallation
There are two methods for uninstalling a node in the TAC environment: console mode and manual mode.
Console Mode
The following is the process of removing a node in console mode.
Shut down the Tibero instance.
End TBCM.
Delete the Tibero installation directory as well as all the subdirectories by using the OS's command.
Manual Mode
The following is the process of removing a node manually.
Shut down the Tibero instance.
End TBCM.
Delete the Tibero installation directory as well as all the subdirectories.
Supported Character Sets
This chapter describes the character sets supported in Tibero.
Supported Character Sets
Language
Character Set
Description
Universal
UTF8
The following example checks the available character sets for installing the Tibero binary.
Migration Methods
This section explains the methods used for database migration.
T-UP
The following is a diagram showing the data migration process using T-UP.
[Figure 4] Migration process with T-UP
[Figure 4] Migration process with T-UP
Features
Internally, using JAVA and JDBC, connect to source DB and Tibero.
However, both the source DB and Tibero JDBC Driver are required, and JDK or JRE must be pre-installed.
If the Source DB is a heterogeneous RDBMS, the JDBC Driver for the Source DB is also required.
Data is transferred two times through the network, moving from the source DB > T-UP > Tibero. Since Data moves across the networks off both Source DB and Tibero, using T-UP as an intermediary, it may be less advantageous for large-scale migration.
Preliminary Tasks (Optional)
To change the path and name of data files within a tablespace, first extract the creation script and manually set it up in advance.
To change the default tablespace for Schema(=user), first extract the creation script and manually set it up in advance.
For more information about using T-UP, refer to the "T-UP" section in the "Tibero Utility Guide."
Table Migrator
The following is a diagram showing the data migration process using Table Migrator.
[Figure 5] Migration process with Table migtator
Features
Using command-based approach, connect to both the source DB and Tibero internally using JAVA’s JDBC Driver. However, source DB and Tibero JDBC Driver are required, and JDK and JRE must be pre-installed.
A separate computer (client) is not required; it operates on either the source database server or the Tibero server.
Since an intermediate server is not required, data moves through the network only once.
Preliminary Tasks (Mandatory)
The tables to be migrated must be created before migrating the database using Table Migrator.
If Table Migrator Guide is needed, please contact the TmaxTibero Technical Support Team.
DB Link
The following is a diagram showing the data migration process using DB Link.
[Figure 6] Migration process with DB Link
Features
Create a DB Link object on either the source database or Tibero.
Since no intermediate server is required, data transfers through the network only once.
It allows migrating a single table's data at a time, making it advantageous for migrating large tables.
Preliminary Tasks (Mandatory)
DB Link configuration must be executed before migrating the database using DB Link.
If the source DB is Oracle, configuring Tibero to Oracle is recommended, as it has fewer limitations.
For more information about configuring the DB Link, refer to the "DB Link Guide".
tbLoader
The following is a diagram showing the data migration process using tbLoader.
[Figure 7] Migration process with tbLoader
Features
Data can be converted into a SAM file and loaded in a single operation.
It is advantageous for large data migrations.
Preliminary Tasks (Mandatory)
Before migrating the database using tbLoader, a text file (SAM file) must be created in advance on the source database and copied to the Tibero server.
For more information about using tbLoader, refer to the "tbLoader" in Tibero utility guide.
Manual Migration
The following is a diagram showing the data migration process using a manual migration.
[Figure 8] Manual migration process
Features
This method involves extracting scripts from the source DB using a client tool and manually applying them to Tibero.
Since data cannot be manually migrated, a tool such as T-UP is used for data migration.
If an issue occurs during the process, it can be resolved before proceeding to the next step.
Preliminary Tasks (Mandatory)
Before the manual migration, the DDL creation scripts must be extracted in advance using a client tool.
Refer to this guide for instructions on manual migration.
Considerations for migration methods
The following are considerations when applying migration methods.
Migration can be performed by combining multiple methods rather than using just one approach.
Minimal downtime is required when transitioning actual operations at the client site.
The client should test each migration method and measure the time required to ensure the shortest possible migration time.
Methods
Application Timing
Introduction to Tibero
It describes the basic concepts, processes, and directory structures of Tibero.
Tibero, which manages massive data and ensures a stable business continuity, provides the following key features required for the RDBMS environment.
Key Features
Configuring HugePage
This chapter describes how to configure HugePage for each operating system.
Linux
This section describes how to configure HugePage in Linux.
Root permission is required.
$ oslevel -r
7100-04
CRITICAL
NONE
BY SUBPARTITION
FOR QUERY HIGH
Red Hat Enterprise Linux 8.8
Red Hat Enterprise Linux 8.9
Red Hat Enterprise Linux 8.10
Red Hat Enterprise Linux 9.3
Red Hat Enterprise Linux 9.4
Oracle Linux 8.6
Oracle Linux 8.7
Oracle Linux 8.8
Oracle Linux 8.9
Oracle Linux 8.10
Oracle Linux 9.3
Oracle Linux 9.4
Rocky Linux 8.6
Rocky Linux 8.8
Rocky Linux 8.9
Rocky Linux 8.10
Rocky Linux 9.3
Rocky Linux 9.4
ProLinux 7.5
ProLinux 8.5
CentOS 7
64 bits
AIX
1 GB
2 GB
500 MB
2.5 GB / 400 MB
JDK 1.5.17 or later
10
SQL_STAT_HISTORY_THRESHOLD
50
100
GROUP_BY_SORT_TREE_NODE_DUMP_MAKE_NEW
NO
GROUP_BY_SORT_TREE_NODE_DUMP_MAKE_RE
SULT
NO
SEQUENCE_PIN_BUCKET_CNT
100
USE_SQL_STAT_HIST_IN_BG_PROC
NO
USE_TRUNCATE_OBJ_PRIVILEGE
NO
CLOB
NUMBER
REAL NUMBER
NUMBER
SMALLMONEY
NUMBER(10,4)
MONEY
NUMBER(19,4)
SMALLDATETIME
DATE or TIMESTAMP
DATETIME
DATE or TIMESTAMP
CHAR(N)
CHAR(N)
VARCHAR(N)
VARCHAR(N)
UNICHAR(N)
NCHAR(N)
UNIVARCHAR(N)
NVARCHAR(N)
NCHAR(N)
NCHAR(N)
NVARCHAR(N)
NVARCHAR(N)
BINARY(N)
CLOB
VARBINARY(N)
BLOB
BIT
NUMBER(1) or CHAR(1)
TEXT CLOB
CLOB
IMAGE
BLOB
CHAR
VARCHAR
VARCHAR
VARCHAR2
VARCHAR2
(It is created as VARCHAR internally but functions the same as Oracle's VARCHAR2)
NCHAR
NCHAR
NVARCHAR
NVARCHAR
NVARCHAR2
NVARCHAR2
(It is created as NVARCHAR internally but functions the same as Oracle's NVARCHAR2)
BLOB
BLOB
CLOB
CLOB
NCLOB
NCLOB
LONG
LONG
NUMBER
NUMBER
NUMERIC
NUMERIC
(It is created as NUMBER internally)
INT
INT
(It is created as NUMBER internally)
DECIMAL
DECIMAL
(It is created as NUMBER internally)
DOUBLE
NUMBER
FLOAT
FLOAT
(It is created as NUMBER internally)
REAL
REAL
(It is created as NUMBER internally)
SMALLINT
SMALLINT
(It is created as NUMBER internally)
BINARY_FLOAT
NUMBER
BINARY_DOUBLE
NUMBER
DATE
DATE
TIMESTAMP
TIMESTAMP
BFILE
Tibero does not support BFILE, so bypass by using BLOB
RAW
RAW
LONG RAW
LONG RAW
XMLTYPE
XMLTYPE
(Syntax changes are required as the creation syntax differs slightly: Oracle uses SYS.XMLTYPE, while Tibero uses XMLTYPE)
Oracle : SYS.XMLTYPE, Tibero : XMLTYPE)
GEOMETRY
GEOMETRY
VARCHAR(MAX)
CLOB
NVARCHAR(MAX)
NCLOB
VARBINARY(MAX)
BLOB
UNIQUEIDENTIFIER
VARCHAR
SQL_VARIANT LONG
RAW
BIGINT
NUMBER
TINYINT NUMBER
NUMBER
SMALLINT NUMBER
NUMBER
INT NUMBER
NUMBER
NUMERIC(P,S)
NUMBER(n,n)
DECIMAL(P,S)
NUMBER(n,n)
FLOAT(PRECISION)
NUMBER
NTEXT
DOUBLE(PRECISION)
-h, --help
Displays the help page.
shapefile name
Name of a .shp file that already exists.
table name
Name of a table in the database where data is loaded with tbLoader.
idcol
Name of a column that is created using the record number of a .shp file, not a .dbf
file. If omitted, a new column is not created.
endian
Endian information (big or little) to be used in the created geometry type. The default value is the endian of the machine.
multipolygon
Option to convert the polygon type of the .shp file to the multipolygon type. Set to N to convert to the polygon type.
option
Option to use.
username
Database user name.
password
Database user password.
database name
Database name.
query
Query of specifying GEOMETRY to be loaded to a shapefile. Query results must have the same type of GEOMETRYs.
-f, --file
Name of a shapefile to create. (Default value: shape) .shp, .shx, and .dbf files are created with the specified name. The shapefile's path can be specified. If a file name is specified without a path, the file is created in the path where the command is executed.
-g, --geom
Name of a column to convert to a shapefile when there are multiple GEOMETRY columns in a table. (Default value: geom)
-h, --help
Displays the help page.
option
Option to use.
username
Database user name.
password
Database user password.
database name
Database name.
shapefile
Name of a .shp file that already exists.
-t, --table
Name of a table to convert a shapefile to. The default value is the same name with the shape file.
-f, --file
Name of a shapefile to create. (Default value: shape) .shp, .shx, and .dbf files are created with the specified name. The shapefile's path can be specified. If a file name is specified without a path, the file is created in the path where the command is executed.
-d, --drop
Option to drop a table that has the same name with a table to create. If this option is enabled, the existing table is dropped and a new table is created with the name.
-i, --idcolumn
Name of an ID column of a table to create.
-e, --endian
Endian information (big or little) to be used in the created geometry type. The default value is the endian of the machine.
-p, --polygon
Option to not convert the type of GEOMETRY objects from POLYGON to MULTIPOLYGON. If this option is enabled, POLYGON type objects are not converted to MULTIPOLYGON.
8-bit International Standard Multilingual (Default
value)
UTF16
16-bit International Standard Multilingual
Korean
EUCKR
EUC 16-bit Korean
MSWIN949
MS Windows Code Page 949 Korean
English
ASCII
ASCII 7-bit English
Japanese
SJIS
SHIFT-JIS 16-bit Japanese
SJISTILDE
SHIFT-JIS 16-bit Japanese Including Fullwidth
Tilde
JA16SJIS
MS Windows Code Page 932 Japanese
JA16SJISTILDE
MS Windows Code Page 932 Japanese Including
Fullwidth Tilde
JA16EUC
EUC 24-bit Japanese
JA16EUCTILDE
EUC 24-bit Japanese
Chinese
GBK
MS Windows Code Page 936 Chinese
GB18030
Chinese National Standard GB18030-2000
Chinese, Hong Kong, Taiwanese
ZHT16HKSCS
HKSCS2001 Hong Kong
ZHT16BIG5
BIG5 Code Page Chinese
ZHT16MSWIN950
MS Windows Code Page 950 Chinese
EUCTW
EUC 32-bit Traditional Chinese
Vietnamese
VN8VN3
VN3 8-bit Vietnamese
Thai
TH8TISASCII
Thai Industrial Standard 620-2533 - ASCII 8-bit
Eastern European
EE8ISO8859P2
ISO8859-2 Eastern European
Western European
WE8MSWIN1252
MS Windows Code Page 1252 Western European
WE8ISO8859P1
ISO8859-1 Western European
WE8ISO8859P9
ISO8859-9 Western European (Turkish)
WE8ISO8859P15
ISO8859-15 Western European
Russian, Bulgarian
CL8MSWIN1251
MS Windows Code Page 1251 Cyrillic Script
CL8KOI8R
KOI8-R Cyrillic Script
CL8ISO8859P5
ISO8859-5 Cyrillic Script
RU8PC866
IBM-PC Code Page 866 8-bit Cyrillic Script
Greek
EL8ISO8859P7
ISO8859-7 Greek
EL8MSWIN1253
MS Windows Code Page 1253 8-bit Greek
Arabic
AR8ISO8859P6
ISO8859-6 Arabic
AR8MSWIN1256
MS Windows Code Page 1256 8-bit Arabic
Hebrew
IW8ISO8859P8
ISO8859-8 Hebrew
Warning
Linux supports Transparent Huge Pages (THP), a capability to automatically increase the memory size according to the memory usage patterns in the OS.
THP allows not only shared memory but also process memory to run as HugePage, and this may affect the system performance. Therefore, it is recommended to disable the THP capability by setting the relevant kernel parameter to 'never'.
Enabling HugePage
The following describes how to enable HugePage.
Check the size of HugePage supported in the current OS.
Check the user group ID that runs Tibero.
Apply the groups and number that will allocate HugePage in "/etc/sysctl.conf"
Kernel Parameter
Description
Expression
vm.nr_hugepages
Number of HugePages.
Size of [TOTAL_SHM_SIZE / HugePage size].
vm.hugetlb_shm_group
Group ID that will allocate HugePage.
User group ID that runs Tibero.
Note
Since the minimum value of vm.nr_hugepages for starting only database instances is
[TOTAL_SHM_SIZE / HugePage size], you should consider other programs running on the OS and
adjust the value accordingly, in consultation with an OS engineer.
The following is an example of applying the kernel parameter when TOTAL_SHM_SIZE is set to 1024 MB and the size of HugePage supported by the current OS is 2 MB (2048 KB).
Apply the maximum locked memory value in "/etc/security/limits.conf".
Value
Expression
memlock
HugePage size * number of HugePages
The following is an example of configuring the memlock value.
Restart the operating system.
The modified HugePage value has been applied.
Configure the Tibero initialization parameters in the configuration file (.tip).
Initialization Parameter
Value
TOTAL_SHM_SIZE
HugePage size * HugePage count
USE_HUGE_PAGE
Y
The following is an example of configuring the initialization parameters.
Restart the Tibero server.
Disabling HugePage
To disable HugePage, restore the values that were modified to enable HugePage to their original values. The modified values can be restored by the same process and order used to enable HugePage.
AIX
AIX uses Large Page instead of HugePage. The benefits of using Large Page are similar to those of HugePage.
Enabling HugePage
The following describes how to enable HugePage.
1. Change the Large Page configuration value of the OS.
AIX internally maintains physical memory pool sizes of 4 KB and 16 MB. The size of this pool can be changed to 16 MB by using the vmo command. The remaining space is automatically allocated to the 4 KB pool. From AIX 5.3 on, Large Page pools are dynamically maintained, so the system does not need to be restarted after changing the size.
First, v_pinshm must be separately configured so that the space in which the shared memory is allocated is not swapped to disk. percent_of_real_memory is the amount of memory that TSM possesses as a percentage of the total memory.
Configure the Large Page pool size. num_of_lage_pages is an integer and is equal to TSM / 16 MB.
2. Configure user permissions.
According to the security policy, all users (except the root user) must have the CAP_BYPASS_RAC_VMM permission to use Large Page. The permission can be configured by using the chuser command.
3. Configure the following Tibero initialization parameters in the environment configuration file (.tip).
Initialization Parameter
Value
TOTAL_SHM_SIZE
1 GB (Default value)
USE_HUGE_PAGE
Y
The following example configures the initialization parameters.
4. Restart the Tibero server.
Disabling Large Page
To disable Large Page, restore the values that were modified to enable Large Page to their original values.
Solaris
The functionality of HugePage can be applied by using the ISM (Intimate Shared Memory) function through Large Page.
The advantages of using ISM are as follows:
ISM shared memory is automatically locked by the OS when it is created. This ensures that the memory segment is not swapped to disk. It also allows the kernel to use a fast locking mechanism for I/O of the shared memory segment.
The memory structure used to convert the kernel's virtual memory address into a physical memory address is shared between multiple processes. This sharing reduces CPU consumption and conserves kernel memory space.
Large Page supported in the system's MMU (Memory Management Unit) is automatically allocated in the ISM memory segment. This allocation improves system performance by conserving memory space for managing pages and by simplifying virtual memory address conversion.
Enabling HugePage
To enable HugePage, configure the server initialization parameter as follows.
The parameter is only valid in Solaris and the default value is Y.
If this function is turned on, shmget is used to create shared memory and the SHM_SHARED_MMU option is added when attaching with shmat. This function is only applied in the server process and the listener process. The client module that attaches the server's TSM does not use this option. However, if the parameter is not set to Y, change the value to Y and restart the Tibero server.
Disabling HugePage
Set the server initialization parameter _USE_ISM to N and then restart the Tibero server.
Recommended Settings
Tibero does not restrict the size of HugePage, which can be set within the range allowed by different operating systems.
The recommended settings are as follows:
For small memory (less than 64GB): 4MB
For large memory (more than 64GB): 16MB
LOAD DATA
INFILE 'test_table.dat'
LOGFILE 'test_table.log'
BADFILE 'test_table.bad'
APPEND
INTO TABLE test_table
FIELDS TERMINATED BY ','
OPTIONALLY ENCLOSED BY '"'
ESCAPED BY '\\'
LINES TERMINATED BY '\n'
LOBFILE LOAD PARTIALLY DELIMITED BY ';'
GEOMETRY LOAD AS BLOB
(ID, FIPSSTCO, TRACT2000, BLOCK2000, STFID, geom OUTFILE)
CM information
===============================================================
CM NAME : cm0
CM UI PORT : 8635
RESOURCE FILE PATH : /home/tibero7/cm0_res.crf
CM MODE : GUARD ON, FENCE OFF
LOG LEVEL : 2
===============================================================
tbdown
tbcm -d
$ rm –rf $TB_HOME
tbdown
tbcm -d
rm –rf $TB_HOME
$ tbboot -C
Available character set list
ASCII
CL8ISO8859P5
CL8KOI8R
CL8MSWIN1251
EE8ISO8859P2
EUCKR
......Omitted......
Available nls_date_lang set list
AMERICAN
BRAZILIAN PORTUGUESE
JAPANESE
KOREAN
......Omitted......
$ tbdown
Tibero instance terminated (NORMAL mode).
$ tbboot
Listener port = 8629
Change core dump dir to /home/tibero/tibero7/instance/tibero.
Tibero 7
TmaxData Corporation Copyright (c) 2008-. All rights reserved.
Tibero instance started up (NORMAL mode).
$ vmo r o v_pinshm=1
$ vmo r o maxpin%=percent_of_real_memory
$ vmo p o lgpg_regions=num_of_lage_pages o lgpg_size=16 MB
$ tbdown
Tibero instance terminated (NORMAL mode).
$ tbboot
Listener port = 8629
Change core dump dir to /home/tibero/tibero7/instance/tibero.
Tibero 7
TmaxData Corporation Copyright (c) 2008-. All rights reserved.
Tibero instance started up (NORMAL mode).
USE_ISM=Y
_USE_ISM=N
LOB type
CLOB, BLOB
LOB type. This object can have far larger length than the maximum length (8 KB) of other data types. It is possible to store up to 4GB.
Embedded type
ROWID
Type of column which is automatically inserted by Tibero in rows, even though a user has not declared it explicitly.
DATE
Date, time, and timezone.
TIME TIMESTAMP
TIMESTAMP WITH TIME ZONE
TIMESTAMP WITH LOCAL TIME ZONE
- DATE: specific date
- TIMESTAMP: specific date and time
- TIMESTAMP WITH TIME ZONE: specific time and timezone that are standardized with Coordinated Universal Time (UTC)
- TIMESTAMP WITH LOCAL TIME ZONE: specific date and time that are standardized with Coordinated Universal Time (UTC)
TERVAL YEAR TO MONTH INTERVAL DAY TO SECOND
Time intervals.
- INTERVAL YEAR TO MONTH: An interval between times which is based on years and months.
- INTERVAL DAY TO SECOND: An interval between times which is based on days, hours, minutes, seconds, and decimal seconds.
CLOB BLOB
Large character strings and binary data. Multiple columns can be declared in one table.
ROWID
Automatically given to each row by Tibero system in order to identify the row within database. Includes a physical position of each row.
SQLREAL
float
SQLDOUBLE, SQLFLOAT
double
DATE_STRUCT, SQL_DATE_STRUCT
TIME_STRUCT, SQL_TIME_STRUCT
TIME_STAMP_STRUCT, SQL_TIMESTAMP_STRUCT
Character type
CHAR, VARCHAR, NCHAR, NVARCHAR, RAW, LONG,
LONG RAW
Character strings or binary data. It is possible for LONG and LONG RAW Data types to store up
to 2GB.
Numeric type
NUMBER, INTEGER, FLOAT, BINARY_FLOAT,
BINARY_DOUBLE
Integers or real numbers.
Date type
DATE, TIME, TIMESTAMP, TIMESTAMP WITH TIME ZONE, TIMESTAMP WITH
LOCAL TIMEZONE
Time, date, or timezone.
Interval type
INTERVAL YEAR TO MONTH, INTERVAL DAY TO SECOND
CHAR
VARCHAR
General character strings.
NCHAR
NVARCHAR
Unicode character strings.
RAW
Binary data.
LONG
LONG RAW
Large character strings and binary data. A single column can be declared in one table.
NUMBER INTEGER FLOAT
Integers and real numbers. When declaring the NUMBER type, precision and scale can be declared as well.
- Precision: The total number of digits of the data value
- Scale: The number of places after the decimal point
BINARY_FLOAT BINARY_DOUBLE
Integers and real numbers.
– BINARY_FLOAT: 32-bit floating point type
– BINARY_DOUBLE: 64-bit floating point type
SQLCHAR
unsigned char
SQLSCHAR
signed char
SQLSMALLINT
short int
SQLUSMALLINT
unsigned short int
SQLINTEGER
long int
SQLUINTEGER
unsigned long int
Time intervals.
TAS File
A log for TAS metadata.
NORMAL
2-way mirroring
HIGH
3-way mirroring
EXTERNAL
No mirroring
Under 20,000
1AU
20,000 ~ 40,000
4AU
Over 40,000
16AU
COMM
Processes messages that ASSD control thread receives. It sends a message of requesting information in a database, or processes a request and returns
the result in TAS.
DMON
Continuously checks whether a disk is accessible. If it fails more than specific times, it is treated as FAIL. If the access becomes possible, this thread processes resynchronization. This thread executes in a single node among TAS nodes. The node is called TAS master node. If the mast node fails,
another node becomes a master node.
RBAL
Creates tasks required for rebalancing and sends them to the RBSL thread.
RBSL
Receives tasks required for rebalancing from the RBAL thread and processes
[Figure 2] Configuration of Tibero and TAC using the Cluster Function
[Figure 3] TAS File Allocation
It supports whole, user, and table-level migrations, and its GUI format makes it easy to operate.
The migration process continues even if an issue occurs in the middle, with any issues being addressed only after the migration is fully completed.
It allows migrating a single table's data at a time, making it advantageous for migrating large tables.
Conditional clauses or partitioned tables can also be used.
The process can be automated by integrating with shell script.
T-UP
Uses as a tool for data migration for a simple migration with a GUI (total or user mode) or during a manual migration.
Table Migrator
Uses for migrating large table data and DB Link configuration is complex.
DB Link
Uses for migrating large table data when Table Migrator cannot be used.
tbLoader
Uses when SAM file creation is possible in the source database.
Manual migration
Uses when the migration complexity is high that other migration methods are difficult to apply, or when the same migration needs to be performed repeatedly over a specific period.
(Using automation scripts makes it easier for the second and subsequent repetitions.)
[Figure 5] Migration process with Table migtator
{Figure 6] Migration process with DB Link
[Figure 7] Migration process with tbLoader
[Figure 8] Manual migration process
Distributed Database Link
This feature stores data in a different database instance. By using this function, a read or write operation can be performed for data in a remote database across a network.
Data Replication
This function copies all changed contents of the operating database to a standby database. This operation is done simply by sending change logs through a network to a standby database, which then applies the changes to its data.
Database Clustering
This function addresses the biggest issues of high availability and high performance for any enterprise DB. To achieve this, Tibero DB implements a technology called Tibero Active Cluster.
Database clustering allows multiple database instances to share a database with a shared disk. It is important that clustering maintains consistency among the instances' internal database caches. This is also implemented in Tibero Active Cluster.
Note
For more detailed information, refer to 'Tibero Active Cluster' in Tibero Administrator's Guide.
Parallel Query Processing
Data volumes for businesses are continually increasing. For this reason, it is necessary to have parallel processing technology which enables maximum usage of server resources for massive data processing.
To meet these needs, Tibero supports transaction parallel processing functions optimized for Online Transaction Processing (OLTP) and SQL parallel processing functions adapted for Online Analytical Processing (OLAP). This improves query response time to support quick decision making for business.
Query Optimizer
The query optimizer decides the most efficient plan by considering various data handling methods based on statistics for the schema objects.
Query optimizer performs the following:
Creates various execution plans to process given SQL statements.
Calculates each execution plan's cost by considering statistics for how much data is distributed, tables, indexes, and partitions as well as computer resources such as CPU and memory.
Note
The cost is the relative time needed to perform a certain execution plan.
Optimizer also calculates the cost by considering computer resources such as I/O, CPU and memory.
Selects the lowest cost execution plan.
Main features of the query optimizer are as follows:
Purpose of the query optimization
The final purpose of the query optimizer can be changed. The following table shows two examples.
Classification
Description
Total processing time
Query optimizer can reduce the time to retrieve all rows by using the ALL_ROWS hint.
Initial response time
Query optimizer can reduce the time to retrieve the first row by using the FIRST_ROWS hint.
Query transformation
A query can be transformed to make a better execution plan. The following are examples of query transformation: merging views, unnesting subqueries, and using materialized views.
Determining a data access method
Retrieving data from a database can be performed through a variety of methods such as a full table scan, an index scan, or a rowid scan. Because each method has different benefits depending on the amount of data and the filtering type, the best data access method may vary.
Determining a join handling method
When joining data from multiple tables, the order in which to join the tables and a join method such as a nested loop join, merge join, and hash join must be determined. The order and method have a large effect on performance.
Cost estimation
The cost of each execution plan is estimated based on statistics such as predicate selectivity and the number of data rows.
Basic Properties
Tibero guarantees reliable and consistent database transactions, which are logical sets of SQL statements, by supporting the following four properties.
Atomicity
Each transaction is all or nothing; all results of a transaction are applied or nothing is applied. To accomplish this, Tibero uses undo data.
Consistency
Every transaction complies with rules defined in the database regardless of its result, and the database is always consistent. There are many reasons why a transaction could break a database's consistency. For example, an inconsistency occurs when a table and an index have different data. To deal with this problem, Tibero prevents only a part of a transaction from being applied. Therefore, even if a table has been modified and a related index has not, other transactions can see the unmodified data. The other transactions assumes that there is consistency between the table and the index.
Isolation
A transaction is not interrupted by another transaction. When a transaction is processing data, other transactions wait to access the data and any operation in another transaction cannot use the data.However, no error occurs even in this case. To accomplish this, Tibero uses two methods: multi-version concurrency control (MVCC) and row-level locking. When reading data, MVCC can be used without interrupting other transactions. When modifying data, row level fine-grained lock controls can be used to minimize conflicts and to make a transaction wait.
Durability
Once a transaction has been committed, it must be permanent even if there is a failure such as a power loss or a breakdown. To accomplish this, Tibero uses redo logs and write-ahead logging. When a transaction is committed, relevant redo logs are written to disk to guarantee the transaction's durability. Before a block is loaded on a disk, the redo logs are loaded first to guarantee the database consistency.
Process Structure
Tibero has a multi-process and multi-thread based architecture, which allows access by a large amount of users.
The following figure shows the process structure of Tibero:
[Figure 1] Tibero Process Structure
Tibero has the following three processes:
Listener
Worker Process or Foreground Process
Background Process
Listener
Listener receives requests for new connections from clients and assigns them to an available worker process. Listener plays an intermediate role between clients and worker process using tblistener, an independent executable file. Starting in Tibero 6, listeners are created by MONP, and they are created again when they are forcibly terminated.
A new connection from a client is processed as follows (refer to [Figure 1]).
Listener searches for a worker process that has an available worker thread and then sends the connection request to the worker process (①).
As the connection is assigned with a file descriptor, the client starts operations as if it has been connected to the worker thread from the start regardless of a server’s internal operation.
A control thread that receives a request from listener checks the status (②) of worker threads included in the same worker process and assigns an available worker thread (③) to the connection from the client.
The assigned worker thread and the client are authenticated before starting a session (④).
Worker Process
A worker process communicates with client processes and handles user requests. Tibero creates multiple working processes when a server starts to support connections from multiple client processes. The number of these processes can be adjusted by setting the initialization parameter WTHR_PROC_CNT. Once Tibero RDBMS starts, this number cannot be modified. You need to set the number properly according to the system environment.
Starting in Tibero 6, worker processes are divided into two groups based on their purpose.
A background worker process performs the batch jobs registered in an internal task or job scheduler, while a foreground worker process performs online requests sent through the listener. The groups can be adjusted using MAX_BG_SESSION_COUNT, an initialization parameter.
Note
For more information about initialization parameters, refer to "Tibero Reference Guide".
For efficient use of resources, Tibero executes tasks by thread. In Tibero, a single worker process contains one control thread and ten worker threads by default.
The number of worker threads per process can be adjusted by setting the initialization parameter WTHR_ PER_PROC. This number also cannot be modified once the Tibero starts up, as with WTHR_PROC_CNT.
Rather than arbitrarily modifying the WTHR_PROC_CNT and WTHR_PER_PROC values, it is recommended to use the maximum session count provided by the server which is set using the MAX_SESSION_COUNT initialization parameter.
The WTHR_PROC_CNT and WTHR_PER_PROC values are automatically set according to the MAX_SESSION_ COUNT value. If you set WTHR_PROC_CNT and WTHR_PER_PROC on your own, the result of multiplying these two values must be equal to the value of MAX_SESSION_COUNT.
MAX_BG_SESSION_COUNT must be smaller than MAX_SESSION_COUNT, and must be a multiple of WTHR_ PER_PROC.
A worker process performs jobs using the given control thread and worker threads.
Control Thread
Each worker process has one control thread, which plays the following roles:
Creates as many worker threads as specified in the initialization parameter when Tibero is started.
Allocates a new client connection to an idle worker thread when requested.
Checks signal processing.
Tibero supports I/O multiplexing and performs the role of sending and receiving messages instead of worker threads.
Worker Thread
A worker thread communicates one-on-one with a client It receives and process messages from a client and returns the result. It processes most DBMS jobs such as SQL parsing and optimization. As a worker thread connects to a single client, the number of clients that can simultaneously connect to Tibero RDBMS is equal to WTHR_PROC_CNT multiplied by WTHR_PER_PROC. Tibero RDBMS does not support session multiplexing, witch means a single client connection represents a single session. Therefore, the maximum number of sessions is also equal to WTHR_PROC_CNT multiplied by WTHR_PER_PROC.
The worker thread does not disappear even if it is disconnected from the client. It is created at startup of Tibero and continues to exist until the database shuts down. In this architecture, creating or deleting threads at each reconnection to the client is not necessary no matter how many reconnection occurs, and therefore the overall system performance can be improved.
However, threads must be created as many as the value specified to the initialization parameter even if the actual number of client is smaller. This continuously consumes the OS's resources, but the proportion of resources required to maintain a single active thread in the overall s
ystem is very insignificant, so the system operation is not affected that much.
Caution
A large number of worker threads concurrently attempting to execute tasks may create an excessive load on the OS, which can significantly reduces the system performance.
When implementing a large-scale system, therefore, it is recommended to configure a 3-Tier architecture by installing middleware between Tibero and the client application.
Background Process
Background processes are independent processes that primarily perform time-consuming disk operations at specified intervals or at the request of a worker thread or another background process.
The following are the processes comprising the background process group:
Monitor Process (MONP)
An independent, fully-fledged process. Starting from Tibero 6, it is no longer a 'thread' but a 'process'. It is the first process created after Tibero starts and also the last process to finish when Tibero terminates.
The monitor thread creates other processes, including a listener when Tibero starts. It also periodically checks each process status and deadlocks.
Tibero Manager Process (MGWP)
A process intended for system management. MGWP receives a manager's connection request and allocates a thread that is reserved for system management. MGWP basically performs the same role as a worker process but it directly handles the connection through a special port. Only the SYS account is allowed to connect to the special port.
Agent Process (AGNT)
A process used to perform internal tasks of TTibero required for system maintenance.
Until version 4SP1, this process stored sequence cache values to disk, but starting in Tibero 5, each worker thread stores them individually. The name "SEQW" was changed to "AGNT" starting in Tibero 6.
In Tibero 6, AGNT runs based on a multi-threaded structure, and threads are allocated per workload.
Note
For more details on how to use the sequence process, refer to 'Creating, Changing, and Deleting Sequences' in "Tibero Administrator's Guide".
DataBase Wirte Process (DBWR)
A collection of threads that record database updates on the disk. DBWR includes threads that periodically record user-changed blocks onto disk, threads for recording redo logs onto disk, and check point threads for managing the check point process of the database.
Recovery Worker Process (RCWP)
A process dedicated to recovery and backup operations. During startup, it advances the runlevel subsequent to NOMOUNT mode and performs a recovery by reading redo logs after determining the necessity of a recovery. Executing backup operations with tbrmgr or a media recovery with backup versions is also covered by this process.
Parallel Execution Worker Process (PEWP)
A parallel execution-dedicated process (PEP). When processing PE SQL, one PEP allocates multiple WHTRs in order to maximize the locality. Also, this process is separated from WTHRs for normal client sessions, allowing an easy monitoring and management.
TEXT Indexes
This chapter describes how to create and drop TEXT indexes and explains relevant objects and constraints.
Tibero TEXT improves the performance of queries for text data. It provides the CTXCAT index to rapidly process search queries for columns that include relatively simple information, such as book titles and product names, and the CONTEXT index to index a large volume of data such as text of books.
CTXCAT Indexes
The following describes how to create and drop CTXCAT indexes and explains relevant objects and constraints.
Creating Indexes
Create CTXCAT indexes as follows:
Usage
Item
Description
Note
For detailed information about index configuration preferences and classes, please refer to “”.
Example
Caution
Do not set a table name to 'TEXT'. When executing TEXT index related queries, 'TEXT' is used internally as a package name.
Dropping Indexes
Drop TEXT indexes as follows. The way is the same as for other indexes.
Usage
Item
Description
Example
Index-related Objects
The following objects are created when a CTXCAT index is created.
Name
Type
Description
Index Constraints
CTXCAT indexes have the following constraints.
● A single CTXCAT index cannot be used for multiple columns.
● TEXT indexes cannot be partitioned.
● TEXT indexes can only be created for VARCHAR2 columns.
CONTEXT Indexes
The following describes how to create and drop CONTEXT indexes and explains relevant objects and constraints.
Creating Indexes
Create the CONTEXT index as follows:
Usage
Item
Description
Note
For detailed information about index configuration preferences and classes, please refer to "”.
Example
Caution
Do not set a table name to 'TEXT'. When executing TEXT index related queries, 'TEXT' is used internally as a package name.
Dropping Indexes
Drop TEXT indexes as follows. The way is the same as for other indexes.
Usage
Item
Description
Example
Index-related Objects
The following objects are created when a CONTEXT index is created.
Name
Type
Description
Index Constraints
CONTEXT indexes have the following constraints.
A single CONTEXT index cannot be used for multiple columns.
CONTEXT indexes cannot be global partitioned. But, global non-partitioned indexes can be created.
When BASIC_LEXER is used, CONTEXT indexes can only be created for VARCHAR2 and CLOB columns.
Spatial Structure
This chapter describes schema objects related to Tibero Spatial.
Tables
The following describes each table.
Table
Description
Stores metadata of Spatial Reference System used in a database.
SPATIAL_REF_SYS_BASE
Stores metadata of Spatial Reference System used in a database.
Columns
Column
Data Type
Description
References
View
This section describes views associated with a metadata table of Spatial Reference System.
The following describes each view.
View
Description
ALL_GEOMETRY_COLUMNS
Contains metadata of all GEOMETRY columns which are registered in the database. This view is set according to the OGC standard.
Columns
Column
Data Type
Description
References
SPATIAL_REF_SYS
Contains Spatial Reference System information used in a database.
Columns
All columns in the SPATIAL_REF_SYS_BASE table except for the OWNER column.
References
USER_GEOMETRY_COLUMNS
Contains GEOMETRY columns of all tables owned by the current user.
Columns
Same as in the ALL_GEOMETRY_COLUMNS view.
References
Procedures
This section describes procedures used to manage a metadata table of Spatial Reference System.
The following describes each procedure.
Procedure
Description
REGISTER_SRS
Registers Spatial Reference System metadata to the SPATIAL_REF_SYS_BASE table.
The following is the details.
Prototype
Parameters
Parameter
Description
UNREGISTER_SRS
Unregisters Spatial Reference System metadata from the SPATIAL_REF_SYS_BASE table.
The following is the details.
Prototype
Parameters
Parameter
Description
Release note_7.1
This chapter briefly describes newly added and updated features in Tibero 7.1.
New Features
This section lists and briefly describes newly added features.
TEXT Queries
This chapter describes queries that use Tibero TEXT functions.
CATSEARCH
The CATSEARCH function is used in a WHERE clause of a SELECT statement to use CTXCAT indexes.
CREATE INDEX idx_name on [sch_name.]tbl_name (col_name) CTXCATINDEX
[PARAMETERS('preferences_class_name user_defined_preference_name')]
SQL>create table t(name varchar(400));
Table 'T' created.
SQL>create index t_idx on t(name) ctxcatindex;
Index 'T_IDX' created.
DROP INDEX index_name
SQL>drop index t_idx;
Index 'T_IDX' dropped.
CREATE INDEX idx_name on [sch_name.]tbl_name INDEXTYPE IS CTXSYS.CONTEXT
parameters('preferences_class_name user_defined_preference_name sync(option)')
SQL>create table t(name varchar(400), value varchar(1000));
Table 'T' created.
SQL>create index t_idx on t(name) indextype is ctxsys.context
parameters('sync(on commit)');
Index 'T_IDX' created.
SQL>create index t_idx2 on t(value) indextype is ctxsys.context
parameters('sync(every sysdate+1/24/60)');
Index 'T_IDX2' created.
DROP INDEX index_name
SQL>drop index t_idx;
Index 'T_IDX' dropped.
EXEC REGISTER_SRS
(
SRID IN INTEGER,
AUTH_NAME IN VARCHAR2,
AUTH_SRID IN INTEGER,
SRTEXT IN VARCHAR2,
PROJ4TEXT IN VARCHAR2
);
EXEC UNREGISTER_SRS
(
AUTH_NAME IN VARCHAR2
AUTH_SRID IN INTEGER
);
DBMS Engine
SQL Plan Management
– Prevents performance degradation after an execution plan change.
JSON type
– Stores and processes JSON data.
Fine-grained Auditing
Audits column- or row-level data that meets specific conditions in a table or view. The DBMS_FGA package supports this feature.
For more information, refer to "User Management and Database Security" in Tibero Administrator's Guide.
Flashback Database
– Rewinds the entire database to a specific point in time, without a backup/recovery operation.
– Saves a significant amount of time taken normally for retrieving and recovering backup files to return to a specific point in time.
It generates certain files for writing records to return to an earlier point in time, therefore affects the database performance.
For more information, refer to "Backup and Recovery" in Tibero Administrator's Guide.
TSC(Tibero Standby Cluster)
Snapshot Standby
– Enables independent executions of DDL/DML statements from a certain point of time, while continuing to receive redo logs from a primary node to synchronize with it. When converting back to the primary node, however, all DDL/DML statements that have been executed will be rolled back.
Multi-Node Standby (Multi-Node TSC)
– Ensures high availability between the primary and standby nodes. In read-only mode, queries are distributed across the nodes and this results in a greater query performance.
Cascade Standby (Cascade TSC)
– Transfers redo logs from a standby to another standby, which reduces the network load on the primary node.
For more information, refer to "Tibero Standby Cluster" in Tibero Administrator's Guide.
AWS QuickStarts
– Ensures observer availability.
Splitting Encryption Keys with HSM Devices
– Stores wallet-managed keys to a Hardware Security Module (HSM).
The following HSM devices are supported.
D’Amo KMS (Penta Security)
Vormetric Data Security Manager (Thales)
Measuring and Recording Data for Cloud-Based Tibero Pricing
– Records data for charging cloud license fees.
GOST Encryption Algorithm
GOST as a Tibero encryption algorithm is added.
OLTP Compression
– Compresses tables where occur executions of typical DMLs instead of direct path Insert/Load, in an OLTP environment.
Index Prefix Compression
– Effectively manages the space used by indexes by eliminating duplicate key columns within an index leaf block. You can use this feature when creating or re-creating an index by adding the COMPRESS N clause.
Geometry KNN Computation
– Supports KNN computation.
TAS disk resizing
– Expands the size of an existing disk used in TAS.
TAS disk repair timer
– Automatically drops a failed disk in TAS after a certain period of time.
tbascmd and DDL for Checking TAS Metadata Integrity
A tbascmd command and DDL to check the integrity of metadata about files and disks managed in TAS are added.
Prioritizing Log Flush in SSVR
– Gives preference to log flush over any other jobs in SSVR.
GIS Geography Spatial Coordinates
– Added different spatial coordinate systems and computations that include these coordinates.
New GIS Geometry Features
– Added different types of spatial data including 2D and 3D as well as computations based on these types of data.
Label Security
– Provides row-level data access controls based on associated labels for individual table rows and users.
In-Memory Column Store
– Stores data in memory using a columnar format to optimize data scans on specific columns.
It provides compatibility for NetBackup, a backup/recovery solution by Veritas.
It supports online backup on a standby node, and thereby recovery on a primary node.
The following options have been added or modified.
Option
Description
--interval
Adjusts time intervals in seconds for monitoring and displaying RMGR backup/recovery progress rate.
-v, --verbose
Displays the absolute path of each datafile during an RMGR backup/recovery operation.
-s, --silent
Displays no progress rate of each datafile during an RMGR backup/recovery operation.
-l, --log-level
Sets the logging level for the RMGR history on the client side.
-L
Sets the path to log files for the RMGR history on the client side.
-o
Specifies up to 16 distributed paths for backup/recovery operations.
For more information, refer to "Backup and Recovery" in Tibero Administrator's Guide.
gateway for oracle 19c
– Added Gateway for Oracle 19c.
ESRI shapefile Conversion
– Added tibero2shp, which converts tables into the shapefile format.
Updated Features
This section lists and briefly describes modified and improved key features.
DBMS Engine
Default Character Set
– Changed the default character set of Tibero to UTF8 from MSWIN949.
DBMS_SCHEDULER package
– Improved the overall function of the DBMS_SCHEDULER package and added some of its detail features that were unsupported so far.
TAC Recovery Parallel Reconfiguration
– Redistributes internal resources that are individually managed by each instance for clustering, when a Tibero Active Cluster (TAC) instance goes down or a new instance is added to the active cluster.
– Modified so that multiple threads redistribute resources in parallel, to reduce the overall execution time. Previously, the resource redistribution operation was performed by a single thread.
Usage
Item
Description
column
Column that has a CTXCAT index.
text_query
CATSEARCH query operation, which defines the text to search for.
reserved argument
Reserved for future functionality.
CATSEARCH query operations
The CATSEARCH query supports the following six operations.
Operation
Syntax Example
Description
Logical AND
a b c
Searches for rows that include a, b, and c.
Logical OR
a | b | c
Searches for rows that include a, b, or c.
Logical NOT
a - b
Searches for rows that include a but do not include b.
Cannot be used alone.
" "
"a b c"
Return Values
Return values are NUMBERs that have no meaning.
Examples
The following example creates a table and a CTXCAT index.
The following example inserts data to the table.
The following example searches for data.
CONTAINS
The CONTAINS function is used in a WHERE clause of a SELECT statement to use CONTEXT indexes.
Usage
Item
Description
column
Column that has a CONTEXT index.
text_query
CONTAINS query operation, which defines the text to search for.
reserved argument
Reserved for future functionality.다.
CONTAINS query operations
The CONTAINS query supports the following six operations.
Operation
Syntax Example
Description
Logical AND
a AND b
Searches for rows that include a, b, and c.
Logical OR
a OR b, a | b
Searches for rows that include a or b.
Logical NOT
a ~ b
Searches for rows that include a but do not include b.
SEQUENCE
a b
Return Values
Return values are NUMBERs that have no meaning.
Examples
The following example creates a table and a CONTEXT index and inserts data to the table.
The following example searches for data.
The following example searches for data by using the WITHIN operator. WHITESPACE must be set for the LEXER property.
tbCLI is a Call Level Interface(CLI) provided by Tibero and works as an SQL interface between user application programs and Tibero. Users can use the tbCLI library to create a C or C++ application program which accesses Tibero.
tbCLI is developed based on ODBC (Open Database Connectivity) and X/Open Call Level Interface Standard. tbCLI satisfies all conditions of Level 2 of ODBC and most of conditions of Level 2 of ODBC
3.0. Therefore, the existing application programs written with ODBC or CLI can be easily migrated to the tbCLI environment.
tbCLI is especially useful in a client/server environment, as the following shows.
[Figure 1] Client/Server Environment
If a client application program calls a tbCLI API, the database system processes it and returns the result to the client. Interfaces like tbESQL can be used to process data, but through tbCLI, application programs and data can be manipulated in a more sophisticated way.
The tbCLI has the following features.
Precompiler is not required to create an executable file.
Like tbESQL, tbCLI combines advantages of general program languages and SQL statements. The tbCLI is closer to general programs than tbESQL.
Through tbCLI, modules can be managed efficiently, and readability is enhanced.
No need to bind an application package.
Components
This section describes the basic components a user is required to know before creating or executing the tbCLI program.
tbCLI Handle
Handle is a pointer for one of some major data structures managed by tbCLI. By using a handle, tbCLI can manage complicated data more easily.
The Internal data of a handle is automatically updated when a change occurs to the data structure. Therefore, an application program developer needs neither to know the details of the data structure, nor to access the internal data directly.
tbCLI uses four handles as follows:
Environment handle
Includes data about tbCLI program environment. Includes data such as the current environment state, a list of connection handles allocated to the environment, and error information for the environment.
Connection handle
Includes data about connections with data source. Includes data such as the current connection state, a list of statement handles allocated to the connection, and error information for the connection.
Statement handle
Includes data about an SQL statement that will be executed from the tbCLI program. Includes data such as the current statement state, a list of input parameters and output columns within the statement, and error information for the statement.
tbCLI Function
In order to execute a database job from a tbCLI program, use the tbCLI functions. Most of tbCLI functions receive the target handle as an input parameter and have an SQLRETURN type return code.
The following is a prototype of the SQLExecDirect function among tbCLI functions. The function can execute an SQL statement directly.
tbCLI functions are divided into several groups by functions: functions related to handle allocation and connection, functions related to SQL statement execution, functions related to SQL query results and research, functions related to descriptors, functions related to error information, and functions related to data source information and others.
Refer to the “” for more information about tbCLI functions.
tbCLI Error Message
The tbCLI program gets the execution result by the code returned after executing a tbCLI function, but the user may require more information. In order to offer such information, tbCLI creates a diagnostic record.
Diagnostic record has not only the return code of the executed function but also a variety of information about the execution result.
Header record
Consists of return code, row count, status record count, and executed command type. Except in the case where the return code is SQL_INVALID_HANDLE, if a tbCLI function is executed, the header record is always created.
Status record
Status record includes information about warnings and errors.
Created when the return code is SQL_ERROR, SQL_SUCCESS_WITH_INFO, SQL_NO_DATA, SQL_NEED_DATA, or SQL_STILL_EXECUTING.
One of the most important fields of a status record is SQLSTATE. As standardization of error or warning code, the field values are defined by X/Open and ISP/IEC standards. Format is CCSSS, five-digit character string. CC refers to error class and SSS refers to sub class
A Diagnostic record starts with one head record, and one or more status records are added. In order to get a value from a diagnostic record, the SQLGetDiagRec and SQLGetDiagField functions are required. These two functions only return the diagnostic record information included in the handle given as a parameter. Diagnostic records are used and managed in environment, connection, statement and descriptor handles.
Function
Description
Refer to “” for further details on error messages.
Program Structure
The tbCLI program has basically the following structure.
[Figure 2] tbCLI program structure
Starting setting
SQL query execution and error handling
Ending setting
Starting setting
Before starting a tbCLI program, perform initialization settings. To perform initialization settings, allocate the environment and connection handles, and then implement an actual connection to a datasource. Here, a datasource refers to the whole composition of software and hardware of Tibero.
Starting a tbCLI program is as follows:
[Ex. 1] tbCLI Starting Settings for tbCLI Program
①, ② Allocate the environment handle and the connection handle for initialization settings.
③ Connect to a datasource through SQLConnect function.
In order to call this function, data source name (ds_name), user name (user), and password (passwd) must also be sent as parameters. In addition to this, parameter length must also be set up. In , the null-terminating string, namely SQL_NTS, is set up instead of length.
④ (4) If a datasource is connected, the tbCLI program must allocate at least one statement handle in order to execute an SQL statement.
SQL Query Execution and Error Handling
There are two ways to execute an SQL statement.
Direct Execution
Executes an SQL statement at once by using the SQLExecDirect function.
Performing direct execution is as follows:
[Ex. 2] SQL query execution of tbCLI program - Direct execution
Prepared Execution
Executes through two steps by using the SQLPrepare and SQLExecute functions.
If most of the SQL statements include parameters, use the prepared execution method. Call the SQLBindParameter function between the SQLPrepare and SQLExecute functions to set up the actual value of a parameter.
Executing an SQL statement including two input parameters is as follows:
[Ex. 3] SQL query execution of tbCLI program - Prepared execution
In the previous example, input parameters in the SQL statement are represented as a question mark (?). To mark the input parameter position, use 1 or a larger integer.
① (1) Set up a pointer variable which contains each input parameter included in the prepared SQL statement. Set the input/output direction, C or C++ data type, SQL data type, precision, and scale for input parameter (ⓐ, ⓑ)
② Execute the SQL statement. If this statement is executed, the EMP table is updated by the configured input parameters
Use the SQLRowCount function to check how many rows are updated after executing the SQL statement.
The following shows how to use the function
The Return code of each function has information about the execution result, and therefore a user must check the return code after calling the function.
Ending Settings
To terminate a tbCLI program, perform the opposite of the steps described in “”.
Terminating a tbCLI program is as follows:
[Ex. 4] Ending Settings for tbCLI Program
① (1) Disconnect the datasource.
②, ③ Return the allocated connection handle and the environment handle to the system.
Tibero document navigation map
Please check the list of documents below for the Tibero technical information required for development and operation.
Development
Caterogy 1
Caterogy 2
Manul
Guide
TAS Disk Space Management
This chapter describes how to manage a TAS disk space.
Disk Space Properties
Disk space properties can be set when creating or modifying a disk space.
When creating a disk space, the AU_SIZE property is set. For more information about the allocation unit and extents, refer to "" and "" of “”.
For information about how to configure AU_SIZE in a disk space, refer to "".
CATSEARCH( column, text_query, reserved argument)
SQL> create table book(id number, name varchar(4000));
SQL> create index book_ctxcatindex on book(name) ctxcatindex;
SQL> insert into book values(1,'The little boat.');
SQL> insert into book values(2,'The little yellow digger.');
SQL> insert into book values(3,'The magic pasta pot : an old tale.');
SQL> insert into book values(4,'The mousehole cat.');
SQL> insert into book values(5,'The pear in the pear tree.');
SQL> insert into book values(6,'The rainbow fish.');
SQL> insert into book values(7,'The story about Ping.');
SQL> select * from book where catsearch(name, 'story ping', null) = 0;
ID NAME
------- --------------
7 The story about Ping.
1 row selected.
SQL> select * from book where catsearch(name, 'li*', null) = 0;
ID NAME
------- --------------
1 The little boat.
2 The little yellow digger.
2 rows selected.
SQL> select * from book where catsearch(name, '"little boat"', null) = 0;
ID NAME
------- --------------
1 The little boat.
1 row selected.
CONTAINS( column, text_query, reserved argument)
SQL> create table t(c1 clob);
SQL> insert into t values('Paris Rome Warsav');
SQL> insert into t values('Seoul Incheon');
SQL> insert into t values('Paris Rome Seoul');
SQL> commit;
SQL> create index t_idx on t(c1) indextype is ctxsys.context;
SQL> select * from t where contains(c1, 'Paris', NULL) > 0;
C1
------------------------------------------------------------------
Paris Rome Warsav
Paris Rome Seoul
2 rows selected.
SQL> select * from t where contains(c1, 'Paris and Warsav', NULL) > 0;
C1
-------------------------------------------------------------------
Paris Rome Warsav
1 row selected.
SQL> select * from t where contains(C1, 'Warsav | Seoul', null) = 0;
C1
---------------------------------------------------------------------
Paris Rome Warsav
Seoul Incheon
Paris Rome Seoul
3 rows selected.
SQL> select * from t where contains(c1, 'Paris - Seoul', NULL) > 0;
C1
---------------------------------------------------------------------
Paris Rome Warsav
Paris Rome Seoul
2 rows selected.
SQL> drop table t;
Table 'T' dropped.
SQL> create table t (c1 clob);
Table 'T' created.
SQL> insert into t values ('Paris.-Rome');
1 row inserted.
SQL> commit;
Commit completed.
SQL> select * from t;
C1
--------------------------------------------------------------------------
Paris.-Rome
1 row selected.
SQL> begin
2 text_ddl.create_preference('mylex','BASIC_LEXER');
3 text_ddl.set_attribute('mylex','WHITESPACE','-');
4 end;
5 /
PSM completed.
SQL> begin
2 text_ddl.create_section_group('nullgroup', 'NULL_SECTION_GROUP');
3 text_ddl.add_special_section('nullgroup', 'SENTENCE');
4 end;
5 /
PSM completed.
SQL> create index t_idx on t (a) indextype is ctxsys.context
2 parameters ('LEXER mylex sync (on commit) section group nullgroup');
Index 'T_IDX' created.
SQL> select * from t where contains(a, 'Paris Rome within sentence') > 0;
0 row selected.
SQL> select * from t where contains(a, 'Paris within sentence') > 0;
C1
-------------------------------------------------------------------------------
Paris.-Rome
1 row selected.
-n
Specifies the NetBackup path for backup/recovery operations.
-d, --datafile
Specifies a datafile to back up or recover.
-T, --skip-tablespace
Specifies a tablespace not to back up or recover.
--skip-readonly
Excludes read-only tablespaces from backup/recovery targets.
--skip-offline
Excludes offline tablespaces from backup/recovery targets.
-a, --archive-only
Backs up latest archive log files instead of datafiles.
--from-seq
Specifies the first sequence of an archive log to back up.
--to-seq
Specifies the last sequence of an archive log to back up.
--thread
Specifies a redo thread for an archive log backup/recovery.
--arc-dest-force
Allows an archive log backup/recovery operation to continue even if no arbitrary archive log file is found in a specified location.
--delete-original
Deletes original files instead of backups after an archive log backup/recovery is complete.
--with-password-file
Backs up or recovers the password file as well, which is required to log in as the SYS user in MOUNT mode.
--no-rollback
Retains all files that have been backed up during a canceled/failed backup, instead of rolling them back.
--continue
Continues to recover backup files without importing them.
--for-standby
Backs up/recovers all datafiles for constructing a standby, and archive log files required for recovery, as well as online redo log files.
--recover-to
Restores first a backup set in a specified location, and then starts recovery.
--restore-only
Restores datafiles to back up without recovering them.
--restore-archive-only
Restores archive log files to back up without recovering them.
--wallet
Opens a wallet with a user-specified password, to recover an encrypted tablespace.
-b, --backup-set
Finds and retrieves first a specified backup set, before deleting or recovering the backup set.
--archivelog
Deletes actual archive log files, instead of the backups.
--cf-only
Deletes only data in control files, instead of the actual backup sets or the physical archive log files.
--sent-to-standby
Deletes archive logs after they have been transferred to a standby.
--switch
Instantly switches to backup datafiles from the original datafiles of the database.
--no-image-logging
Uses the block consistency check instead of the conventional image logging, for a backup operation.
Searches for rows that include a phrase "a b c".
( )
(a b) | c
Specifies the priority of operations.
In the example, a b is calculated first, and then | c is calculated.
Wildcard
ab*, a*b, *ab
* represents zero or more arbitrary characters.
Searches for rows that include the phrase of a b.
Wildcard
ab%, %ab
% represents zero or more arbitrary characters.
WITHIN
a WITHIN SENTENCE, a WITHIN PARAGRAPH
Searches for rows containing a sentence or paragraph that includes a.
Creating a Disk Space
This section describes how to create a disk space.
The following devices can be used in a disk space.
Character Device
A physical device can be used as a character device.
Block Device
A physical disk device can be used as a block device in Linux. Since direct I/O is not guaranteed in other OSs, a block device is not supported.
Using the CREATE DISKSPACE SQL Statement
A disk space can be created using the CREATE DISKSPACE SQL statement.
Consider the following when creating a disk space. 디스크 스페이스를 생성할 때 다음의 사항들을 고려해야 합니다.
Redundancy level
To use the TAS mirroring function, configure the redundancy level.
Failure group definition
A failure group can be configured. If a failure group is configured, then copies are created in separate failure groups during mirroring. If a failure group is not configured, then each disk becomes a failure group. If a failure group is divided, operation is not interrupted even when a problem occurs in the group.
Disk space properties
Configures properties such as the allocation unit size.
TAS automatically recognizes the size of each disk device. If the size of the disk device cannot be automatically recognized or if the usage size of the disk device is limited, then use the SIZE clause in the disk when creating a disk space. To name a disk, use the NAME clause.
The disk size and name can be checked by using the V$AS_DISK view.
Example
The following is an example of creating a disk space named ds0 with a redundancy level of NORMAL and failure groups of fg1 and g2. Set the AS_DISKSTRING initialization parameter to '/devs/disk*', and use the disk spaces that are found as a TAS disk.
[Example 1] Creating Disk Space ds0
In the above example, the NAME clause was used to specify a name for each disk. If disk names are not specified, then a default name in the "{Disk Space Name}_####" format is given; "####" is the disk namein the disk space.
In the example, AU_SIZE is set to 4MB. To check the allocation unit size that is configured when creating a disk space, use the V$AS_DISKSPACE view.
Modifying a Disk Space
A disk space can be configured by using the ALTER DISKSPACE statement. A disk can be added or removed from a disk space during operation, and disk space rebalancing can be performed.
When a disk is added or removed, the changes are not applied immediately to the disk space. This is because the data in the existing disks must be evenly redistributed to the new disks when disks are added, and if a disk is removed, the data of the removed disk must be redistributed to the remaining disks to prevent data loss.
This process of evenly redistributing data in a disk space is called rebalancing. Adding orremoving a disk is applied in a disk space through disk space rebalancing.
Adding a Disk
A disk can be added in a disk space by using the ADD clause of the ALTER DISKSPACE statement. Disk related clauses and the failure groups used in the CREATE DISKSPACE statement are used in the ADD clause.
The following example shows a SQL statement that adds a disk to disk space ds0. New disk devices'/devs/disk105' and '/devs/disk106' are added to the failure group fg1 of disk space ds0. A disk was added by using the REBALANCE clause, rebalancing the disk space.
[Example 2] Adding a Disk in Disk Space ds0
Removing a Disk Space
A disk can be removed from a disk space by using the DROP clause of the ALTER DISKSPACE statement.
The following example shows a SQL statement that removes disks "disk105" and "disk 106" from disk space ds0.
[Example 3] Removing a Disk from Disk Space ds0
When a disk is in the FAIL state due to disk failure, the disk can be removed using the FORCE option. The following example shows a SQL statement that removes a disk in the 'FAIL' state.
[Example 4] Removing a disk in the 'FAIL' state from Disk Space ds0
All disks in a failure group can be removed.
The following example shows a SQL statement that removes all disks from the failure group fg1 of disk space ds0.
[Example 5] Removing Disks of Failure Group fg1 in Disk Space ds0
A disk can be added or removed through a single SQL statement.
In the following example, disk "disk204" is removed from disk space ds0, and disk device '/devs/disk205'is added in the failure group fg2 of disk space ds0.
[Example 6] Adding or Removing a Disk in Disk Space ds0
Resizing a Disk
Disks can be resized by using the RESIZE clause of the ALTER DISKSPACE statement.
The new size must be equal to or smaller than physical size of the actual disk. You must enter the bigger value than the current value, as decreasing the size is not currently supported.
If you run the RESIZE command, the disk is changed to PREPARE_RESIZE status, in which the disk size is still kept unchanged. To change the disk size completely, run the REBALANCE command. If youwant to cancel the resizing, run the UNPREPARE command to revert the disk to the previous status.
In the following example, the size of disk105 in disk space ds0 is changed to 512G.
[Example 7] Resizing a Disk to 512G in Disk Space ds0
Size of two or more disks can be changed at once.
In the following example, all disks in the failure group fg1 are resized to 512G.
[Example 8] Resizing All Disks to 512G in the Failure Group fg1
In the following example, all disks in disk space ds0 are resized to 512G.
[Example 9] Resizing All Disks to 512G in Disk Space ds0
Unpreparing a Disk
The prepared states of a disk for add, drop, and force drop can be undone by using the UNPREPARE clause of the ALTER DISKSPACE statement.
The PREPARE_DROP, PREPARE_FORCE, and PREPARE_ADD states are restored back to the ONLINE, FAIL, and UNUSED states, respectively. The PREPARE states indicate that the rebalance command has not been executed on the disk yet. After executing the command, the state cannot be undone by using the UNPREPARE clause.
The following example restores the state of disk105 in ds0 from PREPARE_DROP to ONLINE.
[Example 10] Restoring disk105 State from PREPARE_DROP to ONLINE
Disk Space Rebalancing
Rebalancing can be performed manually in a case such as when it has not been performed when addingor removing a disk.
The following example shows a SQL statement that rebalances the disk space ds0.
[Example 11] Rebalancing Disk Space ds0 (1)
The following example shows how to use the WAIT option to wait until rebalancing is complete.
[Example 12] Rebalancing Disk Space ds0 (2)
Using the REBALANCE clause with the FORCE option forcibly performs rebalancing even if there is no disk to add or remove. If the option is used, rebalancing performance decreases because the volume of extents to move increases.
To check if rebalancing is complete, retrieve the disk state from the V$AS_DISK view. Rebalancing jobs in progress can be checked from the V$AS_OPERATION view.
Deleting a File
Files in a disk space can be deleted by using the DROP clause of the ALTER DISKSPACE statement.
The following example shows a SQL statement that deletes the file '+DS0/file000.dtf' from the disk spaceds0.
[Example 13] Deleting a File from Disk Space ds0
Multiple files can be deleted from a disk space at one time by listing multiple file names. Each file name must be separated by a comma (,).
The following example shows a SQL statement that deletes multiple files at once from disk space ds0. In this example, the files '+DS0/file000.dtf' and '+DS0/file001.dtf' are deleted from the disk space ds0.
[Example 3.14] Deleting Multiple Files from Disk Space ds0
Deleting a Disk Space
A disk space can be deleted by using the DROP DISKSPACE statement.
The following example shows a SQL statement that deletes the disk space ds0.
[Example 15] Deleting Disk Space ds0
Handling Disk Errors
TAS guarantees availability by using mirroring and failure groups even when a disk has an error. If the disk error is resolved, resynchronization is executed for integrity of data that has been modified during the error.
Availability
TAS provides mirroring that copies data and stores it in multiple disks. Each copy is saved in a different failure group. If the redundancy level of disk space is NORMAL or HIGH, a copy in a different failure group can be used when an error occurs in a disk included in a failure group or in an entire failure group (or up to two failure groups if the redundancy level is HIGH), which guarantees service availability.
Failover
TAS manages disk status by monitoring it periodically. A current status of a disk can be checked with the V$AS_DISK view. For more information about the view, refer to “ V$AS_DISK”.
If an error occurs in a disk, its status is changed to FAIL. I/O for a disk in FAIL status is recorded in separate metadata, and it is applied to the disk through resynchronization after the disk is recovered.
Resynchronization
Resynchronization is executed for integrity of data that has been modified while a disk is in FAIL status. It is available only when the redundancy level is NORMAL or HIGH.
Since TAS provides mirroring, I/O is executed for a copy located in another failure group even if a diskhas an error. Therefore, when the disk error is resolved, data in the disk can be recovered with the copy, which is resynchronization.
When a Disk Error Is Not Resolved
If a disk in FAIL status continuously operates, reliability is lowered because a data copy located in the disk cannot be used. To prevent that a disk in FAIL status operates for a long time, TAS automatically removes the disk after a specific time and executes rebalancing to maintain mirroring by moving a copy to another disk.
The following parameter is used.
Parameter
Description
AS_DISK_REPAIR_WAIT_TIME
Wait time for TAS to automatically remove a disk in FAIL status. If set to 0, TAS does not automatically remove a disk in FAIL status. (Unit: minutes, default value: 0)
CREATE DISKSPACE ds0 NORMAL REDUNDANCY
FAILGROUP fg1 DISK
'/devs/disk101' NAME disk101,
'/devs/disk102' NAME disk102,
'/devs/disk103' NAME disk103,
'/devs/disk104' NAME disk104
FAILGROUP fg2 DISK
'/devs/disk201' NAME disk201,
'/devs/disk202' NAME disk202,
'/devs/disk203' NAME disk203,
'/devs/disk204' NAME disk204
ATTRIBUTE 'AU_SIZE'='4M';
ALTER DISKSPACE ds0
ADD FAILGROUP fg1 DISK
'/devs/disk105' NAME disk105,
'/devs/disk106' NAME disk106
REBALANCE;
ALTER DISKSPACE ds0 DROP DISK disk105;
ALTER DISKSPACE ds0 DROP DISK disk106;
ALTER DISKSPACE ds0 DROP DISK disk105 FORCE;
ALTER DISKSPACE ds0 DROP DISKS IN FAILGROUP fg1;
ALTER DISKSPACE ds0
DROP DISK disk204
ADD FAILGROUP fg2 DISK '/devs/disk205' NAME disk205;
ALTER DISKSPACE ds0 RESIZE DISK disk105 size 512G;
ALTER DISKSPACE ds0 RESIZE DISKS IN FAILGROUP fg1 size 512G;
ALTER DISKSPACE ds0 RESIZE ALL size 512G;
ALTER DISKSPACE ds0 UNPREPARE DISK disk105;
ALTER DISKSPACE ds0 REBALANCE;
ALTER DISKSPACE ds0 REBALANCE WAIT;
ALTER DISKSPACE ds0 DROP FILE '+DS0/file000.dtf';
ALTER DISKSPACE ds0 DROP FILE '+DS0/file000.dtf', '+DS0/file001.dtf';
DROP DISKSPACE ds0;
Statistics of the database can be used.
The tbCLI ensures stability of threads to enable multi-threaded application programs to be developed
Descriptor handle
Includes data about each column or bound parameters of the result set related to a statement handle. Includes data such as: input parameters of an SQL statement and metadata for output columns.
SQLGetDiagField
Used to get the information from a single field among the diagnostic records. Can be used for both header record and status record.
SQLGetDiagRec
Used to get multiple field values such as SQLSTATE code, error code, and diagnostic message, which are included in status record. Can be used only in status record.
The chapters in this part explain the procedures for upgrading the source DB, Tibero 6.
The steps for the operations are as follows:
Checklist and Check Methods
Executing Export
1. Checklist and Check Methods
Check below items to upgrade from Tibero 6 to Tibero 7.
CHARACTERSET
Check Redo
Check Undo
Check Temp Tablespace
CHARACTERSET
Check the value for NLS_CHARACTERSET and NLS_NCHAR_CHARACTERSET.
Refer to below when creating a target DB.
Check Redo
Check MEMBER per each log group, and size(mb) and MEMBERS per each group.
Check Undo
Check the TABLESPACE_NAME of the UNDO being used in the database, along with the FILE_NAME, size, maxsize, and AUTOEXTENSIBLE status of the associated data files.
Check Temp Tablespace
Check the TABLESPACE_NAME using the Temp file, along with the FILE_NAME, size, AUTOEXTENSIBLE status, and maxsize of the respective file.
Check User Tablespace
Check the TABLESPACE_NAME for Tablespaces excluding the Default Tablespace, along with the FILE_NAME, size, maxsize, and AUTOEXTENSIBLE status of the data files used in each Tablespace.
Check Log mode
Check the log mode, and if it is set to ARCHIVELOG, review LOG_ARCHIVE_DEST, LOG_ARCHIVE_FORMAT, LOG_ARCHIVE_OVERWRITE, and LOG_ARCHIVE_RETRY_TIME.
If there are any settings different from the default values except log mode, configure them in the tip file of the Target DB.
Check Control file
Refer to the path and file name modified when creating the target DB database and modify the path and file name appropriately.
Check JOB
Create JOB manually in the Target DB as it is not migrated.
Check DB Link (Tibero to Tibero, Tibero to Oracle, etc.)
Create DB Link manually in the Target DB as it is not migrated.
Check External Procedure usage
Check the external reference libraries, and if results are found, copy the post-processing files such as so and class files to the same path in the Target DB or recompile them in the Target DB. Libraries are not migrated, so they need to be manually created in the Target DB.
The following is an example of checking external reference libraries.
C External Procedure
JAVA External Procedure
The following is an example checkeing JAVA Class path.
Check the configuration for $TB_HOME/bin/tbjavac and $TB_HOME/client/bin/tbjavaepa when referring to external libraries in JAVA External Procedure.
Check Wrapped PSM(PL/SQL)
Wrapped PL/SQL cannot be queried from the DB, so it is not possible to obtain the creation statements for manual creation. Therefore, the original creation statement is required for migration.
Create Wrapped PSM (PL/SQL) manually in the Target DB as it is not migrated.
The following is an example of checking Wrapped PSM (PL/SQL).
Check Directory
Check if the directory used by the External table exists, and if it does, copy and recreate the corresponding file to match the system path in the Target DB.
Check Object Count
Save the query results after execution and check the Object Count.
The saved results above will be used as a reference for verifying the migrated object count in
Check Constraint
Save the query results after execution and check the Constraint.
The saved results above will be used as a reference for verifying the migrated Constraint in
2. Export
1) Exiting all application connected to DB
End all applications connected to the Source DB to prevent data changes during the export.
The following is an example of checking the connected sessions.
2) Stopping JOB execution
Stop JOB execution to prevent data changes during the export.
The following is an example of stopping JOB number 100.
3) Executing tbexport
Execute the export in Database(FULL) mode of tbexport.
The following is the usage for tbexport.
The following is an example of tbexport usage for Tibero 6 on Source DB server.
TAS Information Views
This chapter describes how to view TAS information by using dynamic views.
TAS Disk Space Related Views
The following views can be used to display TAS disk space information.
These views can only be used in TAS instances.
View
Description
Pre-installation Tasks
This chapter describes how to perform pre-installation tasks such as verifying hard disk space, installing JDK, and setting kernel parameters for each operating system.
Overview
Before installing Tibero, perform the following tasks.
SQL> SET LINESIZE 120
SQL> COL name FOR a30
SQL> COL value FOR a20
SQL> SELECT name, value
FROM sys._dd_props
WHERE name like '%CHARACTERSET%'
ORDER BY 1;
NAME VALUE
-------------------------------- ----------
NLS_CHARACTERSET UTF8
NLS_NCHAR_CHARACTERSET UTF16
SQL> SET LINESIZE 120
SQL> COL member FOR a50
SQL> SELECT * FROM v$logfile;
GROUP# STATUS TYPE MEMBER
----------- -------- -----------------------------
0 ONLINE /data2/tb6/tbdata/log001.log
0 ONLINE /data2/tb6/tbdata/log002.log
1 ONLINE /data2/tb6/tbdata/log003.log
1 ONLINE /data2/tb6/tbdata/log004.log
2 ONLINE /data2/tb6/tbdata/log005.log
2 ONLINE /data2/tb6/tbdata/log006.log
SQL> SELECT group#, bytes/1024/1024 as "size(mb)", members, archived FROM v$log;
GROUP# size(mb) MEMBERS ARCHIVED
----------- -------- ----------- -----------
0 50 2 NO
1 50 2 NO
2 50 2 NO
SQL> SET LINESIZE 120
SQL> COL tablespace_name FOR a20
SQL> COL file_name FOR a50
SQL> SELECT tablespace_name
FROM dba_tablespaces
WHERE contents = 'UNDO';
TABLESPACE_NAME
--------------------
UNDO
SQL> show parameter UNDO_TABLESPACE;
NAME TYPE VALUE
----------------- -------- ---------
UNDO_TABLESPACE STRING UNDO
SQL> SELECT tablespace_name,
file_name,
bytes/1024/1024 "size(mb)",
maxbytes/1024/1024 "maxsize(mb)",
autoextensible
FROM dba_data_files
WHERE tablespace_name like 'UNDO%';
TABLESPACE_NAME FILE_NAME size(mb) maxsize(mb) AUTOEXTENSIBLE
---------------- ---------------------------- -------- ----------- --------------
UNDO /data2/tb6/tbdata/undo001.tdf 400 1024 YES
SQL> SET LINESIZE 150
SQL> COL tablespace_name FOR a30
SQL> COL file_name FOR a50
SQL> SELECT tablespace_name,
file_name, bytes/1024/1024 "size(mb)",
autoextensible,
maxbytes/1024/1024 "max(mb)"
FROM dba_temp_files;
TABLESPACE_NAME FILE_NAME size(mb) AUTOEXTENSIBLE max(mb)
---------------- ----------------------------- -------- -------------- --------
TEMP /data2/tb6/tbdata/temp001.tdf 400 YES 1024
SQL> SET linesize 150
SQL> COL tablespace_name FOR a30
SQL> COL file_name FOR a50
SQL> SELECT tablespace_name,
file_name,
bytes/1024/1024 "size(mb)",
maxbytes/1024/1024 "maxsize(mb)",
autoextensible
FROM dba_data_files
WHERE tablespace_name not in('SYSTEM', 'UNDO', 'USR');
TABLESPACE_NAME FILE_NAME size(mb) maxsize(mb) AUTOEXTENSIBLE
---------------- ---------------------------- -------- ----------- --------------
DBTECH_TBS /tb6/tbdata/dbtech_tbs01.dtf 50 5120 YES
DBTECH_IDX /tb6/tbdata/dbtech_idx01.dtf 50 1024 YES
SQL> SELECT log_mode FROM v$database;
LOG_MODE
---------------
ARCHIVELOG
SQL> SHOW PARAM ARCHIVE
NAME TYPE VALUE
----------------------- -------- ------------------------------------------
LOG_ARCHIVE_DEST DIRNAME /data2/tb6/tibero6/database/tb4/archive/
LOG_ARCHIVE_FORMAT STRING log-t%t-r%r-s%s.arc
LOG_ARCHIVE_OVERWRITE Y_N NO
LOG_ARCHIVE_RETRY_TIME UINT32 60
SQL> alter database backup controlfile to trace
as '/data2/tb6/tb6_export/controlfile_tb6.sql';
Database altered.
SQL> !cat /data2/tb6/tb6_export/controlfile_tb6.sql
CREATE CONTROLFILE REUSE DATABASE "tb6"
LOGFILE
GROUP 0 (
'/data2/tb6/tbdata/log001.log',
'/data2/tb6/tbdata/log002.log'
) SIZE 50M,
GROUP 1 (
'/data2/tb6/tbdata/log003.log',
'/data2/tb6/tbdata/log004.log'
) SIZE 50M,
GROUP 2 (
'/data2/tb6/tbdata/log005.log',
'/data2/tb6/tbdata/log006.log'
) SIZE 50M
NORESETLOGS
DATAFILE
'/data2/tb6/tbdata/system001.tdf',
'/data2/tb6/tbdata/undo001.tdf',
'/data2/tb6/tbdata/usr001.tdf',
'/data2/tb6/tbdata/dbtech_tbs01.dtf',
'/data2/tb6/tbdata/dbtech_idx01.dtf'
ARCHIVELOG
MAXLOGFILES 255
MAXLOGMEMBERS 8
MAXDATAFILES 100
CHARACTER SET MSWIN949
NATIONAL CHARACTER SET UTF16
;
--ALTER DATABASE MOUNT
---- Recovery is required in MOUNT mode.
--ALTER DATABASE RECOVER AUTOMATIC;
--ALTER DATABASE OPEN ;
---- Adding Tempfiles is required in OPEN mode.
-- ALTER TABLESPACE TEMP ADD TEMPFILE '/data2/tb6/tbdata/temp001.tdf'
-- SIZE 400M REUSE AUTOEXTEND ON NEXT 10M MAXSIZE 1G;
SQL> SET LINESIZE 150
SQL> COL what FOR a30
SQL> COL interval FOR a30
SQL> COL username FOR a20
SQL> alter session set NLS_DATE_FORMAT='YYYY/MM/DD HH24:MI:SS';
SQL> SELECT job as job_no,
b.username,
what,
to_char(next_date, 'yyyy/mm/dd HH24:MI:SS') as next_date,
interval,
broken
FROM dba_jobs a, dba_users b
WHERE a.schema_user=b.user_id;
JOB_NO USERNAME WHAT NEXT_DATE INTERVAL BROKEN
------ -------- --------------------------- ------------------- --------- ------
1 DBTECH dbms_output.put_line('ok'); 2013/06/30 00:00:00 SYSDATE+1 N
SQL> SET LINESIZE 150
SQL> COL owner FOR a15
SQL> COL db_link FOR a20
SQL> COL username FOR a20
SQL> COL host FOR a10
SQL> COL created FOR a10
SQL> SELECT owner, db_link, username, host, created FROM dba_db_links;
OWNER DB_LINK USERNAME HOST CREATED
--------------- -------------------- -------------------- ---------- ----------
DBTECH TBLINK DBTECH2 tb6 2013/06/12
SQL> SET LINESIZE 120
SQL> COL owner FOR a10
SQL> COL library_name FOR a30
SQL> COL file_spec FOR a50
SQL> COL status FOR a10
SELECT owner, library_name, file_spec, status FROM dba_libraries;
SET LINESIZE 120
COL owner FOR a10
COL name FOR a30
COL source FOR a50
SELECT owner, name, source FROM dba_java_classes;
SQL> SHOW PARAM JAVA_CLASS_PATH;
NAME TYPE VALUE
---------------- -------- --------------------------
JAVA_CLASS_PATH DIRNAME /data2/tb6/tbdata/java/
SQL> SET LINESIZE 120
SQL> COL owner FOR a30
SQL> COL object_name FOR a40
SQL> SELECT owner, object_name, functionable, wrapped
FROM dba_procedures
WHERE wrapped = 'YES';
OWNER OBJECT_NAME FUNCTIONABLE WRAPPED
------------------------- ------------------------- ------------ -------
DBTECH WRAP_TEST NO YES
SQL> SET LINESIZE 120
SQL> COL name FOR a20
SQL> COL path FOR a60
SQL> SELECT * FROM dba_directories;
NAME PATH
-------------------- ----------------------
SAM /data2/tb6/DIR_SAM
SQL> SET LINESIZE 150
SQL> SET PAGES 500
SQL> COL owner FOR a20
SQL> SELECT owner, object_type, status, count(*)
FROM dba_objects
WHERE owner not in ('SYS', 'SYSCAT', 'SYSGIS', 'OUTLN')
GROUP BY owner, object_Type, status
ORDER BY owner, object_type, status;
OWNER OBJECT_TYPE STATUS COUNT(*)
-------------------- -------------------- ------- ----------
DBTECH DATABASE LINK VALID 1
DBTECH FUNCTION VALID 3
DBTECH INDEX VALID 9
DBTECH JAVA VALID 1
DBTECH LIBRARY VALID 1
DBTECH PROCEDURE VALID 3
DBTECH SEQUENCE VALID 3
DBTECH SYNONYM VALID 6
DBTECH TABLE VALID 10
DBTECH TRIGGER VALID 2
DBTECH VIEW VALID 1
DBTECH2 FUNCTION VALID 1
DBTECH2 INDEX VALID 7
DBTECH2 LOB VALID 2
DBTECH2 PACKAGE VALID 2
DBTECH2 PACKAGE BODY VALID 2
DBTECH2 PROCEDURE VALID 4
DBTECH2 SEQUENCE VALID 1
DBTECH2 TABLE VALID 7
DBTECH2 TRIGGER VALID 1
DBTECH2 VIEW VALID 1
PUBLIC SYNONYM VALID 565
TIBERO TABLE VALID 1
SQL> SET LINESIZE 150
SQL> COL owner FOR a30
SQL> SELECT owner
,constraint_type
,count(constraint_name) as con_cnt
FROM dba_constraints
WHERE owner not in ('SYS', 'SYSCAT', 'SYSGIS', 'OUTLN')
GROUP BY owner, constraint_type
ORDER BY owner ,constraint_type;
OWNER CONSTRAINT_TYPE CON_CNT
------------------------------ --------------- ----------
DBTECH C 21
DBTECH O 0
DBTECH P 7
DBTECH R 3
DBTECH U 1
DBTECH2 C 7
DBTECH2 P 7
DBTECH2 R 1
SQL> SELECTcount(*) FROM v$session;
COUNT(*)
---------- -
2
All aliases in the disk space mounted by a TAS instance.
V$AS_DISK
All disks discovered by a TAS instance.
V$AS_DISKSPACE
All disk spaces discovered by a TAS instance.
V$AS_OPERATION
All jobs that are being processed in all disk spaces mounted by a TAS
instance.
V$AS_EXTENT_MAP
Physical location of all extents managed by a TAS instance.
V$AS_FILE
All files in all disk spaces mounted by a TAS instance.
When using V$AS_* views, the disk space number may have been changed. This is because a disk space number is given when a disk space is mounted.
V$AS_ALIAS
V$AS_ALIAS view displays all aliases in the disk space mounted by a TAS instance.
Column
Data Type
Description
NAME
VARCHAR(48)
Alias.
DISKSPACE_NUMBER
NUMBER
Disk space number included in the alias.
FILE_NUMBER
NUMBER
File number of the alias.
FILE_INCARNATION
NUMBER
File incarnation number of the alias.
V$AS_DISK
V$AS_DISK view displays all disks discovered by a TAS instance.
Column
Data Type
Description
DISKSPACE_NUMBER
NUMBER
Disk space number that contains the disk.
DISK_NUMBER
NUMBER
Disk number in the disk space.
STATE
VARCHAR(16)
Disk status in the disk space.
ONLINE: Disk is in use.
NOT_USED: Disk is not used in the disk space. The DISKSPACE_NUMBER is displayed as 255.
OS_MB
NUMBER
Size of the disk recognized by the OS.
V$AS_DISKSPACE
V$AS_DISKSPACE view displays all disk spaces discovered by the TAS instance.
Column
Data Type
Description
DISKSPACE_NUMBER
NUMBER
Number given in the disk space.
NAME
VARCHAR(48)
Disk space name.
SECTOR_SIZE
NUMBER
Physical block size. (Unit: byte)
BLOCK_SIZE
NUMBER
TAS metadata block size. (Unit: byte)
V$AS_OPERATION
V$AS_OPERATION view can display all jobs that are being processed in all disk spaces mounted by a TAS instance.
Column
Data Type
Description
DISKSPACE_NUMBER
NUMBER
Disk space number.
OPERATION
VARCHAR(16)
Job type in progress.
REBALANCE: Rebalancing is in progress.
SYNC: Synchronization is in progress for failed disk(s).
STATE
VARCHAR(8)
Current job state. Since this view displays a job in
progress, the job state is always RUN.
POWER
NUMBER
Power of the operation. Configuring it is not supported currently. (Default value: 10)
The following example displays the rebalancing job that is being processed in the disk space ds0 by using V$AS_OPERATION.
[Example 1] Viewing Jobs in Progress
V$AS_EXTENT_MAP
V$AS_EXTENT_MAP view displays the physical location of all extents managed by a TAS instance.
Column
Data Type
Description
DISKSPACE_NUMBER
NUMBER
Disk space number to which the file belongs.
FILE_NUMBER
NUMBER
File number in the disk space.
EXTENT_NUMBER
NUMBER
Extent number in the file.
REDUN_NUMBER
NUMBER
Redundancy number of the extent.
V$AS_FILE
V$AS_FILE view displays all files in the disk space mounted by a TAS instance.
Column
Data Type
Description
DISKSPACE_NUMBER
NUMBER
Disk space number to which the file belongs.
FILE_NUMBER
NUMBER
File number in the disk space.
INCARNATION
NUMBER
File incarnation number.
BLOCK_SIZE
NUMBER
File block size. (Unit: bytes)
The following is an example of displaying the alias, number, and size of all files in a disk space by using V$AS_ALIAS and V$AS_DISK.
[Example 2] Viewing Files and Aliases
Install JDK
Install OS-specific packages
Set OS-specific kernel parameters (shell limits parameters)
Set NTP server
Verify host name, port number, system account, and localhost
Verifying Available Disk Space
Although it slightly depends on which platform you use, installing Tibero requires at least 2 GB of free HW space. This is the minimum space needed to create the database after installation.
For more information about hardware requirements, refer to “System Requirements”.
To verify available free disk space, run the df command on a Unix system.
Installing JDK
To install Tibero, JDK 1.5.17 or a later version must be installed.
JDK 1.9 or higher versions are not supported currently.
To install a specific vendor's JDK, refer to the respective installation guide provided by the vendor.
Installing Packages
This section describes the packages required for each operating system.
Packages of the following versions or higher must be installed in each package, and the package name or version may differ for each OS and version.
Platform
Packages
Linux
gcc-3.4.6-11
gcc-c++-3.4.6-11
libgcc-3.4.6-11
libstdc++-3.4.6-11
libstdc++-devel-3.4.6-11
libaio-0.3.105-2
libaio-devel-0.3.105-2
pstack
glibc
Solaris
libCrun.so.1 (SUNW_1.6)
pstack
AIX
procstack
For RHEL 8.1 or higher versions, the following packages must be installed.
Platform
Packages
Linux
ibnsl.so.1
libncurses.so.5
Setting Parameters
The following describes how to set kernel and shell limits parameters for each operating system.
After setting all required parameters, reboot the system.
Linux
Kernel and shell limits parameters for Linux are as follows:
Kernel parameters
Configuration file
Setting values
Kernel Parameter
Value
kernel.sem
The minimum setting values for SEMMSL, SEMMNS, SEMOPM, and SEMMNI are as follows:
– SEMMSL : 2 / Recommnded value : (Total Tibero threads) x 2
– SEMMNS : (Total Tibero thread number) x 2
– SEMOPM : 2(=SEMMSL) / Recommnded value : (Total Tibero threads) x 2
– SEMMNI : (Total Tibero threads)
The maximum values are not limited, and it is recommended to set them high enough.
kernel.shmall
ceil (shmmax/PAGE_SIZE)
kernel.shmmax
Half of physical memory (byte)
kernel.shmmni
4096
fs.nr_open
nofile parameter value or higher
fs.file-max
(nofile parameter) x (WTHR_PROC_CNT + PEP_PROC_CNT) or 67108864
Shell limits parameter
Configuration file
Setting values
Parameter
Description
nofile
Set to (WTHR_PER_PROC * ((total data files in db) + 15)) + (tbsvr
process count + 5) + 100, or 3000000.
nproc
Set to at least MAX_SESSION_COUNT+10000.
Soft Limit: 65536
Hard Limit: 65536
For RHEL 7.2 or higher versions, the following kernel parameter settings are required.
Configuration file
Setting values
Kernel Parameter
Value
RemoveIPC
No
Note
Running SELinux in enforce mode may cause a process failure. Therefore, enforce mode is not recommended for Tibero.
Solaris
Kernel and shell limits parameters for Solaris are as follows:
Kernel parameters
Configuration file
Setting values
Kernel Parameter
Value
project.max-sem-ids
(Total Tibero threads) x 2
process.max-sem-nsems
10000
process.max-sem-ops
200
project.max-shm-memory
4294967295 (half of physical memory)
project.max-shm-ids
100
project.max-lwps
MAX_SESSION_COUNT+10000 or higher
Shell limits parameter
Configuration file
Setting values
Kernel Parameter
Value
nofile
Set to (WTHR_PER_PROC * ((total data files in db) + 15)) + (tbsvr
process count + 5) + 100, or 3000000.
nproc
Soft Limit : 65536
Hard Limit : 65536
Starting from Solaris 10, it is recommended to manage parameters at the user level by creating a project.
The following example configures parameters for a specific user.
Create a project.
Configure parameters.
Reconnect as the user.
AIX
Kernel and shell limits parameters for AIX are as follows:
Kernel parameters
The only kernel parameter that needs to be changed in the AIX environment is maxuproc, which can be changed using smitty or chdev. The AIX kernel dynamically allocates and reallocates resources to predefined limits as needed, therefore no additional kernel parameter settings are required.
Parameter
Description
maxuproc
Number of processes started when Tibero boots.
Therefore, the value must be greater than the number of processes to be started by the DB installation user. (Recommended value: 16384)
Refer to the following when calculating the appropriate values depending on your operating environment.
User setting: Worker process counts + Background process counts + System process counts + Additional (100)
Shell Limits parameters
Configuration file
Configuration values
Parameter
Recommended Value
Soft FILE size
-1 (Unlimited)
Soft CPU time
-1 (Unlimited)
Soft DATA segment
-1 (Unlimited)
Soft STACK size
-1 (Unlimited)
Soft Real Memory size
-1 (Unlimited)
Setting NTP Server
During a database operation, somtimes the system clock can be set backwards by the xntpd daemon, causing invalid data output. To prevent this error, synchronize the system clock and then restart the daemon by using the '-x' option.
If you want to apply the same option for system restart as well, remove the comment mark for the following in "/etc/rc.tcpip".
Others
The host name, port number, system account, and localhost must be verified before installing Tibero.
Host name
Verify the host name for requesting a license. Check the /etc/hosts file, or run the following command on the console to verify it.
Port number
Verify the port number when Tibero starts. The default value is 8629.
System account
Verify the system account with which Tibero is installed and operated.
localhost
Use the ping command to verify that the localhost is configured correctly. If it is not configured correctly, modify the /etc/hosts file.
# prctl -n project.max-shm-memory -i project user.tibero
project: 100: user.tibero
NAME PRIVILEGE VALUE FLAG ACTION RECIPIENT
project.max-shm-memory
privileged 4.00GB - deny -
system 16.0EB max deny -
# Check the current configuration.
# lsattr -E -l sys0 -a maxuproc
maxuproc 1024 Maximum number of PROCESSES allowed per user True
# Change the maxuproc value.
# chdev -l sys0 -a maxuproc=16384
/etc/security/limits
# stopsrc -s xntpd
# startsrc -s xntpd -a "-x"
start /usr/sbin/xntpd "$src_running" "-x"
uname –n
ping localhost
PREPARE_ADD: Disk is to be added to the disk space. The disk cannot be used until rebalancing starts.
PREPARE_DROP: Disk is to be dropped from the disk space. The disk can be used until rebalancing is complete.
PREPARE_FORCE: Disk is to be removed. The disk cannot be used during rebalancing.
ADDING: Disk is currently being added through rebalancing.
DROPPING: Disk is currently being dropped through rebalancing.
FORCING: Disk is currently being dropped without offloading its data.
SYNC: Synchronization is in progress for changes that could not be applied due to a temporary disk failure.
FAIL: An error has occurred on the disk or the disk has been forcibly taken offline.
SCRUB: File scrubbing is in progress.
ALIAS_INCARNATION
NUMBER
Incarnation number of the alias.
TOTAL_MB
NUMBER
Disk size.
FREE_MB
NUMBER
Available disk space.
NAME
VARCHAR(48)
Disk name.
FAILGROUP
VARCHAR(48)
Failure group name that contains the disk.
PATH
VARCHAR(256)
Disk path.
CREATE_DATE
DATE
Date at which the disk was added to the disk space.
ALLOCATION_UNIT_SIZE
NUMBER
Allocation unit size. (Unit: byte)
STATE
VARCHAR(16)
Disk space state in the TAS instance.
MOUNTING: Disk space is currently being mounted.
CREATING: Disk space is being created.
MOUNT: Disk space has been mounted.
TYPE
VARCHAR(8)
Disk space redundancy level.
EXTERN: User files are not mirrored.
NORMAL: User files are two-way mirrored across 2 or more failgroups.
HIGH: User files are three-way mirrored across 3 or more failgroups.
TOTAL_MB
NUMBER
Disk space size.
FREE_MB
NUMBER
Size of available disk space.
REQUIRED_MIRROR_FREE_MB
NUMBER
Extra disk space used for disk failures.
USABLE_FILE_MB
NUMBER
Size of available disk space adjusted for mirroring.
JOB_DONE
NUMBER
Number of extents completed.
JOB_REMAIN
NUMBER
Number of extents remained.
JOB_TOTAL
NUMBER
Total number of extents of the job.
EST_SPEED
NUMBER
Estimated job speed. (Unit: extents/second)
EST_REMAIN_TIME
VARCHAR(32)
Estimated time required to complete the job. (Unit: seconds)
EXTENT_SIZE
NUMBER
Extent size. (Unit: AU)
DISK_NUMBER
NUMBER
Number of the disk that saves the extent.
AU_NUMBER
NUMBER
AU number of the extent in the disk.
BYTES
NUMBER
File size. (Unit: bytes)
TYPE
VARCHAR(8)
File type.
DATA: General data file.
CTRL: Control file.
CM: CM file.
REDO: Redo log file.
ARCH: Archive log file.
TEMP: Temporary file.
REDUNDANCY
VARCHAR(8)
File redundancy level.
EXTERN: Files are not mirrored.
NORMAL: Files are two-way mirrored across 2 or more failgroups.
HIGH: Files are three-way mirrored across 3 or more failgroups.
STRIPED
VARCHAR(8)
Striping type.
COARSE: Files are striped in AU size units.
FINE: Files are striped in 1/8 * AU size units.
fs.aio-max-nr
1048576
net.ipv4.ip_local_port_range
1024 65000
net.core.rmem_default
The maximum value between 262144 and the current OS setting
net.core.wmem_default
The maximum value between 262144 and the current OS setting
net.core.rmem_max
The maximum value among 67108864, the current OS setting,
TCP_RCVBUF_SIZE and _INC_TCP_RCVBUF_SIZE
net.core.wmem_max
The maximum value among 67108864, the current OS setting,
TCP_RCVBUF_SIZE and _INC_TCP_RCVBUF_SIZE
Tibero Environment
It describes management tools, directories, environment variables, and configuration files for a Tibero environment.
Management Tools
This section describes management tools for a Tibero environment.
tbSQL
tbSQL is an interactive utility provided by Tibero®(hereafter Tibero) to process SQL statements. This utility can process SQL queries, Data Definition Language (DDL), and transactional SQL statements. It can also be used to create and execute PSM programs, and DBAs can execute commands to manage Tibero systems.
In addition, tbSQL provides many other functions, such as auto commit setting, OS command execution, output save, and script creation. The script function allows the user to conveniently create SQL statements, PSM programs, and tbSQL utility commands into a single script file.
tbSQL is one of the most frequently used utility in Tibero. It provides the following functions in addition to executing SQL statements.
Input, edit, save, and execute general SQL statements and PSM programs
Configure and terminate of a transaction
Batch processing using a script
T-Up
T-Up is a utility provided by Tibero DB. This utility provides function for checking compatibility before migration and migrating all or partial database schema objects to Tibero.
The following are the features provided by T-Up.
Compatibility Analysis
Compatibility analysis determines if the source database's schema objects, SQL statements, and database related APIs can be supported in Tibero and analyzes causes for any unsupported items.
Evaluates compatibility of source database's schema objects, SQL statements, and application APIs.
Provides analysis result report in HTML.
Migration
The migration function migrates schema objects, such as tables, indexes, and views, PSM programs, etc. from the source database to Tibero DB so that they can be used as before.
Migrates user-selected data to Tibero.
Migrates schema objects, such as tables, indexes, views, and synonyms, and various constraints defined on the tables.
Migrates privileges and roles.
Note
T-Up is implemented in Java, and requires Java 6 or later. Before starting T-Up, the target database's JDBC driver file path must be set to the classpath setting in the execution script.
T-Up functions described in this chapter include those described in Tibero 6 FS06.
tbExport
tbExport is the export utility provided by Tibero.
This utility helps to export all or some part of a schema object saved in a Tibero When you export one schema object using tbExport utility, the related schema objects will also be exported automatically. For example, if you export one table, the constraints and indexes that are created with the table will also be exported. If necessary, it is possible to stop some of the related schema objects from being exported.
tbExport has three modes: full data mode, user mode, and table mode.
Note
Those modes can only be used by a DBA. If DBA privilege cannot be granted, it is recommended to grant the SELECT ANY DICTIONARY privilege.
The files created through the tbExport utility are OS files. Therefore, unlike Tibero Specify the log created while exporting by using the LOG parameter.
The following describes the Complete, Alert, and Error messages created as a result of executing the tbExport utility.
Item
Description
tbExport utility has the following features.
Logical Backup
Extracts the data and internal schema of Tibero.
Data with Different Point of Time
When exporting many tables at once, data in the tables will not be exported all at the same time. The data will be exported in order.
Saving the Table Definition
Saves the table definition (DDL script of a table) regardless of the data existence.
Reorganizing the Table
After creating a table, it removes all the fragmentations and migrated rows caused by a lot of DML work.
tbImport
tbImport is the import utility provided by Tibero.
It can import the schema object saved in an external file into the Tibero database. Along with tbExport utility, this utility is useful when processing a database backup and transmitting a database between different machines. The tbImportutility has functions similar or symmetrical to the tbExport utility.
When you import one schema object using the tbImport utility, related schema objects will also be imported automatically. If necessary, it is possible to block some of the related schema objects from being imported.
tbImport has three modes like the tbExport utility: full database mode, user mode, and table mode.
Note
Those modes only be used by a DBA. If DBA privilege cannot be granted, it is recommended to grant the SELECT ANY DICTIONARY privilege.
Logs created while importing by using the LOG parameter should be specified.
The following describes the Complete, Alert, and Error messages created as a result of executing tbImport.
Item
Description
tbLoader
tbLoader is a utility designed to load a large amount of data into a Tibero database at once. With tbLoader, the user does not need to create SQL statements to insert data into the database. Instead, column data can be converted into a general text file and loaded into the database. tbLoader is useful when loading a lot of data into Tibero database.
tbLoader enables the user to easily create data files and reduce the data loading time.
Directory Structure
The following directory structure is created after installing Tibero.
Note
The $TB_SID in the above directory structure is replaced by the server SID according to each system environment.
The following are the default directories in Tibero.
bin
Bin contains Tibero executables and server management utilities.
The tbsvr and tblistener files are executables for creating the Tibero, and tbboot and tbdown are used to start up and shut down the Tibero.
Caution
The tbsvr and tblistener tbboot command.
client
The following are about subdirectories.
Subdirectories
Description
config
Config contains the configuration files for Tibero.
The $TB_SID.tip file in this directory determines Tibero's environment settings.
database
The following are about subdirectories.
$TB_SID
$TB_SID contains all database information unless it is configured separately. It includes the metadata and the following file types.
File
Description
$TB_SID/java
$TB_SID/java contains Java EPA class file unless JAVA_CLASS_PATH is defined.
Instance
The following are about subdirectories.
$TB_SID/audit
$TB_SID/audit saves the audit files that records activities of database users using system privileges or schema object privileges.
$TB_SID/log
$TB_SID/log saves system log (slog), DBMS log (dlog), internal log (ilog), listener log (lsnr), and memlog files of Tibero.
File
Description
System log, DBMS log, internal log, and listener log files are accumulated as the database operates. The maximum size of the log directory can be set, and Tibero deletes old files if the maximum size is reached.
The following are the initialization parameters for a DBMS log file.
Initialization Parameter
Description
$TB_SID/dump
$TB_SID/dump contains dump files generated because of DDL or errors in Tibero.
Subdirectory
Description
$TB_SID/path
$TB_SID/path contains the socket files used for interprocess communication in Tibero.
Caution
Reading or modifying files in this directory is prohibited while Tibero is running.
lib
lib contains the spatial function library files for Tibero.
license
license contains the Tibero (license.xml). This XML file can be opened using a text editor to check its contents.
The following is about the subdirectory.
Subdirectory
Description
nls
The following is about the subdirectory.
Subdirectory
Description
scripts
Scripts contain various SQL statements used when creating a database in Tibero. It also includes various view definitions that reflect the current state of Tibero.
The following is about the subdirectory.
Subdirectory
Description
Installation Environment
If Tibero is installed normally the system needs to specify the following environment variables:
Environment Variable
Description
If environment variables are not properly specified, Tibero cannot be used. Therefore, it is recommended to check the environment variables in advance.
Note
This guide follows the syntax of for the execution of UNIX shell commands. Depending on the shell type, the syntax may differ.
For more details on this, check "The operating system's guide".
The environment variables can be checked in a UNIX shell prompt as follows.
$TB_HOME
This directory contains the Tibero server, client libraries, and other files for additional features.
$TB_SID
It is recommended to specify the service ID as the database name.
$PATH
$PATH must include the following directories:
Directory
Description
Applying and Verifying User Configuration File
After Tibero is installed, the following properties are added in the user configuration file
Environment Variable
Description
when a process is abnormally terminated On Unix, virtual memory information remains on the disk. This process is called a core dump. It requires significant amounts of computing resources and temporarily lowers system performance during execution, and the dump files generated in the process take up a large part of disk space. Therefore, this process is not recommended for Tibero.
To disable the core dump feature, add the following command to the configuration file (.profile) of the user account.
Even if a user's configuration file has been created as above, it is not actually applied.
To apply the configuration file, proceed the following steps.
Run the following command to apply the configuration file. Valid only on Unix systems (including Linux).
Run the following command to check the configuration file is properly applied.
Linux
Windows
tbExport
This chapter describes the tbExport utility and its usage.
Overview
tbExport is Tibero export utility that extracts a part or full of schema objects saved in Tibero database and saves them to a file in a specific format. It is useful for database backup and data transfer between heterogeneous databases.
When exporting a schema object by using tbExport, all relevant schema objects are also exported automatically. For example, if you export a table, constraints and indexes related to the table are also exported. If necessary, some of schema objects related to an exported object can be specified not to export.
tbExport has three modes: full database mode, user mode, and table mode. Only DBA can use these modes. If a user who wants to perform export has no DBA privilege, it is recommended to grant the SELECT ANY DICTIONARY privilege to the user.
tbExport result files are OS files. Therefore, the files can be processed like general files. For example, they can be transferred by using FTP, saved in CD-ROM, and stored in remote Tibero database.
To set log that occurs during export, use the LOG parameter.
The following describes each tbExport result message.
tbExport has the following features.
Logical backup
Extracts Tibero internal schema and data.
Data at different points in time
When exporting multiple tables, data in each table is exported sequentially. Therefore, exported data is not from the same point in time.
Saving table definitions
Saves table definition (tables' DDL scripts) regardless of data existence.
Quick Start
tbExport is automatically installed and uninstalled along with Tibero. It is implemented in Java and can be run on any platform where Java Virtual Machine (JVM) is installed.
Preparations
To use tbExport, check the following requirements.
JRE 1.4.2 or later must be installed.
tbExport must be installed in a platform where Tibero database server is installed. Otherwise, it must be connected to the platform through a network.
The following class libraries are required. (Default location: $TB_HOME/client/lib/jar)
The class libraries are automatically installed along with Tibero.
No separate tasks are required.
Export Modes
There are three export modes: full database mode, user mode, and table mode. Each mode can be set with a parameter.
The following shows the relationship between schema objects in each mode.
[Figure 1] Export Modes
Full Database Mode
Exports entire Tibero database. Objects of all users except for the SYS user are exported.
To use this mode, set the FULL parameter to Y as follows:
User Mode
Exports all schema objects of specified users except for the SYS user. DBA can specify multiple users. To use this mode, set the USER parameter to the list of users as follows:
Table Mode
Exports schema objects related to one or more specified tables.
To use this mode, set the TABLE parameter to the list of tables along with their owner as follows:
Executing tbExport
To execute tbExport, run the tbexport command in the $TB_HOME/client/bin directory.
The following executes tbExport in full database mode.
Executing tbExport
tbExport Parameters
This section describes tbExport parameters that can be set at the command prompt.
Executing tbExport without any parameters displays the list and usage of the parameters as follows:
The following describes each parameter.
The order of entered parameters does not matter. CFGFILE can be set only at the command prompt, but the other parameters can be set in a configuration file as well as at the command prompt. Note that parameter names set in the file must be in uppercase.
The following shows how to set parameters in a configuration file. Some parameters can have multiple values as shown in the second line.
The following is an example of setting parameters.
Usage Example
The following is an example of exporting data by using tbExport.
tbExport Usage Example
Appendix
This chapter describes how to use TAS to configure Tibero.
The example is based on a Linux x86_64 system, and all commands to be executed on TAS and Tibero, except SQL, must be modified according to the OS of the target system.
Note
The example in this chapter represents best practices and does not represent the minimum systemrequirements.
For system requirements, refer to "Tibero Installation Guide".
TAS only supports Linux and AIX.
Preparing for Installation
This section describes the items that need to be prepared before configuring the database.
Installation Environment
The following table describes the installation environment for the example.
Item
Value
It is assumed that the required binaries already exist in the installation path.
It is assumed that the same shared disk path is seen from all nodes.
Disk Preparation
The following is the process of preparing shared disks. The process must be performed on all nodes.
Disks can be used as shared disks by modifying their privilege or ownership. However, this can cause the issue that a disk name is changed after OS rebooting. To prevent the issue, it is recommended to configure device nodes by using udev.
The following is an example of device nodes configured using udev.
The links displayed as the result of the first ls command in the above example are symbolic links created according to the udev rules.
The following is an example of the udev rules file used to configure device nodes.
The udev rules file must have the rules extension and exist under the /etc/udev/rules.d directory (in Ubuntu 14.04, the directory path varies according to OS).
The above example file finds a device with the specified SCSI_ID (RESULT=="SCSI_ID") from the node of block devices (SUBSYSTEM=="block") with a kernel name of sd? (KERNEL=="sd?") and then configures owner and user privileges and creates the given symbolic link for the device.
To check a device SCSI_ID, execute /lib/udev/scsi_id (in Ubuntu 14.04, the directory path varies according to OS) with the administrator privilege. The following is an example.
Kernel Parameter Setting
To configure Tibero with TAS, set an additional kernel parameter besides kernel parameters described in "Tibero Installation Guide."
The kernel parameter can be set in the following configuration file (in Linux).
Set the kernel parameter as follows:
TAS Instance Installation
This section describes how to configure a TAS instance with two nodes.
Environment Variable Configuration
Configure the environment variables in the user configuration files (.bashrc, etc.) of the OS.
Set the TB_HOME variable to the path where the TAS instance binary is installed on each node. Set the TB_SID variable to a distinct value for each node so that they can be identified uniquely.
The following is an example of configuring the first node. Set TB_SID of the TAS instance and CM_SID of the Cluster Manager on the first node to 'as0' and 'cm0' respectively.
Set TB_SID of the TAS instance and CM_SID of the Cluster Manager on the second node to 'as1' and 'cm1' respectively.
Initialization Parameter Configuration
The initialization parameters for TAS are the same as those for Tibero Active Cluster(TAC) by default.
The following are the additional initialization parameters required for TAS instance.
Parameter
Description
The following are the initialization parameters for node 1.
The following are the initialization parameters for node 2.
Caution
To use a general file as a device, AS_ALLOW_ONLY_RAW_DISKS must be set to N.
A disk, which does not exist in the path pattern set to TAS_DISKSTRING, cannot be included inthe disk space.
Connection String Configuration
The following is an example of setting the connection string configuration file.
Creating and Starting a Disk Space
The following describes how to create and start a disk space.
Before creating a disk space, start the TAS instance on node 1 in NOMOUNT mode first.
Connect to the running instance, and create a disk space.
To use external data mirroring function like RAID for high availability, the redundancy level must be set to EXTERNAL REDUNDANCY to prevent the use of internal data mirroring.
Once the disk space is created, the TAS instance is stopped automatically and it can be restarted in the NORMAL mode.
Create an as resource configuration file that is required for the Cluster Manager on the node 1 to execute the AS binary.
To configure a cluster with TAS instances, start up the Cluster Manager and add resources. When adding the as resource, specify the file path to the created configuration file in the envfile attribute.
Start up the instance in NORMAL mode.
Connect to the running instance and add a thread to start up the TAS instance on node 2.
Create an as resource configuration file that is required for the Cluster Manager on the node 2 to execute the AS binary.
Start up the Cluster Manager and add resources on node 2.
Start up the TAS instance on node 2.
Tibero Instance Installation
The steps to install and start up a Tibero instance is the same as those for a DB instance without TAS instance, except for specifying the path for the files that will be created.
Environment Variable Configuration
Configure the environment variables in the user configuration files (.bashrc, etc.) of the OS.
Set the TB_HOME variable to the path where the Tibero DB instance binary is installed on each node. Set the TB_SID variable to a distinct value for each node. The following example sets TB_SID of the DB instance on the first node to 'tac0'.
Set the TB_SID of the DB instance on node 2 to 'tac1'. If CM_SID is not set, set it to cm1.
The SID of each instance must be distinct only on the same server. Duplicate SIDs can be used if the instances are on different servers.
Initialization Parameter Configuration
The following parameters must be set to use the TAS instance.
Parameter
Description
The following are the initialization parameters for node 1.
The following are the initialization parameters for node 2.
Connection String Configuration
The following is an example of setting the connection string configuration file.
Creating and Starting Up a Database
The following describes how to create and start a database.
Create a DB resource configuration file that is required for the Cluster Manager to execute the tibero binary.
Create a resource used for tibero clustering on the Cluster Manager that booted when configuring the TAS instance on node 1.
Start up the instance in NOMOUNT mode.
Connect to the instance and create the database.
Restart the instance in NORMAL mode, and then create the UNDO tablespace and REDO THREAD for node 2.
Add a DB resource to the Cluster Manager on node2.
Start up the instance on node 2.
TAS Recommendations
The following are the recommended requirements for TAS.
Initialization Parameter Settings
Set the memory for Active Storage instance to a lower value than the database instance. The following memory settings are recommended for proper operation.
Parameter
Value
Disk Space REDUNDANCY Setting
When using an external data replication function like RAID, REDUNDANCY can be set to EXTERNAL. Otherwise, REDUNDANCY should be set to NORMAL. However, it can be set to HIGH if data availability is preferred over performance.
Disk Space Failure Group Setting
It is recommended to place disks that reside in the same physical server or switch in the same failure group since there is a high probability that a switch or cable failure will cause all the disks to be inaccessible. Since Active Storage keeps replicated copies of data in another failure group, data still can be accessed when failure occurs in the failure group. It is recommended to use three or more failure groups.
Disk Space Capacity Setting
Set the disk space capacity properly based on the database capacity. The maximum number of disks for a disk space is 1,024, and the maximum disk space capacity is 16 TB. It is recommended to maintain enough free disk space for data replication during disk failures.
Management Tips for DBA
Use SQL as a SYS user to connect to an Active Storage instance. The current disk space and disk states can be checked by querying the views described in “”. When there is a disk failure, the disk state in the view is changed to FAIL.
Disk Properties
It is recommended to use the same property settings (size, speed, etc.) for disks in the same disk space. This can be effective for disk striping by balancing the use of each disk.
tbImport
This chapter describes the tbImport utility and its usage.
Overview
tbImport is Tibero import utility that imports schema objects saved in external files to Tibero database. Like tbExport, it is useful for database backup and data transfer between heterogeneous databases.
When importing a schema object by using tbImport, all relevant schema objects are also imported automatically. If necessary, some of schema objects related to an imported object can be specified not to import.
tbImport has three modes: full database mode, user mode, and table mode. Only DBA can use these modes. If a user who wants to perform import has no DBA privilege, it is recommended to grant the SELECT ANY DICTIONARY privilege to the user. To set log that occurs during import, use the LOG parameter.
512GB each
Shared Disk Path
/dev/sdc, /dev/sdd, /dev/sde, /dev/sdf
Installation Account
dba
Tibero Installation Path
/home/dba/tibero
Number of Nodes
2
Internal Node IP
100.100.100.11, 100.100.100.12
TAS PORT
9620
TAS CM PORT
20005
TAS LOCAL CLUSTER PORT
20000
Number of Shared Disks
4
INSTANCE_TYPE
Instance type (set to AS to indicate Active Storage).
Provides information about the target database for migration.
Provides various migration methods with the [Option] button.
Displays migration progress through the Progress screen.
LSNR_LOG_FILE_SIZE
Maximum listener log file size
LSNR_LOG_TOTAL_SIZE_LIMIT
Maximum size of the directory where listener log files are saved
Complete Message
Displayed when the export has been successfully processed.
Alert Message
Displayed when the export has finished, but something is wrong.
It occurs when users try to export a table that does not exist. In this case, the tbExport displays an Alert message, skips the corresponding table, and then continues with exporting the next object.
Error Message
Displayed when an error occurs during export and the export cannot continue.
It occurs when the export cannot be processed anymore because of, for example, a shortage of system memory or failure of creating a necessary view for the export. After this error message is displayed, the export session will be terminated.
Complete Message
Displayed when the import has been successfully processed.
Alert Message
Displayed when the import has been finished, but something is wrong.
Error Message
Displayed when an error occurs during import and the import cannot continue.
bin
Contains the following Tibero client executables.
[Utilities]
– tbSQL : Basic client program for executing SQL queries and checking their results.
– T-Up : Utility for migrating data to and checking compatibility with Tibero from another database.
– tbExport : Utility for writing data to an external file for data migration or logical backup.
– tbImport : Utility for importing data from an external file.
– tbLoader : Utility for loading a large amount of data into the database.
– tbpc : Utility for converting embedded SQL in a C program to C so that the program can be compiled by a C compiler.
For further details on utilities, refer to "".
For the tbpc utility, refer to "TiberotbESQL/C Guide".
config
Contains configuration file for executing a Tibero client program.
include
Contains the header files for creating a Tibero client program.
lib
Contains the library files for creating a Tibero client program.
For more information, refer to "Tibero Application Developer's Guide" and "Tibero tbESQL/C Guide".
ssl
Contains certificate and key files for server security.
epa
Contains configuration and log files related to external procedures.
Name of a binary dump file created by OS and used during export. (Default value: default.dat)
FULL
Option to export data in full database mode.
Y: Uses full database mode.
N: Uses either user or table mode. Either one must be specified. (Default value)
GEOM_ASBYTES
Option to export geometry column data as bytes.
Y: Exports the data as bytes.
N: Exports the data as WKB. (Default value)
In a server of Tibero 6 or later version, geometry column data is stored as WKB. Therefore, if this option is set to Y, export and import performance improves because LOB data can be processed without using a function such as st_asbinary.
GRANT
Option to export permissions.
Y: Exports permissions. (Default value)
N: Does not export permissions.
INDEX
Option to export indexes.
Y: Exports indexes. (Default value)
N: Does not export indexes.
INLINE_CONSTRAINT
Option to display scripts with inline constraints.
Y: Displays scripts with inline constraints. Only non-null scripts are supported.
N: Displays scripts with out-of-line constraints. (Default value)
IP
IP address of the Tibero server to export. (Default value: localhost)
LOG
Name of the export log file.
LOGDIR
Directory that includes the export log file.
NO_PACK_DIR
Directory that includes a decompressed dump file. If this option is specified, the value set in the FILE parameter is ignored.
Since files in the specified directory can be deleted, it is recommended to specify a new or an empty directory.
OVERWRITE
Option to overwrite an existing file with the same name.
Y: Overwrites the file.
N: Does not overwrite the file. (Default value)
Note that you may lose an existing file.
PACK_TYPE
Option to select a packing algorithm for files to export.
TAR: Compresses files in TAR format. (Default value)
ZIP: Compresses files in ZIP format.
PASSWORD
Password for the user who performs export.
PACK_TYPE (hidden)
Packing algorithm.
TAR: TAR format. (Default value)
ZIP: ZIP format.
PARALLEL_DEGREE
(hidden)
Parallel hint to use in queries used to export table data.
(Default value: 0 (NOT PARALLEL))
PORT
Port number of the Tibero server to export. (Default value: 8629)
QUERY
Filter conditions for data to export.
The conditions are used regardless of the mode, but can be applied to undesired tables.
Enclose a WHERE clause with "\ and enclose a string in the clause with "\".
If an SQL statement has a syntax issue due to the condition, the statement is retried to be executed without the condition.
REMAP_TABLESPACE
Changes the tablespace name.
Examples)
Changing the tablespace name from USR1 to USR3
REMAP_TABLESPACE=usr1:usr3
Specified when using encrypted username and password.
Use this item to create EXPIMP_WALLET encryption file.
Usage
SAVE_CREDENTIAL=[EXPIMP_WALLET_FILE_NAME]
Examples)
SAVE_CREDENTIAL=/tmp/.expimp
USERNAME=username
SCRIPT
Option to show the DDL script that creates schema objects during export.
Y: Shows the DDL script.
N: Does not show the DDL script. (Default value)
SERVER_VER (hidden)
Tibero version to export. Create a script appropriate for the version. Export version constants are:
8: Tibero 6, Tibero 7 (Default value)
7: Tibero 5 SP1
6: Tibero 5
SID
SID of the Tibero server to export.
STATISTICS
Option to export statistics about the file to export. Recalculating the statistics such as SAFE and RECALCULATE is not supported.
Y: Exports the statistics about the target file.
N: Does not export the statistics about the target file. (Default value)
TABLE
Table names to export in table mode. For more information, refer to "".
● Usage
TABLE=tablelist
TEMP_DIR
Directory that includes temporary dump files generated during export.
THREAD_CNT
Number of threads used to export table data. (Default value: 4)
USER
Users of objects to export in user mode. For more information, refer to "".
USER=userlist
USERNAME
User account that performs export.
NOVALIDATE
Option to check whether the existing rows satisfy constraints to export.
Y: Does not check whether the existing rows satisfy the constraints.
N: Checks whether the existing rows satisfy the constraints. (Default value)
This item is effective only when it is set for export. This setting also applies to import regardless of the setting for import.
INDEX_PARALLEL_DEGREE
Parallel degree for indexes to export. (Default value: 0 (NOPARALLEL))
Item
Description
Complete
Message
Displayed when export successfully completed.
Warning Message
Displayed when export completed with one or more warnings. When tbExport recognizes that a table to export does not exist, this message is displayed, the table is skipped, and exporting the next object is tried.
Error Message
Displayed when export cannot continue due to an error. In cases such as that system memory is insufficient and views required for export are not created, this message is displayed. After this message is displayed, the tbExport session ends.
Item
Description
CFGFILE
Configuration file name
COMPRESS
Option to compress data during export.
Y: Compresses data.
N: Does not compress data. (Default value)
If set to Y, a single thread is used.
CONSISTENT
Option to export data in Consistent mode, which exports data based on the time when the exporting starts.
Y: Uses Consistent mode.
N: Does not use Consistent mode. (Default value)
This is not available for targets that are not supported in flashback queries.
CONSTRAINT
Option to export constraints.
Y: Exports constraints. (Default value)
N: Does not export constraints.
ENCRYPTION
Option to encrypt data in the dump file during export. The encryption algorithm is AES-128.
Select one of the following options:
ALL: Encrypts both data and metadata.
DATA_ONLY: Encrypts only data.
ENCRYPTED_COLUMNS_ONLY: Encrypts only encrypted columns.
METADATA_ONLY: Encrypts only metadata.
NONE: Encrypts no data. (Default value)
ENCRYPTION_PASSWORD
Password for the dump file with data encrypted by using the ENCRYPTION parameter.
[Figure 1] Export Modes
EXCLUDE
The following describes each tbImport result message.
Item
Description
Complete
Message
Displayed when import successfully completed.
Alert Message
Displayed when import completed with one or more warnings.
Error Message
Displayed when import cannot continue due to an error.
Quick Start
tbImport is automatically installed and uninstalled along with Tibero. It is implemented in Java and can be run on any platform where Java Virtual Machine (JVM) is installed.
Preparations
To use tbImport, check the following requirements.
JRE 1.4.2 or later must be installed.
tbImport must be installed in a platform where Tibero database server is installed. Otherwise, it must be connected to the platform through a network.
The following class libraries are required. (Default location: $TB_HOME/client/lib/jar)
tbImport class : expimp.jar
Common utility library : toolcom.jar
Common utility logger library : msllogger-14.jar
JDBC driver : internal-jdbc-14.jar
The class libraries are automatically installed along with Tibero.
No separate tasks are required.
Import Modes
There are three import modes: full database mode, user mode, and table mode. Exported data can be imported depending on mode. Each mode can be set with a parameter.
The following shows the relationship between schema objects in each mode.
[Figure 3] Import Modes
[Figure 3] Import Modes
Full Database Mode
Imports entire Tibero database from exported files. Objects of all users except for the SYS user are imported.
To use this mode, set the FULL parameter to Y as follows:
User Mode
Imports all schema objects of specified users except for the SYS user from exported files. DBA can specify multiple users.
To use this mode, set the USER parameter to the list of users as follows:
Table Mode
Imports schema objects related to one or more specified tables from exported files.
To use this mode, set the TABLE parameter to the list of tables along with their owner as follows:
From User To User Mode
Imports schema objects of a user specified in the FROMUSER parameter after changing the owner of the schema objects to a user specified in the TOUSER parameter. DBA can specify multiple users. This mode is a type of the user mode.
To use this mode, set the FROMUSER and TOUSER parameters as follows:
Executing tbImport
To execute tbImport, run the tbimport command in the $TB_HOME/client/bin directory.
The following executes tbImport in full database mode.
Executing tbImport
Usage
This section describes how to execute import for various cases.
Importing Tables with Constraints
If a table to import has constraints, its rows that violate the constraints are not imported.
If table constraints are saved and then table data is saved during import, rows that violate the constraints are not saved. For example, assume that two tables have a referential integrity constraint. If a child table data is tried to be saved before its parent table data is saved, no row of the child table is saved.
Therefore, to import tables with constraints, import all the table data and then set the table constraints.
Importing Compatible Tables
Before executing tbImport, a user can define a table with the same name of the table to import in a target database. The newly defined table can be defined differently from the table to import if the two tables are compatible.
To maintain compatibility between tables, note the following.
Table columns
A table in a target database must have all columns of the table to import.
Data types
Both tables have the same data types and default values for each column.
When adding a new column
Do not specify a primary key or NOT NULL constraint.
Importing Data to Existing Tables
Data can be imported to an existing table with the same name of the table to import. For this, both tables must be compatible.
If a user defines a table with the same name of the table to import in a target database before executing tbImport, or the target table already exists, some rows can be not imported due to preset constraints.
There are the following two methods to import data to existing tables.
Not applying constraints
Do not apply the constraints during import.
Changing the processing order
Change the import processing order. For example, if two tables have a referential integrity constraint, save the parent table and then its child table.
If the table size is huge, use the second method (changing the processing order) for better performance. The first method (not applying constraints) checks constraints on all table rows after applying constraints, which decreases performance.
tbImport Parameters
This section describes tbImport parameters that can be set at the command prompt.
Executing tbImport without any parameters displays the list and usage of the parameters as follows:
The following describes each parameter.
Item
Description
BIND_BUF_SIZE
Size of the bind buffer used in a stream when importing data in DPL.
(Default value: 1 MB (1048576))
CFGFILE
Configuration file name.
COMPRESS
Option to import files compressed during export.
Y: Imports the files.
N: Does not import the files. (Default value)
If set to Y, a single thread is used.
COMMIT
Option to execute commit after an insert operation. (Default value: N)
Units of an insert operation:
Commits data imported in CPL when the data exceeds the bind insert buffer size (1 MB).
If a LONG or LONG RAW column exists, the data is committed by row.
CONSTRAINT
Option to import constraints.
Y: Imports constraints. (Default value)
N: Does not import constraints.
DPL
Option to import data in DPL.
Y: Uses DPL.
N: Does not use DPL. (Default value)
The order of entered parameters does not matter. CFGFILE can be set only at the command prompt, but the other parameters can be set in a configuration file as well as at the command prompt. Note that parameter names set in the file must be in uppercase.
The following shows how to set parameters in a configuration file. Some parameters can have multiple values as shown in the second line.
The following is an example of setting parameters.
Usage Example
The following are the steps for importing data by using tbImport
Table definitions
Table data
Table indexes
Table constraints, views, procedures, etc.
The following is an example of importing data by using tbImport.
tbExport 7.0 102665 TmaxData Corporation Copyright (c) 2008-. All rights reserved.
Usage: tbexport [options] [parameter=value parameter=value ...]
Options:
-h|--help Display the more detailed information.
-v|--version Display the version information.
-p|--patch Display the binary's patch information.
Parameters:
CFGFILE Config file name
COMPRESS Compress Mode: Y/N, default: N
CONSTRAINT Export Constraint: Y/N, default: Y
CONSISTENT Consistent Mode: Y/N, default: N
ENCRYPTION Specifies a Encryption Mode
ENCRYPTION_PASSWORD Specifies a password for encrypting data
in the export Dump File
EXCLUDE Limit the export to specific objects
FILE Export dump file name, default: default.dat
FULL Full Mode: Y/N, default: N
GEOM_ASBYTES Export the geometry columns as bytes, default: N
GRANT Export Grant: Y/N, default: Y
INDEX Export Index: Y/N, default: Y
INLINE_CONSTRAINT Use the Inline Constraint: Y/N, default: N
(this option is only supported for the not null)
IP IP address, default: localhost
LOG Export script log file name
LOGDIR Export log directory
NO_PACK_DIR Export unpacked dump files to specified directory.
If this option is specified, FILE parameter will be ignored.
OVERWRITE Overwrite datafile if same file name exists: Y/N, default: N
PACK_TYPE Packing algorithm: TAR/ZIP, default: TAR
PASSWORD User password
PORT PORT number, default: 8629
QUERY Where predicate: (Optional) to filter data to be exported
(must be used with TABLE parameter.)
REMAP_TABLESPACE Remaps the objects from the source tablespace to the target
tablespace.
REMAP_TABLE Remaps the objects from the source table to the target table.
ROWS Export Table Rows: Y/N, default: Y
SAVE_CREDENTIAL Save your username and password to specified file
SCRIPT LOG THE DDL SCRIPT: Y/N, default: N
SID Database name
STATISTICS Export Statistics: Y/N, default: N
TABLE Table Mode: table name list
Append :<Partition Name> to select a single partition (Optional)
TARGETDB Target Server, default: TIBERO
TEMP_DIR Directory for the temporary raw dump files.
THREAD_CNT Thread Count, default: 4
USER User Mode: user name list
USERNAME Database user name
NOVALIDATE NOVALIDATE: Y/N , default: N
INDEX_PARALLEL_DEGREE Option of index parallel degree, default: 0 (NOPARALLEL)
tbImport 7.0 101902 TmaxData Corporation Copyright (c) 2008-. All rights reserved.
Usage: tbimport [options] [parameter=value parameter=value ...]
Options:
-h|--help Display the more detailed information.
-v|--version Display the version information.
-p|--patch Display the binary's patch information.
Parameters:
BIND_BUF_SIZE Specify the buffer size of DPL stream, default: 1M(1048576)
CFGFILE Config file name
COMPRESS Config file name
COMMIT Commit after the insertion, default: N
CONSTRAINT Import Constraint: Y/N, default: Y
DBLINK Import DB Link: Y/N, default: Y
DPL Use Direct Path Load: Y/N, default: N
ENCRYPTION_PASSWORD Specifies a password for accessing encrypted data
in the Dump File
EXCLUDE_TABLE Exclude Imported Table, default: None
EXCLUDE_USER Exclude Imported User, default: None
EXP_SERVER_VER Specify the exported server version, default: 8
FILE Import dump file name, default: default.dat
FROMUSER FromUser toUser Mode: user name list
(must be used with TOUSER parameter)
FULL Full Mode: Y/N, default: N
GRANT Import Grant: Y/N, default: Y
GEOM_ASBYTES Import the data to the geometry columns as bytes, default: N
IGNORE Ignore create error due to object existence: Y/N, default: N
INDEX Import Index: Y/N, default: Y
IO_BUF_SIZE Specify the buffer size of file I/O, default: 16M(16777216)
IP IP address, default: localhost
LOG Import script log file name
LOGDIR Import log directory
NATIONAL_CHARSET Specify the exported national character set,
default is the exported character set
NOLOGGING Import Table's NOLOGGING attribute: Y/N, default: N
NO_PACK_DIR Import unpacked dump files from specified directory.
If this option is specified, FILE parameter will be ignored.
PACK_TYPE Packing algorithm: TAR/ZIP, default: TAR
PASSWORD User password
ROLE Import Role: Y/N, default: Y
PORT PORT number, default: 8629
PSM Import PSM: Y/N, default: Y
P_DPL Use Parallel DPL: Y/N, default: N
ROWS Import Table Rows: Y/N, default: Y
SAVE_CREDENTIAL Save your username and password to specified file
SCRIPT LOG THE DDL SCRIPT: Y/N, default: N
SEQUENCE Import Sequence: Y/N, default: Y
SID Database name
STATISTICS Import Statistics: Y/N, default: N
SYNONYM Import Synonym: Y/N, default: Y
TABLE Table Mode: table name list
TEMP_DIR Directory for the temporary raw dump files.
THREAD_CNT Thread Count, default: 4
TOUSER FromUser toUser Mode: user name list
(must be used with FROMUSER parameter)
TRIGGER Import Trigger: Y/N, default: Y
USER User Mode: user name list
USERNAME Database user name
In a server of Tibero 5 SP1 or previous version, do not set this option to Y to export data as WKB. This option must be set to N, and use the st_asbinary function to export data as WKB. A performance issue may occur when temp LOB data needs to be created and processed for export, and an issue that huge geometry data cannot be processed may occur when DPL is used for import.
Changing to a case-sensitive tablespace name
REMAP_TABLESPACE="Usr1":usr3
Changing a partition table name
REMAP_TABLE=test1.partition_test1:test2.partition_test2
PASSWORD=password
The following sets environment variables of the EXPIMP_WALLET file.
export EXPIMP_WALLET=/tmp/.expimp
The following are priorities for the previous setting. If all of them are not specified, an error occurs.
1. username and password parameters entered at the command line.
2. USERNAME and PASSWORD files in cfgfile.
3. USERNAME and PASSWORD in the EXPIMP_WALLET file.
Commits data imported in DPL when the data exceeds BIND_BUF_SIZE.
DBLINK
Option to import DBLink.
Y: Imports DBLink. (Default value)
N: Does not import DBLink.
ENCRYPTION_PASSWORD
Password used during export.
This is used to access encrypted data in a dump file.
EXCLUDE_TABLE
Option to exclude specific tables from import.
Usage
EXCLUDE_TABLE=tablelist
Examples)
Commas (,) can be used to exclude multiple tables. When using a comma, there must not be any spaces before or after the comma.
EXCLUDE_TABLE=table1,table2
Tablename can be specified along with username.
EXCLUDE_TABLE=user1.table1
If only tablename is specified without username, all tables with the same tablename will be imported regardless of users.
Tablename and username.tablename can be specified together.
EXCLUDE_TABLE=table1,user1.table2
Duplicate tablenames can be specified. All target tables are excluded.
EXCLUDE_TABLE=user1.table1,user1.table1,table1
EXP_SERVER_VER
Exported server version.
Export version constants are:
8: Tibero 6, Tibero 7 (Default value)
7: Tibero 5 SP1
6: Tibero 5
FILE
Name of a binary dump file created by OS and used during import. (Default value: default.dat)
FROMUSER
Original owners of objects used during export. This is used in From User To User mode.
Usage
Set in the following format. The number of mappings must be the same.
FROMUSER=userlist
Example)
Multiple users can be set.
FROMUSER=user1,user2 TOUSER=user3,user4
Objects of multiple users can be mapped to a single user.
FROMUSER=user1,user2 TOUSER=user3,user3
Duplicate users cannot be set in FROMUSER.
FROMUSER=user1,user1 TOUSER=user3,user4
FULL
Option to import data in full database mode.
Y: Uses full database mode.
N: Uses either user or table mode. Either one must be specified. (Default value)
GRANT
Option to import permissions.
Y: Imports permissions. (Default value)
N: Does not import permissions.
GEOM_ASBYTES
Option to import data to geometry columns as bytes.
Y: Imports the data as bytes
N: Imports the data as WKB. (Default value)
This option is unnecessary in Tibero 6 and later because geometry column data is stored in WKB format. Use this option when importing data from Tibero 5 SP1 and earlier.
When exporting data from Tibero 5 SP1 or earlier, if GEOM_ASBYTES is set to N and geometry column data is exported in WKB format, set this option to N. To import data in DPL, set the
_DP_IMPORT_GEOM_FROM_OLD_FORMAT' iparam (default value: N) to Y.
IGNORE
Option to ignore an import error that is caused due to already existing schema objects.
Y: Ignores the error.
N: Does not ignore the error. (Default value)
INDEX
Option to import indexes.
Y: Imports indexes. (Default value)
N: Does not import indexes.
IO_BUF_SIZE
Size of a buffer used for file I/O during import. (Default value: 16 MB (16777216))
IP
IP address of the Tibero server to import. (Default value: localhost)
LOG
Name of the import log file.
LOGDIR
Directory that includes the import log file.
NATIONAL_CHARSET
Exported language set. (Default value: exported character set)
NOLOGGING
Option to add the NOLOGGING attribute for import tables.
Y: Adds the NOLOGGING attribute for the tables.
N: Does not add the NOLOGGING attribute for the tables. (Default value)
NO_PACK_DIR
Directory that includes a decompressed dump file used for import. If this option is specified, the value set in FILE is ignored.
PACK_TYPE
Option to select a packing algorithm for compressed file import.
TAR: Imports compressed TAR files. (Default value)
ZIP: Imports compressed ZIP files.
PASSWORD
Password for the user who performs import.
ROLE
Option to import roles.
Y: Imports roles. (Default value)
N: Does not import roles.
PORT
Port number of the Tibero server to import. (Default value: 8629)
PSM
Option to import PSM objects.
Y: Imports PSM objects. (Default value)
N: Does not import PSM objects.
P_DPL
Option to use the parallel DPL method for import.
Y: Uses the method.
N: Does not use the method. (Default value)
ROWS
Option to import table data.
Y: Imports table data. (Default value)
N: Does not import table data.
SAVE_CREDENTIAL
Specified when using encrypted username and password. Use this item to create EXPIMP_WALLET encryption file.
Usage
SAVE_CREDENTIAL=[EXPIMP_WALLET_FILE_NAME]
Example)
SAVE_CREDENTIAL=/tmp/.expimp
USERNAME=username
PASSWORD=password
The following sets environment variables of the EXPIMP_WALLET file.
export EXPIMP_WALLET=/tmp/.expimp
The following are priorities for the previous setting. If all of them are not specified, an error occurs.
1. Username and password parameters entered at the command line.
2. USERNAME and PASSWORD files in cfgfile.
3. USERNAME and PASSWORD in the EXPIMP_WALLET file.
SCRIPT
Option to show the DDL script that creates schema objects during import.
Y: Shows the DDL script.
N: Does not show the DDL script. (Default value)
SEQUENCE
Option to import sequences.
Y: Imports sequences. (Default value)
N: Does not import sequences.
SID
SID of the Tibero server to import.
STATISTICS
Option to import statistics about the file to import. Recalculating the statistics such as SAFE and RECALCULATE is not supported.
Y: Imports the statistics about the target file.
N: Does not import the statistics about the target file. (Default value)
SYNONYM
Option to import synonyms.
Y: Imports synonyms. (Default value)
N: Does not import synonyms.
TABLE
Table names to import in table mode.
Usage
TABLE=tablelist
TEMP_DIR
Directory that includes temporary dump files generated during import.
THREAD_CNT
Number of threads used to import table data. (Default value: 4)
TOUSER
New owners of objects to import in From User To User mode.
Usage
TOUSER=userlist
TRIGGER
Option to import triggers.
Y: Imports triggers. (Default value)
N: Does not import triggers.
USER
Users of objects to import in user mode.
Usage
USER=userlist
USERNAME
User account that performs import.
TAS Instance Management
This chapter describes how to configure TAS initialization parameters, how to start a TAS instance, how to configure the Tibero initialization parameters for using TAS, and how to create a database.
TAS Initialization Parameter Configuration
First, configure LISTENER_PORT, MAX_SESSION_COUNT, MEMORY_TARGET, and TOTAL_SHM_SIZE
according to the system configuration.
Note
For information about configuring initialization parameters, refer to "Tibero Reference Guide".
Additionally, configure the following initialization parameters.
Parameter
Description
The following are initialization parameter configuration examples.
Using a single disk
Using multiple disks (comma as delimiter)
Using multiple disks with wildcard pattern matching
Using '?' at the beginning of the path to reference TAS home directory
The following are optional initialization parameters.
Parameter
Description
TAS Instance Management
This section describes how to manage a TAS instance.
Preparations
Configure the TB _SID and TB _HOME environment variables.
Configure the TAS access information in the $TB_HOME/client/config/tbdsn.tbr file to access to tbsql.
Create a tip file for the TAS instance configuration.
TAS Startup
This section describes the environment configurations needed for starting up a TAS instance using an example file.
The TAS instance that uses a tip file in the following example uses all disk devices in "/devs/disk*" as aTAS disk.
[Example 1] TAS Instance tip File Example
When starting up a TAS instance for the first time, it must be started up in NOMOUNT mode.
Use tbsql to connect to the TAS instance that is running in NOMOUNT mode. Next, create the default disk space by using the CREATE DISKSPACE SQL statement.
The following DDL statement is an example of using the CREATE DISKSPACE clause.
A TAC instance automatically shuts down when the default disk space is created. After a default disk space is created, a TAS instance can be started up in NORMAL mode. Even when an additional disk space is created, the instance does not shut down.
Note
For more information about creating a disk space, refer to “”.
The following example shows the tip file of each required instance when starting up two TAS instances as a cluster. The TAS instances that use this tip file use all the shared disk devices in "/devs/disk*" as a TAS disk. Set CM_PORT to the port number specified in CM_UI_PORT of the CM_TIP file.
[Example 2] TAS Instance Clustering tip File Example: <as0.tip>
[Example 3] TAS Instance Clustering tip File Example: <cm0.tip>
[Example 4] TAS Instance Clustering tip File Example: <as1.tip>
[Example 5] TAS Instance Clustering tip File Example: <cm1.tip>
After starting up a TAS instance in the NOMOUNT mode and creating a disk space, start up TBCM and then add clustering resources as in the following example. When adding the clustering resources, enter '+' followed by the disk path set in AS_DISKSTRING of the tip file for the cfile attribute, so that the path can be recognized as a path for TAS.
When adding the as resource, create a configuration file that is required to execute the Active Storage (AS) binary as in . Enter the file path for the envfile attribute and TB_SID of the instance to start up for the name attribute.
[Example 6] Creating a Configuration File for the as Resource: <as0.profile>
Note
For more information about TBCM (Tibero Cluster Manager), refer to Tibero Administrator's Guide.
Cluster Manager is used to enhance availability and manageability as it allows seamless operation even when an instance fails in the Active Storage cluster.
Now the TAS instance with a TB_SID of 'as0' can be started up.
Before starting up the TAS instance 'as1', the REDO thread must be added to the instance.
'ds0' is the name of the default disk space created in the previous step. The REDO thread number "1" must be the same as the THREAD initialization parameter value in the tip file of TAS instance 'as1'.
Start up TBCM and add clustering resources as follows. The service resources added when CM_SID=cm0 do not need to be added.
[Example 7] Creating a Configuration File for the as Resource: <as1.profile>
Now the TAS instance 'as1' can be started up.
TAS Shutdown
Run the tbdown command to shut down a TAS instance. tbdown shuts down all Tibero instances currently using that TAS instance.
Note
If a TAS instance being used by a Tibero instance is shut down forcibly before the Tibero instance is shut down, the Tibero instance shuts down abnormally. To avoid this, shut down the Tibero instance first.
TAS Binary Replace
To replace the existing binary with a new one when the TAS instance has been already configured, the following must be executed to prevent an incompatibility issue between the old and new versions.
'ds0' is the name of the default disk space.
Tibero Instance Configuration
For a Tibero instance to use a TAS disk space, configure the following initialization parameters in the tip file of Tibero.
Parameter
Description
The following shows the tip file that is required for running a Tibero instance that uses a TAS instance. The Tibero instance that uses this tip file stores the control file in the disk space named 'ds0'.
[Example 8] Example of a Tibero Instance tip File that uses a TAS instance.
When setting the DB_CREATE_FILE_DEST initialization parameter to "+{disk space name}", if the LOG_ARCHIVE_DEST, PSM_SHLIB_DIR, and JAVA_CLASS_PATH initialization parameters are not configured manually, then the child directories of DB_CREATE_FILE_DEST are set to their default values. Since TAS currently does not support directories, these parameters must be manually configured as in the following example.
The following example shows how to create a Tibero database that uses a TAS file. The paths of the files that make up the database, which are stored in the disk space "ds0", must be specified in the "+DS0/..." format.
[Example 9] Example of the CREATE DATABASE of the Tibero Instance that uses a TAS File
Note
For more information about how to configure the initialization parameters of Tibero, refer to "Tibero Reference Guide".
For information about the CREATE DATABASE statement, refer to "Tibero SQL Reference Guide".
Installation
This chapter describes how to install Tibero.
Tibero can be installed using an installer or manually.
An installation file in the format of tibero7-bin-<fixset>_<platform>.tar.gz is used for all platforms.
At least one disk device is required for using TAS .
To use the TAS clustering function, at least one shared disk is required.
INSTANCE_TYPE
String value.
Type: String
Available values: "TIBERO" | "AS" | "ACTIVE_STORAGE"
Default value: "TIBERO"
AS_DISKSTRING
TTAS disk path.
Type: String
Available values: Disk path
Default value: ""
AS_ALLOW_ON LY_RAW_DISKS
If set to 'N', files in a general file system are recognized as a disk device to be used as a TAS disk.
Type: Boolean
Options: Y | N
Default value: Y
AS_WTHR_CNT
Number of rebalancing threads to create during TAS instance startup. The threads process rebalancing or resynchronization.
Type: Integer
Value: Positive integer
Default value: 10
USE_ACTIVE_STORAGE
Option to use the Active Storage file. Set to 'Y'.
Type: Boolean
Options: Y | N
Default value: N
AS_ADDR
IP address of a TAS instance that will be used by the Tibero instance.
Type: String
Allowed value: IP address as String
Default value: "127.0.0.1"
AS_PORT
LISTENER_PORT value of a TAS instance that will be used by the Tibero instance.
$ CREATE DISKSPACE ds0 NORMAL REDUNDANCY
FAILGROUP fg1 DISK
'/devs/disk101' NAME disk101,
'/devs/disk102' NAME disk102,
'/devs/disk103' NAME disk103,
'/devs/disk104' NAME disk104
FAILGROUP fg2 DISK
'/devs/disk201' NAME disk201,
'/devs/disk202' NAME disk202,
'/devs/disk203' NAME disk203,
'/devs/disk204' NAME disk204
ATTRIBUTE 'AU_SIZE'='4M';
CREATE DATABASE "tibero"
USER SYS IDENTIFIED BY tibero
MAXINSTANCES 8
MAXDATAFILES 100
CHARACTER SET MSWIN949
LOGFILE GROUP 1 '+DS0/log0001.log' SIZE 100M,
GROUP 2 '+DS0/log0002.log' SIZE 100M,
GROUP 3 '+DS0/log0003.log' SIZE 100M
MAXLOGGROUPS 255
MAXLOGMEMBERS 8
NOARCHIVELOG
DATAFILE '+DS0/system001.dtf' SIZE 100M
AUTOEXTEND ON NEXT 100M MAXSIZE UNLIMITED
SYSSUB DATAFILE '+DS0/syssub001.dtf' SIZE 100M
AUTOEXTEND ON NEXT 100M
DEFAULT TEMPORARY TABLESPACE tmp
TEMPFILE '+DS0/temp001.dtf' SIZE 100M
AUTOEXTEND ON NEXT 100M MAXSIZE UNLIMITED
EXTENT MANAGEMENT LOCAL AUTOALLOCATE
UNDO TABLESPACE undo00
DATAFILE '+DS0/undo001.dtf' SIZE 100M
AUTOEXTEND ON NEXT 100M
EXTENT MANAGEMENT LOCAL AUTOALLOCATE
DEFAULT TABLESPACE usr
DATAFILE '+DS0/usr001.dtf' SIZE 100M
AUTOEXTEND ON NEXT 100M MAXSIZE UNLIMITED
EXTENT MANAGEMENT LOCAL AUTOALLOCATE;
Manual Installation
Tibero can be manually installed in all supported platforms. This is referred to as "manual installation".
UNIX
The following is the manual installation process of Tibero for Unix.
Prepare the following two files.
Binary executable file (tar.gz)
License file (license.xml)
Set the environment variables in the environment configuration files (.bashrc, .bash_profile, .profile, etc.) for each OS user account.
The following are examples of environment variables and their values.
The environment variable configuration method varies with different OSs.
For more information, refer to the respective OS guide.
For more information about each environment variable, refer to “Applying and Verifying User Configuration File”.
Extract the compressed binary executable file (tar.gz) to home/tibero/Tibero. Copy the issued license file (license.xml) to the license subdirectory in %TB_HOME%.
Enter the following command from the $TB_HOME/config path.
After executing the command, the configuration file (.tip), tbdsn.tbr, and psm_commands.bat are created.
Start the Tibero server in 'NOMOUNT Mode'.
Connect to the database by using the tbSQL utility.
In the following example, the 'sys' account is used to connect to the database.
Create a database using the CREATE DATABASE statement.
In the following example, a database named 'tibero' is created.
The following describes each setting item in the process.
Item
Description
maxdatafiles
Sets the maximum value of data files in the database.
(Default value: 100)
character set
Sets the character set of the database.
maxloggroups
Sets the maximum value of log groups. (Default value: 255)
maxlogmembers
Sets the maximum value of log files in a log group. (Default value: 8)
Note
For more information about the CREATE DATABASE statement, refer to Tibero SQL Reference Guide.
After the database is created, run the tbboot command to restart Tibero.
Enter the system.sh script from $TB_HOME/scripts directory to execute the SQL file in the current directory. The SQL file creates roles, system users, views, packages, etc.
(The default passwords for the sys and syscat accounts are tibero and syscat, respectively.)
Note
For more information about options provided in system.sh(.vbs), refer to Appendix “system.sh”.
After the Tibero installation is complete, the Tibero process starts.
To check the process state, execute the following command.
Installation Verification
This section describes how to verify whether Tibero has been successfully installed.
Directory Structure
The following directory structure is created after installing Tibero.
Note
The $TB_SID in the above directory structure is replaced by the server SID according to each system environment.
The following are the default directories in Tibero.
bin
Contains Tibero executables and server management utilities. The tbsvr and tblistener files are executables for creating the Tibero, and tbboot and tbdown are used to start up and shut down the Tibero.
client
Contains the following subdirectories.
Subdirectories
Description
bin
Contains the following Tibero client executables (utilities).
tbSQL : Basic client program for executing SQL queries and checking their results.
T-Up : Utility for migrating data to and checking compatibility with Tibero from another database.
config
Contains configuration file for executing a Tibero client program.
include
Contains the header files for creating a Tibero client program.
lib
Contains the library files for creating a Tibero client program. For more information, refer to Tibero Application Developer's Guide and
TiberotbESQL/C Guide.
ssl
Contains certificate and key files for server security.
epa
Contains configuration and log files related to external procedures. For more
information, refer to Tibero External Procedure Guide.
config
Contains the configuration files for Tibero. The $TB_SID.tip file in this directory contains the environment settings for Tibero.
database
Contains the following subdirectories.
$TB_SID
Contains all database information unless it is configured separately. It includes the metadata and the following file types.
File
Description
Control File
Contains the location of all other files.
Data File
Contains the actual data.
Log File
Contains all data changes for use during data recovery.
$TB_SID/java
Contains Java EPA class file unless JAVA_CLASS_PATH is defined.
instance
Contains the following subdirectories.
$TB_SID/audit
Contains the audit files that records activities of database users using system privileges or schema object privileges.
$TB_SID/log
Contains system log (slog), DBMS log (dlog), internal log (ilog), listener log (lsnr), and memlog files of Tibero.
File
Description
System log file (slog)
Used for debugging. This file logs all server activities in detail that can be used for troubleshooting performance issues or resolve bugs within Tibero.
DBMS log file (dlog)
Records more important server activities than the system log file. It records about server startup and mode, ddl executions, etc.
Internal log file (ilog)
Records system logs for events configured for each thread. Use tbiv to view the logs.
Listener log file (lsnr)
Used for debugging Listener objects. It records important activities in Listeners objects and the logs are used for debugging purposes.
System log, DBMS log, internal log, and listener log files are accumulated as the database operates. The maximum size of the log directory can be set, and Tibero deletes old files if the maximum size is reached.
The following are the initialization parameters for a DBMS log file.
Initialization Parameter
Description
DBMS_LOG_FILE_SIZE
Maximum DBMS log file size.
DBMS_LOG_TOTAL_SIZE_LIMIT
Maximum size of the directory where DBMS log files are saved.
SLOG_FILE_SIZE
Maximum system log file size.
SLOG_TOTAL_SIZE_LIMIT
Maximum size of the directory where system log files are saved.
ILOG_FILE_SIZE
Maximum internal log file size.
ILOG_TOTAL_SIZE_LIMIT
Maximum size of the directory where internal log files are saved.
$TB_SID/dump
Contains dump files generated because of errors.
Subdirectory
Description
act
Contains information generated by thread activity monitoring.
diag
Contains log and dump files generated when the diag function is used in TAC.
tracedump
Contains information for SQL and PSM error debugging and dump files generated by a DDL command for dump.
$TB_SID/path
Contains the socket files used for interprocess communication in Tibero. The files in this directory must not be read or updated while Tibero is running.
lib
Contains the spatial function library files for Tibero.
license
Contains the Tibero (license.xml). This XML file can be opened using a text editor to check its contents.
The following is the subdirectory.
Subdirectory
Description
oss_licenses
Contains the open license terms that must be complied with when using
Tibero.
nls
Contains the following subdirectory.
Subdirectory
Description
zoneinfo
Contains the time zone information file for Tibero.
scripts
Contains various SQL statements used when creating a database in Tibero. It also includes various view definitions that reflect the current state of Tibero.
The following is the subdirectory.
Subdirectory
Description
pkg
Contains the package creation statements for Tibero.
Applying and Verifying User Configuration File
After Tibero is installed, the following properties are added in the user configuration file.
Environment Variable
Description
TB_HOME
Installation path of Tibero. If you didn't specify the path, {user home directory}/Tibero/tibero7 is set as TB_HOME by default.
TB_SID
SID entered during installation. If not entered, it is set to tibero by default.
LD_LIBRARY_PATH
Path to the shared libraries required to use Tibero. All required libraries are located in $TB_HOME/lib and $TB_HOME/client/lib, and the environment variables vary by the OS type.
SunOS, Linux: LD_LIBRARY_PATH
AIX: LIBPATH
PATH
Directory paths to Tibero. It is set to $TB_HOME/bin and $TB_HOME/client/bin by default.
In Unix, when a process is abnormally terminated, virtual memory information remains on the disk. This process is called a core dump. It requires significant amounts of computing resources and temporarily lowers system performance during execution, and the dump files generated in the process take up a large part of disk space. Therefore, this process is not recommended for Tibero.
To disable the core dump feature, add the following command to the configuration file (.profile) of the user account.
Because the user configuration file has been created as previously described does not mean it is actually applied. You need to perform the following to apply the configuration file.
Run the following command to apply the configuration file. Valid only in Unix systems (including Linux).
To verify whether the configuration file is properly applied, run the following commands.
Startup and Shutdown
Only database administrators (DBAs) are allowed to start up or shut down Tibero.
Startup
Executes the following tbboot command to start up Tibero.
Option
Description
-h
Displays help for the tbboot command.
-v
Displays the current version information of Tibero .
-l
Displays the license information of Tibero.
-C
Displays character sets supported by Tibero.
-c
Disables Replication mode when Tibero is set to the replication mode.
-t BOOTMODE
Starts Tibero in different modes. (Optional)
Tibero uses the tbboot command to choose one of the following booting modes.
NOMOUNT: Only starts up the Tibero process.
MOUNT: Supports database management functions such as media recovery.
Shutdown
Tibero is shut down by the tbdown command.
You can run the tbdown command along with options as follows:
Option
Description
-h
Displays help for the tbdown command.
-t DOWNMODE
Shuts down the Tibero server in different modes. (Optional)
Tibero uses the tbdown command to choose one of the following shutdown modes.
NORMAL: Normally shuts down the database.
POST_TX: Shuts down the database after all transactions are complete.
Connecting to the database with a tbSQL utility
Run the tbsql command.
You can enter user ID and password as follows:
To connect to the database through a listener, enter @ after the user ID and password, and then the alias set specified in the tbdsn.tbr file.
User Accounts
The following user accounts are automatically created upon the installation of Tibero.
User Account
Description
SYS
Manages database by creating and managing system packages, synonyms, users, roles, virtual tables, sequences, dynamic views, and so on.
SYSCAT
Creates and manages the static catalog views for database management.
SYSGIS
Creates and manages GIS (Geographic Information System)-related tables.
OUTLN
Stores SQL hints for an SQL query to be repeated always with the same query plan.
TIBERO, TIBERO1
Sample user accounts that have been granted CONNECT, RESOURCE and DBA roles.
TEXT Indexing Elements
This chapter describes elements related to Tibero TEXT indexes.
Tibero TEXT indexes can be configured with the following preference classes:
PREFERENCE Class
Description
STORAGE
Storage of an index and a table, which are created when a TEXT index
is created.
LEXER
Lexer used for the TEXT index.
WORDLIST
Token created for the TEXT index.
STOPLIST
Preferences can be created using TEXT_DDL.CREATE_PREFERENCE.
Tibero TEXT provides predefined preferences for the seven preference classes above.
Users can create new preferences using the defined preferences.
After a preference has been created, the properties of the preference can be changed using TEXT_DDL.SET_ATTRIBUTE.
STORAGE
The STORAGE class specifies the storage for an index and table which are created when a TEXT indexis created.
BASIC_STORAGE is defined in the STORAGE class and has the following properties:
Property
Description
LEXER
The LEXER class specifies the lexer to use for a TEXT index.
BASIC_LEXER
Uses whitespace or special character delimited words.
BASIC_LEXER has the following attributes:
Attribute
Description
JAPANESE_LEXER
Used to generate tokens in Japanese text. JAPANESE_LEXER is a Japanese morphological analyzer. JAPANESE_LEXER has the following attributes.
Attribute
Description
CHINESE_LEXER
Used to generate tokens in Chinese text.
CHINESE_LEXER has the following attributes.
Only available in UTF8 and GBK character sets.
Can use CONTEXT indexes but not CTXCAT indexes.
CHINESE_VGRAM_LEXER
Used to generate tokens in Chinese text. Unlike CHINESE_LEXER, tokens are generated based on the number of characters. Lexical meaning is not used.
CHINESE_VGRAM_LEXER has the following limitations.
Only available in UTF8 character set.
WORLD_LEXER
Used to generate tokens from documents containing multiple languages. This automatically detects the language and generates a token. Tokens are generated based on whitespace for languages with whitespace, and they are made in 2-grams for Japanese or Chinese containing no whitespace.
WORLD_LEXER has the following limitations.
Only available in UTF8 character sets.
Japanese or Chinese, which generate tokens in 2-gram, do not support wildcards.
Can use CONTEXT indexes but not CTXCAT indexes.
WORDLIST
The WORDLIST class specifies a token created when a TEXT index is created. BASIC_WORDLIST is defined in the WORDLIST class and has the following properties:
Attribute
Description
STOPLIST
The STOPLIST class specifies words which are excluded from TEXT indexes. DEFAULT_STOPLIST and EMPTY_STOPLIST are defined in the STOPLIST class.
DEFAULT_STOPLIST has basic stopwords. For details about the basic stopwords, please refer to “”.
EMPTY_STOPLIST is a STOPLIST without STOPWORD.
A new stoplist can be created using TEXT_DDL.CREATE_STOPLIST. A new stopword can be added to the list using TEXT_DDL.ADD_STOPWORD.
DATASTORE
The DATASTORE class specifies how your documents are stored. The DATASTORE class defines DIRECT_DATASTORE and MULTI_COLUMN_DATASTORE.
DIRECT_DATASTORE
DIRECT_DATASTORE internally stores data in text columns. Each row is indexed as a single document. DIRECT_DATASTORE has no attributes.
MULTI_COLUMN_DATASTORE
MULTI_COLUMN_DATASTORE stores data in multiple columns. Tibero combines the columns specified with MULTI_COLUMN_DATASTORE by each row and then indexes the rows.
Attribute
Description
FILTER
The FILTER class specifies how to filter documents to be indexed.
The FILTER class only defines NULL_FILTER.
NULL_FILTER
NULL_FILTER does not filter. It indexes general documents, HTML and XML documents without filtering. Type NULL_FILTER has no attributes.
SECTION GROUP
The SECTION_GROUP class divides the document structure into multiple sections. This class only defines NULL_SECTION_GROUP, which does not define a section. You can use TEXT_DDL.CREATE_SECTION_GROUP to create a new SECTION_GROUP.
TEXT_DDL Package
The following procedures are provided by TEXT_DDL to create and manage preferences.
Procedure
Description
ADD_SPECIAL_SECTION
The ADD_SPECIAL_SECTION procedure adds a SENTENCE or PARAGRAPH as a SPECIAL SECTION in a SECTION GROUP. Adding a special section allows you to find a sentence or paragraph by using the WITHIN operator.
After specifying section groups containing special sections, the delimiter specified when creating indexes tokenizes special sections.
Sentences are delimited by [word][punctuation][whitespace] or [word][punctuation][newline]. Paragraphs are delimited by [word][punctuation][newline][whitespace] or [word][punctuation][newline][newline].
Note
The default punctuation value is [. / ! / ?], andthe default newline value is [\n / \r]. The user cannot modify these punctuation and newline values.
Prototype
Parameter
Parameter
Description
Example
ADD_STOPWORD
The ADD_STOPWORD procedure adds a stopword to a stoplist.
Prototype
Parameter
Parameter
Description
Example
CREATE_PREFERENCE
The CREATE_PREFERENCE procedure creates a new preference.
Prototype
Parameter
Parameter
Description
Example
CREATE_SECTION_GROUP
The CREATE_SECTION_GROUP procedure creates a new section group.
Prototype
Parameter
Parameter
Description
Example
CREATE_STOPLIST
The CREATE_STOPLIST procedure creates a new stoplist.
Prototype
Parameter
Parameter
Description
Example
DROP_PREFERENCE
The DROP_STOPLIST procedure deletes a stoplist.
Prototype
Parameter
Parameter
Description
Example
DROP_SECTION_GROUP
The DROP_PREFERENCE procedure deletes a preference.
Prototype
Parameter
Parameter
Description
Example
DROP_STOPLIST
The DROP_STOPLIST procedure deletes a stoplist.
Prototype
Parameter
Parameter
Description
Example
REMOVE_SECTION
Deletes a SECTION from a SECTION GROUP
Prototype
Parameter
Parameter
Description
Example
REMOVE_STOPWORD
The REMOVE_STOPWORD procedure deletes a stopword from a stoplist.
Prototype
Parameter
Parameter
Description
Example
SET_ATTRIBUTE
The SET_ATTRIBUTE procedure specifies the attributes for a preference.
Prototype
Parameter
Parameter
Description
Example
CTX_DDL Package
The following are procedures provided by CTX_DDL to manage CONTEXT indexes.
OPTIMIZE_INDEX
Optimizes synchronized indexes. This improves query performance because old data is removed.
Prototype
Parameter
Parameter
Description
Example
SYNC_INDEX
Synchronizes CONTEXT indexes to process inserts, updates, and deletes to the base table.
Prototype
Parameter
Parameter
Description
Example
CTX_OUTPUT Package
The following are procedures provided by CTX_OUTPUT to manage CONTEXT indexes.
tibero@Tibero:~/Tibero/tibero7/bin$ tbboot nomount
Change core dump dir to /home/tibero7/tibero7/bin/prof.
Listener port = 8629
Tibero7
TmaxData Corporation Copyright (c) 2008-. All rights reserved.
Tibero instance started up (NOMOUNT mode).
tibero@Tibero:~/Tibero/tibero7/client/bin$ tbsql sys/tibero
tbSQL 7
TmaxData Corporation Copyright (c) 2008-. All rights reserved.
Connected to Tibero.
SQL>
SQL> create database "tibero"
user sys identified by tibero
maxinstances 8
maxdatafiles 100
character set MSWIN949
national character set UTF16
logfile
group 1 'log001.log' size 50M,
group 2 'log002.log' size 50M,
group 3 'log003.log' size 50M
maxloggroups 255
maxlogmembers 8
noarchivelog
datafile 'system001.dtf' size 100M autoextend on next 10M maxsize unlimited
default temporary tablespace TEMP
tempfile 'temp001.dtf' size 100M autoextend on next 10M maxsize unlimited
extent management local autoallocate
undo tablespace UNDO
datafile 'undo001.dtf' size 200M autoextend on next 10M maxsize unlimited
extent management local autoallocate
SYSSUB
datafile 'syssub001.dtf' size 10M autoextend on next 10M maxsize unlimited
default tablespace USR
datafile 'usr001.dtf' size 100M autoextend on next 10M maxsize unlimited
extent management local autoallocate;
Database created.
SQL> quit
Disconnected.
tibero@Tibero:~/Tibero/tibero7/bin$ tbboot
Change core dump dir to /home/tibero7/tibero7/bin/prof.
Listener port = 25010
Tibero 7
TmaxData Corporation Copyright (c) 2008-. All rights reserved.
Tibero instance started up (NORMAL mode).
tibero@Tibero:~/Tibero/tibero7/scripts$ system.sh
Enter SYS password:
Enter SYSCAT password:
Creating the role DBA...
create default system users & roles?(Y/N):
Creating system users & roles...
Creating virtual tables(1)...
Creating virtual tables(2)...
Granting public access to _VT_DUAL...
Creating the system generated sequences...
Creating internal dynamic performance views...
Creating outline table...
Creating system package specifications:
Running /home/tibero/Tibero/tibero7/scripts/pkg/pkg_standard.sql...
Running /home/tibero/Tibero/tibero7/scripts/pkg/pkg_dbms_output.sql...
Running /home/tibero/Tibero/tibero7/scripts/pkg/pkg_dbms_lob.sql...
Running /home/tibero/Tibero/tibero7/scripts/pkg/pkg_dbms_utility.sql...
......omitted......
Creating spatial meta tables and views ...
Creating internal system jobs...
Creating internal system notice queue ...
Done.
For details, check /home/tibero7/tibero7/instance/tibero/log/system_init.log.
tbExport : Utility for writing data to an external file for data migration or logical backup.
tbImport : Utility for importing data from an external file.
tbLoader : Utility for loading a large amount of data into the database.
tbpc : Utility for converting embedded SQL in a C program to C so that the program can be compiled by a C compiler.
For further details on utilities, refer to Tibero Utilities Guide.
For the tbpcutility however, refer to TiberotbESQL/C Guide.
RECOVERY: Runs a standby database when configuring a Tibero Standby Cluster.
NORMAL: Enables normal use of all database functions.
RESETLOGS: Initializes log files when the Tibero server is restarted after a media recovery.
READONLY: Only allows the database to be read. No updates are permitted.
FAILOVER: Uses Standby as Primary in Tibero Standby Cluster environments.
IMMEDIATE: Shuts down the database after forcibly terminating all tasks and rolling back any running transactions.
ABORT: Forcibly terminates the Tibero processes.
SWITCHOVER: Terminates the primary database in the normal mode after synchronizing the primary database with the standby database.
ABNORMAL: Forcibly terminates the server process without accessing the Tibero server.
LSNR_LOG_FILE_SIZE
Maximum listener log file size.
LSNR_LOG_TOTAL_SIZE_LIMIT
Maximum size of the directory where listener log files are saved.
R_TABLE_CLAUSE
Tablespace of an index for the ROWID column in a mapping table.
S_TABLE_CLAUSE
Reserved for future functionality.
DROP_SECTION_GROUP
Deletes SECTION_GROUP.
DROP_STOPLIST
Deletes a stoplist.
REMOVE_SECTION
Deletes a SECTION from a SECTION GROUP.
REMOVE_STOPWORD
Deletes a stopword from a stoplist.
SET_ATTRIBUTE
Specifies the attributes of a preference.
parallel_degree
Parallel degree. (Unsupported)
Words which are excluded from TEXT indexes.
DATASTORE
Datastore that specifies where your TEXT index is stored.
FILTER
Filtering method to index your document.
SECTION GROUP
Organizes your document into section groups.
I_TABLE_CLAUSE
Tablespace of a table that saves TEXT index token.
I_ROWID_INDEX_CLAUSE
Tablespace of an index for the ROWID column in a token table.
I_INDEX_CLAUSE
Tablespace of an index for a token column in a token table.
K_TABLE_CLAUSE
Reserved for future functionality.
P_TABLE_CLAUSE
Reserved for future functionality.
N_TABLE_CLAUSE
Reserved for future functionality.
MIXED_CASE
Option to preserve case-sensitivity of text for indexing. If set to YES, case
is preserved. (Attribute: TRUE/FALSE, default value: FALSE)
BASE_LETTER
Option to ignore base letters, such as Umlaut and acute accent for indexing.If set to YES, base letters are ignored.
(Attribute: TRUE/FALSE, default value: FALSE)
WHITESPACE
Option to search for a sentence or paragraph by joining with punctuation or newline characters to separate sentences or paragraphs. The default valueis space or tab. Other than the default value, user-specified whitespace characters can be recognized.
(Attribute: string, default value: space or tab characters)
ASCII_MIXED_CASE
Option to preserve case-sensitivity of ASCII text for indexing. If set to YES, case is preserved. (Attribute: TRUE/FALSE, Default: FALSE)
DELIMETER
Option to ignore Japanese delimiters, such as /, -, ·, etc. If set to YES, such characters are ignored. (Attribute: TRUE/FALSE, Default: FALSE)
PREFIX_INDEX
If this is specified as YES, prefixes of words are indexed to improve the performance of searching for a prefix.
(Attribute: YES/NO, Default: NO)
PREFIX_MIN_LENGTH
Minimum length of a prefix when PREFIX_INDEX is specified as YES. (Range: 1 ~ 64, Default: 1)
PREFIX_MAX_LENGTH
Maximum length of a prefix when PREFIX_INDEX is specified as YES. (Range: 1 ~ 64, Default: 64)
COLUMNS
Comma-separated columns to be indexed. You can specify the columns of type VARCHAR, CLOB, NUMBER, and DATE. You can also specify column
name, column expression, and PSM function. (Attribute: STRING)
DELIMITER
Delimiter to split the column text.
– COLUMN_NAME_TAG: Delimits the text of each column by XML format start and end tags. Each tag has a column name. (Default)
– NEWLINE: Delimits the text of each column by newline.
ADD_SPECIAL_SECTION
Adds a SENTENCE or PARAGRAPH as a SPECIAL SECTION in
a SECTION GROUP.
ADD_STOPWORD
Adds a stopword to a stoplist.
CREATE_PREFERENCE
Creates a new preference.
CREATE_SECTION_GROUP
Defines a new SECTION_GROUP.
CREATE_STOPLIST
Creates a new stoplist.
DROP_PREFERENCE
Deletes a preference.
group_name
Name of a SECTION GROUP to be added.
section_name
Name of a section to be added. Can be specified as 'SENTENCE' or
'PARAGRAPH'.
stoplist_name
STOPLIST name.
stopword
Stopword to add.
lang
Language to which the stopword applies. (Unsupported)
udef_pref_name
PREFERENCE name
pdef_pref_name
Predefined Tibero TEXT preference name.
udef_pref_name
Preference name.
pdef_pref_name
Predefined Tibero TEXT preference name.
stoplist_name
Stoplist name.
stoplist_type
Stoplist type.
Currently, DEFAULT_STOPLIST and EMPTY_STOPLIST are supported.
udef_pref_name
Preference name.
udef_pref_name
Section group name.
stoplist_name
Stoplist to delete.
group_name
Name of a SECTION GROUP to be deleted.
section_name
Name of a SECTION to be deleted.
stoplist_name
Name of a stoplist which includes the stopword to be deleted.
stopword
Stopword to delete.
lang
Language to which the stopword applies. (Unsupported)
udef_pref_name
Preference to specify the attribute for.
attribute_name
Attribute name.
value
Attribute value.
idx_name
Index name.
optlevel
One of the following two optimization methods.
– FAST: combine duplicate tokens, but do not remove old (removed row) data.
– FULL: combine duplicate tokens, and then remove the old (removed row) data.
maxtime
Maximum optimization time. (Unsupported)
token
Token to be optimized. (Unsupported)
part_name
Partition name for local indexes.
token_type
Token type. (Unsupported)
idx_name
Index name.
memory
Runtime memory to use for synchronization. (Unsupported)
part_name
Partition name for local indexes.
parallel_degree
Parallel degree. (Unsupported)
maxtime
Maximum synchronization time. (Unsupported)
locking
How to deal with the case where another synchronization is already running
in the same index or partition. (Unsupported)
file_name
Name of the log file.
write_option
If the log file already exists, this parameter specifies whether you overwrite
CTX_DDL.OPTIMIZE_INDEX (
idx_name IN VARCHAR2,
optlevel IN VARCHAR2,
maxtime IN NUMBER DEFAULT NULL,
token IN VARCHAR2 DEFAULT NULL,
part_name IN VARCHAR2 DEFAULT NULL,
token_type IN NUMBER DEFAULT NULL,
parallel_degree IN NUMBER DEFAULT 1)
begin
ctx_ddl.optimize_index('myindex','FAST');
end
CTX_DDL.SYNC_INDEX (
idx_name IN VARCHAR2 DEFAULT NULL,
memory IN VARCHAR2 DEFAULT NULL,
part_name IN VARCHAR2 DEFAULT NULL,
parallel_degree IN NUMBER DEFAULT 1,
maxtime IN NUMBER DEFAULT NULL,
locking IN NUMBER DEFAULT LOCK_WAIT)
begin
ctx_ddl.sync_index('myindex');
end
CTX_OUTPUT.END_LOG;
begin
ctx_output.end_log;
end
CTX_OUTPUT.START_LOG (
file_name IN VARCHAR2,
write_option IN BOOLEAN DEFAULT TRUE)
begin
ctx_output.start_log('myindex', true);
end
Utility API
This chapter describes functions used to call Tibero utilities from applications.
Tibero provides C and C++ functions related to its utilities. Application developers can call the utilities from applications by using the utility API
Header Files
The utility API uses the following header files.
Structures
Utility API can define the following structures.
sqlstr structure
TBExpImpMeta structure
TBExportIn structure
TBExportOut structure
TBExportStruct structure
TBImportIn structure
TBImportOut structure
TBImportStruct structure
Utility API
TBConnect
Connects to Tibero server by using database connection information (SID, user name, and password).
Syntax
Parameters
Return codes
Related function
TBDisconnect
Disconnects from Tibero server that matches the database connection information (SID).
Syntax
Parameters
Return codes
Related function
TBExport
Extracts data from a database to an external file. The file contains the extracted data as text, and it is saved as a data file for tbLoader. Column data and records are extracted with column and record separators. Data to export can be specified with a SELECT statement, and this requires the SELECT permission on the target table or view.
Syntax
Parameters
Return codes
Example
TBImport
Loads data from an external file to the database. Fixed-length and delimited record type files are supported by tbLoader. The INSERT permissions for the table or view is required to use this utility.
Syntax
Parameters
Return codes
Example
Command Line Tool
This chapter describes how to use TASCMD, a command line tool, to query and manage files stored in a disk space.
Overview
TASCMD commands can be used to query disk spaces and query and manage files stored in a disk space. It can also be used to save a file from a local directory to a disk space and vice versa.
When a TASCMD command is executed, TASCMD accesses the TAS instance and requests necessary data or jobs.
lineTermLen
Input
SQLSMALLINT
Record separator string length.
enclStart
Input
SQLCHAR *
Start string of a data column. If set to a double quotation mark ("), this is appended at the start of the column data.
enclStartLen
Input
SQLSMALLINT
Start string length.
enclLen
Input
SQLCHAR *
End string of a data column. If set to a double quotation mark ("), this is appended to the end of the column data.
enclEndLen
Input
SQLSMALLINT
End string length.
escape
Input
SQLCHAR *
ESCAPE string used to interpret column data. This is only used in TBImport structure.
escapeLen
Input
SQLSMALLINT
Length of the ESCAPE string used to interpret column data. This is used only in TBImport structure.
iFileType
Input
SQLSMALLINT
Currently only SQL_DEL, which uses column separator, is available.
piMsgFileName
Input
SQLCHAR *
Name of the message file that contains errors and warnings that occur while extracting data and other useful information.
iMsgFileNameLen
Input
SQLSMALLINT
Length of the message file name. If a file name ends with NULL, specify SQL_NTS.
piExportInfoIn
Input
TBExportIn *
Pointer to a TBExportIn structure that has input metadata required to extract data.
piExportInfoOut
Input
TBExportOut *
Pointer to a TBExportOut structure that has result data occurred after extracting data.
iCommitCount
Input
SQLINTEGER
Number of records to commit at a time when loading data. Because of a performance issue, the actual number of records committed may not be same as this value.
iErrorCount
Input
SQLINTEGER
Allowed maximum number of error records. If this number is exceeded while loading data, loading is stopped.
oRowsUpdated
Output
SQLINTEGER
Number of records updated in a table or view.
oRowsRejected
Output
SQLINTEGER
Number of records failed to be loaded.
oRowsCommitted
Output
SQLINTEGER
Number of records committed successfully.
iFileType
Input
SQLSMALLINT
Currently, only SQL_DEL, which uses a column separator, is available.
piMsgFileName
Input
SQLCHAR *
Name of the message file that contains errors and warnings that occur while loading data and other useful information.
iMsgFileNameLen
Input
SQLSMALLINT
Length of the message file name. If a file name ends with NULL, specify SQL_NTS.
piBadFileName
Input
SQLCHAR *
Name of the error file that contains errors occurred while loading data.
iBadFileNameLen
Input
SQLSMALLINT
Length of the error file name. If a file name ends with NULL, specify SQL_NTS.
iDPL
Input
BOOL
Option to use direct path load when loading data.
iTrailNullCols
Input
BOOL
Option to bind the last column data that does not
exist in a data file to NULL.
piImportInfoIn
Input
TBImportIn *
Pointer to a TBImportIn structure that has input metadata required to load data.
piImportInfoOut
Input
TBImportOut *
Pointer to a TBImportOut structure that has result data occurred after loading data.
Header File
Description
tbutil.h
Declares utility API and defines related structures.
The following structures are defined.
struct sqlstr
struct TBExpImpMeta
struct TBExportIn
struct TBExportOut
struct TBExportStruct
struct TBImportIn
struct TBImportOut
struct TBImportStruct
sqlca.h
Declares a structure used to send utility errors to applications.
The following structure is defined.
struct sqlca
sqlcli.h
ODBC standard header file. Defines standard API and macros.
Field
Usage
Type
Description
length
Input
SQLSMALLINT
String length
data
Input
SQLCHAR *
String pointer
Field
Usage
Type
Description
fieldTerm
Input
SQLCHAR *
Column (field) separator string.
fieldTermLen
Input
SQLSMALLINT
Column (field) separator string length.
lineTerm
Input
SQLCHAR *
Record separator string.
Field
Usage
Type
Description
iMeta
Input
TBExpImpMeta *
Pointer to a TBExpImpMeta structure that has input metadata required to extract data.
Field
Usage
Type
Description
oRowsExported
Output
SQLINTEGER
Number of records extracted from a data file.
Field
Usage
Type
Description
piDataFileName
Input
SQLCHAR *
Path to a file to store extracted data.
iDataFileNameLen
Input
SQLSMALLINT
Length of the data file name. If a file name ends with NULL, specify SQL_NTS.
piActionString
Input
sqlstr *
Data extracted from a table or view by using a SELECT statement. The data is saved in the column order of the SELECT statement.
Field
Usage
Type
Description
iMeta
Input
TBExpImpMeta *
Pointer to a TBExpImpMeta structure that has input metadata required to load data.
iRowCount
Input
SQLINTEGER
Number of records to load. If set to 0, all records in the data file are loaded.
iSkipCount
Input
SQLINTEGER
Number of records to skip when loading data.
Field
Usage
Type
Description
oRowsRead
Output
SQLINTEGER
Number of records read from a data file.
oRowsSkipped
Output
SQLINTEGER
Number of records skipped from a data file.
oRowsInserted
Output
SQLINTEGER
Number of records inserted into a table or view.
Field
Usage
Type
Description
piDataFileName
Input
SQLCHAR *
Path to a data file to load.
iDataFileNameLen
Input
SQLSMALLINT
Length of the data file name. If a file name ends with NULL, specify SQL_NTS.
piActionString
Input
sqlstr *
Column and table to load and detailed meta data. Uses the same string format as in the tbLoader's control file. For more information, refer to the control file format for tbLoader.
When executing TASCMD, specify connection information for the target TAS instance as follows:
[Example 1] TASCMD Execution Parameters
TASCMD connects to the local TAS instance through an entered port number. The port number must be entered, and the TAS instance must booted before executing TAS and its command.
TASCMD Commands
The following describes each TASCMD command.
Command
cd
Changes the current path.
du
Displays the total disk space occupied by the files and directories in the
specified path, or the total capacity of the disk spaces.
exit
Terminates TBASCMD.
help
Displays help about TBASCMD commands.
ls
Displays the list of files and directories in the specified path, or disk spaces.
lsds
Displays the detailed list of disk spaces.
Note
The mv and check commands are available from the 7.2.1 release, and the du command displays the disk space currently used by the files in the directory.
A file name or path option can be specified as absolute or relative path.
Absolute path
Starts with the '+' symbol followed by the disk space name and path in the disk space.
[Example 2] Absolute Path
Relative path
Path relative to the current path. It is combined with the current path for use in a command.
[Example 3] Relative Path
The following symbols can be used in a relative path.
Symbol
Description
"."
Current path.
".."
Parent path. If the last '/' in a path or the current path is a disk space, this indicates the top-level path ('+').
Additional path can be appended after a "." or "..".
[Example 4] Relative Path Symbol Example
cd
Changes the current path.
Usage
Option
Description
path
Path to which the current path is changed, if it exists.
du
Displays the total disk space occupied by the files and directories in the specified path, or the total capacity of the disk spaces. If the top-level path (+) is specified, the total and free sizes of disk spaces are displayed.
Note
The 'du' command, available from the 7.2.1 release, displays the disk space currently used by the files in the directory.
Usage
Option
Description
-a
Displays the disk space occupied by all files of the subdirectories in the specified
path.
path
Path (optional). If not specified, the current path is used.
Note
The -a option is not available from the 7.2.1 release
Example
The following example displays the size of files and their size adjusted for mirroring.
The following example displays the total and free sizes of disk spaces.
exit
Terminates TASCMD.
Usage
help
Displays help about TASCMD commands. If a command is not specified, help is displayed for all commands.
Usage
ls
Displays the list of files and directories in the specified path, or disk spaces. If the top-level path (+) is specified, a disk space list is displayed.
Usage
Option
Description
-a
Displays the list of all files of the subdirectories in the specified path.
-s, --size
Displays the file size as well as the specified path.
-l, --long
Displays the file information as well as the specified path.
path
Path (optional). If not specified, the current path is used.
Note
The -s and -l options are available from the 7.2.1 release.
Example
The following example displays a list of files.
The following example displays a list of disk spaces.
lsds
Displays the detailed list of disk spaces. The information includes the disk space number, name, and status, redundancy level, sector size, meta block size, size allocated on disk, total size, and free size.
Usage
Example
pwd
Displays the current path.
Usage
Example
rm
Removes TAS files.
Usage
Option
Description
-f, --force
Ignores non-existent files and does not display an error message.
-r, --recursive
Removes a directory.
-v, --verbose
Displays the processing results.
files
Path and name of file(s) to remove. One or more files can be specified.
Note
The -f, -r, and -v options are available from the 7.2.1 release.
Example
When the rm command is executed while the database is running, errors occur to all files except for the .arc file.
cp, cpfromlocal, cptolocal
cp creates a new TAS file by copying an existing TAS file, pfromlocal creates a new TAS file by copying a local file, and cptolocal creates a local file by copying an existing TAS file. Each command also displays the copied file size, time taken to copy the file, and speed.
If the specified new file name already exists, an error message is displayed without copying the file.
Usage
Option
Description
infile, outfile
Can be specified as absolute or relative paths. outfile is created by copying the
file specified by infile. The copied capacity, required time, and speed are output.
-redun redun_no
Specifies a mirror of a target file. Copies a mirror that corresponds to the redundancy number (redun_no). redun_no can has a number between 0 and 2,
depending on the redundancy level of the target file.
-t file_type
Determines the file type in a TAS configuration. (See '.)
-r, --recursive
Copies the directory.
-v, --verbose
Displays the processing results.
-b, --blksize
Defines the block size of the file.
Note
The -r, -v, -b, --bs, --ibs, --obs, --count, --skip, and --seek options are available from the 7.2.1 release.
Example
mkdir
Creates a directory.
Usage
Option
Description
-f, --force
Ignores the existing directory and does not display an error message.
dirname
Name of a directory to create.
Note
The -f option is available from the 7.2.1 release.
Example
mv
Moves a file.
Note
The mv command is available from the 7.2.1 release.
Usage
Option
Description
-v
Displays the processing results.
src_file, dest_file
Can be designated as either an absolute or relative path. Files designated as
src_file are changed to dest_file.
Example
check
Checks compatibility of the TAS file information the user knows.
Note
The check command is available from the 7.2.1 release.
Usage
Option
Description
--ds_no
Disk space number the user knows.
--file_no
File number the user knows.
--blksize
Block size the user knows.
--size
File size the user knows.
filename
Name of the file to be checked. An absolute or relative path can be entered.
Example
TBASCMD Error Codes
The following describes causes and solutions for errors that may occur when using TAS.
Note
The error codes apply to the 7.2.1 release and earlier versions.
ERROR CODE -1: invalid tas port number
Cause
A negative number, 0, or a non-numeric string was entered as a port number.
Action
Check the port number.
ERROR CODE -2: more arguments needed
Cause
No argument was entered when executing tbascmd.
Action
Enter a required argument.
ERROR CODE -3: invalid argument
Cause
An invalid argument was entered when executing tbascmd.
Action
Enter a valid argument.
ERROR CODE -4: connection failed
Cause
Failed to connect to a TAS instance through a port number.
Action
Check the port number or whether the TAS instance is running.
ERROR CODE -5: invalid command "INPUT CMD"
Cause
An invalid ascmd command was entered.
Action
Enter a valid ascmd command.
ERROR CODE -6: length of command cannot exceed "ASCMD_CMD_LEN_MAX"
Cause
The length of an entered ascmd command exceeds the maximum length.
Action
Enter an ascmd command with the length less than or equal to 2048 characters.
ASCMD +DS0/test> ls test.dtf
- Number of files found: 1
ASCMD +DS0/test> mv test.dtf mv_test.dtf
Moving file: +DS0/test/test.dtf -> +DS0/test/mv_test.dtf ASCMD +DS0/test> ls
mv_test.dtf
- Number of files found: 1
This section explains the procedures and methods for migrating from other DBMS to Tibero.
Pre-Migration Considerations
This section explains the checklist items to review before migrating from Oracle to Tibero DB.
The pre-migration check is an important step for understanding the features of other DBMS and verifying the values that need to be applied to Tibero.
Note that the SQL statements explained in this section (queries executable in 10g and 11g) may vary slightly depending on the Oracle version.
1) General
Log in as a user with DBA privileges, such as Oracle's sys or system, to verify the information below.
Item
Description
Version Information
Check the version of Oracle migrated.
Migration Character Set
Use the corresponding character set between Oracle and Tibero
Select Migration User (Schemas)
Log in with a user account that has DBA access to Oracle's 'sys' or 'system,' and perform the query.
Retrieve users
The following is the list of all users.
Retrieve open users
The following is a query to retrieve the currently open users.
Oracle Default Users
The following usernames are automatically created when Oracle is installed and should be excluded during migration. (Usernames may vary slightly depending on the Oracle version.)
User Name
Description
Source:
Migration size
Only check the tablespaces where the tables and indexes of the users targeted for migration are stored. The example below shows how to check the entire tablespace.
Check Total Tablespace Size and Usage
Total
Migration Validation Items
Only check the information related to the users targeted for migration.
Check Object count by status
The dba_objects view includes even deleted objects (in $BIN~ format), so for an accurate count, it is recommended to check views like dba_tables and dba_indexes.
Requesting the client’s DB administrator to clean up any INVALID objects can reduce migration time.
Check Object count
Used for Comparing the object count between Oracle and Tibero after the migration is used for validation.
Check Constraint count
2) DB Creation-Related Items
Log in as a user with DBA privileges, such as Oracle's sys or system, to check the information below. When executing CREATE DATABASE command during Tibero installation, refer to the information below to create the database.
The following is an explanation of the items related to database creation.
Item
Description
Character Set
Check the character set information.
Oracle
Tibero
The following provides an explanation of the items verified.
Item
Description
The following is the character set mapping information between Oracle and Tibero.
Oracle
Tibero
If the US7ASCII character set contains Korean characters, you may choose to use MSWIN949, depending on the purpose. However, adjustments may be needed for encoding and decoding on the application.
When changing from KO16KSC5601, KO16MSWIN949, and JA16SJIS to UTF8 or AL32UTF8, the column size of the relevant tables should be increased by 1.5 to 2 times before performing data migration.
National Character set
Oracle
Tibero
If Oracle's national character set is UTF8 and Tibero's is UTF16, characters of the related type may become corrupted during migration, so matching settings are necessary.
Initial Parameters
Check the initial parameter information
The following are initial parameters that need to be verified when migrating from Oracle.
Parameter
Description
To check the size of memory-related SGA subcomponents, query "V$SGA."
Redo Log Configuration
When creating redo logs in Tibero, refer to this information and create files of the same or larger size.
The following is an example of checking redo logs.
Undo and Temp Configuration
When creating Undo and Temp in Tibero, refer to this information and create files of the same or larger size.
The following is an example of checking the Undo tablespace.
The following is an example of checking the Temp tablespace.
Log mode
The following is an example of checking the log mode.
If it is in ARCHIVE LOG mode, change the mode after the migration is complete to reduce migration time.
3) Check additional Objects
The following is an explanation of additional objects that need to be checked.
Item
Description
Check DB Link
Check tnsnames.ora file
Check Job
Check Cluster Object
Check XML Type
Check BitMap Index
2. Migration
This section explains the methods for executing the actual migration.
The following is the migration process.
1) Pre-Migration Preparation
2) Extraction of migration DDL Scripts
3) Adjustment of migration DDL Scripts
4) Migration
5) Migration validation
Refer to the content of each section for detailed explanations of each process.
1) Pre-Migration Preparation
The following is the standard order for creating objects during migration.
Steps 4 through 8 may need to be adjusted based on the dependencies of the client’s objects to suit their specific requirements.
Steps
Object
Description
2) Extract Migration DDL Scripts
Use the T-UP DDL export feature to extract Oracle DDL statements.
Other tools that can extract scripts may also be used.
Extract DDL Scripts for Key Objects of the Database
Extract the DDL statements for tablespace, user, and table.
(1) T-UP > Migrator
Select “Migrator”
[Figure 9] Migrator of T-up
(2) Source Database > Type Conversion
Select Data Types Corresponding to ORACLE
[Figure 10] Type Conversion
(3) Schema Object
Select “Independent Objects” Tablespace and User.
Select “Dependent Objects” Table.
Select “Schema” Table.
[Figure 11] Schema Objection
(4) Migration Option
Deactivate “Data Transfer” and “DDL Execution”.
Select “Export DDL Script”, Specify “Filename” and “Path”.
If you want to separate files by schema, select “Create Individual DDL Script” Files.
[Figure 12] Migration Option
(5) Target Database > Summary
Check the export target.
[Figure 13] Summary
(6) Data Migration
Execute “Migrate“.
[Figure 14] Data Migration
(7) Result > “close”
“In the "Result" stage, execution information is displayed, and DDL export information is not shown.
[Figure 15] Result
(8) Check file
Check that the DDL statements were generated correctly.
[Figure 16] Check file
Extract DDL Scripts for Other Database Objects
Extract the remaining objects (DDL) except for Tablespace, User, and Table.
(1) T-UP > Migrator
Select “Migrator”.
[Figure 17] Select Migrator
(2) Source Database > Type Conversion
Select data types corresponding to ORACLE . The table is not included and is therefore not relevant to your selection.
[Figure 18] Type Conversion
(3) Schema Object
Select “Dependent Objects” for extraction objects.
Select “Schema” Table to include tables for selection and dependency.
[Figure 19] Schema Objection
(4) Migration Option
Deactivate “Data Transfer and “DDL Execution”.
Select “Export DDL Script”, Specify “Filename” and “Path”.
If you want to separate files by schema and object, select “Create Individual DDL Script” Files.
[Figure 20] Migration Option
(5) Target Database > Summary
Check the extraction target.
[Figure 21] Summary
(6) Data Migration
Execute “Migrate“.
[Figure 22] Data Migration
(7) Result > “close”
In the “Result” stage, execution information is displayed, and DDL export information is not shown.
[Figure 23] Result
(8) Check file
Check that the DDL statements were generated correctly.
[Figure 24] Check file
3) Adjust Migration DDL Scripts
Organize and modify the extracted script so that it can be executed in Tibero.
DDL Scripts for Key Objects in the Database
Adjust Tablespace, User, Table DDL Scripts
The filename for the tablespace, user, and table script is export_ddl.sql.
Tablespace DDL
When Tibero DB is created, system, undo, and default temp tablespaces already exist, so don’t need to be created. But, temp tablespaces other than the default temp tablespaces must be migrated. (e.g., TEMP1)
Exclude Oracle-specific tablespaces (e.g., SYSAUX)
Modify the path, filename, or size of the data file as needed.
Comment out items that are not supported in Tibero.
The following explains the items to be commented out in the tablespace script.
User DDL
Check the passwords for each user. (Contact the Oracle DB administrator.)
User passwords are set to the default "tibero."
This applies only to users targeted for migration. Users that are automatically created during Oracle installation do not need to be migrated.
Comment out any items that are unsupported in Tibero.
Table DDL
Due to the character set migration from Oracle, an Active Value error may occur.
If an error occurs in the column type, refer to "" on Data Types.
DDL Scripts for Other Database Objects
Adjust DDL Scripts for Objects other than Tablespace, User, and Table
The extracted filename is export_other_ddl.sql.
List of Other Objects
Index View
Constraint
Sequence Synonym
Materialized View
Library
Function
Since it is not included in the DDL for other objects, refer to Oracle to create it
4) Migration
DDL Scripts for Major Database Objects
(1) Upload the export_ddl.sql file to the Tibero database server.
If an error occurs in the column type, refer to "" on Data Types.
(2) Execute export_ddl.sql.
Data magration
During the data migration process, various tools are used to perform the migration.
T-UP
Execute migration from the client PC using T-UP.
Oracle → T-UP(Client PC) → Tibero
Table Migrator
Execute migration in Tibero using Table Migrator.
Oracle → Tibero
DB Link
Execute migration from Tibero to Oracle using Oracle DB Link.
Oracle → Tibero
For more information about using each tool, refer to the manual for each tool.
DDL Scripts for Other Database Objects
1) Upload the export_other_ddl.sql file to the Tibero database server.
If there are many users or if the migration needs to be performed repeatedly, it is recommended to create a shell (or batch) script for the process.
When performing repeated migrations, clearly organize dependencies and exceptions during the first migration to ensure that errors do not occur during the second or third migrations by including preparatory steps in the script.
Use a shell program to automatically create objects, and verify the process as follows.
2) Execute export_other_ddl.sql.
Synoym
It is not a problem to creat it even though the original object referenced by a synonym does not exist. After the original object is created, it will automatically be VALID when used.
View
When creating views, errors may occur due to dependencies or object permissions. Even if compilation errors occur during the initial creation, proceed to create all objects first, then refer to "" to validate the objects.
The following is an example of checking dependencies.
Sequence
To prevent any changes to Oracle’s current values during the final migration, quit the application before proceeding.
PSM(=PL/SQL)
Consider the following points when creating PSM:
- Errors may occur due to dependencies or object permissions. Even if compilation errors occur initially, complete the creation of all objects first, then refer to "" to validate the objects.
- The error "TBR-8053: Not authorized" may occur if there is no permission for the relevant object. In this case, grant the necessary permissions and recreate the object.
- Errors might occur within queries in PSM. For details, refer to "" to make the required changes.
- Since Tibero does not support object types, bypass this by declaring the type within a package.
The following is to create object type by bypassing it with the type in the package.
Oracle
Tibero
Index
The following explains the comparison of index counts between Oracle and Tibero after index creation.
Constraint
Compare with the items checked in "Constraint Count Check" from "".
Trigger
When migrating a disabled trigger from Oracle, a syntax error may occur, so process it as follows:
- Comment out the disable syntax.
- Apply the disable setting in Tibero
Grant
The following are unsupported Grant items in Tibero, which should be excluded when calculating the Grant count.
If the above privileges are granted along with regular privileges,, not all permissions will be granted, so it is necessary to find and delete unsupported privileges and then re-execute.
OthersRefer to Oracle to create other items such as external procedures and jobs.
Object Status Change
Due to dependencies and object permissions, an object's status may be INVALID at the time of creation. Process this as follows:
(1) Check Object
Check the count by status
Check INVALID Object
(2) Execute recompile
Log in with the 'sys' account and recompile the invalid objects in a specific schema as shown below.
(3) Recompile and Check for Errors by Object
Log in as the relevant user, recompile each object, and check for any errors.
Recompile View
Recompile PSM(=PL/SQL)
Check PSM(=PL/SQL) error
Recompile Index
5) Migration validation
After the migration is complete, the main items to check in the database side are the number of objects and data validation.
Object count
Table
View
Synonym
Sequence
Package
Package Body
Function
Procedure
Index
Constraint
Grant
Trigger
Data Validation
Oracle DB Link
Count Comparison
Comparison of Minus Results
T-UP Data Transfer Verification
(1) T-UP > Migrator
Select “Migrator”
[Figure 25] Migrator of T-up
(2) Source Database > Type Conversion
Select Data Types Corresponding to Oracle.
[Figure 26] Type Conversion
(3) Schema Object
Select “Dependent Objects” Table.
Select Schemas and Tables to migrate in "Schemas".
[Figure 27] Schema Objection
(4) Migration Option
Activate “Data Transfer”
Select “Verification”
[Figure 28] Migration Option
(5) Target Database > Summary
Check corresponding schemas and tables between Source and Target.
[Figure 29] Summary
(6) Data Migration
Execute “Migrate“.
[Figure 30] Data Migration
(7) Result
Type: Check success rate for designated tables in data.
[Figure 31.1] Result
Type: Click on "Data" to view verification results.
[Figure 31.2] Result
3. Application Migration
After completing the database migration, proceed with the application migration.
This may require significant modifications to interfaces and application queries.
1) Interface Modification
JDBC
Copy tibero6-jdbc.jar driver to the Application's driver management folder in $TB_HOME/client/lib/jar folder.
Oracle
Tibero
ODBC
Install Tibero ODBC.
Oracle
Tibero
OLE DB
Install Tibero OLE DB.
Oracle
Tibero
2) Application Query Modifications
Application query modification is done when necessary, typically in the following situations:
Case 1. When a Syntax Error occurs
.
Situation
Solution
Case 2. When the results are not displayed in a sorted order
.
Situation
Solution
Case 3. When an error occurs when compiling after writing PSM (PL/SQL)
.
상황
대응방법
AWR_STAGE
Used to load data into the AWR from a dump file
CSMIG
User for Database Character Set Migration Utility
CTXSYS
The Oracle Text account.
DBSFWUSER
The account used to run the DBMS_SFW_ACL_ADMIN package.
DBSNMP
The account used by the Management Agent component of Oracle Enterprise Manager to monitor and manage the database.
DEMO
User for Oracle Data Browser Demonstration (last version 9.2)
DIP
The account used by the Directory Integration Platform (DIP) to synchronize the changes in Oracle Internet Directory with the applications in the database.
DMSYS
Data Mining user
DSSYS
Oracle Dynamic Services and Syndication Server
DVF
The account owned by Database Vault that contains public functions to retrieve the Database Vault Factor values.
DVSYS
There are two roles associated with this account. The Database Vault owner role manages the Database Vault roles and configurations. The Database Vault Account Manager is used to manage database user accounts. Note: Part of Oracle Database Vault user interface text is stored in database tables in the DVSYS schema. By default, only the English language is loaded into these tables. You can use the DVSYS. DBMS_MACADM.ADD_NLS_DATA procedure to add other languages to Oracle Database Vault.
EXFSYS
User to hold the dictionary, APIs for the Expression Filter
FLOWS_FILES
The account owns the Oracle Application Express uploaded files.
GGSYS
The internal account used by Oracle GoldenGate. It should not be unlocked or used for a database login.
GSMADMIN_INTERNAL
The internal account that owns the Global Data Services schema. It should not be unlocked or used for a database login.
GSMCATUSER
The account used by Global Service Manager to connect to the Global Data Services catalog.
GSMUSER
The account used by Global Service Manager to connect to the database.
HR (Human Resources)
OE (Order Entry)
SH (Sales History)
Training/ demonstration users containing the popular EMPLOYEES and DEPARTMENTS tables
LBACSYS
The Oracle Label Security administrator account. Starting with Oracle Database 18c, the LBACSYS user account is created as a schema-only account.
MDDATA
The schema used by Oracle Spatial and Graph for storing geocoder and router data.
MDSYS
The Oracle Spatial and Graph administrator account.
ORACLE_OCM
This account contains the instrumentation for configuration collection used by the Oracle Configuration Manager.
ORDPLUGINS
Object Relational Data (ORD) User used by Time Series, etc.
ORDSYS
Object Relational Data (ORD) User used by Time Series, etc.
OUTLN
The account that supports plan stability. Plan stability enables you to maintain the same execution plans for the same SQL statements. OUTLN acts as a role to centrally manage metadata associated with stored outlines.
PERFSTAT
Oracle Statistics Package (STATSPACK) that supersedes UTLBSTAT/UTLESTAT
REMOTE_SCHEDULER_AGENT
The account to disable remote jobs on a database. This account is created during the remote scheduler agent configuration. You can disable the capability of a database to run remote jobs by dropping this user.
SCOTT
ADAMS
JONES
CLARK
BLAKE
Training/ demonstration users containing the popular EMP and DEPT tables
SYS
The account used to perform database administration tasks.
SYS$UMF
The account used to administer Remote Management Framework, including the remote Automatic Workload Repository (AWR).
SYSBACKUP
The account used to perform backup and recovery tasks.
SYSDG
The account used to administer and monitor Oracle Data Guard.
SYSKM
The account used to perform encryption key management.
SYSRAC
The account used to administer Oracle Real Application Clusters (RAC).
SYSTEM
Another account used to perform database administration tasks.
TRACESVR
Oracle Trace server
TSMSYS
User for Transparent Session Migration (TSM) a Grid feature
WMSYS
The account used to store the metadata information for Oracle Workspace Manager.
XDB
The account used for storing Oracle XML DB data and metadata.
XS$NULL
The internal account that represents the absence of a database schema user in a session, and indicates an application user session is in use. XS$NULL cannot be authenticated to a database, nor can it own any database schema objects, or possess any database privileges.
GBK
VN8VN3
VN8VN3
MEMORY_TARGET
Set the total available memory size (for Oracle 11g)
5
View
Errors may occur due to dependencies.
6
Sequence
-
7
Data Migration
8
psm(=pl/sql)
Use tools such as T-UP or Table Migrator to migrate the data.
9
Index
This applies to packages, procedures, and functions, where errors may also occur due to dependencies.
10
Constraint
-
11
Trigger
-
12
Grant
-
13
Other (C, Java external procedure, Job , etc.)
-
Procedure Package
Type
Trigger
Object Privilege
Job
DBMS_SCHEDULER
External Procedure
After all users have been created, compare the object count with Oracle to ensure nothing is missing.
If any objects were not created successfully, identify and resolve the issue, then manually create the objects and proceed to the next step.
Version Information
For Oracle versions 9i, 10g, and 11g, there are many migration cases, but versions outside of these require further review.
Migration Character Set
Select the Tibero character set that corresponds to the character set currently used in Oracle.
Migration Users
Exclude default users that are automatically created when Oracle is installed. Client confirmation is required for the migration users.
Migration Size
Factors that have the greatest impact on conversion time.
In addition, the client's conversion time may vary greatly depending on DISK I/O, NETWORK I/O, etc.
Migration Validation
Information used for comparison after the migration is completed.
ANONYMOUS
Enables HTTP access to Oracle XML DB.
APEX_050100
The account that owns the Oracle Application Express schema and metadata.
APEX_PUBLIC_USER
The minimally privileged account used for Oracle Application Express configuration with Oracle Application Express Listener or Oracle HTTP Server and mod_plsql.
APPQOSSYS
Used for storing and managing all data and metadata required by Oracle Quality of Service Management.
AUDSYS
The account where the unified audit data trail resides.
AURORA$ORB$UNAUTHENTICATED
Used for users who do not authenticate in Aurora/ORB
Character Set
Select the character set that corresponds to Oracle.
Initial Parameters
Check the session count, memory settings, etc.
Redo Configuration
Check the number or size of groups and members.
Undo and Temp Configuration
Check the size of the Undo and Temp tablespaces.
Log Mode
As this is not supported in Tibero, consider changing to a general index.
NLS_CHARACTERSET
DB Character Set
NLS_NCHAR_CHARACTERSET
National Character Set
US7ASCII
ASCII
KO16KSC5601
EUCKR or MSWIN949
KO16MSWIN949
MSWIN949
UTF8, AL32UTF8
UTF8
JA16SJIS[TILDE]
JA16SJIS[TILDE]
JA16EUC[TILDE]
JA16EUC[TILDE]
UTF8
UTF8
AL16UTF16(Default value)
UTF16(Default value)
SESSIONS
Set the number of sessions
OPEN_CURSORS
The number of cursors that can be opened per session.
UNDO_RETENTION
Set the undo retention time.
SGA_MAX_SIZE
Check the total available SGA size.
SGA_TARGET
Set the target size of the SGA
PGA_AGGREGATE_TARGET
Check the total available PGA size
DB Link
Check the DB Link information for the migration user and identify the type of DB containing the data.
tnsnames.ora
Check the host information used for the DB Link.
Job
Check if there are any jobs for the migration user or the entire system, and if migrating, ensure that they do not change the data during execution.
Cluster Object
Consider converting to a regular table format, as Tibero does not support cluster objects.
XML Type
Change sys.xmltype in the column definitions of table creation statements to xmltype.
BitMap Index
Consider converting to a regular index, as this is not supported in Tibero.
1
Tablespace
-
2
User
-
3
Table
-
4
Synonym
It’s not an issue if the source object doesn’t exist at the time of creation, but it’s recommended to create it first, as it will automatically become VALID when queried later.
Item
Description
BLOCKSIZE 4K
Since Tibero does not specify a block size for each tablespace, it should be commented out. This is fixed when the database is created through initialization parameters, and it is generally set to 8KB.
SEGMENT SPACE MANAGEMENT MANUAL
Since Tibero only supports the AUTO setting, the MANUAL setting should be changed to AUTO.
FLASHBACK ON
Since Tibero supports flashback feature in full mode through parameters, this should be commented out.
TABLESPACE GROUP
Since TABLESPACE GROUP is not supported, it should be commented out. Consider splitting multiple data files within a single tablespace.
Item
Description
GRANT UNLIMITED TABLESPACE TO USER_NAME
Tibero uses UNLIMITED by default, and this syntax is not supported, so it should be commented out.
ALTER USER USERNAME QUOTA UNLIMITED ON USERNAME
Since the per-user QUOTA feature is not supported, it should be commented out.
Situation
Description
Fewer Indexes in Tibero
Consider that indexes may be automatically created when constraints are generated. Compare after all constraints are created.
More Indexes in Tibero
Check whether the additional indexes were automatically created for LOB columns within tables.
(This automatic creation also occurs in Oracle 11g r2, but may not happen in earlier versions of Oracle.)
Item
Description
COMMIT REFRESH
When creating an Mview, it is supported as a creation syntax and not as a privilege.
QUERY REWRITE
When creating an Mview, it is supported as a creation syntax and not as a privilege.
DEBUG
It is a PL/SQL DEBUGGING privilege currently, but not supported in Tibero.
FLASHBACK
This is supported in the form of parameters, but not as a privilege.
1
When writing an SQL statement, if you execute a join or similar operation without assigning an alias to the table or subquery clause in the from clause, a syntax error will occur if duplicate columns exist.
Assign alias to avoid duplication.
2
When using a query like UNION ALL to view results, a syntax error will occur if the main query has a specific column as a number type and a subquery as a varchar type.
Use the same data type in the same column clause.
3
A syntax error will occur in PSM (PL/SQL) if variables with the same name are declared within the same scope.
Use the variable name from the final declaration and delete earlier declarations of variables with the same name.
1
In Oracle, results may be displayed in sorted form even without an ORDER BY clause, whereas in Tibero, the results may not.
However, in the case of queries to check only some values by forcibly applying indexes, etc. to a large table, Tibero will sort and output them without using order by clause.
If you need sorted results, be sure to apply ORDER BY.
1
When compiling after writing PSM (PL/SQL), Tibero checks whether the columns, etc., for objects in the internal SQL statements actually exist. If they are not valid, Tibero will throw an error.
In contrast, Oracle may still successfully compile in such situations, but a runtime error may occur later.
Use actual existing objects and correct column names.
$ tbboot -C
Available character set list
Charset name Equivalent Oracle Charset name
AR8ISO8859P6 AR8ISO8859P6
AR8MSWIN1256 AR8MSWIN1256
ASCII US7ASCII
CL8ISO8859P5 CL8ISO8859P5
CL8KOI8R CL8KOI8R
CL8MSWIN1251 CL8MSWIN1251
EE8ISO8859P2 EE8ISO8859P2
EL8ISO8859P7 EL8ISO8859P7
EL8MSWIN1253 EL8MSWIN1253
EUCKR KO16KSC5601
EUCTW ZHT32EUC
GB18030 GB18030
GBK ZHS16GBK
IW8ISO8859P8 IW8ISO8859P8
JA16EUC JA16EUC
JA16EUCTILDE JA16EUCTILDE
JA16SJIS
JA16SJISTILDE
MSWIN949 KO16MSWIN949
RU8PC866 RU8PC866
SJIS JA16SJIS
SJISTILDE JA16SJISTILDE
TH8TISASCII TH8TISASCII
UTF16 AL16UTF16
UTF8 UTF8
VN8VN3 VN8VN3
WE8ISO8859P1 WE8ISO8859P1
WE8ISO8859P15 WE8ISO8859P15
WE8ISO8859P9 WE8ISO8859P9
WE8MSWIN1252 WE8MSWIN1252
ZHT16BIG5 ZHT16BIG5
ZHT16HKSCS ZHT16HKSCS
ZHT16MSWIN950 ZHT16MSWIN950
Available nls_date_lang set list
AMERICAN
BRAZILIAN PORTUGUESE
JAPANESE
KOREAN
RUSSIAN
SIMPLIFIED CHINESE
THAI
TRADITIONAL CHINESE
VIETNAMESE
select username, account_status, default_tablespace, temporary_tablespace
from dba_users order by oracle;
set linesize 120
set pagesize 100
select username, default_tablespace, temporary_tablespace
from dba_users where account_status='OPEN' order by username;
select x.a tablespace_name
, sum(x.b)/1024 "tot_size(mb)"
, sum(x.c)/1024 "used_size(mb)"
, sum(x.c)/sum(x.b)*100 rate
from (
select
b.tablespace_name a
,sum(bytes)/1024 b
,0 c
from dba_data_files b
group by b.tablespace_name
union
select
d.tablespace_name,
0,
sum(bytes)/1024
from dba_segments d
group by d.tablespace_name
)x
group by x.a;
select sum(x.b)/1024 "tot(mb)", sum(x.c)/1024 "used(mb)"
from (
select sum(bytes)/1024 b, 0 c
from dba_data_files b
union
select 0, sum(bytes)/1024
from dba_segments d
) x;
select owner, object_type, status, count(*)
from dba_objects
where owner in (select username from dba_users where account_status='OPEN' )
group by owner, object_Type, status
order by owner, object_type, status;
WITH mig_user AS
(
SELECT username
FROM dba_users
WHERE account_status='OPEN'
AND username NOT IN('SYS', 'SYSTEM', 'WMSYS','EXFSYS', 'XDB', 'ORDSYS','MDSYS','SYSMAN')
)
SELECT
O.OWNER
,NVL(TBL.TABLE_CNT, 0) AS "TABLE_CNT"
,O.VIEW_CNT
,O.DBLINK_CNT
,O.SEQ_CNT
,O.PKG_CNT
,O.PKGBODY_CNT
,O.PROC_CNT
,O.FUNC_CNT
,O.TYPE_CNT
,O.TYPEBODY_CNT
,O.LIB_CNT
,TRI.TRIGGER_CNT
,NVL(SYN.SYN_CNT,0) AS "SYN_CNT"
,NVL(PUB_SYN.PUB_SYN_CNT,0) AS "PUB_SYN_CNT"
,NVL(IDX.IDX_CNT, 0) AS "IDX_CNT"
,NVL(G.GRANT_CNT, 0) AS "GRANT_CNT"
,NVL(LOB.LOB_CNT, 0) AS "LOB_CNT"
,NVL(JOB.JOB_CNT, 0) AS "JOB_CNT"
FROM (
SELECT
T.OWNER
,SUM( DBLINK_CNT ) AS "DBLINK_CNT"
,SUM( VIEW_CNT ) AS "VIEW_CNT"
,SUM( SEQ_CNT ) AS "SEQ_CNT"
,SUM( PKG_CNT ) AS "PKG_CNT"
,SUM( PKGBODY_CNT ) AS "PKGBODY_CNT"
,SUM( PROC_CNT ) AS "PROC_CNT"
,SUM( FUNC_CNT ) AS "FUNC_CNT"
,SUM( TYPE_CNT ) AS "TYPE_CNT"
,SUM( TYPEBODY_CNT ) AS "TYPEBODY_CNT"
,SUM( LIB_CNT ) AS "LIB_CNT"
FROM (
SELECT
OWNER
,CASE WHEN OBJECT_TYPE = 'DATABASE LINK' THEN COUNT(1) ELSE 0 END
AS "DBLINK_CNT"
,CASE WHEN OBJECT_TYPE = 'VIEW' THEN COUNT(1) ELSE 0 END AS
"VIEW_CNT"
,CASE WHEN OBJECT_TYPE = 'SEQUENCE' THEN COUNT(1) ELSE 0 END AS
"SEQ_CNT"
,CASE WHEN OBJECT_TYPE = 'PACKAGE' THEN COUNT(1) ELSE 0 END AS
"PKG_CNT"
,CASE WHEN OBJECT_TYPE = 'PACKAGE BODY' THEN COUNT(1) ELSE 0 END
AS "PKGBODY_CNT"
,CASE WHEN OBJECT_TYPE = 'PROCEDURE' THEN COUNT(1) ELSE 0 END AS
"PROC_CNT"
,CASE WHEN OBJECT_TYPE = 'FUNCTION' THEN COUNT(1) ELSE 0 END AS
"FUNC_CNT"
,CASE WHEN OBJECT_TYPE = 'TYPE' THEN COUNT(1) ELSE 0 END AS
"TYPE_CNT"
,CASE WHEN OBJECT_TYPE = 'TYPE BODY' THEN COUNT(1) ELSE 0 END AS
"TYPEBODY_CNT"
,CASE WHEN OBJECT_TYPE = 'LIBRARY' THEN COUNT(1) ELSE 0 END AS
"LIB_CNT"
FROM dba_objects
WHERE owner in (select username from mig_user)
GROUP BY owner, OBJECT_TYPE
)T
GROUP BY T.OWNER
)O
LEFT JOIN (
SELECT OWNER, COUNT(1) AS TABLE_CNT
FROM DBA_TABLES
WHERE owner in (select username from mig_user)
GROUP BY OWNER
) TBL ON O.OWNER = TBL.OWNER
LEFT JOIN (
SELECT OWNER, COUNT(1) AS GRANT_CNT
FROM DBA_TAB_PRIVS
WHERE owner in (select username from mig_user)
AND TABLE_NAME NOT LIKE 'BIN$%'
GROUP BY OWNER
) G ON O.OWNER = G.OWNER
LEFT JOIN (
SELECT OWNER, COUNT(1) AS IDX_CNT
FROM DBA_INDEXES
WHERE owner in (select username from mig_user)
GROUP BY OWNER
) IDX ON O.OWNER = IDX.OWNER
LEFT JOIN (
SELECT OWNER, COUNT(1) AS LOB_CNT
FROM DBA_LOBS
WHERE owner in (select username from mig_user)
GROUP BY OWNER
) LOB ON O.OWNER = LOB.OWNER
LEFT JOIN (
SELECT SCHEMA_USER, COUNT(1) AS JOB_CNT
FROM DBA_JOBS
WHERE SCHEMA_USER in (select username from mig_user)
GROUP BY SCHEMA_USER
) JOB ON O.OWNER = JOB.SCHEMA_USER
LEFT JOIN (
SELECT OWNER, COUNT(1) AS TRIGGER_CNT
FROM DBA_TRIGGERS
WHERE OWNER in (select username from mig_user)
AND TRIGGER_NAME NOT LIKE 'BIN$%'
GROUP BY OWNER
) TRI ON O.OWNER = TRI.OWNER
LEFT JOIN (
SELECT OWNER, COUNT(1) AS "SYN_CNT"
FROM DBA_SYNONYMS
WHERE OWNER in (select username from mig_user)
AND OWNER != 'PUBLIC'
GROUP BY OWNER
) SYN ON O.OWNER = SYN.OWNER
LEFT JOIN (
SELECT TABLE_OWNER as "OWNER", COUNT(1) AS "PUB_SYN_CNT"
FROM DBA_SYNONYMS
WHERE TABLE_OWNER in (select username from mig_user)
AND OWNER = 'PUBLIC'
GROUP BY TABLE_OWNER
) PUB_SYN ON O.OWNER = PUB_SYN.OWNER
ORDER BY O.OWNER;
set linesize 150
col owner format a30
select owner
,constraint_type
,count( constraint_name ) as "con_cnt"
from dba_constraints
where owner in (select username from dba_users where account_status='OPEN' )
group by owner, constraint_type
order by owner ,constraint_type;
set linesize 150
set pagesize 100
column value$ format a100
select
name,
value$
from
sys.props$
where
name like '%CHARACTERSET'
order by
name;
select * from _vt_nls_character_set;
show parameter <parameter name>
set linesize 150
select * from v$logfile;
select group#, bytes/1024/1024 as "size(mb)", members, archived from v$log;
show parameters undo_tablespace; set linesize 150
col tablespace_name format a40
col file_name format a50
select tablespace_name, file_name, bytes/1024/1024 "size(mb)"
,maxbytes/1024/1024 "maxsize(mb)", autoextensible
from dba_data_files
where tablespace_name = 'UNDOTBS1' -- input the result value of show parameters undo_tablespace;
col file_name format a50
select tablespace_name, file_name, bytes/1024/1024 "size mb", autoextensible
from dba_temp_files;
select log_mode from v$database;
set linesize 150
col owner format a15
col db_link format a20
col username format a20
col host format a50
select * from dba_db_links;
cat $ORACLE_HOME/network/admin/tnsnames.ora
set linesize 200
select job, schema_user, broken, instance from dba_jobs;
set linesize 150
col interval format a50
select job, schema_user, next_date, broken, interval from dba_jobs;
SELECT *
FROM DBA_OBJECTS
WHERE OBJECT_TYPE LIKE '%CLUSTER%'
AND OWNER NOT IN ('SYS');
set linesize 200
SELECT owner, table_name, column_name, data_type
FROM DBA_TAB_COLS
WHERE DATA_TYPE LIKE '%XML%'
AND OWNER NOT IN ('SYS');
SELECT *
FROM DBA_INDEXES
WHERE INDEX_TYPE LIKE '%BITMAP%';
$ tbsql sys/tibero
tbSQL
Connected to Tibero.
SQL> spool export_ddl.log Spooling is started.
SQL> @export_ddl.sql
-- Check for Errors Through the spool File
SQL> spool off
Spooling is stopped: export_ddl.log
$ tbsql sys/tibero
tbSQL
Connected to Tibero.
SQL> spool export_other_ddl.log Spooling is started.
SQL> @export_other_ddl.sql
-- Check for Errors Through the spool File
SQL> spool off
Spooling is stopped: export_other_ddl.log
SELECT OWNER, NAME, REFERENCED_OWNER, REFERENCED_NAME, REFERENCED_TYPE
FROM DBA_DEPENDENCIES
WHERE TYPE='VIEW'
AND REFERENCED_TYPE NOT IN ('TABLE', 'SYNONYM')
AND REFERENCED_NAME NOT IN ('DUAL')
AND REFERENCED_NAME NOT LIKE 'DBA_%'
AND OWNER NOT IN ('SYS', 'ORANGE','MDSYS', 'EXFSYS', 'XDB', 'SYSMAN', 'DBSNMP', 'SYSTEM' )
AND REFERENCED_OWNER NOT IN ('SYS', 'ORDSYS', 'WMSYS', 'MDSYS','EXFSYS', 'XDB',
'SYSMAN','SYSTEM','OLAPSYS', 'APEX_030200', 'CTXSYS')
ORDER BY 1, 2;
CREATE OR REPLACE TYPE DOCUROLE_ID_OBJ IS OBJECT(DOCUROLE_ID VARCHAR2(6));
/
CREATE OR REPLACE TYPE DOCUROLE_ID_TAB IS TABLE OF DOCUROLE_ID_OBJ;
/
CREATE OR REPLACE FUNCTION USER_DOCUROLESET(PARAM IN VARCHAR2)
RETURN DOCUROLE_ID_TAB
IS
L_DOCUROLE_ID_TAB DOCUROLE_ID_TAB := DOCUROLE_ID_TAB();
BEGIN
L_DOCUROLE_ID_TAB.EXTEND;
L_DOCUROLE_ID_TAB(1).DOCUROLE_ID := 'test';
RETURN L_DOCUROLE_ID_TAB;
END;
/
CREATE OR REPLACE PACKAGE "PK_TYPES" AS
TYPE DOCUROLE_ID_OBJ IS RECORD(DOCUROLE_ID VARCHAR2(6));
TYPE DOCUROLE_ID_TAB IS TABLE OF DOCUROLE_ID_OBJ;
END;
/
CREATE OR REPLACE FUNCTION USER_DOCUROLESET(PARAM IN VARCHAR2)
RETURN PK_TYPES.DOCUROLE_ID_TAB
IS
L_DOCUROLE_ID_TAB PK_TYPES.DOCUROLE_ID_TAB := PK_TYPES.DOCUROLE_ID_TAB();
N INTEGER := 0;
BEGIN
L_DOCUROLE_ID_TAB.EXTEND;
L_DOCUROLE_ID_TAB(1).DOCUROLE_ID := 'test';
RETURN L_DOCUROLE_ID_TAB;
END;
/
alter trigger trigger_name disable;
col owner format a20
set pages 500
select owner, object_type, status, count(*)
from dba_objects
group by owner, object_Type, status
order by owner, object_type, status;
set linesize 120
col object_name format A30
col owner format a20
select owner, object_name, object_type, status
from dba_objects
where status='INVALID';
alter function function_name compile;
alter procedure procedure_name compile;
show errors
alter index index_name rebuild;
set linesize 150
column owner format a30
select
owner,
count(table_name) as "table_cnt"
from
dba_tables
where
owner not in ('SYS','SYSGIS','SYSCAT','PUBLIC','OUTLN','TIBERO','TIBERO1')
group by
owner
order by
owner;
set linesize 150
column owner format a30
select
owner,
count(view_name) as "view_cnt"
from
dba_views
where
owner not in ('SYS','SYSGIS','SYSCAT','PUBLIC','OUTLN','TIBERO','TIBERO1')
group by
owner
order by
owner;
set linesize 150
column owner format a30
select
owner,
count(1) as "synonym_cnt"
from
dba_synonyms
where
owner not in ('SYS','SYSGIS','SYSCAT','PUBLIC','OUTLN','TIBERO','TIBERO1')
group by
owner
order by owner;
set linesize 150
column sequence_owner format a30
select
sequence_owner,
count( sequence_name ) as "sequence_cnt"
from
dba_sequences
where
sequence_owner not in
('SYS','SYSGIS','SYSCAT','PUBLIC','OUTLN','TIBERO','TIBERO1')
group by
sequence_owner
order by
sequence_owner;
set linesize 150
column owner format a30
select
owner,
count( name ) as "package_cnt"
from
dba_source
where
type = 'PACKAGE' and
owner not in ('SYS','SYSGIS','SYSCAT','PUBLIC','OUTLN','TIBERO','TIBERO1')
group by
owner
order by
owner;
set linesize 150
column owner format a30
select
owner,
count( name ) as "package_body_cnt"
from
dba_source
where
type = 'PACKAGE BODY' and
owner not in ('SYS','SYSGIS','SYSCAT','PUBLIC','OUTLN','TIBERO','TIBERO1')
group by
owner
order by
owner;
set linesize 150
column owner format a30
select
owner,
count( name ) as "function_cnt"
from
dba_source
where
type = 'FUNCTION' and
owner not in ('SYS','SYSGIS','SYSCAT','PUBLIC','OUTLN','TIBERO','TIBERO1')
group by
owner
order by
owner;
set linesize 150
column owner format a30
select
owner,
count( name ) as "procuedure_cnt"
from
dba_source
where
type = 'PROCEDURE' and
owner not in ('SYS','SYSGIS','SYSCAT','PUBLIC','OUTLN','TIBERO','TIBERO1')
group by
owner
order by
owner;
set linesize 150
column owner format a30
select
owner,
count( index_name ) as "index_cnt"
from
dba_indexes
where
owner not in ('SYS','SYSGIS','SYSCAT','PUBLIC','OUTLN','TIBERO','TIBERO1')
group by
owner
order by
owner;
set linesize 150
column owner format a30
select
owner,
constraint_type,
count( constraint_name ) as "constraint_cnt"
from
dba_constraints
where
owner not in ('SYS','SYSGIS','SYSCAT','PUBLIC','OUTLN','TIBERO','TIBERO1')
group by
owner, constraint_type
order by
owner ,constraint_type;
set linesize 150
column col format a30
select
owner,
count(1) as "grant_cnt"
from
dba_tab_privs
where
owner not in ('SYS','SYSGIS','SYSCAT','PUBLIC','OUTLN','TIBERO','TIBERO1')
group by
owner
order by
owner;
set linesize 150
column owner format a30
select
owner,
count(trigger_name) as "trigger_cnt"
from
dba_triggers
where
owner not in ('SYS','SYSGIS','SYSCAT','PUBLIC','OUTLN','TIBERO','TIBERO1')
group by
owner
order by
owner;
select 'tbl1' as table_name, count(*) as oracle_count, count(*)
- (select count(*) from tbl1 where rownum = 1) as diff from tbl1@ora;
Provider=tbprov.Tbprov.6;Data Source=MyDB;User ID=dbtech;Password=dbtech
;Updatable Cursor=True;OLE DB Services=-2
tbLoader
This chapter describes the tbLoader utility and its usage.
Overview
tbLoader is a utility that loads a large amount of data to Tibero database at once. Instead of inserting each data to a database by writing SQL statements, you can load column data at once after converting it to a general text file. Therefore, it is useful when loading a large amount of data to Tibero database.
tbLoader allows users to easily create data files and reduces data loading time.
Quick Start
tbLoader is automatically installed and uninstalled along with Tibero.
The following shows how to execute tbLoader at a command prompt.
For information about the options, refer to “”.
The following executes tbLoader.
Executing tbLoader
I/O Files
tbLoader receives control and data files and outputs log and error files. Control and data files are written by users as input files, while log and error files are automatically created by tbLoader as output files. Since the input and output files in tbLoader are all text files, users can easily create input files.
This section describes the input and output files needed in tbLoader.
Control File
A control file defines parameters used to execute tbLoader. In this file, a user specifies the location of data to read, how to read the data, and the actual location of the data.
For information about control file options, refer to “”.
Data File
A data file is a text file that contains database table data. Users can create and modify a data file by using a general text editor and save SQL query results in the file by using the SPOOL command in tbSQL.
User-specified data files are in either fixed or delimited record format.
Fixed Record Format
Fixed record format is used when a user specifies position information for all columns in the control file. Instead of using a delimiter, data values are read from user-specified positions. A column position is determined by the byte length. This format is less flexible than the delimited record format but it has better performance.
The record size or the end of line (EOL) character can be specified to separate each record. To improve performance, the system reads data from the column position specified in the control file, ignoring the ESCAPED BY and LINE STARTER parameter values.
A fixed record can only be used with the POSITION clause, not the FIELDS or LINE STARTED BY clause.
For information about clauses, refer to “”.
When using the LINES FIX clause
The LINES FIX clause is used for fixed (in bytes) records. The record length must be specified in the control file (for example, LINES FIX 12). The LINES TERMINATED BY clause is ignored.
The following is an example of fixed records.
When not using the LINES FIX clause
When the record size is not specified in the control file, the EOL character ('\n') is used as a line separator.
The following is an example of using the EOL character as a line separator
In the example.dat file, the second line does not have values in the last two columns. In this case, an error occurs if TRAILING NULLCOLS is not specified.
For more information about TRAILING NULLCOLS, refer to “”
Delimited Record Format
Delimited record format is used when position information is not specified for all columns in the control file. Each field is separated by FIELD TERMINATOR (field delimiter) and each record is separated by LINE TERMINATOR (record delimiter). This format has lower performance than the fixed record format but it is more flexible.
The following is an example of delimited records.
Log File
A log file writes tbLoader execution process. This file provides users with basic metadata of the input columns and statistics about successful and failed input records. It also provides the cause of failed records analyzed by tbLoader.
Error File
An error file writes records that are failed to be loaded by tbLoader. Users can modify the records in this file and reload them.
Data Loading Methods
tbLoader loads data by using the following two methods.
Conventional Path Load
Default data loading method provided by tbLoader. It reads column data from user-specified data files, saves them in a column array, and loads them into the database server using batch update. It has lower performance than the direct path load but it can be used without any constraints.
Direct Path Load
Reads data from user-specified data files and loads the data to a column array so that the data matches the column data type. The column array data is converted to Tibero database blocks through a block formatter, and the converted blocks are directly written to Tibero database.
It has better performance than the conventional path load but it has the following constraints.
The CHECK and referential key constraints are not checked.
Constraints
The section describes the constraints of tbLoader.
When Delimiter Values Are Duplicate
If any of the FIELD TERMINATED, ENCLOSED BY, ESCAPED BY, and LINE TERMINATED BY parameter values are duplicate, data files cannot be read normally.
For example, if the FIELD TERMINATED BY and ENCLOSED BY parameters have the same value as follows, an error occurs.
When ESCAPED BY Option Is Not Specified
If a character specified with ENCLOSED BY, FIELD TERMINATED BY, or LINE TERMINATED BY is used as an input field value in a data file as follows, ESCAPED BY must be specified.
For more information, refer to “”.
When Table Owner and User Are Different
If the table owner and the user who is trying to load the table data are different, the user must have the LOCK ANY TABLE privilege to access the table in the DPL mode. The server policy is getting a table lock before lading data to prevent another session from executing DML on the table, which ensures high performance of DPL.
Use the following statement to grant the privilege.
If the user does not have the privilege, the following error occurs.
Whitespace Handling
This section describes how tbLoader handles whitespaces.
When a Field Value Contains Only Whitespace(s)
An input file's field value that corresponds to a column value of a record has only whitespace(s), tbLoader loads 0 or NULL depending on the data type of the input table column.
When a Field Value Contains Whitespace(s)
tbLoader treats blank space (' '), tab ('\t'), and EOL ('\n') characters as a whitespace unless the character is specified with the FIELD TERMINATED BY or LINE TERMINATED BY clause. Whitespaces can exist at the start and end of a field. Whitespaces in the middle of a field are treated as data.
tbLoader treats whitespace differently depending on the data file type.
Fixed Records
Whitespaces preceding a field value are treated as actual data, and whitespace following a field value are regarded as unnecessary and are truncated. This is because users can delete the leading whitespace but may add trailing whitespace for formatting purposes.
The following shows how whitespace are handled for a fixed record
Delimited Records
All whitespaces preceding or following a field value are truncated because they are regarded as unnecessary. To add a whitespace as data, enclose the whitespace with the ENCLOSED BY string.
The following shows how whitespace are handled for a delimited record.
Specifying Whitespaces As Data
To specify whitespaces preceding or following a field value as data, use the “” clause.
Advanced Functions
This section describes advanced functions of tbLoader.
Parallel DPL
If direct path load is used to transfer data, the target table is locked to prevent concurrent data loading into the same table. Parallel DPL can be used for concurrent data loading.
When using Parallel DPL, the Parallel DPL flag is set in data to load. A server receives the data in parallel and then merges and saves the data. To use Parallel DPL, set "direct" to Y and "parallel" to a value greater than or equal to 2 in tbloader.
The following example shows how to use Parallel DPL.
Using Parallel DPL in tbLoader
Encrypting Access Information
tbLoader allows to encrypt database connection information (connect_string) by using an encryption file (wallet). To use this function, create an encryption file (wallet) that saves connection information first. For more information, refer to "".
The following example shows how use an encryption file.
Using Encryption File (wallet) to Execute tbLoader
Currently, this function is supported only in UNIX with Open SSL installed.
Memory Protection
tbLoader provides memory protection. This function is enabled by default. To disable this function, set the following environment variable to N.
Disabling Memory Protection
Compressed Data Transmission
tbLoader provides data compression when transmitting data by using direct path load. To use this function, set the TBCLI_DPL_COMPRESSION_LEVEL environment variable to the compression level on the client where tbLoader executes.
The following describes how to set TBCLI_DPL_COMPRESSION_LEVEL.
Enabling Compressed Data Transmission on the Client
To transmit compressed data to a server, _USE_DPL_MSG_COMPRESSION must be set in the tip file of the server.
Enabling Compressed Data Reception on the Server
Control File Options
This section describes how to specify control file options.
Users can specify the following options in a control file.
Character set included in data files
Byte ordering of data files
Data file that contains data to load
The following is the control file format. The order of the options must be preserved.
Items enclosed in square brackets ([ ]) are optional.
The following describes each clause that can be used in the control file.
CHARACTERSET
Specifies a character set. Multiple character sets of data can be loaded to Tibero server. The specified character set affects the character set of control and data files. If no character set is specified, the TB_NLS_LANG value set in the client environment variable or MSWIN949 is used as the default character set for data files.
The default value for TB_NLS_LANG is as follows:
Tibero 6 or earlier : MSWIN949
Tibero 7 or later : UTF8
Syntax
Example
When a current client character set is KSC5601 (TB_NLS_LANG =EUCKR), add the following to the control file to load an MSWIN949 data file to the server.
BYTEORDER
Specifies the byte order of data. It is required to read binary data.
Syntax
Example
INFILE
Specifies the path and name of a data file (text file) that contains actual data. The path can be an absolute or relative path.
If the path is specified both at a command prompt and in the control file, the value specified at the command prompt is preferred.
Syntax
Example
LOGFILE
Specifies the path and name of a log file that contains logs recorded during data loading. The path can be an absolute or relative path.
If the path is specified both at a command prompt and in the control file, the value specified at the command prompt is preferred.
Syntax
Example
BADFILE
Specifies the path and name of an error file that contains records failed to be loaded. The path can be an absolute or relative path.
If the path is specified both at a command prompt and in the control file, the value specified at the command prompt is preferred.
Syntax
Example
DISCARDFILE
Specifies the path and name of a file that contains records omitted by a WHEN conditional clause. The path can be an absolute or relative path.
If the path is specified both at a command prompt and in the control file, the value specified at the command prompt is preferred.
Syntax
Example
SKIP_ERRORS
Specifies error numbers that will not be recorded in an error file.
Syntax
Example
APPEND|REPLACE|TRUNCATE|MERGE
Specifies how to process data when a user-specified table has existing data.
Since REPLACE and TRUNCATE delete table records and then perform auto-commit, the data cannot be recovered after executing tbLoader.
The following is the details of processing the existing data.
Syntax
Example
PRESERVE BLANKS
Preserves blanks included in field data when saving the data in a database.
Syntax
Example
INTO TABLE
Specifies a target table to which data in a data file is loaded.
Syntax
Example
WHEN
Specifies a condition for fields of a data file to load.
Syntax
Example
MULTI INSERT INDEXES|FAST BUILD INDEXES
Specifies how to create indexes when loading data to a target table with direct path load. Either one of the following can be used.
MULTI INSERT INDEXES
Creates indexes for multiple records at once.
FAST BUILD INDEXES
Ignores existing indexes. Loads all data of a data file and then recreates indexes.
If the target table has a large amount of data when using tbLoader, use MULTI INSERT INDEXES. If not, use FAST BUILD INDEXES. Note that indexes can be in unusable status due to an issue such as data redundancy when using direct path load.
Syntax
Example
FIELDS TERMINATED BY
Specifies a field terminator. When reading records from a data file, each field is delimited by the specified field terminator.
Syntax
Example
FIELDS OPTIONALLY ENCLOSED BY
Specifies a character string that encloses the start and end of a field when reading records from a data file.
tbLoader treats a field value that includes a meta string, such as an empty character (' ', '\t', '\r', '\n'), a field terminator, and a line terminator, as a data value. It treats the ESCAPED BY string as a meta string even if the string is enclosed in the ENCLOSED BY string.
Note that if a field value contains a string that is the same as the ENCLOSED BY string, the ESCAPED BY string must be used as its prefix. Otherwise, the string is treated as the ENCLOSED BY string and the rest of the field value is not recognized.
Syntax
Example
The following shows when the start and end strings are the same.
The following shows when the start and end strings are different.
The following shows when a parameter value is specified.
If a field value contains a string that is the same as the ENCLOSED BY string as follows, the ESCAPED BY string must be used as its prefix.
FIELDS ESCAPED BY
Specifies a character string that enables to read a special character or character string. Use a double backslash (\) to specify a backslash ().
Syntax
Example
LINES FIX
Specifies the length of a line in a data file. The FIELDS, LINE TERMINATED BY, and LINE STARTED BY clauses cannot be used together. POSITION clause must be used together to distinguish columns. If POSITION is not specified, the default value is NULL.
Syntax
Example
Assume that a data file is as follows:
tbLoader reads the data file as follows.
LINES STARTED BY
Specifies a character string (prefix) that indicates the start of a line. Only data following the specified prefix are loaded. If a line does not contain the prefix, the entire line is ignored. For performance reasons, a prefix must consist of a sequence of the same character.
Syntax
Example
Assume that LINES STARTED BY is set as follows:
Assume that a data file is as follows:
tbLoader reads the data file as follows.
LINES TERMINATED BY
Specifies a character string that indicates the end of a line.
Syntax
Example
The following example specifies the line_terminator_string as '|\n' consisting of two ASCII characters.
In Windows files, use '|\r\n' as the line terminator.
TRAILING NULLCOLS
Treats data of the last column that does not exist in a data file as NULL. If this clause is not specified, data of NULL column is treated as an error.
Syntax
Example
The following example treats the job column values as NULL.
IGNORE LINES
Ignores as many lines as the specified number from the start of a data file to load. If a negative value is entered, as many lines as the specified number from the end of a data file are ignored.
Syntax
Example
The following ignores the first line of a data file. When the first line indicates a column name, typically set to 1.
UNORDERED
Loads data in fixed record format when the data corresponding to each column in the control file is not positioned in ascending order in the data file.
Syntax
Example
Specify this clause to avoid an error when the numbers entered after position are not in ascending order.
Table Column Attributes
Specifies columns of a table where a user enters data. Note that the columns must be specified in the order they appear in a data file. Specify the column name of the target table in the column_name parameter.
The following is the details.
FILLER
Specifies a column to be excluded from the data file.
Syntax
Example
For a fixed record, specify FILLER before the position clause.
For a delimited record, specify FILLER after the column name.
POSITION
Specifies the start and end positions of a column in a line of a data file.
Syntax
Example
For a fixed record, specify the exact position along with the column list as follows:
For a delimited record, the POSITION clause is not required.
Data Types
tbLoader supports a set of certain data types. Default values and methods of binding column data vary by data type.
tbLoader provides the following data types.
Numeric
Character string
Binary
Datetime
Numeric
Loads character string data into numeric columns in Tibero. A NULL value is bound to 0 by default and then loaded into the database. To bind a NULL value, the column must be specified as a character string data type.
The following is the details.
Syntax
For more information about size, refer to "".
Character String
Loads character string data into character (CHAR, VARCHAR, CLOB, and NCLOB) columns in Tibero. A NULL value is bound to NULL by default and then loaded into the database. To bind 0 for a NULL value, the column must be specified as a numeric data type.
Syntax
Binary
Loads binary data into large object (RAW, BLOB, and LONGRAW) columns in Tibero. A NULL value is bound to NULL by default and then loaded into the database.
Syntax
Datetime
Loads character string data into date (DATE, TIME, and TIMESTAMP) columns in Tibero. A NULL value is bound to NULL by default and then loaded into the database.
Tibero client uses TB_NLS_DATE_FORMAT and TB_NLS_TIMESTAMP_FORMAT to specify DATE and TIMESTAMP type columns. You can also manually specify DATE, TIMESTAMP, and TIME columns in the control file of tbLoader. To manually specify a column, you must enclose the column in double quotation marks (" ").
Syntax
Example
The following is a sample control file of tbLoader. This example specifies the date format, 'YYYYMMDD', for the hiredate column in the data.dat file
Data Buffer Size
tbLoader reads data from a data file and saves it in a data buffer. Then it converts the data into a Tibero server data type and loads it into the server.
To read delimited records, tbLoader uses database schema information to allocate an appropriate buffer size. To read fixed-length records, tbLoader uses the start and end values of the POSITION clause to allocate the size.
If the data length is known, you can specify the data buffer size. You can also specify the desired data buffer size in bytes to read large object data such as BLOB, CLOB, LONG, and LONG RAW.
Example
The following control file allocates 5-byte data buffer for the empno column and 10-byte data buffer for the hiredate column.
OUTFILE
Specifies a non-data file to read large object data (BLOB, CLOB, LONG, and LONG RAW type) or binary data (RAW). To use OUTFILE, you must specify the file path in a data file.
If OUTFILE is specified, tbLoader internally saves file data in a buffer and loads the data to a server multiple times. If not, tbLoader directly reads large object data from a data file and allocates a 32-KB data buffer by default. To read larger data, you can specify "".
Example
Assume that a control file is as follows:
If a file path is set in the resume column of the data.dat file, tbLoader reads data from the file.
CONSTANT
Specifies the value of a specific column as a constant regardless of a data file value. The constant must be enclosed in double quotation marks (" ") because it may include a blank character.
Example
When a control file is as follows, the empno column value is specified as 1234 regardless of the data value in the data.dat file.
Preserve Blanks
Preserves blanks included in a specified column. It is similar to “”, but you can select columns.
Example
When a control file is as follows, all blanks in the first field of the empno column are preserved.
SQL Expression
Specifies SQL expressions for a column value. The SQL expression must be enclosed in double quotation marks (" "). Data can be bound to the column by using a colon (:) and the column name in the expression.
Example
When a control file is as follows, the SYSDATE value is converted to a character string with the format of 'YYYYMMDD' by using the TO_CHAR function and then saved in the empno column. The empno column's field value from the data file is bound to the ename column.
NULLIF
Specifies a conditional statement to replace a specific column value with NULL. The left-hand side of the conditional expression can be a column name or column number, and the right-hand side is enclosed in single quotation marks (' ') or can use the BLANKS keyword.
Syntax
Example
When a control file is as follows, if the value of the empno column is 0, the ename column is replaced with NULL.
Comments
Comments out a line of the control file.
Example
tbLoader Parameters
This section describes tbLoader parameters that can be specified at the command line.
If a parameter is not specified when executing tbLoader, it can be entered at the command line. The following describes available command-line parameters.
The following describes each parameter.
At the command line, users can enter metadata required for a parameter or control file. Note that the userid, control, direct, message, readsize, bindsize, errors, and rows parameters can be specified only at the command line.
The -c option displays character sets that are available in the current version for backward compatibility.
The following shows that tbLoader parameters can be entered at the command line.
Usage Example
This section describes examples of loading delimited records, fixed records, and large object data (such as BLOB and CLOB).
Create a table (performed in all examples).
Create a control file.
Create a data file.
Execute tbLoader.
The following creates a common table. In this section, the database name is "default" and the table owner is loader/loader_pw.
Delimited Records
Use the convention path load method to load delimited records into Tibero server.
Creating a Control File
The following is the contents of the control file, control.ctl.
The control file includes the following information.
Data file
The data.dat file in the current directory.
Log file
If a log file name is not specified at the command prompt, the control file name is used as the log file name by default. In this example, control.log is created by default.
Creating a Data File
The following is the contents of the data file, data.dat.
Executing tbLoader
Execute tbLoader.
Checking Log and Error Files
After executing tbLoader, check the log and error files.
The log file contains logs generated while executing tbLoader
The error file contains data that tbLoader failed to load. The failed data can be modified and reloaded into Tibero database.
Fixed Records Terminated by EOL
Use the direct path load method to load fixed records into Tibero server.
Creating a Control File
The following is the contents of the control file, control.ctl.
The control file includes the following information.
Data file
The data.dat file in the /home/test directory.
Log file
If a log file name is not specified at the command prompt, the control file name is used as the log file name by default. In this example, control.log is created by default.
Creating a Data File
The following is the contents of the data file, data.dat.
Since tbLoader reads fixed records, the column data must be accurately positioned in the data file
Executing tbLoader
Execute tbLoader.
Checking Log and Error Files
After executing tbLoader, check the log and error files.
The log file contains logs generated while executing tbLoader.
As shown in the previous log file, there are 3 records that failed to be loaded because their last column value does not exist. The last column value can be bound to NULL by using the “” clause.
The error file contains data that tbLoader failed to load. The failed data can be modified and reloaded into Tibero database.
Fixed Records
Use the conventional path load method to load fixed records into Tibero server.
Creating a Control File
The following is the contents of the control file, control.ctl.
The control file includes the following information.
Data file
The data.dat file in the current directory.
Log file
If a log file name is not specified at the command prompt, the control file name is used as the log file name by default. In this example, control.log is created by default.
Creating a Data File
The following is the contents of the data file, data.dat. Since tbLoader reads fixed records, the column data must be accurately positioned in the data file. Note that the following example separates records in multiple lines, but they must be written in a single line in actual use
Executing tbLoader
Execute tbLoader.
Checking Log and Error Files
After executing tbLoader, check the log and error files.
The log file contains logs generated while executing tbLoader.
The error file contains data that tbLoader failed to load. The failed data can be modified and reloaded into Tibero database.
Large Object Data
Use the conventional path load method to load delimited records into Tibero server.
The following shows how to create an input file including a BOLB column for saving large binary data. The method of creating an input file including a CLOB column for saving large text data is similar to this method.
Creating a Control File
The following is the contents of the control file, control.ctl.
The control file includes the following information.
Data file
The data.dat file in the current directory.
Log file
If a log file name is not specified at the command prompt, logfile.log is created in the current directory by default.
Creating a Data File
The following is the contents of the data file, data.dat. To load binary data to a BLOB column, enter the path to the binary file.
Executing tbLoader
Execute tbLoader
Checking Log and Error Files
After executing tbLoader, check the log and error files.
The log file contains logs generated while executing tbLoader.
The error file contains data that tbLoader failed to load. The failed data can be modified and reloaded into Tibero database
The primary key, unique key, and NOT NULL constraints are checked.
The insert trigger does not work during data loading.
Log file that records events during data loading
Error file that records data failed to be loaded
Error number to exclude from the error file
How to process existing data in a table (APPEND|REPLACE|TRUNCATE|MERGE)
Field terminator and other options (TERMINATOR, ENCLOSED BY STRING, ESCAPED BY STRING)
Start and end strings of a line
Number of lines to ignore from a data file
Options for a specific table column
Specifies error numbers that will not be recorded in an error file.
Specifies how to process data when a user-specified table has
existing data.
Preserves blanks included in field data when saving the data in a database.
Specifies a target table to which data in a data file is loaded.
Specifies a condition for fields of a data file to load.
Specifies how to create indexes when loading data to a target table with direct path load.
Specifies a field terminator.
Specifies a character string that encloses the start and end of a field when reading records from a data file.
Specifies a character string that enables to read a special character or character string.
Specifies the length of a line in a data file.
Specifies a character string that indicates the start of a line.
Specifies a character string that indicates the end of a line.
Treats data of the last column that does not exist in a data file as NULL.
Ignores the specified number of lines from the start of a data file to load.
Specifies columns of a table where a user enters data.
Specifies SQL expressions for a column value.
Conditional statement to replace a specific column value with NULL.
Number of lines to skip from the first line of a data file. (Default value: 0)
Same as the control file option, “”.
errors
Maximum number of errors allowed when uploading data. (Default value: 50)
tbLoader loads data until the number of errors reaches this number.
The range of ERRORS is between -1 and 2147483647 (maximum integer value). The value must be -1, 0, or an integer.
If ERRORS is set to 0, no errors are allowed.
rows
Number of records to commit when uploading a large amount of data. For the tbLoader performance, the actual number of records sent to the server may not be same as this value.
message
Number of logical records that tbLoader is currently processing.
If not specified, the progress will not be displayed. Using a number that is too small may affect performance.
readsize
Size of a read-only buffer that tbLoader uses to read data files.
Option to disable all indexes of the target table before loading data.
Y: Changes all indexes to UNUSABLE status.
N: Does not change index status. (Default value)
direct
Option to use the direct path load method for data loading.
Y: Uses direct path load.
N: Uses conventional path load. (Default value)
dpl_log
Option to record logs in the log file of the server when loading data using direct path load.
Y: Records logs. Allows recovery, but lowers loading performance.
N: Does not record logs. Does not allow recovery. (Default value)
parallel
Number of threads used when loading data using direct path load. (Default value: 1)
tbLoader uses as many thread(s) that read data and thread(s) that load the data to the server as the specified value in parallel.
bindsize
Size of the direct path stream used by a client when loading data using direct path load.
The Tibero client does not upload the data to the server until the size of the bound data reaches this value. This parameter increases efficiency of uploading large amounts of data.
Tibero: Uses a control file written with tbLoader. (Default value)
Oracle: Uses a control file written with SQL*Loader.
dpl_parallel
No longer used.
multithread
No longer used.
Check log and error files.
Error file
If an error file name is not specified at the command prompt, the data file name is used as the error file name by default. In this example, data.bad is created by default. However, the error file is not created if there are no failed records.
Target table
Data will be loaded into the club table's id, name, and masterid columns.
FIELDS TERMINATED BY, FIELDS OPTIONALLY ENCLOSED BY, FIELDS ESCAPED BY, and LINES TERMINATED BY character strings
Use a comma (,) for FIELD TERMINATED BY, double quotation marks (" ") for FIELDS OPTIONALLY ENCLOSED BY, and the newline character (|\n) for LINES TERMINATED BY. Since the FIELDS ESCAPED BY character string is not specified, the default value, a double backslash (\\), is used.
Data to load
The first line of the data file is ignored due to the IGNORE LINES clause.
Error file
If an error file name is not specified at the command prompt, the data file name is used as the error file name by default. In this example, data.bad is created by default. However, the error file is not created if there are no failed records.
Target table
Data will be loaded into the member table's id, name, job, birthdate, city, and age columns.
FIELDS TERMINATED BY, FIELDS OPTIONALLY ENCLOSED BY, FIELDS ESCAPED BY, and LINES TERMINATED BY character strings
For fixed records, FIELDS TERMINATED BY, FIELDS OPTIONALLY ENCLOSED BY, and FIELDS
ESCAPED BY character strings are not used. Since LINES FIX is not used, EOL is used for LINES TERMINATED BY.
Data to load
Data is loaded from the first line of the data file.
Error file
If an error file name is not specified at the command prompt, the data file name is used as the error file name by default. In this example, data.bad is created by default. However, the error file is not created if there are no failed records.
Target table
Data will be loaded into the member table's id, name, job, birthdate, city, and age columns.
FIELDS TERMINATED BY, FIELDS OPTIONALLY ENCLOSED BY, FIELDS ESCAPED BY, and LINES TERMINATED BY character strings
For fixed records, FIELDS TERMINATED BY, FIELDS OPTIONALLY ENCLOSED BY, and FIELDS
ESCAPED BY character strings are not used. Since LINES FIX is used, LINES TERMINATED BY is not used.
Data to load
Data is loaded from the first line of the data file.
“TRAILING NULLCOLS”
If a record value of the data file does not exist, bind the value to NULL.
Error file
If an error file name is not specified at the command prompt, badfile.bad is created in the current directory by default. However, the error file is not created if there are no failed records.
Target table
Data will be loaded into the member table's id, name, job, birthdate, city, age, and picture columns.
FIELDS TERMINATED BY, FIELDS OPTIONALLY ENCLOSED BY, FIELDS ESCAPED BY, and LINES TERMINATED BY character strings.
Use a comma (,) for FIELD TERMINATED BY, double quotation marks (" ") for FIELDS OPTIONALLY ENCLOSED BY, a double backslash (\\) for FIELDS ESCAPED BY, and a newline character (\n) for LINES TERMINATED BY.
Data to load
The first two lines of the data file are ignored due to the IGNORE LINES clause.
“TRAILING NULLCOLS”
If a record value of the data file does not exist, bind the value to NULL.
Specifies a file that contains records omitted by a WHEN conditional
clause
Item
Description
characterset_name
Character set that is available for TB_NLS_LANG.
(Default value: the default character set for the client)
Item
Description
endian_type
Byte order of the data file if it is different from the order of the machine. Set
to either BIG ENDIAN or LITTLE ENDIAN.
Item
Description
data_file_name
Data file path and name.
Item
Description
log_file_name
Log file path and name. (Default value: control_file_name.log)
Item
Description
bad_file_name
Error file path and name. (Default value: data_file_name.bad)
Item
Description
discard_file_name
File path and name.
Item
Description
error_number
Error numbers that will not be recorded in an error file.
Item
Description
APPEND
Appends new data to the existing data. (Default value)
REPLACE
Deletes the existing data by using the DELETE command and adds new data.
A user must have the permission for DELETE. If there is a trigger for DELETE, the trigger is executed. If the table has a referential integrity constraint, the constraint must be disabled before using DELETE.
TRUNCATE
Deletes the existing data by using the TRUNCATE command and adds new data.
If the table has a referential integrity constraint, the constraint must be disabled before using TRUNCATE.
MERGE(column_name,
.....)
Specifies a list of columns to merge.
tbLoader uses the user-specified column list as key values. If new data has the same key value as the existing data, the new data overwrites the existing data. If there is no matching key, new data is inserted.
Item
Description
table_name
Target table name. PUBLIC synonym can be specified.
Item
Description
column_name
Column name to compare.
column_pos
Column number to compare. The number can be greater than or equal to 1 and must be enclosed in parentheses.
operator
Comparison operator. Equality (=) and inequality (!=, <, >) operators are
available.
value_string
Value to compare to. Can be a string enclosed in single quotation marks or the BLANKS keyword.
Binary data. For more information about size, refer to "Data Buffer Size".
Item
Description
date_fmt_string
DATE column
timestamp_fmt_string
TIMESTAMP column
time_fmt_string
TIME column
Item
Description
column_name
Column name to compare.
column_pos
Column number to compare. The number can be greater than or equal to 1 and must be enclosed in parentheses.
operator
Comparison operator. Equality (=) and inequality (!=, <, >) operators are
available.
value_string
Value to compare to. Can be a string enclosed in single quotation marks or the BLANKS keyword.
Item
Description
userid
Tibero database user name and password and the database name in the following format:
userid=userid/passwd@databasename
control
Path and name of the control file that contains parameter information. Both absolute and relative paths are available.
data
Path and name of the text file that contains actual data. Both absolute and relative paths are available.
If the path is specified at the command prompt and in the control file, the former is used.
log
Path and name of the log file about data loading process. Both absolute and relative paths are available. (Default value: control_file_name.log)
If the path is specified at the command prompt and in the control file, the former is used.
bad
Path and name of the file that records failed to be loaded. Both absolute and relative paths are available. (Default value: data_file_name.bad)
If the path is specified at the command prompt and in the control file, the former is used.
discard
Path and name of the file that contains records omitted by a WHEN conditional clause. Both absolute and relative paths are available. If this parameter is not specified, omitted records are not recorded.
If the path is specified at the command prompt and in the control file, the former is used.
example.ctl:
LOAD DATA
INFILE 'example.dat'
LOGFILE 'example.log'
BADFILE 'example.bad'
APPEND
INTO TABLE EMP
LINES FIX 12
(
empno position (01:04),
ename position (06:12)
)
example.dat:
7922 MILLER 7777 KKS 7839 KING 7934 MILLER 7566 JONES
example.ctl:
LOAD DATA
INFILE 'example.dat'
LOGFILE 'example.log'
BADFILE 'example.bad'
APPEND
INTO TABLE EMP
TRAILING NULLCOLS
(
empno position (01:04),
ename position (06:15),
job position (17:25),
mgr position (27:30),
sal position (32:39)
)
example.dat:
7922 MILLER CLERK 7782 920.00
7777 KKS CHAIRMAN
7839 KING PRESIDENT 5500.0
7934 MILLER CLERK 7782 920.00
7566 JONES MANAGER 7839 3123.75
7658 CHAN ANALYST 7566 3450.00
7654 MARTIN SALESMAN 7698 1312.50
example.ctl:
LOAD DATA
INFILE 'example.dat'
LOGFILE 'example.log'
BADFILE 'example.bad'
APPEND
INTO TABLE emp
FIELDS TERMINATED BY ','
OPTIONALLY ENCLOSED BY '"'
ESCAPED BY '\\'
LINES TERMINATED BY '\n'
(
empno,
ename,
job,
mgr,
hiredate,
sal,
comm,
deptno
)
control.ctl:
LOAD DATA
...
(
empno position (01:04),
ename position (06:15),
job filler position (17:25),
mgr position (27:30),
sal position (32:39),
comm position (41:48),
deptno position (50:51)
)
control.ctl:
LOAD DATA
...
(
empno position (01:04),
ename position (06:15),
job position (17:25),
mgr position (27:30),
sal position (32:39),
comm position (41:48),
deptno position (50:51)
)
$ tbloader
tbLoader 7
TmaxData Corporation Copyright (c) 2008-. All rights reserved.
Usage: tbloader [options] [controls]
Options:
-h|--help Display the more detailed information.
-c|--charset Display usable character sets in this version.
-v|--version Display the version information.
Controls:
userid Username/password@dbname
control The name of the control file
data The name of the data file
log The name of the log file
bad The name of the bad file
discard The name of the bad file
skip The count of line to skip in data file (Default: 0)
errors The count of error to allow (Default: 50)
rows The count of row for each commit
(Default: commit after the end)
message The count of records to process to print out (Default: 0)
readsize The size of buffer to read from the data file
(Default: 65536)
disable_idx Whether to disable indexes before loading (Default: N)
direct Whether to use the Direct Path Loading (Default: N)
dpl_log Whether to log about the Direct Path Loading (Default: N)
parallel The count of threads to execute Parallel Direct Path Loading
(Default: 1)
bindsize The size of buffer to read in the Direct Path Loading
(Default: 65536)
syntax Control file syntax (Default : tibero)
dpl_parallel Deprecated
multithread Deprecated
Example:
tbloader userid=userid/passwd@dbname control=sample.ctl bindsize=1000000
CREATE TABLE MEMBER
(
ID NUMBER(4) NOT NULL,
NAME VARCHAR2(10),
JOB VARCHAR2(9),
BIRTHDATE DATE,
CITY VARCHAR2(10),
PICTURE BLOB,
AGE NUMBER(3),
RESUME CLOB
);
CREATE TABLE CLUB
(
ID NUMBER(6) NOT NULL,
NAME VARCHAR2(10),
MASTERID NUMBER(4)
);
LOAD DATA
INFILE './data.dat'
APPEND
INTO TABLE club
FIELDS TERMINATED BY ','
OPTIONALLY ENCLOSED BY '"'
LINES TERMINATED BY '|\n'
IGNORE 1 LINES
(
id integer external,
name,
masterid integer external
)
id name masterid|
111111,FC-SNIFER,2345|
dkkkkkkkkkk|
111112,"DOCTOR CLUBE ZZANG",2222|
111113,"ARTLOVE",3333|
111114,FINANCE,1235|
111115,"DANCE MANIA",2456|
111116,"MUHANZILZU",2378|
111117,"INT'L",5555
tbLoader 7
TmaxData Corporation Copyright (c) 2008-. All rights reserved.
Data File : ./data.dat
Bad File : ./data.bad
Table 'CLUB' was loaded from the data file.
Column Name Position DataType
----------------- ----------- --------------
ID 1 NUMERIC EXTERNAL
NAME 2 CHARACTER
MASTERID 3 NUMERIC EXTERNAL
Record 2 was rejected.
TBR-80053 : Some relatively positioned columns are not present in the record.
Record 3 was rejected.
TBR-80025 : Column data exceeds data buffer size.
Record 6 was rejected.
TBR-80025 : Column data exceeds data buffer size.
Table 'CLUB'
-----------------------------
8 Rows were requested to load.
5 Rows were loaded successfully.
3 Rows were failed to load because of some errors
Elapsed time was: 00:00:00.407089
dkkkkkkkkkk|
111112,"DOCTOR CLUBE ZZANG",2222|
111115,"DANCE MANIA",2456|
LOAD DATA
INFILE '/home/test/data.dat'
APPEND
INTO TABLE MEMBER
(
id position (01:04) integer external,
name position (06:15),
job position (17:25),
birthdate position (27:36),
city position (38:47),
age position (49:51) integer external
)
7777 KKS CHAIRMAN 1975-11-18 SEOUL 33
7839 KING PRESIDEN DAEGU 45
7934 MILLER CLERK 1967-01-24 BUSAN 37
7566 JONES MANAGER
7499 ALLEN SALESMAN ddddddddd KYUNG-JU
aaaa7654 MARTIN SALESMAN
7648 CHAN ANALYST 1979-10-11 INCHON 28
tbLoader 7
TmaxData Corporation Copyright (c) 2008-. All rights reserved.
Data File : ./data.dat
Bad File : ./data.bad
Table 'MEMBER' was loaded from the data file.
Column Name Position DataType
------------------- --------- -----------------
ID 1 NUMERIC EXTERNAL
NAME 2 CHARACTER
JOB 3 CHARACTER
BIRTHDATE 4 DATE
CITY 5 CHARACTER
AGE 6 NUMERIC EXTERNAL
Record 4 was rejected.
TBR-80053 : Some relatively positioned columns are not present in the record.
Record 5 was rejected.
TBR-80053 : Some relatively positioned columns are not present in the record.
Record 6 was rejected.
TBR-80053 : Some relatively positioned columns are not present in the record.
Table 'MEMBER'
---------------------
7 Rows were requested to load.
4 Rows were loaded successfully.
3 Rows were failed to load because of some errors
Elapsed time was: 00:00:00.338089
7566 JONES MANAGER
7499 ALLEN SALESMAN ddddddddd KYUNG-JU
aaaa7654 MARTIN SALESMAN
LOAD DATA
INFILE './data.dat'
APPEND
INTO TABLE MEMBER
LINES FIX 51
TRAILING NULLCOLS
(
id position (01:04) integer external,
name position (06:15),
job position (17:25),
birthdate position (27:36),
city position (38:47),
age position (49:50) integer external
)
7777 KKS CHAIRMAN 1975-11-18 SEOUL 33
7839 KING PRESIDENT 1963-04-13 DAEGU
7934 MILLER CLERK 1967-01-24 BUSAN 41
7566 JONES MANAGER 1955-08-20 53
7499 ALLEN SALESMAN 1977-12-28
7648 CHAN ANALYST 1979-10-11 ULSAN 28
tbLoader 7
TmaxData Corporation Copyright (c) 2008-. All rights reserved.
Data File : ./data.dat
Bad File : ./data.bad
Table 'MEMBER' was loaded from the data file.
Column Name Position DataType
-------------- --------- ------------
ID 1 NUMERIC EXTERNAL
NAME 2 CHARACTER
JOB 3 CHARACTER
BIRTHDATE 4 DATE
CITY 5 CHARACTER
AGE 6 NUMERIC EXTERNAL
Record 2 was rejected.
TBR-5074: Given string does not represent a number in proper format.
Record 4 was rejected.
TBR-5045: Only TIME format can be omitted.
Table 'MEMBER'
--------------------
6 Rows were requested to load.
4 Rows were loaded successfully.
2 Rows were failed to load because of some errors
Elapsed time was: 00:00:00.022404
7839 KING PRESIDENT 1963-04-13 DAEGU
7566 JONES MANAGER 1955-08-20 53
LOAD DATA
INFILE './data.dat'
LOGFILE './logfile.log'
BADFILE './badfile.bad'
APPEND
INTO TABLE member
FIELDS TERMINATED BY ','
OPTIONALLY ENCLOSED BY '"'
ESCAPED BY '\\'
LINES TERMINATED BY '\n'
TRAILING NULLCOLS
IGNORE 2 LINES
(
id integer external,
name,
job,
birthdate,
city,
age integer external,
picture outfile
)
tbLoader 7
TmaxData Corporation Copyright (c) 2008-. All rights reserved.
Data File : ./data.dat
Bad File : ./badfile.bad
Table 'MEMBER' was loaded from the data file.
Column Name Position DataType
-------------- ---------- ----------
ID 1 NUMERIC EXTERNAL
NAME 2 CHARACTER
JOB 3 CHARACTER
BIRTHDATE 4 DATE
CITY 5 CHARACTER
AGE 6 NUMERIC EXTERNAL
PICTURE 7 RAW
Record 4 was rejected.
TBR-80025 : Column data exceeds data buffer size.
Table 'MEMBER'
---------------------
6 Rows were requested to load.
5 Rows were loaded successfully.
1 Rows were failed to load because of some errors
Elapsed time was: 00:00:00.055475
7499, "Allen", "Salesman" a,1981:02/20,26
If ERRORS is set to a positive integer value, as many errors as the value are allowed. If the number of errors exceeds the value, data uploading is stopped.
If ERRORS is set to -1, all errors are skipped and only error-free data are uploaded
This chapter describes the tbSQL utility and its usage.
Overview
tbSQL is an interactive Tibero utility that processes SQL statements. It allows to process SQL queries, Data Definition Language (DDL), and transactional SQL statements and to create and execute PSM programs. It also allows DBAs to execute commands to manage Tibero systems.
In addition, tbSQL provides many other functions, such as auto commit setting, OS command execution, output saving, and script creation. Especially, you can create a script including multiple SQL statements, PSM programs, and tbSQL utility commands.
tbSQL is one of the most frequently used Tibero utilities. It provides the following functions.
Inputs, edits, saves, and executes general SQL statements and PSM programs
Sets and ends transactions
Executes batch processing through a script
Quick start
tbSQL is automatically installed and uninstalled along with Tibero.
Execution
The following executes tbSQL.
Executing tbSQL
When tbSQL is executed successfully, the SQL prompt is displayed. You can enter and execute SQL statements at the prompt.
The following is the command syntax for executing tbSQL.
Usage
[options]
[connect_string]
Information about a user account that attempts to access Tibero. It is specified as follows:
The following describes each item for connect_string.
[start_script]
Script file to execute when tbSQL starts. It is specified as follows:
The following describes each item for start_script.
Database Connection
The SQL prompt displayed after executing tbSQL means that it is ready to connect to a database.
If there are any tasks to process before starting the database session, create the tbsql.login file. This file is searched in the current directory. If not found, it is searched in the directory set in the TB_SQLPATH environment variable.
The following connects to a database by using tbSQL.
Connecting to Database
The previous example executes tbSQL and connects to a database with specified username and password in the UNIX shell prompt.
There are the following rules for username and password.
If connect_identifier is omitted as in the previous example, the connection is made to the default database. To connect to a specific database, specify connect_identifier in one of the following ways.
Data Source Name (DSN)
Specify the name defined in the tbdsn.tbr file or ODBC data source in Windows.
The following is an example.
If tbdsn.tbr includes the previous information, connect to the database as follows:
Connection descriptionSpecify connection information in one of the following two methods.
Method 1
Example
Method 2
Example
Interface
The following shows the interface between users and tbSQL.
In the previous example, after tbSQL is executed, a connection is made to a database by using the CONNECT command with the username, dbuser.
Like this, tbSQL is a text-based user interface utility.
In this document, all SQL statements, PSM programs, and tbSQL commands, with some exceptions, are written in uppercase letters.
(Command parameters written in lowercase letters are specified by the user.)
The tbSQL interface works as follows:
When tbSQL is executed successfully, the SQL prompt is displayed.
At the SQL prompt, you can enter SQL statements, PSM programs, and tbSQL commands.
Input can span multiple lines.
SQL statements and PSM programs can be not executed when entered, but tbSQL commands are executed when entered.
Not case-sensitive.
Input text is not case-sensitive, with some exceptions such as a string value in an SQL statement.
For example, the following two statements have the same meaning.
Environment Configuration
To configure tbSQL environment, use the SET command. You can set the output format of SQL query results, transaction commit option, and other environment options.
The following is the syntax of the SET command.
For detailed information, refer to “”.
End
To end tbSQL, use the EXIT or QUIT command at the SQL prompt.
For detailed information about tbSQL commands, refer to “”.
System Variables
This section describes system variables for tbSQL. To set the system variables, use the SET command, and to display the results, use the SHOW command.
The following describes each system variable.
The following sets system variables.
AUTOCOMMIT
Executes a commit after processing SQL statements such as INSERT, UPDATE, DELETE, MERGE, and PSM blocks.
Syntax
AUTOTRACE
Displays the plan and statistics of a running query. To use this variable, DBA or PLUSTRACE privilege is required. The PLUSTRACE privilege includes permissions required to use AUTOTRACE. A user who has DBA privilege can create the PLUSTRACE privilege and grant it to another user.
To create the privilege, the $TB_HOME/scripts/plustrace.sql script can be used.
Syntax
Input
Options
The following describes each option.
BLOCKTERMINATOR
Sets a character that indicates the end of a PSM block.
Syntax
COLSEP
Sets a delimiter for columns displayed after processing a SELECT statement.
Syntax
CONCAT
Sets a character that indicates the end of a substitution variable name.
Syntax
DDLSTATS
Displays the plan and statistics of a running DDL statement. To use this variable, AUTOTRACE must be enabled.
Syntax
DEFINE
Sets a character used to define a substitution variable.
Syntax
DESCRIBE
Sets the level of object specification to display.
Syntax
ECHO
Displays running script queries when a script file is executed with the START or @ command.
Syntax
EDITFILE
Sets the default file name used for the EDIT command. If the extension is omitted, the value set in SUFFIX is used.
Syntax
ESCAPE
Sets an escape character used to ignore the substitution variable character defined in DEFINE. If the escape character is followed by a substitution variable, the variable is not recognized as a substitution variable.
Syntax
EXITCOMMIT
Executes a commit when tbSQL ends.
Syntax
FEEDBACK
Displays the SQL statement results.
Syntax
HEADING
Displays column headers for query results.
Syntax
HEADSEP
Sets a new line character for column headers.
Syntax
HISTORY
Sets the size of command history.
Syntax
INTERVAL
Sets the wait time between executions of the LOOP command.
Syntax
LINESIZE
Sets the length of a line on the screen.
Syntax
LONG
Sets the output length of large object data, such as CLOB, BLOB, NCLOB, LONG, and XML data.
Syntax
MARKUP
Displays the output of a utility in HTML.
Syntax
Input parameters
Option
The following are options for detail settings of HTML markup.
The MARKUP capability is supported starting with Tibero 7 FS02 release.
NEWPAGE
Sets the number of empty lines added to the beginning of each page.
Syntax
NUMFORMAT
Sets the default format of NUMBER columns. The format applies only to numeric columns whose format is not set with the COLUMN command.
Syntax
NUMWIDTH
Sets the output length of NUMBER data. The length cannot exceed the value set in LINESIZE.
Syntax
PAGESIZE
Sets the number of lines per page.
Syntax
PAUSE
Waits for user input before displaying the next page.
Syntax
RECSEP
Displays a row separator.
Syntax
RECSEPCHAR
Sets a character used as a row separator. This character is repeatedly displayed as many times as LINESIZE.
Syntax
ROWS
Displays query statement results.
Syntax
SERVEROUTPUT
Displays the result of the DBMS_OUTPUT package.
Syntax
SQLCODE
Displays the last SQLCODE. This value cannot be set with the SET command.
Syntax
SQLPROMPT
Sets the prompt string.
Syntax
SQLTERMINATOR
Sets a character that indicates the end of an SQL statement.
Syntax
SUFFIX
Sets the default file extension.
Syntax
TERMOUT
Displays the result of commands in a script.
Syntax
TIME
Displays the current time in the prompt.
Syntax
TIMEOUT
Sets the timeout for a server response to the ping command.
Syntax
TIMING
Displays the processing time along with SQL and PSM statement results.
Syntax
TRIMOUT
Trims whitespaces at the end of each line when displaying SQL and PSM statement results.
Syntax
TRIMSPOOL
Trims whitespaces at the end of each line when spooling SQL and PSM statement results.
Syntax
UNDERLINE
Sets a character used to underline headers.
Syntax
VERIFY
Displays commands including substitution variables after replacing the variables with values.
Syntax
WRAP
Wraps lines that are longer than LINESIZE.
Syntax
Basic Functions
tbSQL is mainly used to execute user-entered queries such as SQL statements and PSM programs. This section describes how to enter and execute the queries and explains additional functions.
Entering Queries
At the tbSQL prompt, you can enter SQL statements, PSM programs, and tbSQL commands. The following describes how to enter them.
SQL Statements
Enter SQL statements as follows:
Entering SQL statements
Enter general SQL statements at the prompt. An SQL statement can span multiple lines. To cancel entering a statement, enter an empty line.
Line break
Break a line when entering an SQL statement in multiple lines. You can break a line anywhere except in the middle of a string. It is recommended to break a line by clause for readability.
Inserting comments
Insert comments into SQL statements. Comments start with two dashes (--) and end with the newline character. They can start at the beginning of a line or after another string.
The following enters an SQL statement in tbSQL.
PSM Programs
A PSM program consists of multiple SQL and PSM statements. Each SQL statement ends with a semicolon (;). When you start entering a PSM program, tbSQL will be automatically switched to the PSM program input mode. In the mode, SQL statements are not executed until an entire program is entered.
Entering the following statements switch tbSQL to the PSM program input mode: DECLARE and BEGIN for anonymous blocks, CREATE (OR REPLACE) PROCEDURE that creates a procedure, CREATE (OR REPLACE) FUNCTION that creates a function, and CREATE (OR REPLACE) TRIGGER that creates a trigger.
Enter PSM programs as follows:
Entering PSM ProgramsA PSM program can span multiple lines. To cancel entering a PSM program, enter the block terminator character (set in ). The default character is a period (.). Enter the character in a separate line without any other characters.
Inserting comments
Same as in SQL statements.
Using stored Statements
Entered programs are stored in SQL buffer and can be reused.
The following enters an anonymous block in tbSQL.
In the previous example, a line is entered as a comment, and the PSM program is ended by entering the block terminator character (.) below the END statement. You can check that the character is entered in a separate line without any other characters.
For more information about tbPSM, refer to "Tibero tbPSM Guide".
tbSQL Commands
Enter tbSQL commands at the prompt to execute SQL statements and manage Tibero database.
tFor information about the commands, refer to “”.
Executing Queries
There are the following three ways to execute queries entered at the tbSQL prompt.
Executing SQL statements and PSM programs stored in the SQL buffer
The SQL buffer stores an SQL statement or a PSM program entered lastly. To execute the SQL statement or PSM program, enter the RUN or / command.
Executing SQL statementsEntering a full SQL statement followed by a semicolon (;) executes the statement.
Executing an SQL statement and storing it in the SQL bufferTo execute an SQL statement or a PSM program and store it in the butter, enter the / command. Enter the command in a separate line without any other characters like the block terminator character.
There is no separate command for executing tbSQL utility commands. The commands are not stored in the SQL buffer. They are executed when entered.
The following shows how to execute an SQL statement stored in the SQL buffer.
In the previous example, at the first prompt, an SQL statement is executed by entering the statement and a semicolon (;). At the second prompt, the / command is entered, which executes the SQL statement stored in the SQL buffer. Since the SQL buffer stores an SQL statement entered lastly, the SQL statement entered at the first prompt is executed. Therefore, the execution results (1) and (2) are the same.
The following shows how to execute an SQL statement and store it in the SQL buffer. A semicolon (;) is not entered at the end of the SQL statement.
Additional Functions
The following describes additional basic functions.
Inserting Comments
There are the following two ways to insert comments.
Using /* and */
Same as in the C and C++ programing languages. Enclose multi-line comments with /* and */. A comment cannot nest another comment.
Using two dashes (--)
Single-line comments start with two dashes (--) and end with the newline character. They can start anywhere except for in a line with a period (.) that indicates the end of a PSM program.
The following causes an error.
Autocommit
Data modified with an SQL statement is not applied to a database until the transaction including the statement is committed. A transaction usually includes multiple SQL statements.
In tbSQL, you can enable or disable autocommit by using the AUTOCOMMIT variable (default value: OFF). To set the variable, use the SET AUTOCOMMIT command. To check the current setting, use the SHOW AUTOCOMMIT command.
Executing OS Commands
To execute OS commands in tbSQL, use the ! or HOST command.
The following lists all script files with the .sql extension.
After executing an OS command, the tbSQL prompt is displayed.
If the ! or HOST command is used without an OS command, the OS command prompt is displayed. To return to the tbSQL prompt, enter EXIT as follows:
Saving Input and Output
To save all data entered and displayed in tbSQL to a text file, use the SPOOL command. This command saves all user-entered SQL statements and PSM programs, tbSQL commands, query and program execution results, and the tbSQL prompt to a text file. If you execute the command, spooling starts from the next line. To stop this function, use the SPOOL OFF command.
The following uses the SPOOL command with a file name (save.txt). Note that if the file name already exists, the existing file is overwritten.
The following are the contents of the save.txt file in the previous example.
The file contains user-entered SQL statements, the query result, and the SPOOL OFF command.
Advanced Functions
This section describes the advanced tbSQL functions including batch processing using a script and DBA functions for managing Tibero.
Script Functions
A script is a series of SQL statements, PSM programs, and tbSQL commands. When executing a script in tbSQL, all the queries in the script are executed sequentially.
Creating a Script
You can create and edit a script file externally, or call an external editor in tbSQL to create and edit a script file.
The following uses vi as an external editor in tbSQL.
To edit a script file by using an external editor, use the EDIT command with specifying the file name. The file extension can be omitted if the extension is the same as the value set in the SUFFIX system variable.
The following calls an external editor to edit the run.sql script file.
Add SQL statements, PSM programs, and tbSQL commands to a script file as follows:
Adding queries
Same as entering queries at the tbSQL prompt. A query can span multiple lines.
Ending SQL statements and PSM programs
An SQL statement must be ended with a semicolon (;). A PSM program must be ended with a period (.) in the last line.
Inserting comments
You can insert comments into a script file.
When a script is executed, SQL statements in the script are executed immediately. PSM programs in the script are executed with the RUN or / command.
The following is a sample script file that executes some operations on the EMP table. Blank lines are allowed between lines.
Executing a Script
To execute a script file, use the START or @ command with specifying the file name. The file extension can be omitted if the extension is the same as the value set in the SUFFIX system variable (default value: sql). The script file is searched in the current directory. If not found, it is searched in the directory set in the TB_SQLPATH environment variable.
The following each line executes the run.sql script file and has the same result.
A script file can include one or more script files by using the START or @ command. Make sure not to get into an infinite loop when using a script file recursively.
You can execute a script file when starting tbSQL by using the @ command. This is useful when executing a batch program in the OS.
The following executes the run.sql script file when starting tbSQL.
The following also executes the run.sql script file when starting tbSQL by using the shell redirection command.
DBA Functions
A user with the DBA privilege can execute DBA functions in tbSQL.
The following logs in as the SYS user with the DBA privilege.
After starting tbSQL, you can connect to a database as a user with the DBA privilege by using the CONNECT command.
The following connects to a database as the SYS user with the DBA privilege.
A DBA can perform the following task in tbSQL.
● Ending Tibero by using the TBDOWN command
User Access Control
tbSQL allows to restrict users from executing certain commands. For this, the CLIENT_ACCESS_POLICY table is referenced. The SYS user creates this table, and a DBA defines the access policy in the table to grant command execution permission to specific users.
tbSQL loads the table data when a user connects to a database and it checks the permission whenever the user executes a command. The loaded data is released when the user disconnects from the database.
Privilege is not checked for SYS users.
Creating Access Control Table
The SYS user can create the access control table by executing the $TB_HOME/scripts/client_policy.sql file.
Privilege is not checked if the table does not exist or has an issue.
The contents of the CLIENT_ACCESS_POLICY table are as follows:
Configuring Command Access Control
To restrict executing tbSQL, SQL, or PSM commands, add rows to the CLIENT_ACCESS_POLICY table like the following. To allow executing the commands, delete the rows
The following are the lists of commands that can be controlled.
tbSQL Commands
SQL Commands
PSM Commands
The following is an example of using the user access control function.
Encrypting Connection Information
Database connection information (connect_string) can be saved in an encryption file (wallet.dat) and reused in tbSQL. The file is located in the path set in the ISQL_WALLET_PATH environment variable and can be used from the next connection.
Creating an Encryption File
Connect to a database in tbSQL and then create an encryption file by using the command.
The following sets the ISQL_WALLET_PATH environment variable to wallet.dat in the current directory and then encrypts database connection information.
In the previous example, since ISQL_WALLET_PATH is set before starting tbSQL, it is tried to decrypt the set file, but an error occurs because the set file does not exist. To resolve this issue, reconnect to the database and create the file by using thecommand.
The following creates wallet.dat in the current directory by encrypting database connection information without setting ISQL_WALLET_PATH.
You can specify the path of wallet.dat when executing
Using an Encryption File
Set the encryption file (wallet.dat) created in the previous example in ISQL_WALLET_PATH before executing tbSQL to reuse database connection information used before creating the file.
The following connects to a database by using the file set in ISQL_WALLET_PATH.
To use the encryption file, it must be set in ISQL_WALLET_PATH. The encryption file is only available in tbSQL instance where the file is created. To use the same file in another tbSQL instance, the encryption file must be reconfigured using the aforementioned steps.
This function is not available in Windows.
tbSQL Commands
This section describes commands available in tbSQL.
The following is sample syntax.
The following describes each item in the syntax.
The following are examples of valid commands.
With tbSQL commands, you can execute SQL statements and manage databases. The following describes the commands in alphabetical order.
The following are the tbSQL commands.
!
Executes an OS command. Same as the HOST command.
Syntax
Example
%
Executes a command stored in the tbSQL history buffer.
Syntax
Example
@, @@
Executes a script file. If the script file has the same extension as the one set in the SUFFIX system variable, the extension can be omitted. tbSQL finds the specified script file in the current directory.
System variables set with the SET command before executing the script remain in effect while executing the script. Use the EXIT or QUIT command in a script file to end tbSQL.
Same as the START command.
Syntax
Example
/
Executes PSM programs or SQL statements that are stored in the SQL buffer.
Syntax
Example
ACCEPT
Receives user input and saves it in a specified substitution variable. The value automatically replaces a value that matches &variable in an SQL statement or a PSM program.
Syntax
Example
APPEND
Appends user-entered text or statements to the SQL buffer.
Syntax
Example
ARCHIVE LOG
Displays Archive log file information.
Syntax
Example
CHANGE
Finds an old pattern in the current line of the SQL buffer and changes it to a new pattern. Typically, the current line of the last executed SQL statement is the last line. For information about how to change the current line, refer to the following example.
Syntax
Input
option
Example
Since the current line is always the last line by default, the DUAL in the second line is changed to T.
To change the current line, enter the line number.
An arbitrary pattern can be specified with '...'. It can be placed in the front, back, or middle of a word.
To change all old patterns in the entire statement, use the "a" option. The following changes * to the specified new pattern.
CLEAR
Initializes or deletes specified data.
Syntax
option
Example
COLUMN
Specifies the display properties of a specified column. When the column name is specified, only the display properties of the column are displayed. Otherwise, those of all columns are displayed.
Syntax
input
option
Example
CONNECT
Connects to the database as a specified user. If no user name or password is specified, tbSQL displays its prompt and requests the name or password.
Executing the CONNECT command commits the previously executed transaction, disconnects the existing connection, and then attempts to establish a new connection. Although it fails to establish the new connection, the previous connection is not recovered.
The following is the syntax.
Syntax
Example
DEFINE
Defines or displays substitution variables.
Syntax
Example
DEL
Deletes the line that is stored in the SQL buffer. If no line number is specified, all lines are deleted.
Syntax
Example
DESCRIBE
Displays the column information of the specified object. An object can be a table, view, synonym, function, procedure, or package.
For tables and views, the column name, data type, constraint, index information, maximum length, precision, scale, and other items are displayed.
For functions and procedures, parameter information (name, data type, IN/OUT) are displayed. For packages, all details about the functions and procedures of the package are displayed.
The column information about an object owned by a specified user can also be displayed. If no username is specified, the current username is used by default.
Syntax
Example
DISCONNECT
Ends the connection to the current database. Executing this command commits currently running transaction but does not end tbSQL.
If a script file includes CONNECT but does not include DISCONNECT, a connection to a database remains open. Therefore, it is recommended to add DISCONNECT to a script file that includes CONNECT.
Syntax
EDIT
Edits the contents of an SQL buffer or a certain file by using an external editor. An external editor can be specified in the $TB_EDITOR environment variable.
If $TB_EDITOR is not set, this command references $EDITOR. If neither variable is set, the vi editor is used. If the SQL buffer is empty, an error will be returned.
A file name can be specified without an extension if its extension is the same as the value set in the SUFFIX system variable. The default value of SUFFIX is .sql, and it can be changed with the SET command. tbSQL searches for the specified file in the current directory.
Syntax
Example
EXECUTE
Processes PSM statements that are CALL statements or anonymous blocks. There must be a semicolon (;) at the end of a statement.
Syntax
Example
This command is also useful when defining a value to a user-defined bind variable.
EXIT
Ends tbSQL. (Same as the QUIT command.)
Commits all running transactions and ends all database connections.
Syntax
EXPORT
Exports SELECT statement results or table data to a file with a format that tbLoader can recognize. The data can be exported in fixed format or variable format that uses column and row separators.
Syntax
Example
The following creates t.csv (data file) and t.ctl (control file).
The following exports data in variable format.
HELP
Displays help information about commands including a specified word.
Syntax
Example
HISTORY
Displays commands stored in the history buffer.
Syntax
Example
HOST
Executes an OS command. Same as the ! command.
Syntax
INPUT
Adds a user-input SQL statement after the last line in the SQL buffer.
Syntax
Example
The following specifies no option. Unlike the previous example, the SQL statement will be executed as soon as it is entered.
LIST
Displays specified lines stored in the SQL buffer.
Syntax
Example
LOADFILE
Saves a Tibero table in the format that can be recognized by Oracle SQL*Loader.
Syntax
Example
The following saves the emp table in the format that can be recognized by Oracle SQL*Loader. This creates two files, emp.ctl and emp.dat.
LOOP
Repeatedly executes a statement. Enter <Ctrl>+C to end the loop.
Syntax
Example
LS
Displays information about a user-created database object with a specific type or name.
Syntax
Example
PASSWORD
Changes the user password.
Syntax
Example
PAUSE
Pauses the execution until the user presses the <Enter> key.
Syntax
Example
PING
Displays whether a specified database is accessible.
Syntax
Example
PRINT
Displays the name and value of user-defined bind variables.
Syntax
Example
PROMPT
Displays a specified message or an empty line.
Syntax
Example
The following is an example of the externally written SQL file named PromptUsage.sql.
The following shows the execution result of PromptUsage.sql.
QUIT
Ends tbSQL. Commits all running transactions and ends all database connections.
(Same as the command.)
Syntax
RESTORE
Restores user-selected data from a specified file.
Syntax
Example
RUN
Executes PSM programs or SQL statements that are stored in the SQL buffer.
Same as the / command, but displays statements stored in the buffer.
Syntax
Example
SAVE
Saves user-selected information to a specified file.
For more information about SAVE CREDENTIAL, refer to
“”.
Syntax
Example
SET
Sets tbSQL system variables. The variable values can be checked with the SHOW command. However, the changed system variable is valid only in the current session.
For detailed information about system variables, refer to “”.
Syntax
Example
SHOW
Shows tbSQL system variables.
Syntax
option
Example
SPOOL
Saves all screen outputs to a file in the current directory. The results of the HOST and ! commands are excluded.
Syntax
Example
START
Executes a script file. (Same as the command.)
Syntax
TBDOWN
Ends Tibero database. Select one of four options depending on the urgency. Some options require recovery process when rebooting the database.
To execute this command, connect to the database as SYSDBA or SYSOPER.
Syntax
Example
UNDEFINE
Deletes substitution variables defined with the ACCEPT or another command.
Syntax
Example
VARIABLE
Declares user bind variables that are available in PSM programs or SQL statements.
Syntax
Example
WHENEVER
Defines tbSQL action to take when an error occurs.
Syntax
clause1
clause2 (Default value: CONTINUE)
Example
Culumn Formats
This section describes data types for tbSQL columns.
The column format can be specified and displayed using thecommand.
Character Type
The length of CHAR, NCHAR, VARCHAR, and NVARCHAR types is the same as that of a database column by default. If data length is greater than column length, the data is written in the next line or truncated. This issue can be easily handled with a character type format.
Syntax
Example
Numeric Type
The following describes how to set a numeric column format.
Syntax
input
fmt_str format
The following shows formats that can be specified in fmt_str.
Example
Allows DBAs to manage databases
Starts and ends databases
Executes external utilities and programs
Configures the tbSQL utility.
"." (0x2E)
Sets a character that indicates the end of a substitution
variable name.
DDLSTATS
OFF
Displays the plan and statistics of a running DDL statement.
DEFINE
"&" (0x26)
Sets a character used to define a substitution variable.
DESCRIBE
10
Sets the level of object specification to display.
ECHO
OFF
Displays running script queries when a script file is executed
with the START or @ command.
EDITFILE
.tbedit.sql
Sets the default file name used for the EDIT command.
ESCAPE
OFF
Sets an escape character used to ignore the substitution
variable character defined in DEFINE.
EXITCOMMIT
ON
Executes a commit when a utility is ended.
FEEDBACK
0
Displays the SQL statement results.
HEADING
ON
Displays column headers for query results.
HEADSEP
"|" (0x7C)
Sets a new line character for column headers.
HISTORY
50
Sets the size of command history.
INTERVAL
1
Sets the wait time between executions of the LOOP command.
LINESIZE
80
Sets the length of a line on the screen.
LONG
80
Sets the output length of large object data.
MARKUP
OFF
Sets the output of a utility in html.
NEWPAGE
1
Sets the number of empty lines added to the beginning of each page.
NUMFORMAT
""
Sets the default format of numeric columns.
NUMWIDTH
10
Sets the output length of numeric data.
PAGESIZE
24
Sets the number of lines per page.
PAUSE
OFF
Waits for user input before displaying the next page.
RECSEP
WRAPPED
Displays a row separator.
RECSEPCHAR
" " (0x20)
Sets a character used as a row separator.
ROWS
ON
Displays query statement results.
SERVEROUTPUT
OFF
Displays the result of the DBMS_OUTPUT package.
SQLCODE
Displays the last SQLCODE.
SQLPROMPT
"SQL> "
Sets the prompt string.
SQLTERMINATOR
";" (0x3B)
Sets a character that indicates the end of an SQL statement.
SUFFIX
sql
Sets the default file extension.
TERMOUT
ON
Displays the result of commands in a script.
TIME
OFF
Displays the current time in the prompt.
TIMEOUT
3
Sets the timeout for a server response to the ping command.
TIMING
OFF
Displays the processing time along with SQL and PSM statement results.
TRIMOUT
ON
Trims whitespaces at the end of each line when displaying SQL and PSM results.
TRIMSPOOL
OFF
Trims whitespaces at the end of each line when spooling SQL and PSM results.
UNDERLINE
"-" (0x2D)
Sets a character used to underline headers.
VERIFY
ON
Displays commands including substitution variables after replacing the variables with values.
WRAP
ON
Wraps lines that are longer than LINESIZE.
ENTMAP ON
Enables conversion of characters <, >, ", and & into HTML entities. (Default value)
ENTMAP OFF
Disables conversion of characters <, >, ", and & into HTML entities.
SPOOL ON
Enables formatting with the <html> and <body> tags to the beginning and end of a SPOOL file.
SPOOL OFF
Disables formatting with the <html> and <body> tags to the beginning and end of a SPOOL file. (Default value)
PREFORMAT
ON
Formats query results with the <pre> tag.
PREFORMAT
OFF
Formats query results in HTML tables. (Default value)
Using stored statements
Entered SQL statements are stored in tbSQL's SQL buffer and can be reused. If they are modified, the modified statements are also stored in the buffer.
The SQL buffer stores a single SQL statement or PSM program. Depending on the OS, press the up arrow key () or down arrow key (¯) to select a line of a stored statement. Since one line of a stored statement is displayed whenever you press the key, you can reuse a part or full of SQL statement.
Displays redo log file information.
CHANGE
Finds an old pattern in the current line of the SQL buffer and changes it to a new
pattern.
CLEAR
Initializes or deletes the specified option.
COLUMN
Specifies the display properties of a specified column.
CONNECT
Connects to the database as a specified user.
DEFINE
Defines or displays substitution variables.
DEL
Deletes the line that is stored in the SQL buffer.
DESCRIBE
Displays the column information of the specified object.
DISCONNECT
Ends the connection to the current database.
EDIT
Edits the contents of an SQL buffer or a certain file by using an external editor.
EXECUTE
Processes PSM statements that are CALL statements or anonymous blocks.
EXIT
Ends tbSQL. Same as the QUIT command.
EXPORT
Exports SELECT statement results or table data to a file.
HELP
Displays help information.
HISTORY
Displays commands stored in the history buffer.
HOST
Executes an OS command. Same as the ! command.
INPUT
Adds a user-input SQL statement after the last line in the SQL buffer.
LIST
Displays specified lines from the SQL buffer.
LOADFILE
Saves a Tibero table in the format that can be recognized by Oracle SQL*Loader.
LOOP
Repeatedly executes a statement.
LS
Displays information about a user-created database object with a specific type
or name.
PASSWORD
Changes the user password.
PAUSE
Pauses the execution until the user presses the <Enter> key.
PING
Displays whether a specified database is accessible.
PRINT
Displays the value and name of user-defined bind variables.
PROMPT
Displays a specified message or an empty line.
QUIT
Ends tbSQL. Same as the EXIT command.
RESTORE
Restores user-selected data from a file.
RUN
Executes PSM programs or SQL statements that are stored in the SQL buffer. Same as the / command.
SAVE
Saves user-selected information to a file.
SET
Sets tbSQL system variables.
SHOW
Shows tbSQL system variables.
SPOOL
Saves all screen outputs to a file in the current directory.
START
Executes a script file. Same as the @ command.
TBDOWN
Ends Tibero database.
UNDEFINE
Deletes substitution variables.
VARIABLE
Declares user bind variables.
WHENEVER
Defines tbSQL action to take when an error occurs.
Enables the display properties of the column.
OFF
Disables the display properties of the column.
Only the information belonging to the owner of a specified object is displayed. For tables, only the indexes of the table owner are displayed.
Executes COMMIT before ending tbSQL.
ROLLBACK
Executes ROLLBACK before ending tbSQL.
RELEASE
Displays the release information of tbSQL.
SQLCODE
Displays the SQLCODE for the most recently executed SQL.
9999
Displays as many digits as the specified number of digits.
B
B9999
If the integer part is 0, it is replaced with a blank space.
C
C9999
Displays ISO currency symbol at the specified location.
D
9D999
Displays a decimal character to separate the integer and decimal parts of a real number.
EEEE
9.99EEEE
Displays scientific notation.
G
9G999
Displays a group separator at the specified location of the integer part.
L
L9999
Displays the local currency symbol at the specified location.
MI
9999MI
Displays a minus sign after a negative number or a blank space after a positive number.
PR
9999PR
Displays a negative number enclosed in '<' and '>' (angle brackets) or a positive number enclosed in blank spaces.
RN
RN
Displays as uppercase roman numerals.
rn
rn
Displays as lowercase roman numerals.
S
S9999, 9999S
Displays the positive or negative sign at the beginning or end.
TM
TM
Displays the smallest number.
U
U9999
Displays the dual currency symbol at the specified location.
V
99V999
Displays the value multiplied by 10n.
n is the number of 9 that comes after V.
X
XXXX, xxxx
Displays in hexadecimal format.
Option
Description
-h, --help
Displays help information.
-v, --version
Displays the version.
-s, --silent
Does not display the start message and prompt.
-i, --ignore
Does not execute the login script (tbsql.login).
Item
Description
username
User name. It is not case-sensitive except when it is enclosed in double
quotation marks (" ").
password
User password. It is not case-sensitive except when it is enclosed in single quotation marks (' ').
connect_identifier
Either Data Source Name (DSN) that contains database connection
information or a connection description that complies with predefined rules.
Item
Description
filename
File name.
ext
File extension.
If not set, the extension set in the SUFFIX system variable is used by default.
parameter
Substitution variables used in the file.
Item
Description
Username
Not case-sensitive like schema object names.
However, usernames enclosed in double quotation marks (" ") are case-sensitive.
Password
Not case-sensitive.
However, passwords enclosed in single quotation marks (' ') are case-sensitive.
System Variable
Default Value
Description
AUTOCOMMIT
OFF
Executes a commit after processing SQL statements.
AUTOTRACE
OFF
Displays the plan and statistics of a running query.
BLOCKTERMINATOR
"." (0x2E)
Sets a character that indicates the end of a PSM block.
COLSEP
" " (0x20)
Sets a delimiter for columns displayed after processing a
SELECT statement.
Item
Description
ON
Executes an auto commit.
OFF
Does not execute a commit. (Default value)
If set to OFF, a commit must be executed manually.
n
Executes a commit after processing n SQL statements.
Setting to 0 is the same as setting to OFF, and setting to 1 is the same as setting to ON.
Item
Description
ON
Displays the plan and statistics depending on the query result and options.
OFF
Does not display the query plan and statistics. (Default value)
TRACE[ONLY]
Does not display the query result, but displays the plan and statistics depending on options.
Item
Description
None
Both the plan and statistics are displayed.
EXP[LAIN]
Displays the plan.
STAT[ISTICS]
Displays the statistics.
PLANS[TAT]
Displays query execution information such as processing time, the number of processed rows, and execution count for each node.
Item
Description
c
Character that indicates the end of a PSM block. (Default value: ".")
ON
Enables this variable. (Default value)
OFF
Disables this variable.
Item
Description
text
Column delimiter. (Default value: " ")
Item
Description
c
Character that indicates the end of a substitution variable name. (Default value: ".")
ON
Enables this variable. (Default value)
OFF
Disables this variable.
Item
Description
ON
Enables this variable.
OFF
Disables this variable. (Default value)
Item
Description
c
Character that indicates a substitution variable. (Default value: "&")
ON
Enables this variable. (Default value)
OFF
Disables this variable.
Item
Description
n
Level of object specification to display recursively. (Default value: 10)
Item
Description
ON
Enables this variable.
OFF
Disables this variable. (Default value)
Item
Description
filename[.ext]
File name used for the EDIT command. (Default value: .tbedit.sql)
Item
Description
c
Escape character. (Default value: "\")
ON
Enables this variable.
OFF
Disables this variable. (Default value)
Item
Description
ON
Enables this variable. (Default value)
OFF
Disables this variable.
Item
Description
n
Minimum number of rows to display the results. (Default value: 0)
ON
Enables this variable. (Default value)
OFF
Disables this variable.
Item
Description
ON
Enables this variable. (Default value)
OFF
Disables this variable.
Item
Description
c
New line character. (Default value: "|")
ON
Enables this variable. (Default value)
OFF
Disables this variable.
Item
Description
n
Size of command history. (Default value: 50)
Item
Description
n
Wait time in seconds. (Default value: 1)
Item
Description
n
Length of a line on the screen. (Default value: 80)
Item
Description
n
Output length of large object data.
(Default value: 80, maximum value: 2,000,000,000)
Item
Description
ON
Enables HTML MARKUP.
OFF
Disables HTML MARKUP. (Default value)
Item
Description
HEAD text
Specifies text to be included in the <head> tag. (Default value: default setting of the utility)
BODY text
Specifies attributes for the <body> tag. (Default value: none)
TABLE text
Specifies attributes for the <table> tag.
(Default value: default setting of the utility)
Item
Description
n
Number of empty lines. (Default value: 1)
Item
Description
fmt_str
Default format of numeric columns. (Default value: "")
For more information about numeric type formats, refer to “Column Formats”.
Item
Description
n
Output length of numeric data. (Default value: 10)
Item
Description
n
Number of lines per page. (Default value: 24)
Item
Description
ON
Enables this variable.
OFF
Disables this variable. (Default value)
Item
Description
WRAPPED
Displays a row separator after wrapped rows. (Default value)
Recognizes environment variables and the _user identifier in this string. For example, if '$ISQL_PROMPT' is specified, the value of the environment variable
$ISQL_PROMPT is used as the prompt string. The name of the environment variable is case-sensitive. If '_user' is specified, the value of _user is dynamically replaced with the currently connected user's name and used as the prompt string.
Both an environment variable and the _user identifier can be included in a string at the same time. The maximum length of the string is 128 characters.
Item
Description
c
Character that indicates the end of an SQL statement. (Default value: ";")
ON
Enables this variable.
OFF
Disables this variable.
Item
Description
extension
Default file extension. (Default value: sql)
Item
Description
ON
Enables this variable. (Default value)
OFF
Disables this variable.
Item
Description
ON
Enables this variable.
OFF
Disables this variable. (Default value)
Item
Description
n
Timeout for a server response in seconds. (Default value: 3)
Item
Description
ON
Enables this variable.
OFF
Disables this variable. (Default value)
Item
Description
ON
Enables this variable. (Default value)
OFF
Disables this variable.
Item
Description
ON
Enables this variable.
OFF
Disables this variable. (Default value)
Item
Description
c
Underline character. (Default value: "-")
ON
Enables this variable. (Default value)
OFF
Disables this variable.
Item
Description
ON
Enables this variable. (Default value)
OFF
Disables this variable.
Item
Description
ON
Enables this variable. (Default value)
OFF
Truncates lines that are longer than LINESIZE to match the LINESIZE.
Item
Description
CLIENT
Case-sensitive client program name. Set to tbSQL.
USERID
User ID(s).
Specify as follows. A wildcard (%) is allowed.
TIBERO
T% (All users that start with T)
% (All users)
ACTION
Command to control.
POLICY
Access policy.
Set to DISABLED.
Item
Description
Brackets ([ ])
Optional.
In the sample syntax, the [MAND], [option], and [arg] can be omitted.
Curly braces ({ })
Mutually exclusive parameters. One of them must be entered.
In the sample syntax, choice1 and choice2 are enclosed with curly braces ({, }) and separated by a vertical bar (|). One of them must be entered.
Vertical bar (|)
OR operator used for mutually exclusive parameters.
Asterisk (*)
None or multiple arguments can be entered.
In the sample syntax, [arg] followed by an asterisk (*) can be excluded or entered multiple times.
Italic letters
Must be replaced by another string depending on the command.
Case sensitivity
Commands are not case-sensitive.
Command
Description
!
Executes an OS command. Same as the HOST command.
%
Executes a command stored in the tbSQL history buffer.
@, @@
Executes a script file. Same as the START command.
/
Executes PSM programs or SQL statements that are saved in the SQL buffer. Same as the RUN command.
ACCEPT
Receives user input and saves it in a specified substitution variable.
APPEND
Appends user-entered text or statements to the SQL buffer.
Item
Description
None
Goes to the Windows prompt where multiple OS commands can be entered. To
return to the tbSQL prompt, enter the EXIT command.
command
OS command.
Item
Description
number
Command number in the history buffer.
Item
Description
filename
Script file name.
Item
Description
variable
Substitution variable name. A new variable will be created if it does not exist.
FOR[MAT] format
Format of the substitution variable. If the value does not match the format, an error occurs.
DEF[AULT] default
Default value of the substitution variable.
PROMPT statement
Displays a prompt before receiving a user input
NOPR[OMPT]
Waits for a user input without displaying a prompt.
HIDE
Prevents to display a user input value.
Item
Description
statement
Text or statement to append to the SQL buffer.
Item
Description
delim
Delimiter.
Digits and characters used for old or new patterns are not allowed.
old
Pattern to change. Not case-sensitive.
General words (for example, dual, ksc911) and '...' which means an arbitrary pattern can be used.
Item
Description
delim
Delimiter.
Digits and characters used for old or new patterns are not allowed.
new
New pattern.
option
g: Changes all old patterns in the current line.
c: Changes user-selected old patterns in the current line.
a: Changes all old patterns in the entire statement.
Item
Description
BUFF[ER]
Clears the SQL buffer.
SCR[EEN]
Clears the screen.
COL[UMNS]
Initializes the display properties of all registered columns.
Item
Description
name
Column name.
Item
Description
CLE[AR]
Initializes the column's display properties.
FOR[MAT] text
Sets the column format. For more information, refer to “Column Formats”.
HEA[DING] text
Sets the column heading.
NEW_V[ALUE]
variable
Sets the variable to save the column value.
WRA[PPED]
Wraps the text if the column data exceeds the limit.
TRU[NCATED]
Truncates the data if the column data exceeds the limit.
Item
Description
username
User name.
password
Password for the user.
connect_identifier
Database connection information.
The information includes an IP address, a port number, and DB_NAME. It is set in the tbdsn.tbr file under the $TB_HOME/client/config directory. In Windows, it can be set in ODBC data source, and the source is searched first.
Item
Description
None
Displays all substitution variables.
variable
Substitution variable name.
variable = value
Name and default value of the substitution variable.
Item
Description
number
Deletes the line with the specified number.
number number
Deletes all lines in the specified range.
number LAST
Deletes all lines from the line with the specified number to the last line.
LAST
Deletes the last line.
Item
Description
schema
Schema (or owner) that contains the target object.
object_name
Object to display column information for.
dblink
Database link that contains the target object.
Item
Description
None
Opens the contents stored in the current SQL buffer.
The default file (.tbedit.sql) is used.
This file will be deleted automatically when tbSQL ends.
filename
Name of the file to edit (usually a script file).
Item
Description
statement
PSM statement.
Item
Description
SUCCESS
Returns 0 to indicate success.
FAILURE
Returns 1 to indicate failure.
WARNING
Returns 2 to indicate that tbSQL ends with a warning.
n
Integer exit code. The available code range depends on OS.
variable
Returns the value of a user variable defined with the DEFINE command or a system variable like SQL.SQLCODE. The variable must be a numeric type.
:variable
Specifies an exit code by using a bind variable defined with the VARIABLE command. The variable must be a numeric type.
Item
Description
filename
Name of the file to export. This name is used as a target table name in the control
file.
[schema.]table
Name of the table to export.
variable_fmt
FIELDS ...: Column separator for variable format.
LINES ...: Row separator for variable format.
FIXED: Fixed format indicator.
Item
Description
None
Displays help information about all tbSQL commands.
topic
Search word.
Item
Description
None
Entering the ! command without an OS command goes to the Windows prompt where multiple OS commands can be entered. To return to the tbSQL prompt, enter the EXIT command.
command
OS command.
Item
Description
None
A multi-line SQL statement can be added.
statement
SQL statement to add.
Item
Description
None
Displays all lines.
number
Displays the line with the specified number.
number number
Displays all lines in the specified range.
number LAST
Displays all lines from the line with the specified number to the last line.
LAST
Displays the last line.
Item
Description
filename
File name without a file extension.
Item
Description
stmt
Statement to repeatedly execute.
Item
Description
None
Displays all objects owned by the user.
object_type
One of:
FUNCTION
INDEX
PACKAGE
PROCEDURE
SEQUENCE
SYNONYM
TABLE
TABLESPACE
TRIGGER
USER
VIEW
object_name
Name of the object to display. The percent (%) sign can be used to indicate a temporary pattern.
Item
Description
username
Username to change the password for.
If not specified, the currently connected user is specified.
Item
Description
message
Message to display when the user presses the <Enter> key.
Item
Description
connect_identifier
Name of the database to access.
Item
Description
Displays all bind variables.
variable
Bind variable names.
Item
Description
None
Displays an empty line.
message
Message to display.
Item
Description
filename[.ext]
Name of the file to read. If the file extension is omitted, the SUFFIX value is used.
Item
Description
CREDENTIAL
Encrypts and saves the database connection information. It no filename is specified, it is saved to the file set in ISQL_WALLET_PATH.
HISTORY
Saves command history. If the file extension is omitted, the value set in SUFFIX is used.
CREATE: Creates a file if the specified file does not exist, or causes an error if the file exists. (Default value)
REPLACE: Creates a file if the specified file does not exist, or overwrites the file if it exists.
APPEND: Creates a file if the specified file does not exist, or appends new data to the file if it exists.
filename
File to save to.
Item
Description
parameter
Variable name
value
Variable value
Item
Description
system_parameter
Displays the tbSQL system variable with the specified name.
ALL
Displays all tbSQL system variables.
ERROR
Displays PSM program errors that occurred previously.
PARAM[ETERS] [name]
Displays the database system variable with the specified name. If name is omitted, all the system variables are displayed.
Item
Description
None
Displays the current execution state of this command.
filename
Name of the file to save the output.
APP[END]
Option to add the output to the end of the output file.
OFF
Stops spooling.
Item
Description
filename
Script file name.
Item
Description
NORMAL
Waits until all users end their connections. (Default value)
POST_TX
Waits until currently running transactions are ended.
IMMEDIATE
Rolls back currently running transactions and then forcibly ends the database.
ABORT
Ends the database immediately without rolling back currently running transactions.
Item
Description
None
Deletes all substitution variables.
variable...
Substitution variable names.
Item
Description
None
Displays all bind variables.
variable
Bind variable name
datatype
Data type. Options are:
NUMBER
CHAR(n)
VARCHAR(n)
VARCHAR2(n)
NCHAR(n)
NVARCHAR2(n)
RAW(n)
BLOB
CLOB
NCLOB
DATE
TIMESTAMP
REFCURSOR
Item
Description
OSERROR
Performs the specified action for OS errors from the system on which tbSQL is running.
SQLERROR
Performs the specified action for errors that occur while executing SQL statements. tbSQL errors are ignored.
Item
Description
EXIT
Ends the program when an error occurs.
For information about return codes, refer to the EXIT command.
CONTINUE
Continues on to the next command when an error occurs.
NONE: Does not process the transaction. (Default value)
COMMIT: Commits the transaction.
ROLLBACK: Rolls back the transaction.
Item
Description
name
Column name.
A{n}
A can be replaced with a. n indicates the length of character data.
Item
Description
col_name
Column name.
fmt_str
Column formats described in the following table.
Format
Example
Description
Comma (,)
9,999
Displays a comma (,) at the specified location.
Period (.)
9.999
Displays a period (.) to separate integer and decimal parts.
$ tbsql
tbSQL 7
TmaxData Corporation Copyright (c) 2008-. All rights reserved.
SQL> CONNECT dbuser
Enter password : dbuserpassword
Connected to Tibero.
SQL> SET AUTOCOMMIT ON
SQL> set autocommit on
SET [system_variable] [system_variable_value]
SQL> EXIT
SET AUTOCOMMIT ON
SET PAGESIZE 32
SET TRIMSPOOL ON
SET AUTO[COMMIT] {ON|OFF|n}
SET AUTOT[RACE] {ON|OFF|TRACE[ONLY]} [EXP[LAIN]] [STAT[ISTICS]] [PLANS[TAT]]
SET BLO[CKTERMINATOR] {c|ON|OFF}
SET COLSEP {text}
SET CON[CAT] {c|ON|OFF}
SET DDLSTAT[S] {ON|OFF}
SET DEF[INE] {c|ON|OFF}
SET DESCRIBE DEPTH {n}
SET ECHO {ON|OFF}
SET EDITF[ILE] filename[.ext]
SET ESC[APE] {c|ON|OFF}
SET EXITC[OMMIT] {ON|OFF}
SET FEED[BACK] {n|ON|OFF}
SET HEA[DING] {ON|OFF}
SET HEADS[EP] {c|ON|OFF}
SET HIS[TORY] {n}
SET INTER[VAL] {n}
SET LIN[ESIZE] {n}
SET LONG {n}
SET MARKUP HTML {ON|OFF} [HEAD text] [BODY text] [TABLE text] [ENTMAP {ON|OFF}]
[SPOOL {ON|OFF}] [PRE[FORMAT] {ON|OFF}]
SET NEWP[AGE] {1|n|NONE}
SET NUMF[ORMAT] {fmt_str}
SET NUM[WIDTH] {n}
SET PAGES[IZE] {n}
SET PAU[SE] {ON|OFF}
SET RECSEP {WR[APPED]|EA[CH]|OFF}
SET RECSEPCHAR {c}
SET ROWS {ON|OFF}
SET SERVEROUT[PUT] {ON|OFF} [SIZE n]
SHOW SQLCODE
SET SQLP[ROMPT] {prompt_string}
SET SQLT[MINATOR} {c|ON|OFF}
SET SUF[FIX] {extension}
SET TERM[OUT] {ON|OFF}
SET TI[ME] {ON|OFF}
SET TIMEOUT {n}
SET TIMI[NG] {ON|OFF}
SET TRIM[OUT] {ON|OFF}
SET TRIMS[POOL] {ON|OFF}
SET UND[ERLINE] {c|ON|OFF}
SET VER[IFY] {ON|OFF}
SET WRA[P] {ON|OFF}
SQL> SELECT ENAME, SALARY, ADDR
FROM EMP
-- this is a comment.
WHERE DEPTNO = 5;
SQL>
SQL> DECLARE
deptno NUMBER(2);
BEGIN
deptno := 5;
UPDATE EMP SET SALARY = SALARY * 1.05
WHERE DEPTNO = deptno;
-- this is a comment.
END;
.
SQL>
SQL> SELECT ENAME, SALARY, ADDR
FROM EMP
-- this is a comment.
WHERE DEPTNO = 5;
......Execution result ①......
SQL> /
......Execution result ②......
SQL>
SQL> SELECT ENAME, SALARY, ADDR
FROM EMP
-- this is a comment.
WHERE DEPTNO = 5
/
......Execution result ......
SQL>
(PSM program)
.-- incorrect comment
RUN
SQL> HOST dir *.sql
..... OS command execution result .....
SQL>
SQL> !
$ dir *.sql
..... OS command execution result .....
$ EXIT
SQL>
SQL> SPOOL save.txt
Spooling is started.
SQL> SELECT
*
FROM DUAL;
DUMMY
------
X
1 row selected.
SQL> SPOOL OFF
Spooling is stopped: save.txt
SQL> SELECT
*
FROM DUAL;
DUMMY
------
X
1 row selected.
SQL> SPOOL OFF
$ export TB_EDITOR=vi
SQL> EDIT run
-- SQL statement
SELECT ENAME, SALARY, ADDR FROM EMP
WHERE DEPTNO = 5;
UPDATE EMP SET SALARY = SALARY * 1.05
WHERE DEPTNO = 5;
-- PSM program
DECLARE
deptno NUMBER(2);
BEGIN
deptno := 20;
UPDATE EMP SET SALARY = SALARY * 1.05
WHERE DEPTNO = deptno;
END;
RUN -- Executing the PSM program
/* Applying the changes */
COMMIT;
SQL> START run
SQL> @run
$ tbsql dbuser/dbuserpassword @run
$ tbsql dbuser/dbuserpassword < run.sql
$ tbsql sys/syspassword
SQL> CONNECT sys/syspassword
CLIENT VARCHAR2(32) NOT NULL
USERID VARCHAR2(128)
ACTION VARCHAR2(256)
POLICY VARCHAR2(64)
ACCEPT APPEND ARCHIVE CHANGE
CLEAR COLUMN CONNECT DEFINE
DEL DESCRIBE DISCONNECT EDIT
EXECUTE EXIT EXPORT HELP (?)
HISTORY HOST (!) INPUT LIST
LOADFILE LOOP LS PASSWORD
PAUSE PING PRINT PROMPT
QUIT REMARK RESTORE RUN
SAVE SET SHOW SPOOL
START (@, @@) TBDOWN UNDEFINE VARIABLE
WHENEVER
ALTER ANALYZE AUDIT CALL
COMMENT COMMIT CREATE DELETE
DROP EXPLAIN FLASHBACK GRANT
INSERT LOCK MERGE NOAUDIT
PURGE RENAME REVOKE ROLLBACK
SAVEPOINT SELECT SET CONSTRAINTS SET ROLE
SET TRANSACTION TRUNCATE UPDATE
BEGIN DECLARE
..... Connect as SYS user .....
SQL> CONNECT SYS
..... Configure Access Control .....
SQL> INSERT INTO CLIENT_ACCESS_POLICY VALUES ('tbSQL', 'TIBERO', 'SELECT', 'DISABLED');
..... Connect as TIBERO use .....
SQL> CONNECT TIBERO
SQL> SELECT * FROM DUAL;
TBS-70082: The 'SELECT' command has been disabled.
$ export ISQL_WALLET_PATH=./wallet.dat
$ tbsql
tbSQL 7
TmaxData Corporation Copyright (c) 2008-. All rights reserved.
Can't login with the wallet file.
Login the database and SAVE CREDENTIAL again.
Enter Username: dbuser
Enter Password: dbuserpassword
Connected to Tibero.
SQL> SAVE CREDENTIAL
Complete to generate the wallet file.
$ tbsql
tbSQL 7
TmaxData Corporation Copyright (c) 2008-. All rights reserved.
SQL> CONN dbuser/dbuserpassword
Connected to Tibero.
SQL> SAVE CREDENTIAL "./wallet.dat"
Complete to generate the wallet file.
$ tbsql
tbSQL 7
TmaxData Corporation Copyright (c) 2008-. All rights reserved.
Connected to Tibero.
COM[MAND] param {choice1|choice2} [option] [arg]*
COMMAND param choice1
COM param choice1 option
COM param choice2 arg1 arg2 arg3
! [command]
SQL> ! dir *.sql
SQL> !
% number
SQL> history
1: set serveroutput on
2: set pagesize 40
3: select 1 from dual;
SQL> %3
1
---------
1
1 row selected.
@ {filename}
SQL> @ run
SQL> @ run.sql
/
SQL> SELECT * FROM DUAL;
..... SQL statement execution result .....
SQL> /
..... The same result as above .....
SQL> ACCEPT name PROMPT 'Enter name : '
Enter name : 'John'
SQL> SELECT &name FROM DUAL;
At line 1, column 8
old value : SELECT &name FROM DUAL
new value : SELECT 'John' FROM DUAL
'JOHN'
------
John
1 row selected.
SQL>
A[PPEND] statement
SQL> LIST 2
..... Select the second line .....
SQL> APPEND text
..... Add text to the second line .....
ARCHIVE LOG LIST
SQL> ARCHIVE LOG LIST
NAME VALUE
-------------------------- -----------------------------------------
Database log mode Archive Mode
Archive destination /home/tibero/database/tibero/archive
Oldest online log sequence 300
Next log sequence to archive 302
Current log sequence 302
SQL>
C[HANGE] delim old [delim [new [delim [option]]]]
SQL> SELECT *
FROM DUAL;
..... SQL execution results .....
SQL> C/DUAL/T
FROM T
SQL>
SQL> 5
5 WHERE ROWNUM < 5 AND
SQL> CHANGE /RE...AND/RE ROWNUM >= 5 AND/
5 WHERE ROWNUM >= 5 AND
SQL> CHANGE /...AND/WHERE ROWNUM < 3/
5 WEHRE ROWNUM < 3
SQL> CHANGE /WHE.../WHERE ROWNUM < 5 AND/
5 WHERE ROWNUM < 5 AND
SQL> SELECT *
FROM DUAL;
..... SQL execution results .....
SQL> C/*/'replaced'/a
SELECT 'replaced'
FROM DUAL;
SQL>
SQL> COLUMN
SQL> COLUMN empno
SQL> COLUMN empno CLEAR
SQL> COLUMN empno FORMAT 999,999
SQL> COLUMN ename FORMAT A10
SQL> COLUMN sal HEADING the salary of this month
SQL> COLUMN sal OFF
SQL> COLUMN job WRAPPED
SQL> COLUMN job TRUNCATED
SQL> DEFINE NAME
..... Displays the substitution variable named NAME. .....
SQL> DEFINE NAME = 'SMITH'
..... Defines SMITH as the default value of the substitution variable. .....
SQL> DEFINE
..... Displays all substitution variables. .....
DEL [number|number number|number LAST|LAST]
SQL> DEL 1
..... Deletes the first line. .....
SQL> DEL 1 3
..... Deletes all lines from the first line to the third line. .....
SQL> DEL 1 LAST
..... Deletes all lines from the first line to the last line. .....
SQL> DEL LAST
..... Deletes the last line. .....
EXP[ORT] {QUERY filename|TABLE [schema.]table} [variable_fmt|FIXED]
variable_fmt:
[FIELDS {TERM[INATED] BY {,|text}|ENCL[OSED] BY {"|text}}]
[LINES TERM[INATED] BY {\n|text}]
SQL> EXPORT QUERY 't.csv'
Ready to export to 't.csv'
SQL> SELECT * FROM t;
10 rows exported.
SQL> EXPORT QUERY 't.csv' FIELDS TERMINATED BY ',' LINES TERMINATED BY '\n'
SQL> EXPORT QUERY 't.csv' FIELDS ENCLOSED BY '*'
H[ELP] [topic]
SQL> HELP SET
HIS[TORY]
SQL> HISTORY
..... All commands stored in the history buffer .....
HO[ST] [command]
I[NPUT] [statement]
SQL> select * from dual;
..... Outputs result .....
SQL> LIST
select * from dual SQL> INPUT where rownum < 2
select * from dual where rownum < 2
SQL>
SQL> select * from dual;
..... Outputs result .....
SQL> INPUT
select * from dual
... Enter here. ...
L[IST] [number|number number|number LAST|LAST]
SQL> LIST 1
..... Displays the first line. .....
SQL> LIST 2 3
..... Displays all lines from the second line to the third line. .....
SQL> LIST 2 LAST
.....Displays all lines from the second line to the last line. ......
SQL> LIST LAST
.....Displays the last line. .....
LOAD[FILE] {filename}
SQL> LOADFILE emp
SQL> select * from emp;
LOOP stmt
SQL> LOOP select count(*) from v$session
..... The previous statement is executed every 1 second. .....
SQL> SET INTERVAL 10 SQL> LOOP ls
..... ls is executed every 10 seconds. .....
LS [object_type|object_name]
SQL> LS
NAME SUBNAME OBJECT_TYPE
--------------- ------------- ---------------
SYS_CON100 INDEX
SYS_CON400 INDEX
SYS_CON700 INDEX
_DD_CCOL_IDX1 INDEX
......Omitted......
UTL_RAW PACKAGE
DBMS_STATS PACKGE BODY
TB_HIDDEN2 PACKGE BODY
SQL>
..... Displays all objects. .....
SQL> LS TABLESPACE
TABLESPACE_NAME
-----------------------------------
SYSTEM
UNDO
TEMP
USR
..... Displays all objects with the TABLESPACE type. .....
SQL> LS USER
USERNAME
------------------------------------
SYS
..... Retrieves users with a connection to the system. .....
PASSW[ORD] [username]
SQL> PASSWORD
Changing password for 'TIBERO'
Enter old password: ...Enter the current password...
Enter new password: ...Enter a new password...
Confirm new password: ...Re-enter the new password...
Password changed successfully.
SQL>
SQL> VARIABLE x NUMBER
SQL> EXECUTE :x := 5;
SQL> PRINT x
x
---------
5
SQL>
PRO[MPT] [message]
PROMPT >>> Test is started.
CREATE TABLE T (c1 NUMBER);
INSERT INTO T VALUES (1);
PROMPT Value 1 is inserted.
COMMIT;
PROMPT <<< Test is ended.
SQL> @PromptUsage
>>> Test is started.
Table 'T' created.
1 row inserted.
Value 1 is inserted.
Commit succeeded.
<<< Test is ended.
File finished.
SQL>
SQL> whenever sqlerror exit failure rollback
SQL> select 1 from no_such_table;
TBR-8033: Specified schema object was not found.
at line 1, column 16:
select 1 from no_such_table
$ echo exit code: $?
exit code: 1
$
COL[UMN] {name} FOR[MAT] A{n}
SQL> SELECT 'Tibero is the best choice' test FROM DUAL;
TEST
--------------------------
Tibero is the best choice
1 row selected.
SQL> COL test FORMAT a10
SQL> SELECT 'Tibero is the best choice' test FROM DUAL;
TEST
----------
Tibero is
the best c
hoice
1 row selected.
SQL>
col_name} FOR[MAT] {fmt_str}
SQL> COLUMN x FORMAT 999,999
SQL> SELECT 123456 x FROM DUAL;
X
----------
123,456
1 row selected.
Spatial Functions
Describes functions provided by Tibero Spatial.
Some Spatial functions are provided by default, and other Spatial functions are provided only in a specific environment (C++11 or later, Linux, x86, 64-bit). Some default Spatial functions perform calculations taking into account a coordinate system by using given SRID as an argument.
In the following, functions provided only in a specific environment are marked with (#), and functions that perform calculations taking into account a coordinate system are marked with ($).
ST_AGGR_ASTWKB(#)
Returns a GEOMETRY object as in the Tiny Well Known Binary (TWKB) format. TWKB of a set with an identifier is returned for each GEOMETRY object.
Syntax
[Figure 1] ST_AGGR_ASTWKB
Components
Component
Description
Example
ST_AREA($)
Returns the area of a GEOMETRY object. For a POLYGON object, it calculates and returns its area. For a POINT or LINESTRING object, it returns 0. For a MULTI type GEOMETRY object, it calculates and returns the sum of the areas of internal GEOMETRY objects.
If the coordinate system is a rotating body, the area of the curved surface of the object is calculated in the unit of square meters. The calculation for the spheroid is the default. If you want faster calculations, change them to calculations for the spherical coordinate system.
Syntax
[Figure 2] ST_AREA
Components
Component
Description
Example
ST_ASBINARY
Returns a GEOMETRY object as in Well Known Binary (WKB) format.
Syntax
[Figure 3] ST_ASBINARY
Components
Component
Description
Example
ST_ASGEOJSON
Returns a GEOMETRY object as in GEOJSON format.
Syntax
[Figure 4] ST_ASGEOJSON
Components
Component
Description
Example
ST_ASGML
Returns a GEOMETRY object as in GML format.
Syntax
[Figure 5] ST_ASGML
Components
Component
Description
Example
ST_ASKML
Returns a GEOMETRY object as in KML format.
Syntax
[Figure 6] ST_ASKML
Components
Component
Description
Example
ST_ASTEXT
Returns a GEOMETRY object as in Well Known Text (WKT) format.
Syntax
[Figure 7] ST_ASTEXT
Components
Component
Description
Example
ST_ASTWKB(#)
Returns a GEOMETRY object as in Tiny Well Known Binary (TWKB) format.
Syntax
[Figure 8] ST_ASTWKB
Components
Component
Description
Example
ST_AZIMUTH($)
Measures the angle between the line segment that connects POINT object 1 and POINT object 2 and the vertical upper line segment of the POINT object 1 in a clockwise direction and returns it in arc degree unit. This corresponds to the North Pole azimuth on a rotating body coordinate system. This function can take GEOMETRY on a rotating body coordinate system and GEOMETRY on a plane coordinate system as arguments. If the type of the GEOMETRY object is not POINT, an exception is returned.
Syntax
[Figure 9] ST_AZIMUTH
Components
Component
Description
Example
ST_BOUNDARY
Returns the boundary of a given GEOMETRY object. If the type of the GEOMETRY object is GEOMETRYCOLLECTION, an error is returned.
Syntax
[Figure 10] ST_BOUNDARY
Components
Component
Description
Example
ST_BUFFER($)
Returns a GEOMETRY object representing all points within a certain distance from a given GEOMETRY object. It can perform calculations on GEOMETRY objects on the rotating body coordinate system by using coordinate system information.
Syntax
[Figure 11] ST_BUFFER
Components
Component
Description
Example
ST_BUILDAREA(#)
Returns a POLYGON object that can be formed with line segment components of a given GEOMETRY object. If the line segment components cannot form a POLYGON object, NULL is returned.
Syntax
[Figure 12] ST_BUILDAREA
Components
Component
Description
Example
ST_CENTROID($)
Returns the center of a given GEOMETRY object. It can perform calculations on GEOMETRY objects on the rotating body coordinate system by using coordinate system information. If you want faster calculations, change them to calculations for the spherical coordinate system.
Syntax
[Figure 13] ST_CENTROID
Components
Component
Description
Example
ST_COLLECT
Groups GEOMETRY objects and returns the result as a MULTI type object. Since it is an aggregate function, it returns the result of grouping GEOMETRY objects. Its variant function can take two GEOMETRY objects as arguments.
Syntax
[Figure 14] ST_COLLECT
Components
Component
Description
Example
Example
The following uses a table's geometry column as an argument.
ST_CONTAINS
Returns GEOMETRY object 1 if GEOMETRY object 2 does not exist outside of the GEOMETRY object 1 and at least one point exists inside the GEOMETRY object 1.
Syntax
[Figure 15] ST_CONTAINS
Components
Component
Description
Example
ST_CONVEXHULL
Returns the convex hull of a given GEOMETRY object. A convex hull means the smallest convex closed curve containing a GEOMETRY object.
Syntax
[Figure 16] ST_CONVEXHULL
Components
Component
Description
Example
ST_CROSSES
Returns 1 if two given GEOMETRY objects intersect. If one object includes another or their boundaries are touched, this is not regarded as they intersect.
Syntax
[Figure 17] ST_CROSSES
Components
Component
Description
Example
ST_COVEREDBY(#)
Returns 1 if any point of GEOMETRY object 1 is not outside of GEOMETRY object 2. Its arguments must be GEOMETRY objects on a rotating body coordinate system. Otherwise, it returns an exception.
Syntax
[Figure 18] ST_COVEREDBY
Components
Component
Description
Example
ST_COVERS(#)
Returns 1 if any point of GEOMETRY object 2 is not outside of GEOMETRY object 1. Its arguments must be GEOMETRY objects on a rotating body coordinate system. Otherwise, it returns an exception.
Syntax
[Figure 19] ST_COVERS
Components
Component
Description
Example
ST_DIFFERENCE($)
Returns the part of GEOMETRY object 1 that does not overlap with a GEOMETRY object 2. It can perform operations on GEOMETRY objects on the rotating body coordinate system by using coordinate system information.
Syntax
[Figure 20] ST_DIFFERENCE
Components
Component
Description
Example
ST_DIMENSION
Returns the dimension of a GEOMETRY object.
Syntax
[Figure 21] ST_DIMENSION
Components
Component
Description
Example
ST_DISJOINT
Returns 1 if two GEOMETRY objects do not share any area.
Syntax
[Figure 22] ST_DISJOINT
Components
Component
Description
Example
ST_DISTANCE($)
Returns the shortest distance between two GEOMETRY objects. It can perform calculations on GEOMETRY objects on the rotating body coordinate system by using coordinate system information. If you want faster calculations, change them to calculations for the spherical coordinate system.
Syntax
[Figure 23] ST_DISTANCE
Components
Component
Description
Example
ST_DWITHIN #
Returns whether two GEOMETRY objects are within a specified distance. It can perform calculations on GEOMETRY objects on the rotating body coordinate system by using coordinate system information. If you want faster calculations, change them to calculations for the spherical coordinate system.
Syntax
[Figure 24] ST_DWITHIN
Components
Component
Description
Example
ST_ENDPOINT
Returns the last point of a LINESTRING GEOMETRY object as a POINT object. If the argument is not LINESTRING, NULL is returned.
Syntax
[Figure 25] ST_ENDPOINT
Components
Component
Description
Example
ST_ENVELOPE
Returns a rectangle that surrounds a given GEOMETRY object as a POLYGON object.
Syntax
[Figure 26] ST_ENVELOPE
Components
Component
Description
Example
ST_EQUALS
Returns 1 if two GEOMETRY objects express the same GEOMETRY.
Syntax
[Figure 27] ST_EQUALS
Components
Component
Description
Example
ST_EXTERIORRING
Returns the outer ring of a POLYGON GEOMETRY object. If the argument is not POLYGON, NULL is returned.
Syntax
[Figure 28] ST_EXTERIORRING
Components
Component
Description
Example
ST_EXPAND
Returns a POLYGON object of the bounding box where a given GEOMETRY object is extended in all directions. If the argument is an empty GEOMETRY object, NULL is returned regardless of its expansion.
Syntax
[Figure 29] ST_EXPAND
Components
Component
Description
Example
ST_EXTENT
Returns a POLYGON object of the bounding box that includes a GEOMETRY object. Since it is an aggregate function, it returns the result of grouping GEOMETRY objects.
Syntax
[Figure 30] ST_EXTENT
Components
Component
Description
Example
ST_GEOMCOLLFROMTEXT
Returns a GEOMETRYCOLLECTION object based on given WKT and SRID.
Syntax
[Figure 31] ST_GEOMCOLLFROMTEXT
Components
Component
Description
Example
ST_GEOMCOLLFROMWKB
Returns a GEOMETRYCOLLECTION object based on given WKB and SRID.
Syntax
[Figure 32] ST_GEOMCOLLFROMWKB
Components
Component
Description
Example
ST_GEOMETRYFROMTEXT
Returns a GEOMETRY object based on given WKB and SRID. TEXT in Extended Well-Known Text (EWKT) format that expresses 3D is also supported. Same as ST_GEOMFROMTEXT.
Syntax
[Figure 33] ST_GEOMETRYFROMTEXT
Components
Component
Description
Example
ST_GEOMETRYN
Returns the N-th GEOMETRY object from GEOMETRYCOLLECTION, MULTIPOINT, MULTILINESTRING, and MULTIPOLYGON objects. If a non-MULTI GEOMETRY object is given as an argument, the GEOMETRY object is returned if N is 1, or NULL is returned if N is not 1. If N is greater than the number of GEOMETRY objects, NULL is returned.
Syntax
[Figure 34] ST_GEOMETRYN
Components
Component
Description
Example
ST_GEOMETRYTYPE
Returns the type of a GEOMETRY object.
Syntax
[Figure 35] ST_GEOMETRYTYPE
Components
Component
Description
Example
ST_GEOMFROMGEOJSON
Creates a GEOMETRY object from a given GEOJSON expression and returns it. Only JSON figure fragments can be taken as an argument. A complete JSON document cannot be taken as an argument.
Syntax
[Figure 36] ST_GEOMFROMGEOJSON
Components
Component
Description
Example
ST_GEOMFROMGML
Creates a GEOMETRY object from a given GML expression and returns it. Only GML figure fragments can be taken as an argument. A complete GML document cannot be taken as an argument.
Syntax
[Figure 37] ST_GEOMFROMGML
Components
Component
Description
Example
ST_GEOMFROMKML
Creates a GEOMETRY object from a given KML expression and returns it. Only KML figure fragments can be taken as an argument. A complete KML document cannot be taken as an argument.
Syntax
[Figure 38] ST_GEOMFROMKML
Components
Component
Description
Example
ST_GEOMFROMTEXT
Returns a GEOMETRY object based on given WKB and SRID. TEXT in Extended Well-Known Text (EWKT) format that expresses 3D is also supported. Same as ST_GEOMETRYFROMTEXT.
Syntax
[Figure 39] ST_GEOMFROMTEXT
Components
Component
Description
Example
ST_GEOMFROMTWKB(#)
Returns a given TWKB as a GEOMETRY object.
Syntax
[Figure 40] ST_GEOMFROMTWKB
Components
Component
Description
Example
ST_GEOMFROMWKB
Returns given WKB and SRID as a GEOMETRY object.
Syntax
[Figure 41] ST_GEOMFROMWKB
Components
Component
Description
Example
ST_INTERIORRINGN
Returns the N-th inner ring of a POLYGON object. If the argument is not POLYGON, NULL is returned. If N is greater than the number of the inner rings, NULL is returned.
Syntax
[Figure 42] ST_INTERIORRINGN
Components
Component
Description
Example
ST_INTERSECTION($)
Returns a GEOMETRY object representing the part shared between GEOMETRY object 1 and GEOMETRY object 2. It can perform calculations on GEOMETRY objects on the rotating body coordinate system by using coordinate system information.
Syntax
[Figure 43] ST_INTERSECTION
Components
Component
Description
Example
ST_INTERSECTS($)
Returns 1 if there is a part shared by two GEOMETRY objects. It can perform calculations on GEOMETRY objects on the rotating body coordinate system by using coordinate system information. If a given GEOMETRY argument is the GEOMETRYCOLLECTION type, a runtime error occurs.
Syntax
[Figure 44] ST_INTERSECTS
Components
Component
Description
Example
ST_ISCLOSED
Returns 1 if the first point and the last point of a LINESTRING object are the same. It always returns 1 for a POINT or POLYGON object. For MULTI type GEOMETRY objects, it returns 1 when all internal GEOMETRY values are 1.
Syntax
[Figure 45] ST_ISCLOSED
Components
Component
Description
Example
ST_ISCOLLECTION
Returns 1 if a given GEOMETRY object is GEOMETRYCOLLECTION or MULTI GEOMETRY.
Syntax
[Figure 46] ST_ISCOLLECTION
Components
Component
Description
Example
ST_ISEMPTY
Returns 1 if a given GEOMETRY object is the EMPTY type.
Syntax
[Figure 47] ST_ISEMPTY
Components
Component
Description
Example
ST_ISRING
Returns 1 if a given LINESTRING object is closed (the first point and the last point are the same) and simple. If a non-LINESTRING GEOMETRY object is given as an argument, 0 is returned
Syntax
[Figure 48] ST_ISRING
Components
Component
Description
Example
ST_ISSIMPLE
Returns 1 if a GEOMETRY object has no self-intersection or self-contact points. It returns an exception for GEOMETRYCOLLECTION.
Syntax
[Figure 49] ST_ISSIMPLE
Components
Component
Description
Example
ST_ISVALID
Checks whether a GEOMETRY object is spatially valid (well-formed). It returns 1 if spatially valid, otherwise it returns 0. It returns 1 for EMPTY spatial objects. For invalid objects, it returns the reason why the object is not spatially valid and the location.
Syntax
[Figure 50] ST_ISVALID
Components
Component
Description
Example
ST_LENGTH($)
Returns the length of a LINESTRING object. It returns 0 for POINT and POLYGON. For a MULTI type GEOMETRY object, the sum of the calculation results of the internal GEOMETRY objects is returned. It can perform calculations on GEOMETRY objects on the rotating body coordinate system by using coordinate system information. If you want faster calculations, change them to calculations for the spherical coordinate system.
Syntax
[Figure 51] ST_LENGTH
Components
Component
Description
Example
ST_LINEFROMTEXT
Returns a LINESTRING object based on given WKT and SRID.
Syntax
[Figure 52] ST_LINEFROMTEXT
Components
Component
Description
Example
ST_LINEFROMWKB
Returns a LINESTRING object based on given WKB and SRID.
Syntax
[Figure 53] ST_LINEFROMWKB
Components
Component
Description
Example
ST_MAKEENVELOPE
Returns a rectangular POLYGON object formed with given minimum and maximum values.
Syntax
[Figure 54] ST_MAKEENVELOPE
Components
Component
Description
Example
ST_MAKELINE
Takes POINT, MULTIPOINT, or LINESTRING as an argument and returns a LINESTRING object. Since it is an aggregate function, it returns the result of grouping GEOMETRY objects. You can set the type of the LINESTRING object by using an ORDER BY statement.
Syntax
[Figure 55] ST_MAKELINE
Components
Component
Description
Example
Example
The following uses a table's geometry column as an argument.
Example
The following uses order_by_clause.
ST_MAKEPOINT
Returns a 2D POINT object.
Syntax
[Figure 56] ST_MAKEPOINT
Components
Component
Description
Example
ST_MAKEPOLYGON
Returns a POLYGON object formed with a given structure. The argument must be a closed LINESTRING.
Syntax
[Figure 57] ST_MAKEPOLYGON
Components
Component
Description
Example
ST_MAKEVALID(#)
Changes an invalid GEOMETRY object to a valid object without loss of points and returns it. If a given object is already valid, it is returned as is.
Syntax
[Figure 58] ST_MAKEVALID
Components
Component
Description
Example
ST_MAXX
Returns the larger value of the X coordinate values of the minimum bounding rectangle that surrounds a given spatial object.
Syntax
[Figure 59] ST_MAXX
Components
Component
Description
Example
ST_MAXY
Returns the larger value of the Y coordinate values of the minimum bounding rectangle that surrounds a given spatial object.
Syntax
[Figure 60] ST_MAXY
Components
Component
Description
Example
ST_MINX
Returns the smaller value of the X coordinate values of the minimum bounding rectangle that surrounds a given spatial object.
Syntax
[Figure 61] ST_MINX
Components
Component
Description
Example
ST_MINY
Returns the smaller value of the Y coordinate values of the minimum bounding rectangle that surrounds a given spatial object.
Syntax
[Figure 62] ST_MINY
Components
Component
Description
Example
ST_MLINEFROMTEXT
Returns a MULTILINESTRING object based on given WKT and SRID.
Syntax
[Figure 63] ST_MLINEFROMTEXT
Components
Component
Description
Example
ST_MLINEFROMWKB
Returns a MULTILINESTRING object based on given WKB and SRID.
Syntax
[Figure 64] ST_MLINEFROMWKB
Components
Component
Description
Example
ST_MPOINTFROMTEXT
Returns a MULTIPOINT object based on given WKT and SRID.
Syntax
[Figure 65] ST_MPOINTFROMTEXT
Components
Component
Description
Example
ST_MPOINTFROMWKB
Returns a MULTIPOINT object based on given WKB and SRID.
Syntax
[Figure 66] ST_MPOINTFROMWKB
Components
Component
Description
Example
ST_MPOLYFROMTEXT
Returns a MULTIPOLYGON object based on given WKT and SRID.
Syntax
[Figure 67] ST_MPOLYFROMTEXT
Components
Component
Description
Example
ST_MPOLYFROMWKB
Returns a MULTIPOLYGON object based on given WKB and SRID.
Syntax
[Figure 68] ST_MPOLYFROMWKB
Components
Component
Description
Example
ST_MULTI
Returns GEOMETRY as MULTI type GEOMETRY. If a MULTI type object is given as an argument, it is returned as is.
Syntax
[Figure 69] ST_MULTI
Components
Component
Description
Example
ST_NN($)
Used in a conditional clause. It returns 1 for rows that include a GEOMETRY object that is closest to a GEOMETRY object given as an argument for a table's GEOMETRY column. Rows are returned in order of shortest distance to longest.
Syntax
[Fiture 70] ST_NN
Components
Component
Description
Example
ST_NPOINTS
Returns the number of POINTs in GEOMETRY. Same as ST_NUMPOINTS.
Syntax
[Figure 71] ST_NPOINTS
Components
Component
Description
Example
ST_NUMGEOMETRIES
Returns the number of GEOMETRY objects from GEOMETRYCOLLECTION, MULTIPOING, MULTILINESTRING, and MULTIPOLYGON objects. If a non-MULTI GEOMETRY object is given as an argument, 1 is returned.
Syntax
[Figure 72] ST_NUMGEOMETRIES
Components
Component
Description
Example
ST_NUMINTERIORRING
Returns the number of inner rings of a POLYGON object. If the argument is not POLYGON, NULL is returned.
Syntax
[Figure 73] ST_NUMINTERIORRING
Components
Component
Description
Example
ST_NUMPOINTS
Returns the number of POINTs in GEOMETRY. Same as ST_NPOINTS.
Syntax
[Figure 74] ST_NUMPOINTS
Components
Component
Description
Example
ST_OVERLAPS
Returns 1 if two given GEOMETRY objects have the same dimension, an overlapping part exists, and one object is not completely included in another object.
Syntax
[Figure 75] ST_OVERLAPS
Components
Component
Description
Example
ST_POINT
Returns a 2D POINT object.
Syntax
[Figure 76] ST_POINT
Components
Component
Description
Example
ST_POINTFROMTEXT
Returns a POINT object based on given WKT and SRID.
Syntax
[Figure 77] ST_POINTFROMTEXT
Components
Component
Description
Example
ST_POINTFROMWKB
Returns a POINT object based on given WKB and SRID.
Syntax
[Figure 78] ST_POINTFROMWKB
Components
Component
Description
Example
ST_POINTN
Returns the N-th point of a LINESTRING object as a POINT object. If the argument is not LINESTRING, NULL is returned. -1 means the last POINT of the LINESTRING object. It is counted in the opposite direction, and a POINT object matching the negative argument is returned.
Syntax
[Figure 79] ST_POINTN
Components
Component
Description
Example
ST_POINTONSURFACE
Returns an arbitrary POINT object guaranteed to be placed on a spatial object.
Syntax
[Figure 80] ST_POINTONSURFACE
Components
Component
Description
Example
ST_POLYFROMTEXT
Returns a POLYGON object based on given WKT and SRID.
Syntax
[Figure 81] ST_POLYFROMTEXT
Components
Component
Description
Example
ST_POLYFROMWKB
Returns a POLYGON object based on given WKB and SRID.
Syntax
[Figure 82] ST_POLYFROMWKB
Components
Component
Description
Example
ST_POLYGON
Returns a POLYGON object formed with given LINESTRING and SRID. The argument must be a closed LINESTRING.
Syntax
[Figure 83] ST_POLYGON
Components
Component
Description
Example
ST_POLYGONFROMTEXT
Returns a POLYGON object based on given WKT and SRID.
Syntax
[Figure 84] ST_POLYGONFROMTEXT
Components
Component
Description
Example
ST_POLYGONIZE(#)
Returns POLYGON objects that can be formed from segment components of GEOMETRY sets. Since it is an aggregate function, it returns the result of grouping GEOMETRY objects.
Syntax
[Figure 85] ST_POLYGONIZE
Components
Component
Description
Example
ST_PROJECT(#)
Returns a POINT object projected from a POINT object in a given distance in meters and in a direction (azimuth) in arc degrees. Since the direction of the arc is set based on the azimuth, the east is expressed as /2, the south as , and the west as 3/2. Its arguments must be GEOMETRY objects on a rotating body coordinate system. Otherwise, it returns an exception. If a GEOMETRY object of a non-POINT type is inserted, an exception is returned.
Syntax
[Figure 86] ST_PROJECT
Components
Component
Description
Example
ST_RELATE
Returns 1 if GEOMETRY object 1 and GEOMETRY object 2 satisfy a given relationship. If a given GEOMETRY argument is the GEOMETRYCOLLECTION type, a runtime error occurs.
Syntax
[Figure 87] ST_RELATE
Components
Component
Description
Example
ST_REVERSE
Returns a GEOMETRY object whose vertex order is reversed for a given GEOMETRY object.
Syntax
[Figure 88] ST_REVERSE
Components
Component
Description
Example
ST_SETSRID
Sets and returns SRID of a given GEOMETRY object.
Syntax
[Figure 89] ST_SETSRID
Components
Component
Description
Example
ST_SPLIT(#)
Returns a GEOMETRYCOLLECTION object obtained by dividing GEOMETRY by base GEOMETRY. LINESTRING can be divided by (MULTI)POINT, (MULTI)LINESTRING, (MULTI)POLYGON, and POLYGON can be divided by (MULTI)LINESTRING.
Syntax
[Figure 90] ST_SPLIT
Components
Component
Description
Example
ST_SRID
Returns SRID of a given GEOMETRY object.
Syntax
[Figure 91] ST_SRID
Components
Component
Description
Example
ST_STARTPOINT
Returns the first POINT of LINESTRING. If the argument is not LINESTRING, NULL is returned.
Syntax
[Figure 92] ST_STARTPOINT
Components
Component
Description
Example
ST_SYMDIFFERENCE($)
Returns a GEOMETRY object representing the area excluding intersection of two given GEOMETRY objects. It can perform calculations on GEOMETRY objects on the rotating body coordinate system by using coordinate system information.
Syntax
[Figure 93] ST_SYMDIFFERENCE
Components
Component
Description
Example
ST_TOUCHES
Returns 1 when two given GEOMETRY objects share one or more points, but there is no intersection. If a given GEOMETRY argument is the GEOMETRYCOLLECTION type, a runtime error occurs.
Syntax
[Figure 94] ST_TOUCHES
Components
Component
Description
Example
ST_TRANSFORM(#)
Returns a GEOMETRY object that has an input GEOMETRY's coordinate converted to another spatial reference system. SRID and PROJ4TEXT are used as arguments. ST_TRANSFORM converts coordinates, but ST_SETSRI only sets SRID without converting coordinates.
Syntax
[Figure 95] ST_TRANSFORM
Components
- case1
Component
Description
- case2
Component
Description
- case3
Component
Description
- case4
Component
Description
Example
ST_TRANSLATE(#)
Returns GEOMETRY shifted by a given offset.
Syntax
[Figure 96] ST_TRANSLATE
Components
Component
Description
Example
ST_UNION($)
Returns a GEOMETRY object that sums the areas of two given GEOMETRY objects. It can perform calculations on GEOMETRY objects on the rotating body coordinate system by using coordinate system information.
Syntax
[Figure 97] ST_UNION
Components
Component
Description
Example
ST_WITHIN
Takes two GEOMETRY objects and returns 1 if the first object completely contains the second object.
Syntax
[Figure 98] ST_WITHIN
Components
Component
Description
Example
ST_X
Returns the X coordinate of a POINT object. If the argument is not POINT, NULL is returned.
Syntax
[Figure 99] ST_X
Components
Component
Description
Example
ST_Y
Returns the Y coordinate of a POINT object. If the argument is not POINT, NULL is returned.
Syntax
[Figure 100] ST_Y
Components
Component
Description
Example
DBMS_GEOM Package
Tibero Spatial supports additional functions through the DBMS_GEOM package.
ST_DUMPPOINTS
Returns a set consisting of GEOMETRY and an integer array (path).
Sets all POINTs of an argument GEOMETRY object and an integer array. For example, if LINESTRING is given as an argument, a path is set to {i}, where i is the i-th POINT of the LINESTRING. If POLYGON is given as argument, a path is set to {i,j}, where i is the i-th ring, and j is the j-th POINT of the i-th ring. If the MULTI type is given as an argument, an integer indicating that it is the n-th GEOMETRY is added to the front of each path.
Syntax
[Figure 101] ST_DUMPPOINTS
Components
Component
Description
Example
FROM_WGS84
Converts a GEOMETRY object expressed with latitude and longitude in wgs84 format into a GEOMETRY object expressed with horizontal and vertical axes based on a given point. At this time, the coordinate of the GEOMETRY object is analyzed in the order of longitude and latitude, but this function takes the base point in the order of latitude and longitude.
The FROM_WGS84 and TO_WGS84 functions repeatedly perform floating-point operations. Therefore, distortion of the coordinate information of GEOMETRY type objects may occur. In addition, there is a difference in output results for each execution environment depending on floating-point operation methods.
Syntax
[Figure 102] FROM_WGS84
Components
Component
Description
Example
TO_WGS84
Converts a GEOMETRY object expressed with horizontal and vertical axes into a GEOMETRY object expressed with latitude and longitude in wgs84 format based on a given point. At this time, the coordinate of the GEOMETRY object is analyzed in the order of longitude and latitude, but this function takes the base point in the order of latitude and longitude.
The FROM_WGS84 and TO_WGS84 functions repeatedly perform floating-point operations. Therefore, distortion of the coordinate information of GEOMETRY type objects may occur. In addition, there is a difference in output results for each execution environment depending on floating-point operation methods.
Syntax
[Figure 103] TO_WGS84
Components
Component
Description
Example
geom_expr
Expression indicating a GEOMETRY object.
num_expr
Identifier for each geom_expr.
num1
Number of significant digits after the decimal point of coordinates to be expressed as TWKB. (Default value: 0)
num2
Determines whether to include the length of the encoded GEOMETRY object in TWKB to return. The length is not included by default. If set to 1, it is included.
num3
Determines whether to include the bounding box of the GEOMETRY object in TWKB to return. The bounding box is not included by default. If set to 1, it is included.
geom
GEOMETRY type GEOMETRY object.
default
Calculation method. For a rotating body coordinate system, the spheroid is
calculated by default. If set to 0, a spherical coordinate system is calculated.
geom
GEOMETRY type GEOMETRY object.
geom
GEOMETRY type GEOMETRY object.
num1
Number of significant digits in the coordinate. (Default value: 9)
num2
Option of the GEOJASON format to return.
– 0: Adds no option.
– 1: Adds the minimum bounding rectangle of the GEOMETRY.
– 2: Displays the coordinate in Short CRS format. (Example: EPSG:4326)
– 4: Displays the coordinate in Long CRS format.(Example: urn:ogc:def:crs:EPSG::4326)
– 8: Displays the coordinate in Short CRS format if SRID is not 4326. (Default value)
geom
GEOMETRY type GEOMETRY object.
num1
Number of significant digits in the coordinate. (Default value: 15)
num2
Option of the GML format to return.
– 0: Displays the coordinate in Short CRS format. (Default value)
1: Displays the coordinate in Ling CRS format.
geom
GEOMETRY type GEOMETRY object. An error is returned if the object is
GEOMETRYCOLLECTION type.
num
Number of significant digits in the coordinate. (Default value: 15)
str
Namespace prefix of KML to return. The default namespace has no prefix.
geom
GEOMETRY type GEOMETRY object.
geom
GEOMETRY type GEOMETRY object.
num1
Number of significant digits after the decimal point of the coordinate expressed
as TWKB. (Default value: 0)
num2
Determines whether to include the length of the encoded GEOMETRY object
in TWKB to return. The length is not included by default. If set to 1, it is included.
num3
Determines whether to include the bounding box of the GEOMETRY object in TWKB to return. The bounding box is not included by default. If set to 1, it is
included.
geom1
GEOMETRY type POINT object.
geom2
GEOMETRY type POINT object.
geom
GEOMETRY type GEOMETRY object.
geom
GEOMETRY type GEOMETRY object.
expr
Expression meaning the distance from the given GEOMETRY object.
geom
GEOMETRY type GEOMETRY object.
geom
GEOMETRY type GEOMETRY object.
default
Calculation method. For a rotating body coordinate system, the spheroid is
calculated by default. If set to 0, a spherical coordinate system is calculated.
geom
Expression indicating a GEOMETRY object.
geom1
GEOMETRY type GEOMETRY object that can include geom2.
geom2
GEOMETRY type GEOMETRY object that can be included in geom1.
geom
GEOMETRY type GEOMETRY object.
geom1
GEOMETRY type GEOMETRY object
geom2
GEOMETRY type GEOMETRY object
geom1
GEOMETRY type GEOMETRY object
geom2
GEOMETRY type GEOMETRY object
geom1
GEOMETRY type GEOMETRY object
geom2
GEOMETRY type GEOMETRY object
geom1
GEOMETRY type GEOMETRY object
geom2
GEOMETRY type GEOMETRY object
geom
GEOMETRY type GEOMETRY object
geom1
GEOMETRY type GEOMETRY object
geom2
GEOMETRY type GEOMETRY object
geom1
GEOMETRY type GEOMETRY object.
geom2
GEOMETRY type GEOMETRY object.
default
Calculation method. For a rotating body coordinate system, the spheroid is
calculated by default. If set to 0, a spherical coordinate system is calculated.
geom1
GEOMETRY type GEOMETRY object.
geom2
GEOMETRY type GEOMETRY object.
num
Specified distance. For GEOMETRY, the unit of a set coordinate system is used.
For GEOGRAPHY, meter is the unit.
default
Calculation method. For a rotating body coordinate system, the spheroid is
calculated by default. If set to 0, a spherical coordinate system is calculated.
geom
GEOMETRY type LINESTRING object.
geom
GEOMETRY type GEOMETRY object
geom1
GEOMETRY type GEOMETRY object.
geom
GEOMETRY type GEOMETRY object.
geom
GEOMETRY type POLYGON object.
geom
GEOMETRY type GEOMETRY object.
num1
Distance to extend in the X direction. Forms a POLYGON object extended to
the left and right as much as this distance.
num2
Distance to extend in the Y direction. Forms a POLYGON object extended to
the left and right as much as this distance.
geom_expr
Expression indicating a GEOMETRY object.
str
CHAR, VARCAHR, NCHAR, or NVARCHAR type GEOMETRYCOLLECTION
object in WKT format.
num
Coordinate system information (SRID) of a GEOMETRYCOLLECTION object.
If SRID is not given, 0 (system's default coordinate system) is used.
str
CHAR, VARCAHR, NCHAR, or NVARCHAR type GEOMETRYCOLLECTION
object in WKB format.
num
Coordinate system information (SRID) of a GEOMETRYCOLLECTION object.
If SRID is not given, 0 (system's default coordinate system) is used.
str
CHAR, VARCAHR, NCHAR, or NVARCHAR type GEOMETRY object in WKT
format.
num
Coordinate system information (SRID) of a GEOMETRY object. If SRID is not
given, 0 (system's default coordinate system) is used.
geom
GEOMETRY type GEOMETRY object.
num
Order of the object (N-th).
geom
GEOMETRY type GEOMETRY object.
str
CHAR, VARCAHR, NCHAR, or NVARCHAR type GEOMETRY object in
GEOJSON format.
str
CHAR, VARCAHR, NCHAR, or NVARCHAR type GEOMETRY object in GML
format.
num
Coordinate system information (SRID) of a GEOMETRY object. If SRID is not
given, 0 (system's default coordinate system) is used.
str
CHAR, VARCAHR, NCHAR, or NVARCHAR type GEOMETRY object in KML
format.
num
Coordinate system information (SRID) of a GEOMETRY object. If SRID is not given, 0 (system's default coordinate system) is used.
str
CHAR, VARCAHR, NCHAR, or NVARCHAR type GEOMETRY object in WKT
format.
num
Coordinate system information (SRID) of a GEOMETRY object. If SRID is not
given, 0 (system's default coordinate system) is used.
str
Value of a binary type (BLOB or RAW) where TWKB format for GEOMETRY
objects is saved.
num
Coordinate system information (SRID) of a GEOMETRY object. If SRID is not
given, 0 (system's default coordinate system) is used.
str
Value of a binary type (BLOB or RAW) where TWKB format for GEOMETRY
objects is saved.
num
Coordinate system information (SRID) of a GEOMETRY object. If SRID is not
given, 0 (system's default coordinate system) is used.
geom
GEOMETRY type POLYGON object.
num
Order of the inner ring (N-th).
geom1
GEOMETRY type GEOMETRY object.
geom2
GEOMETRY type GEOMETRY object.
geom1
GEOMETRY type GEOMETRY object.
geom2
GEOMETRY type GEOMETRY object.
geom
GEOMETRY type LINESTRING object.
geom
GEOMETRY type GEOMETRY object.
geom
GEOMETRY type GEOMETRY object.
geom
GEOMETRY type LINESTRING object.
geom
GEOMETRY type GEOMETRY object.
geom
GEOMETRY type GEOMETRY object.
geom
GEOMETRY type LINESTRING object.
default
Calculation method. For a rotating body coordinate system, the spheroid is
calculated by default. If set to 0, a spherical coordinate system is calculated.
str
CHAR, VARCAHR, NCHAR, or NVARCHAR type LINESTRING object in WKT
format.
num
Coordinate system information (SRID) of a LINESTRING object. If SRID is not given, 0 (system's default coordinate system) is used.
str
CHAR, VARCAHR, NCHAR, or NVARCHAR type LINESTRING object in WKB
format.
num
Coordinate system information (SRID) of a LINESTRING object. If SRID is not
given, 0 (system's default coordinate system) is used.
num1
X coordinate of the minimum point (bottom left) of a rectangular POLYGON
object.
num2
Y coordinate of the minimum point (bottom left) of a rectangular POLYGON
object.
num3
X coordinate of the maximum point (top right) of a rectangular POLYGON object.
num4
Y coordinate of the maximum point (top right) of a rectangular POLYGON object.
geom_expr
Expression indicating a GEOMETRY object. Must be a POINT, LINESTRING,
or MULTIPOINT type GEOMETRY object.
order_by_clause
How to sort GEOMETRY objects.
num1
X coordinate of a POINT object.
num2
Y coordinate of a POINT object.
geom1
GEOMETRY type LINESTRING object representing the SHELL of a POLYGON
object to be formed.
geom2
GEOMETRY type LINESTRING object representing the INTERIOR RING of a
POLYGON object to be formed. If there are multiple INTERIOR RINGs, it must be a GEOMETRY type MULTILINESTRING object.
geom
GEOMETRY type GEOMETRY object.
geom
GEOMETRY type GEOMETRY object.
geom
GEOMETRY type GEOMETRY object.
geom
GEOMETRY type GEOMETRY object.
geom
GEOMETRY type GEOMETRY object.
str
CHAR, VARCAHR, NCHAR, or NVARCHAR type MULTILINESTRING object
in WKT format.
num
Coordinate system information (SRID) of a MULTILINESTRING object. If SRID
is not given, 0 (system's default coordinate system) is used.
str
CHAR, VARCAHR, NCHAR, or NVARCHAR type MULTILINESTRING object
in WKB format.
num
Coordinate system information (SRID) of a MULTILINESTRING object. If SRID
is not given, 0 (system's default coordinate system) is used.
str
CHAR, VARCAHR, NCHAR, or NVARCHAR type MULTIPOINT object in WKT
format.
num
Coordinate system information (SRID) of a MULTIPOINT object. If SRID is not
given, 0 (system's default coordinate system) is used.
str
CHAR, VARCAHR, NCHAR, or NVARCHAR type MULTIPOINT object in WKB
format.
num
Coordinate system information (SRID) of a MULTIPOINT object. If SRID is not given, 0 (system's default coordinate system) is used.
str
CHAR, VARCAHR, NCHAR, or NVARCHAR type MULTIPOLYGON object in
WKT format.
num
Coordinate system information (SRID) of a MULTIPOLYGON object. If SRID is
not given, 0 (system's default coordinate system) is used.
str
CHAR, VARCAHR, NCHAR, or NVARCHAR type MULTIPOLYGON object in
WKB format.
num
Coordinate system information (SRID) of a MULTIPOLYGON object. If SRID is
not given, 0 (system's default coordinate system) is used.
geom
GEOMETRY type GEOMETRY object.
geom_expr
GEOMETRY type GEOMETRY object. Must be a GEOMETRY type column
where RTREE is built.
geom
GEOMETRY type GEOMETRY object.
str
Additional information for this function. CHAR, VARCAHR, NCHAR, or NVARCHAR type in WKT format.
str consists of the following 3 parameters delimited by a comma (,).
– res_num: Number of GEOMETRY objects for which 1 is returned. If not specified, 1 is returned for all columns.
– batch_size: Number of GEOMETRY objects to search from RTREE at once. Specify a value determined to be able to perform an efficient operation on a specific value. If not specified, the default value set for the system is used.
– distance: Distance set as a bottleneck. 1 is returned for rows within a distance less than or equal to this value.
– unit : Unit of the distance set as a bottleneck.
geom
GEOMETRY type GEOMETRY object.
geom
GEOMETRY type COLLECTION object.
geom
GEOMETRY type POLYGON object.
geom
GEOMETRY type GEOMETRY object.
geom1
GEOMETRY type GEOMETRY object.
geom2
GEOMETRY type GEOMETRY object.
num1
X coordinate of a POINT object.
num2
Y coordinate of a POINT object.
str
CHAR, VARCAHR, NCHAR, or NVARCHAR type POINT object in WKT format.
num
Coordinate system information (SRID) of a POINT object. If SRID is not given,
0 (system's default coordinate system) is used.
str
CHAR, VARCAHR, NCHAR, or NVARCHAR type POINT object in WKB format.
num
Coordinate system information (SRID) of a POINT object. If SRID is not given,
0 (system's default coordinate system) is used.
geom
GEOMETRY type LINESTRING object.
num
Order of the point (N-th).
geom
GEOMETRY type GEOMETRY object.
str
CHAR, VARCAHR, NCHAR, or NVARCHAR type GEOMETRY POLYGON
object in WKT format.
num
Coordinate system information (SRID) of a POLYGON object. If SRID is not given, 0 (system's default coordinate system) is used.
str
CHAR, VARCAHR, NCHAR, or NVARCHAR type POLYGON object in WKB
format.
num
Coordinate system information (SRID) of a POLYGON object. If SRID is not
given, 0 (system's default coordinate system) is used.
geom
GEOMETRY type LINESTRING object representing the outer SHELL of a POLYGON object to be formed. To form POLYGON with an internal hole, use
the ST_MAKEPOLYGON function.
num
Coordinate system information (SRID) of a POLYGON object to be formed.
str
CHAR, VARCAHR, NCHAR, or NVARCHAR type POLYGON object in WKT
format.
num
Coordinate system information (SRID) of a POLYGON object. If SRID is not
given, 0 (system's default coordinate system) is used.
geom_expr
Expression indicating a GEOMETRY object.
geom
GEOMETRY type POINT object.
num1
Distance in meters.
num2
Azimuth in arc degrees.
geom1
GEOMETRY type GEOMETRY object.
geom2
GEOMETRY type GEOMETRY object.
str
CHAR, VARCAHR, NCHAR, or NVARCHAR string that represents the
relationship between two objects.
geom
GEOMETRY type GEOMETRY object.
geom
GEOMETRY type GEOMETRY object.
num
Coordinate system information (SRID) to set.
geom1
GEOMETRY type GEOMETRY object. GEOMETRY to be divided.
geom2
GEOMETRY type GEOMETRY object. Base GEOMETRY.
geom
GEOMETRY type GEOMETRY object.
geom
GEOMETRY type LINESTRING object.
geom1
GEOMETRY type GEOMETRY object.
geom2
GEOMETRY type GEOMETRY object.
geom1
GEOMETRY type GEOMETRY object.
geom2
GEOMETRY type GEOMETRY object.
geom
GEOMETRY type GEOMETRY object.
num
Coordinate system information (SRID) to convert.
geom
GEOMETRY type GEOMETRY object.
str
PROJ4TEXT of coordinate system information to convert.
geom
GEOMETRY type GEOMETRY object.
str
PROJ4TEXT of coordinate system information before conversion.
str
PROJ4TEXT of coordinate system information to convert.
geom
GEOMETRY type GEOMETRY object.
str
PROJ4TEXT of coordinate system information before conversion.
num
Coordinate system information (SRID) to convert.
geom
GEOMETRY type GEOMETRY object.
num1
Offset to shift in the X direction.
num2
Offset to shift in the Y direction.
geom1
GEOMETRY type GEOMETRY object.
geom2
GEOMETRY type GEOMETRY object.
geom1
GEOMETRY type GEOMETRY object.
geom2
GEOMETRY type GEOMETRY object.
point
GEOMETRY type POINT object.
point
GEOMETRY type POINT object.
geom
GEOMETRY type GEOMETRY object.
geom
GEOMETRY type GEOMETRY object.
latitude
NUMBER type latitude value used as a base for conversion.
longitude
NUMBER type longitude value used as a base for conversion.
geom
GEOMETRY type GEOMETRY object.
latitude
NUMBER type latitude value used as a base for conversion.
longitude
NUMBER type longitude value used as a base for conversion.
SQL> SELECT ST_ASTEXT(ST_COLLECT(A.GEOM, B.GEOM))
FROM GIS A,GIS B WHERE ST_GEOMETRYTYPE(A.GEOM) LIKE 'POINT'
AND ST_GEOMETRYTYPE(B.GEOM) LIKE 'LINESTRING';
ST_ASTEXT(ST_COLLECT(A.GEOM,B.GEOM))
-----------------------------------------------------------------------------------
GEOMETRYCOLLECTION(POINT(1 1),LINESTRING(1 1,2 2))
SQL> SELECT ST_ASTEXT(ST_COLLECT(A.GEOM, B.GEOM))
FROM GIS A,GIS B WHERE ST_GEOMETRYTYPE(A.GEOM) LIKE 'POINT'
AND ST_GEOMETRYTYPE(B.GEOM) LIKE 'LINESTRING';
ST_ASTEXT(ST_COLLECT(A.GEOM,B.GEOM))
----------------------------------------------------------------
GEOMETRYCOLLECTION(POINT(1 1),LINESTRING(1 1,2 2))
SQL> SELECT ST_ASTEXT(A.GEOM),ST_ASTEXT(B.GEOM)
FROM GIS A,GIS B WHERE ST_CONTAINS(A.GEOM,B.GEOM) >0
AND ST_GEOMETRYTYPE(A.GEOM) LIKE 'MULTILINESTRING'
AND ST_GEOMETRYTYPE(B.GEOM) LIKE 'LINESTRING';
ST_ASTEXT(A.GEOM)
-----------------------------------------------------------------------------------
ST_ASTEXT(B.GEOM)
-----------------------------------------------------------------------------------
MULTILINESTRING((1 1,2 2),(3 3,4 5))
LINESTRING(1 1,2 2)
SQL> SELECT ST_ASTEXT(A.GEOM),ST_ASTEXT(B.GEOM),
ST_ASTEXT(ST_DIFFERENCE(A.GEOM,B.GEOM)) FROM GIS A,GIS B
WHERE ST_GEOMETRYTYPE(A.GEOM) LIKE 'LINESTRING'
AND ST_GEOMETRYTYPE(B.GEOM) LIKE 'LINESTRING';
ST_ASTEXT(A.GEOM)
-----------------------------------------------------------------------------------
ST_ASTEXT(B.GEOM)
-----------------------------------------------------------------------------------
ST_ASTEXT(ST_DIFFERENCE(A.GEOM,B.GEOM))
-----------------------------------------------------------------------------------
LINESTRING(1 1,2 2)
LINESTRING(1 1,2 2)
GEOMETRYCOLLECTION EMPTY
SQL> SELECT ST_DISJOINT(A.GEOM,B.GEOM),
ST_ASTEXT(A.GEOM),ST_ASTEXT(B.GEOM) FROM GIS A,GIS B
WHERE ST_GEOMETRYTYPE(A.GEOM) LIKE 'LINESTRING'
AND ST_GEOMETRYTYPE(B.GEOM) LIKE 'LINESTRING';
ST_DISJOINT(A.GEOM,B.GEOM)
----------------------------
ST_ASTEXT(A.GEOM)
-----------------------------------------------------------------------------------
ST_ASTEXT(B.GEOM)
-----------------------------------------------------------------------------------
0
LINESTRING(1 1,2 2)
LINESTRING(1 1,2 2)
SQL> SELECT ST_EQUALS(A.GEOM,B.GEOM),
ST_ASTEXT(A.GEOM),ST_ASTEXT(B.GEOM)
FROM GIS A,GIS B WHERE ST_GEOMETRYTYPE(A.GEOM) LIKE 'POINT'
AND ST_GEOMETRYTYPE(B.GEOM) LIKE 'POINT';
ST_EQUALS(A.GEOM,B.GEOM)
-----------------------------------------------------------------------------------
ST_ASTEXT(A.GEOM)
-----------------------------------------------------------------------------------
ST_ASTEXT(B.GEOM)
-----------------------------------------------------------------------------------
POINT(1 1)
POINT(1 1)
SQL> SELECT ST_ASTEXT(ST_EXTERIORRING(GEOM)) FROM GIS
WHERE ST_GEOMETRYTYPE(GEOM) LIKE 'POLYGON';
ST_ASTEXT(ST_EXTERIORRING(GEOM))
-----------------------------------------------------------------------------------
LINESTRING(1 1,2 1,2 2,1 2,1 1)
LINESTRING(0 0,0 12,12 12,12 0,0 0)
SQL> SELECT ST_ASTEXT(ST_GEOMFROMTWKB('02000202020202'))
FROM DUAL;
ST_ASTEXT(ST_GEOMFROMTWKB('02000202020202'))
----------------------------------------------------------------------------------
LINESTRING(1 1,2 2)
SQL> SELECT ST_ASTEXT(ST_GEOMFROMWKB(ST_ASBINARY(GEOM)))
FROM GIS WHERE ST_GEOMETRYTYPE(GEOM) LIKE 'MULTIPOINT';
ST_ASTEXT(ST_GEOMFROMWKB(ST_ASBINARY(GEOM)))
----------------------------------------------------------------------------------
MULTIPOINT((1 1),(2 2))
SQL> SELECT ST_ASTEXT(ST_INTERIORRINGN(GEOM,1))FROM GIS
WHERE ST_GEOMETRYTYPE(GEOM) LIKE 'POLYGON'
AND ST_NUMINTERIORRING(GEOM) > 1;
ST_ASTEXT(ST_INTERIORRINGN(GEOM,1))
----------------------------------------------------------------------------------
LINESTRING(6 10,6 11,9 11,9 10,6 10)
SQL> SELECT ST_ASTEXT(ST_LINEFROMWKB(ST_ASBINARY(GEOM)))
FROM GIS WHERE ST_GEOMETRYTYPE(GEOM) LIKE 'LINESTRING';
ST_ASTEXT(ST_LINEFROMWKB(ST_ASBINARY(GEOM)))
----------------------------------------------------------------------------------
LINESTRING(1 1,2 2)
SQL> SELECT ST_ASTEXT(ST_MAKELINE(A.GEOM, B.GEOM)) FROM GIS A, GIS B
WHERE ST_GEOMETRYTYPE(A.GEOM) LIKE 'POINT'
AND ST_GEOMETRYTYPE(B.GEOM) LIKE 'LINESTRING';
ST_ASTEXT(ST_MAKELINE(A.GEOM,B.GEOM))
----------------------------------------------------------------------------------
LINESTRING(1 1,2 2)
SQL> SELECT ST_ASTEXT(ST_MAKELINE(GEOM)) FROM GIS
WHERE ST_GEOMETRYTYPE(GEOM) IN ('POINT','MULTIPOINT','LINESTRING');
ST_ASTEXT(ST_MAKELINE(GEOM))
----------------------------------------------------------------------------------
LINESTRING(1 1,1 1,2 2,1 1,2 2)
SQL> SELECT ST_ASTEXT(ST_MAKELINE(GEOM ORDER BY ID DESC))
FROM GIS WHERE ST_GEOMETRYTYPE(GEOM) IN ('POINT','LINESTRING','MULTIPOINT');
ST_ASTEXT(ST_MAKELINE(GEOMORDERBYIDDESC))
----------------------------------------------------------------------------------
LINESTRING(1 1,2 2,1 1,2 2,1 1)
SQL> SELECT ST_ASTEXT(ST_MAKEPOINT(1,2)) FROM DUAL;
ST_ASTEXT(ST_MAKEPOINT(1,2))
----------------------------------------------------------------------------------
POINT(1 2)
SQL> SELECT ST_ASTEXT(ST_MPOINTFROMWKB(ST_ASBINARY(GEOM)))
FROM GIS WHERE ST_GEOMETRYTYPE(GEOM) LIKE 'MULTIPOINT';
ST_ASTEXT(ST_MPOINTFROMWKB(ST_ASBINARY(GEOM)))
----------------------------------------------------------------------------------
MULTIPOINT((1 1),(2 2))
SQL> SELECT ST_ASTEXT(ST_MPOLYFROMWKB(ST_ASBINARY(GEOM)))
FROM GIS WHERE ST_GEOMETRYTYPE(GEOM) LIKE 'MULTIPOLYGON';
ST_ASTEXT(ST_MPOLYFROMWKB(ST_ASBINARY(GEOM)))
----------------------------------------------------------------------------------
MULTIPOLYGON(((1 1,2 1,2 2,1 2,1 1)),((3 3,3 5,5 5,5 3,3 3)))
SQL> SELECT ST_ASTEXT(ST_MULTI(GEOM)) FROM GIS
WHERE ST_GEOMETRYTYPE(GEOM) LIKE 'LINESTRING';
ST_ASTEXT(ST_MULTI(GEOM))
----------------------------------------------------------------------------------
MULTILINESTRING((1 1,2 2))
SQL> SELECT ID FROM GIS WHERE ST_NN(GEOM,
ST_GEOMFROMTEXT('POINT(0 0)'),'RES_NUM=3,BATCH_SIZE=10')=1;
ID
------------
106
101
102
SQL> SELECT ST_NUMPOINTS(GEOM),ST_ASTEXT(GEOM) FROM GIS
WHERE ST_GEOMETRYTYPE(GEOM) LIKE 'LINESTRING';
ST_NUMPOINTS(GEOM)
-------------------
ST_ASTEXT(GEOM)
---------------------------------------------------------------------------------
2
LINESTRING(1 1,2 2)
SQL> SELECT ST_OVERLAPS(A.GEOM,B.GEOM), ST_ASTEXT(A.GEOM),ST_ASTEXT(B.GEOM)
FROM GIS A,GIS B WHERE ST_GEOMETRYTYPE(A.GEOM) LIKE 'LINESTRING'
AND ST_GEOMETRYTYPE(B.GEOM) LIKE 'MULTILINESTRING';
ST_OVERLAPS(A.GEOM,B.GEOM)
----------------------------
ST_ASTEXT(A.GEOM)
---------------------------------------------------------------------------------
ST_ASTEXT(B.GEOM)
---------------------------------------------------------------------------------
0
LINESTRING(1 1,2 2)
MULTILINESTRING((1 1,2 2),(3 3,4 5))
SQL> SELECT ST_ASTEXT(ST_POINT(1,2)) FROM DUAL;
ST_ASTEXT(ST_POINT(1,2))
---------------------------------------------------------------------------------
POINT(1 2)
SQL> SELECT ST_ASTEXT(ST_POINTFROMTEXT('POINT(10 10)')) FROM DUAL;
ST_ASTEXT(ST_POINTFROMTEXT('POINT(1010)'))
---------------------------------------------------------------------------------
POINT(10 10)
SQL> SELECT ST_ASTEXT(ST_POINTFROMWKB(ST_ASBINARY(GEOM))) FROM GIS
WHERE ST_GEOMETRYTYPE(GEOM) LIKE 'POINT';
ST_ASTEXT(ST_POINTFROMWKB(ST_ASBINARY(GEOM)))
---------------------------------------------------------------------------------
POINT(1 1)
SQL> SELECT ST_ASTEXT(GEOM),ST_ASTEXT(ST_POINTN(GEOM,1)) FROM GIS
WHERE ST_GEOMETRYTYPE(GEOM) LIKE 'LINESTRING';
ST_ASTEXT(GEOM)
---------------------------------------------------------------------------------
ST_ASTEXT(ST_POINTN(GEOM,1))
---------------------------------------------------------------------------------
LINESTRING(1 1,2 2)
POINT(1 1)
SQL> SELECT ST_RELATE(A.GEOM,B.GEOM,'TTTTTTTTT'),
ST_ASTEXT(A.GEOM),ST_ASTEXT(B.GEOM) FROM GIS A,GIS B
WHERE ST_GEOMETRYTYPE(A.GEOM) LIKE 'LINESTRING'
AND ST_GEOMETRYTYPE(B.GEOM) LIKE 'LINESTRING';
ST_RELATE(A.GEOM,B.GEOM,'TTTTTTTTT')
-------------------------------------
ST_ASTEXT(A.GEOM)
---------------------------------------------------------------------------------
ST_ASTEXT(B.GEOM)
---------------------------------------------------------------------------------
0
LINESTRING(1 1,2 2)
LINESTRING(1 1,2 2)