# Diagram 및 Stream 등록

## 1. Stream 등록 진입점

최초 로그인 시, Replication Diagram 페이지를 확인 할 수 있다.&#x20;

<figure><img src="https://content.gitbook.com/content/Z9r6hTnnNsxeETetLKRK/blobs/ad7JUSpbvd66vHYO0oit/image.png" alt=""><figcaption><p>
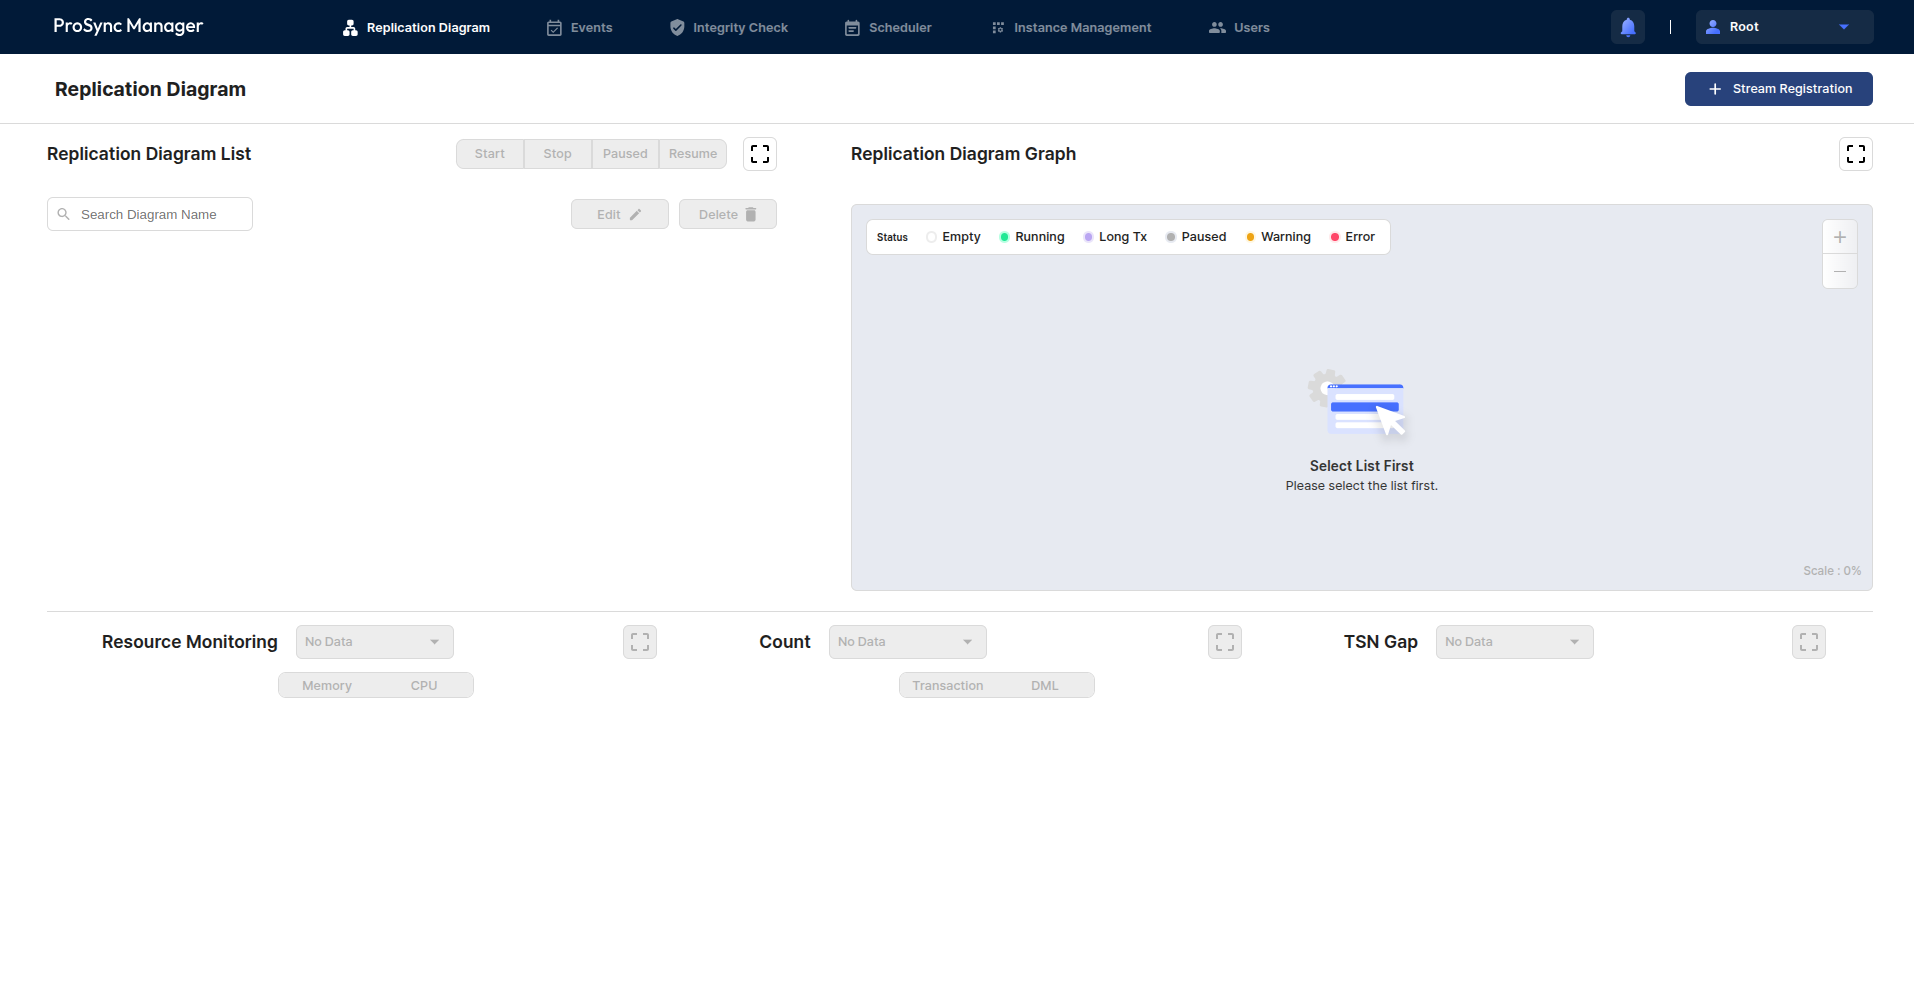
그림 1. Replication Diagram 페이지 화면</p></figcaption></figure>

이 때 우측 상단에 존재하는 Stream Registration 버튼을 통해 Stream 등록이 가능하다.

<figure><img src="https://content.gitbook.com/content/Z9r6hTnnNsxeETetLKRK/blobs/AzRnpPyN1lgLfghCFHOa/image.png" alt=""><figcaption><p>그림 2.  Stream Registration 버튼</p></figcaption></figure>

###

***

## 2. Stream 등록 모달 화면

아래는Stream 설치 모달 첫 화면으로,  Next 버튼을 눌러 다음 단계를 진행한다.

<figure><img src="https://content.gitbook.com/content/Z9r6hTnnNsxeETetLKRK/blobs/pOzj8L0VqKmySdqRdOY9/image.png" alt=""><figcaption><p>그림 3. Stream 등록 모달 화면</p></figcaption></figure>

### &#x20;

***

## 3. Stream information 입력

Stream으로 등록하고자 하는 이름, 등록할 SRC DB, TAR DB의 정보를 입력한다.

<div align="center" data-full-width="false"><figure><img src="https://content.gitbook.com/content/Z9r6hTnnNsxeETetLKRK/blobs/Oa9dli5Tepf5aZkJmxj7/image.png" alt=""><figcaption><p>
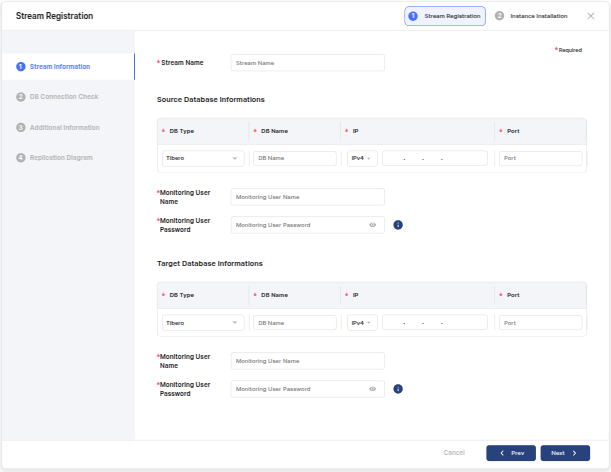
그림 4. Stream information 입력</p></figcaption></figure></div>

<table><thead><tr><th width="228.6666259765625">항목</th><th>설명</th></tr></thead><tbody><tr><td>Stream Name</td><td>Stream 이름</td></tr><tr><td>DB Type</td><td>각 DB의 타입 (Tibero  / Oracle)</td></tr><tr><td>DB Name</td><td>각 DB의 접속 이름</td></tr><tr><td>IP</td><td>각 DB의 접속 IP</td></tr><tr><td>Port</td><td>각 DB의 접속 Port 번호</td></tr><tr><td>Monitoring User Name</td><td>각 DB에 생성한 Monitoring User의 사용자 이름</td></tr><tr><td>Monitoring User Password</td><td>각 DB에 생성한 Monitoring User의 사용자 패스워드</td></tr></tbody></table>

{% hint style="warning" %}
**주의**

IP의 경우 Prosyc의 제약사항을 따르므로, [Prosync 설치 파라미터](https://docs.tmaxtibero.com/prosync-4.5/xMdIH5HX5IPrl88ViHEl/undefined-1/prosync-1/instance#undefined-3)를 확인해야 한다.
{% endhint %}

###

***

## 4. DB Connection Check

<figure><img src="https://content.gitbook.com/content/Z9r6hTnnNsxeETetLKRK/blobs/VANnz7305AkKq4k5rCvL/image.png" alt=""><figcaption><p>
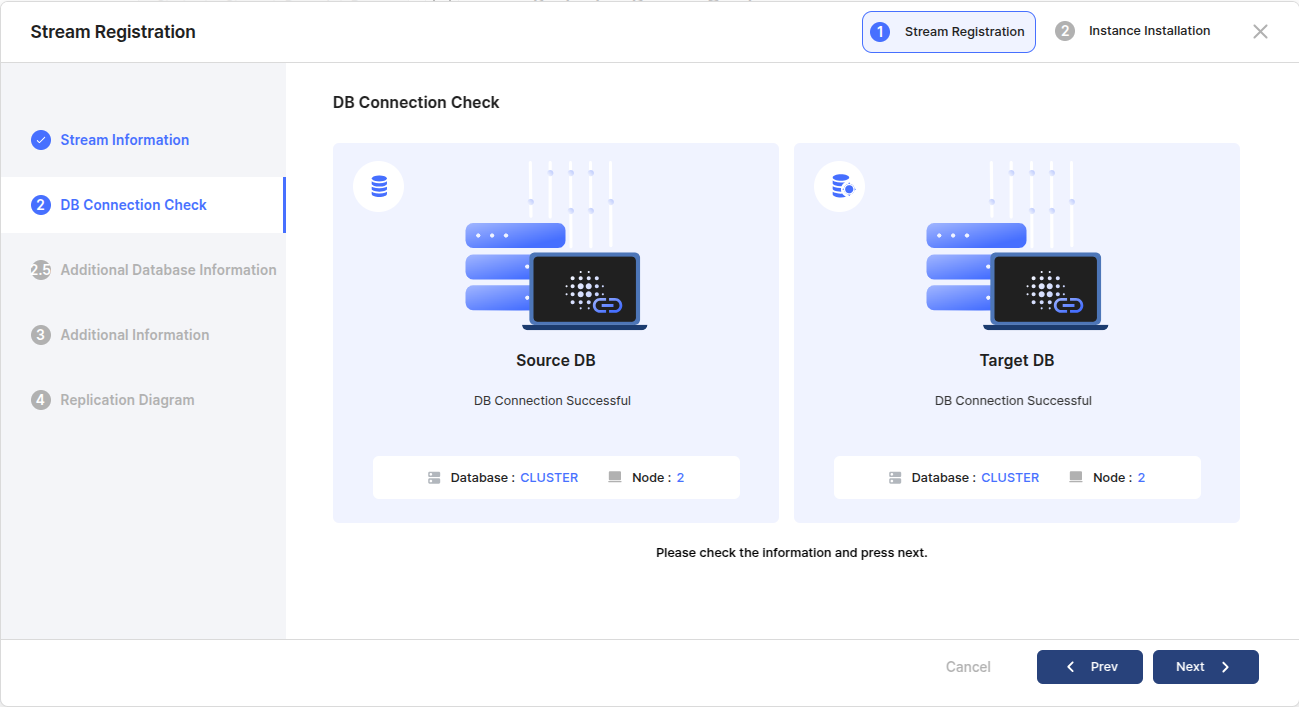
그림 5. DB Connection Check</p></figcaption></figure>

Stream Information 에서 작성한 정보를 토대로 각 DB의 connection 을 확인하고, Cluster 여부 및 Node 갯수를 조회한다.

DB 하나라도 connection 이 실패할 경우 다음 단계로 넘어갈 수 없다.

<figure><img src="https://content.gitbook.com/content/Z9r6hTnnNsxeETetLKRK/blobs/oUwZCJKPjw5XeyOZQnwK/image.png" alt=""><figcaption><p>
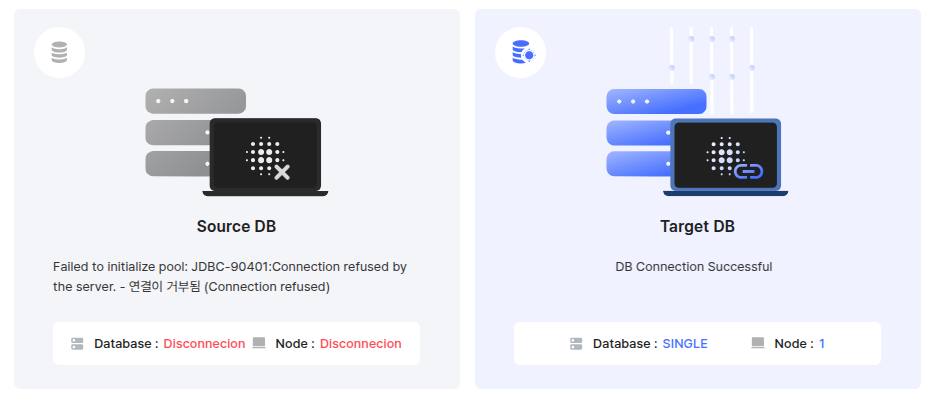
그림 6. SRC DB connection 실패 </p></figcaption></figure>

<figure><img src="https://content.gitbook.com/content/Z9r6hTnnNsxeETetLKRK/blobs/coPxCXDHJh4vzryzEPQg/image.png" alt=""><figcaption><p>
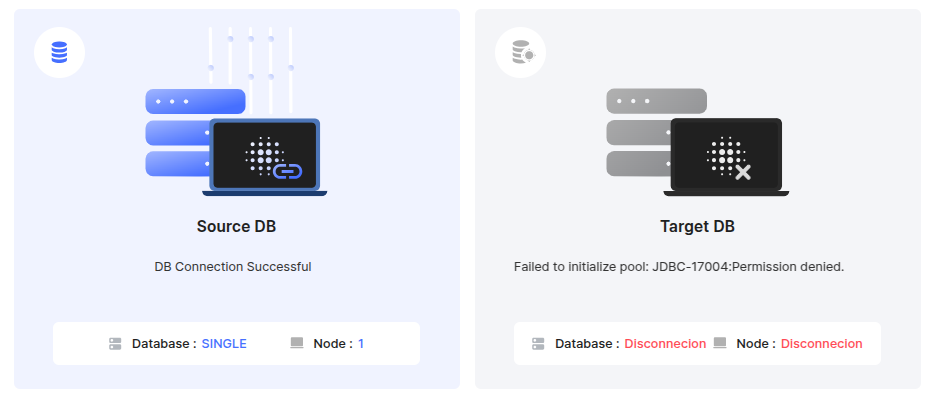
그림 7. TAR DB connection 실패</p></figcaption></figure>

### 4-1. Additional Database Information

<figure><img src="https://content.gitbook.com/content/Z9r6hTnnNsxeETetLKRK/blobs/pJ6oobFeUC14f03Bjtiz/image.png" alt=""><figcaption><p>
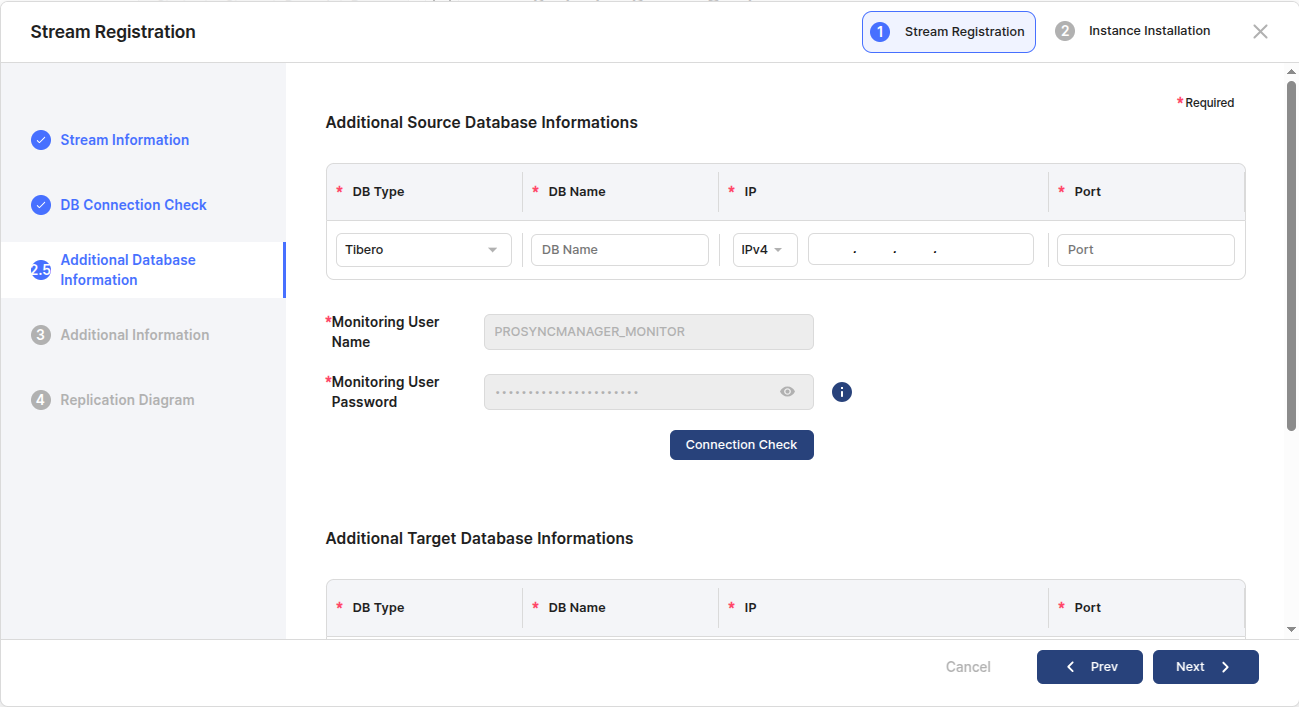
그림 8. Additional Database Information 입력</p></figcaption></figure>

각 SRC / TAR DB 가 Cluster 인 경우, 나머지 노드에 대한 정보가 필요하므로 추가 정보를 입력해야 한다.

이 때 Monitoring User Name 및 Password 는 이전에 입력한 정보가 고정되므로 따로 입력할 필요가 없다.

그리고 각 Node 에 대한 Connection Check를 필수적으로 수행해야 한다.

<figure><img src="https://content.gitbook.com/content/Z9r6hTnnNsxeETetLKRK/blobs/NqSu62JQrRxpJLAmu1sU/image.png" alt=""><figcaption><p>
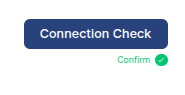
그림 9. Connection Check 버튼</p></figcaption></figure>

Connection Check 버튼을 눌렀을 때, 초록색 Confirm 글자가 확인 되어야 성공한 것이며, 각 Node 에 대해서 모두 Connection Check를 실행 및 성공 해야 한다.

###

***

## 5. Additional Information

등록하고자 하는 Stream에 연결하고자 하는 Agent Process 정보를 입력한다.&#x20;

설치된 Agent의 정보는 `$PRS_HOME/config` 경로의 `prs_instance.map` 파일에서 확인 가능하다.

<figure><img src="https://content.gitbook.com/content/Z9r6hTnnNsxeETetLKRK/blobs/KID0b95GqH2yBP0fSqPw/image.png" alt=""><figcaption><p>
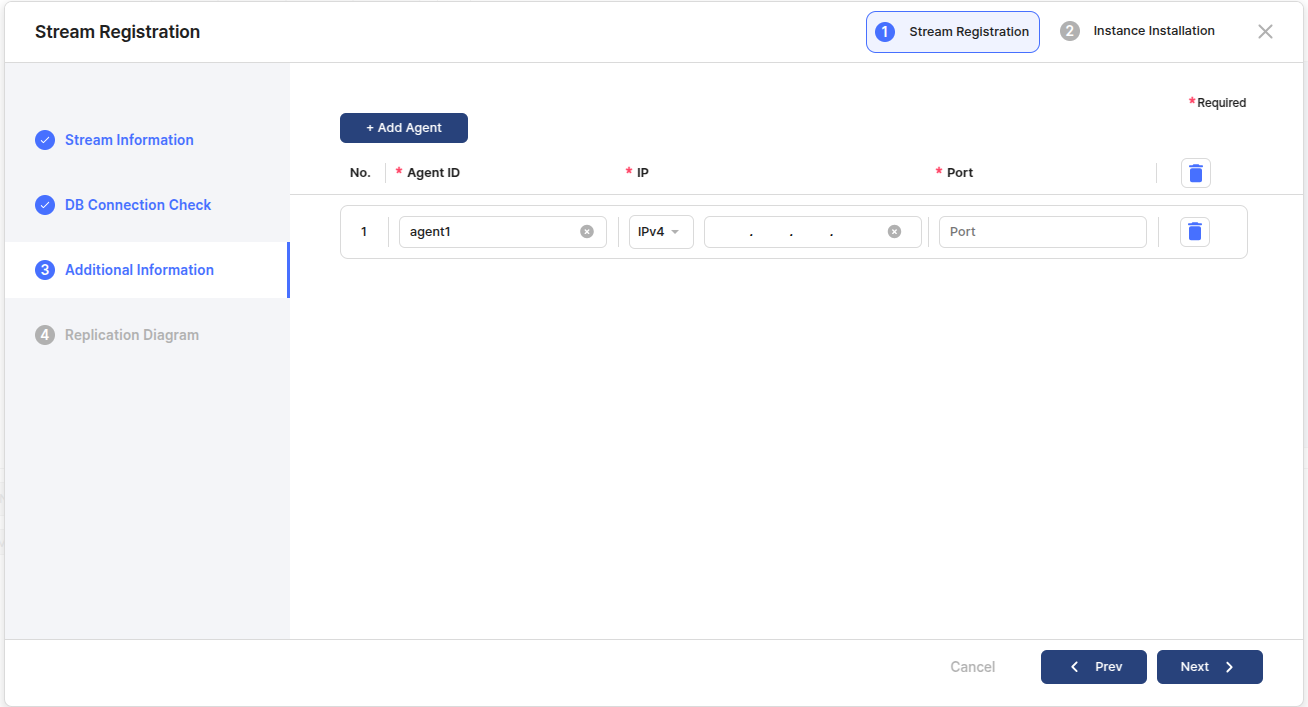
그림 10. Agent Process 정보 입력</p></figcaption></figure>

<table><thead><tr><th width="180">항목</th><th width="567">설명</th></tr></thead><tbody><tr><td>Add Agent</td><td>Agent 정보 입력 list 를 추가하는 버튼이다.</td></tr><tr><td>Agent Id</td><td>해당 Stream에 등록하고자 하는 Agent의 id이다.</td></tr><tr><td>IP</td><td>해당 Stream에 등록하고자 하는 Agent의 ip이다.</td></tr><tr><td>Port</td><td>해당 Stream에 등록하고자 하는 Agent의 port이다.</td></tr></tbody></table>

<figure><img src="https://content.gitbook.com/content/Z9r6hTnnNsxeETetLKRK/blobs/3bS0YrxAITjGANcrFxhQ/image.png" alt=""><figcaption><p>그림 11. 삭제 버튼</p></figcaption></figure>

list 의 Header 및 각 list에서 삭제 버튼을 확인할 수 있다.&#x20;

Header의 삭제 버튼은 모든 list의 입력 사항 및 list 갯수를 초기화 하며, 각 list의 삭제 버튼은 해당되는 list를 삭제한다.

###

***

## 6. Replication Diagram

<figure><img src="https://content.gitbook.com/content/Z9r6hTnnNsxeETetLKRK/blobs/e5aCblJlOfifWQ205V9V/image.png" alt=""><figcaption><p>그림 12. Replication Diagram</p></figcaption></figure>

해당 Stream 을 등록하고자 하는 Diagram을 선택한다.

* Create New Replication Diagram
  * 새로운 Diagram을 만들고자 할 때 선택한다.
  * 만들고자 하는 Diagram 이름을 입력한다.
* Insert into an Existing Replication Diagram
  * 이미 등록되어 있는 Diagram을 선택하고자 할 때 선택한다.
  * 등록하고자 하는 Diagram을 선택한다.

###

***

## 7. Complete Stream Registration

<figure><img src="https://content.gitbook.com/content/Z9r6hTnnNsxeETetLKRK/blobs/bNLqOfyvboyov6qSVXZ1/image.png" alt=""><figcaption><p>
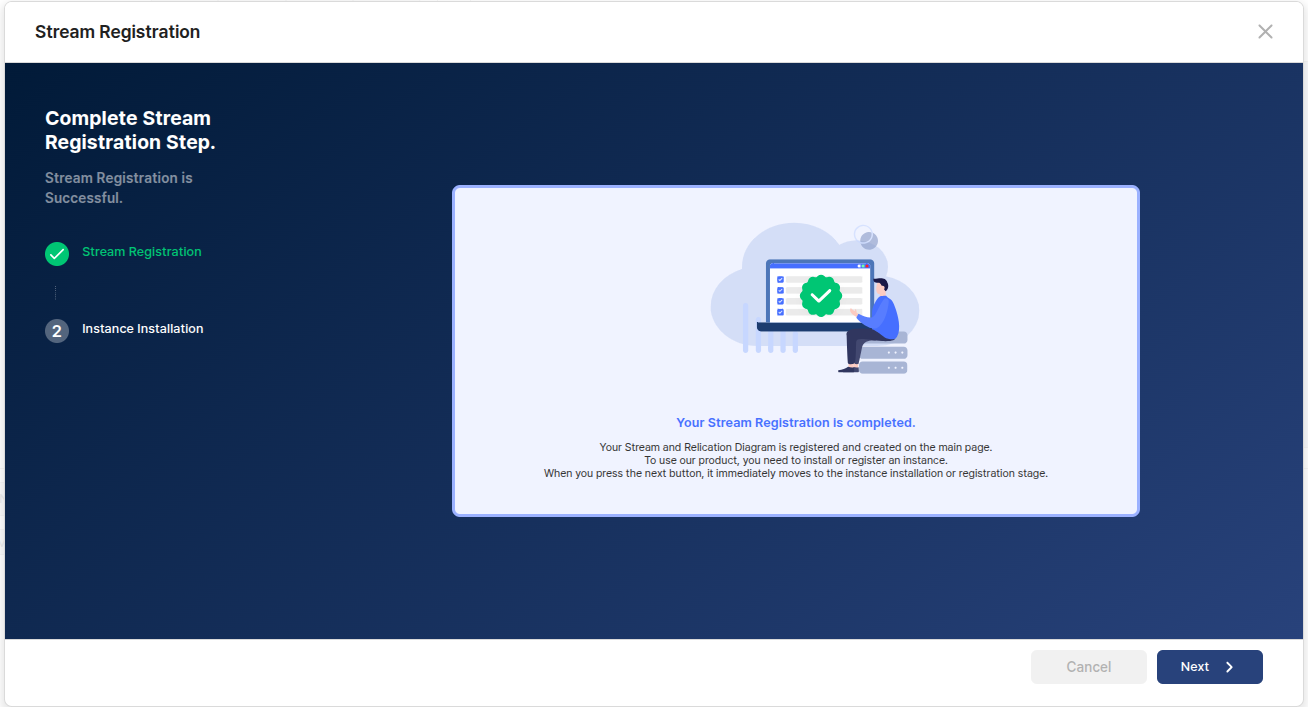
그림 12. Stream 등록완료  확인 화면</p></figcaption></figure>

Stream 등록이 성공한 경우 해당 화면을 확인할 수 있다.

Next 버튼을  통해 [Instance 설치 및 등록](https://docs.tibero.com/prosyncmanager/execution/instance-installation-registration) 진행할 수 있다. 원치 않을 경우 Cancel 또는 모달의 우측 상단 X 버튼을 통해 단계를 중지할 수 있지만, ProSync 의 동기화 기본 단위는 Instance 이므로 Stream 등록 후 Instance 설치(등록)까지 완료하는 것을 권장한다.

만약 Stream 등록에 실패했을 시에는 Prev 버튼을 통해 이전 단계로 돌아가 해당 정보를 수정하여 다시 등록한다.

아래는 Stream 등록 실패의 예시이다.&#x20;

<figure><img src="https://content.gitbook.com/content/Z9r6hTnnNsxeETetLKRK/blobs/4rR94Onc0SUGD2axcWHc/image.png" alt=""><figcaption><p>
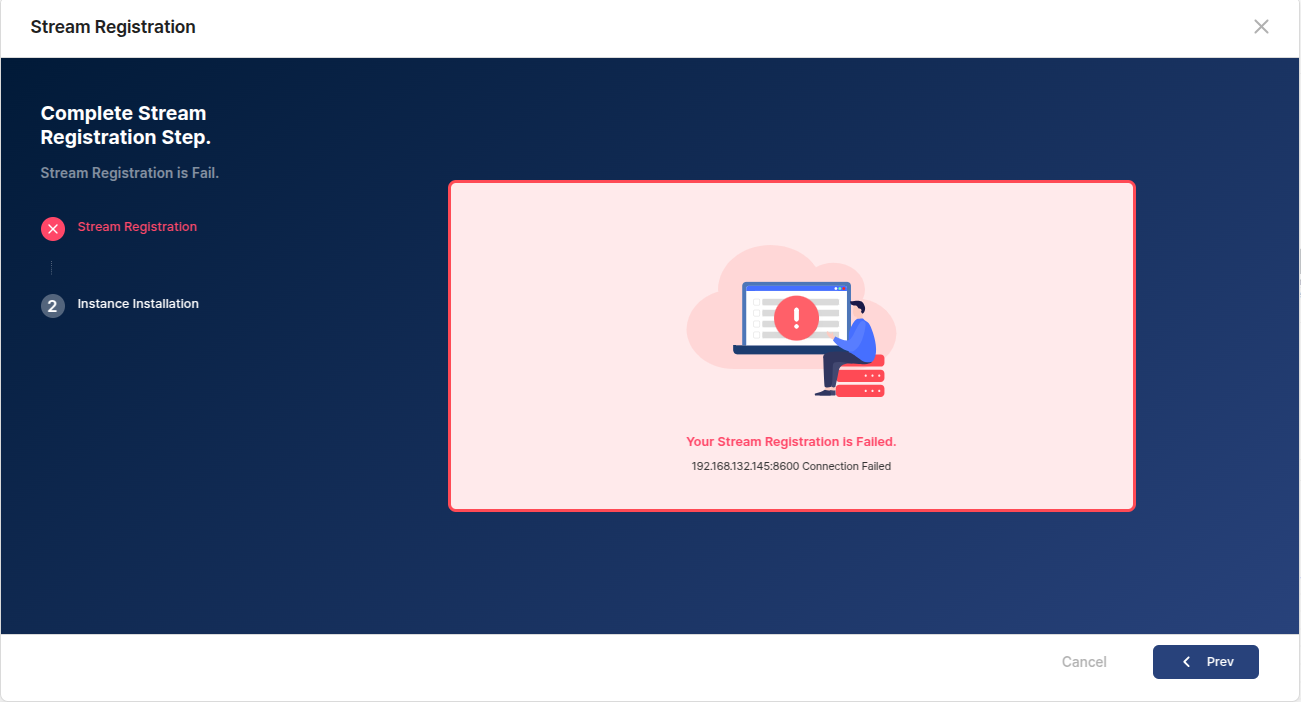
그림 12. Agent Connection 실패 확인 화면</p></figcaption></figure>

###

***

## 8. Stream 및 Diagram 등록 완료 후 메인 화면

<figure><img src="https://content.gitbook.com/content/Z9r6hTnnNsxeETetLKRK/blobs/kn51lEDm9Kpt7ut3zPfW/image.png" alt=""><figcaption><p>
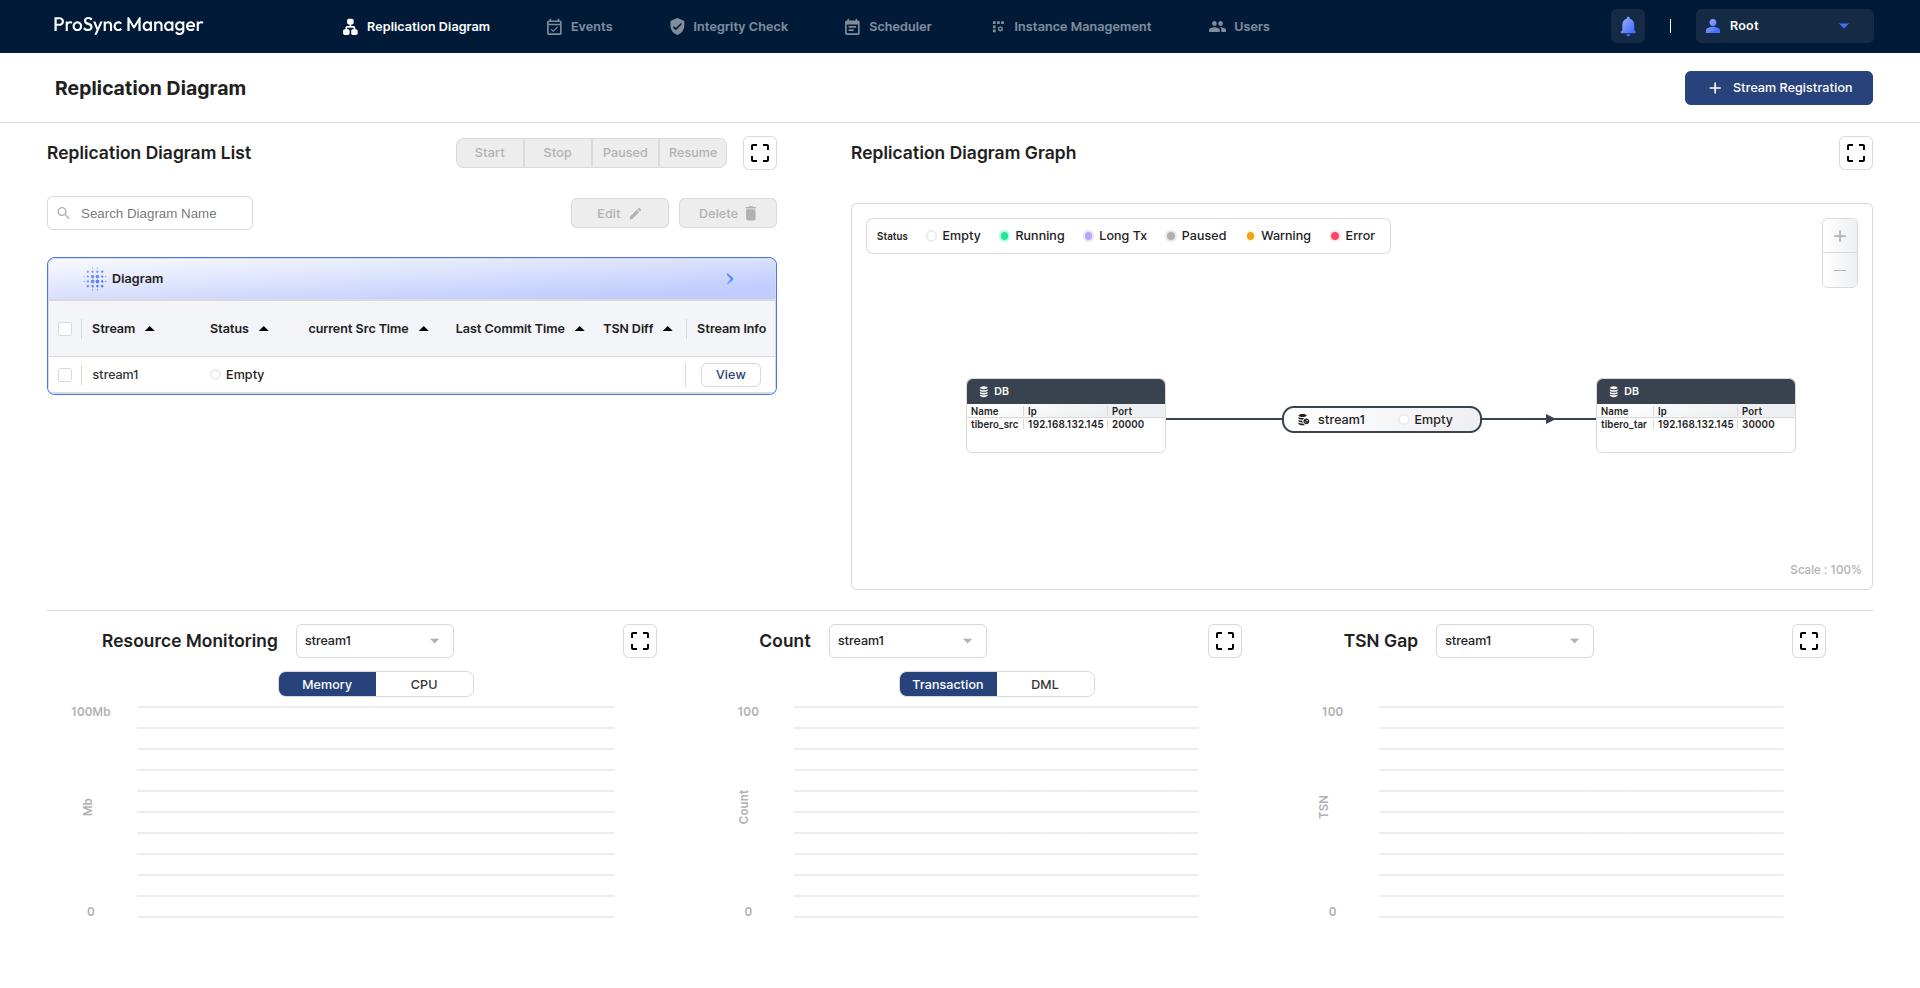
그림 13. 메인 화면(Stream 및 Diagram 등록 완료 후)</p></figcaption></figure>

Stream 등록 성공 후에, 메인 화면에서 다음과 같이 성공적으로 등록 된 것을 확인 할 수 있다.

다만 Diagram 과 Stream 은 동기화의 구성과 흐름을 파악하기 위한 존재로, Instance 설치 및 등록을 진행하지 않을 경우 Status 는 Empty 상태이며 동기화는 진행되지 않는다.&#x20;

동기화의 진행과 상태 파악을 위해선 Instance 를 설치해야만 한다.

{% hint style="warning" %}
**주의**

동일한 Source - Target Database 조합으로, 동일한 방향의 Stream은 오직 하나만 존재해야 한다.

즉, Source가 DB가 A이고 Target이 DB가 B인 Stream이 이미 존재하는 경우, 동일한 방향(DB A → DB B)의 Stream을 추가로 구성할 수 없다.

단, 반대 방향(DB B → DB A)의 Stream은 별도로 구성할 수 있다.
{% endhint %}

###


---

# Agent Instructions: Querying This Documentation

If you need additional information that is not directly available in this page, you can query the documentation dynamically by asking a question.

Perform an HTTP GET request on the current page URL with the `ask` query parameter:

```
GET https://docs.tibero.com/prosyncmanager/execution/diagram-stream-registration.md?ask=<question>
```

The question should be specific, self-contained, and written in natural language.
The response will contain a direct answer to the question and relevant excerpts and sources from the documentation.

Use this mechanism when the answer is not explicitly present in the current page, you need clarification or additional context, or you want to retrieve related documentation sections.
