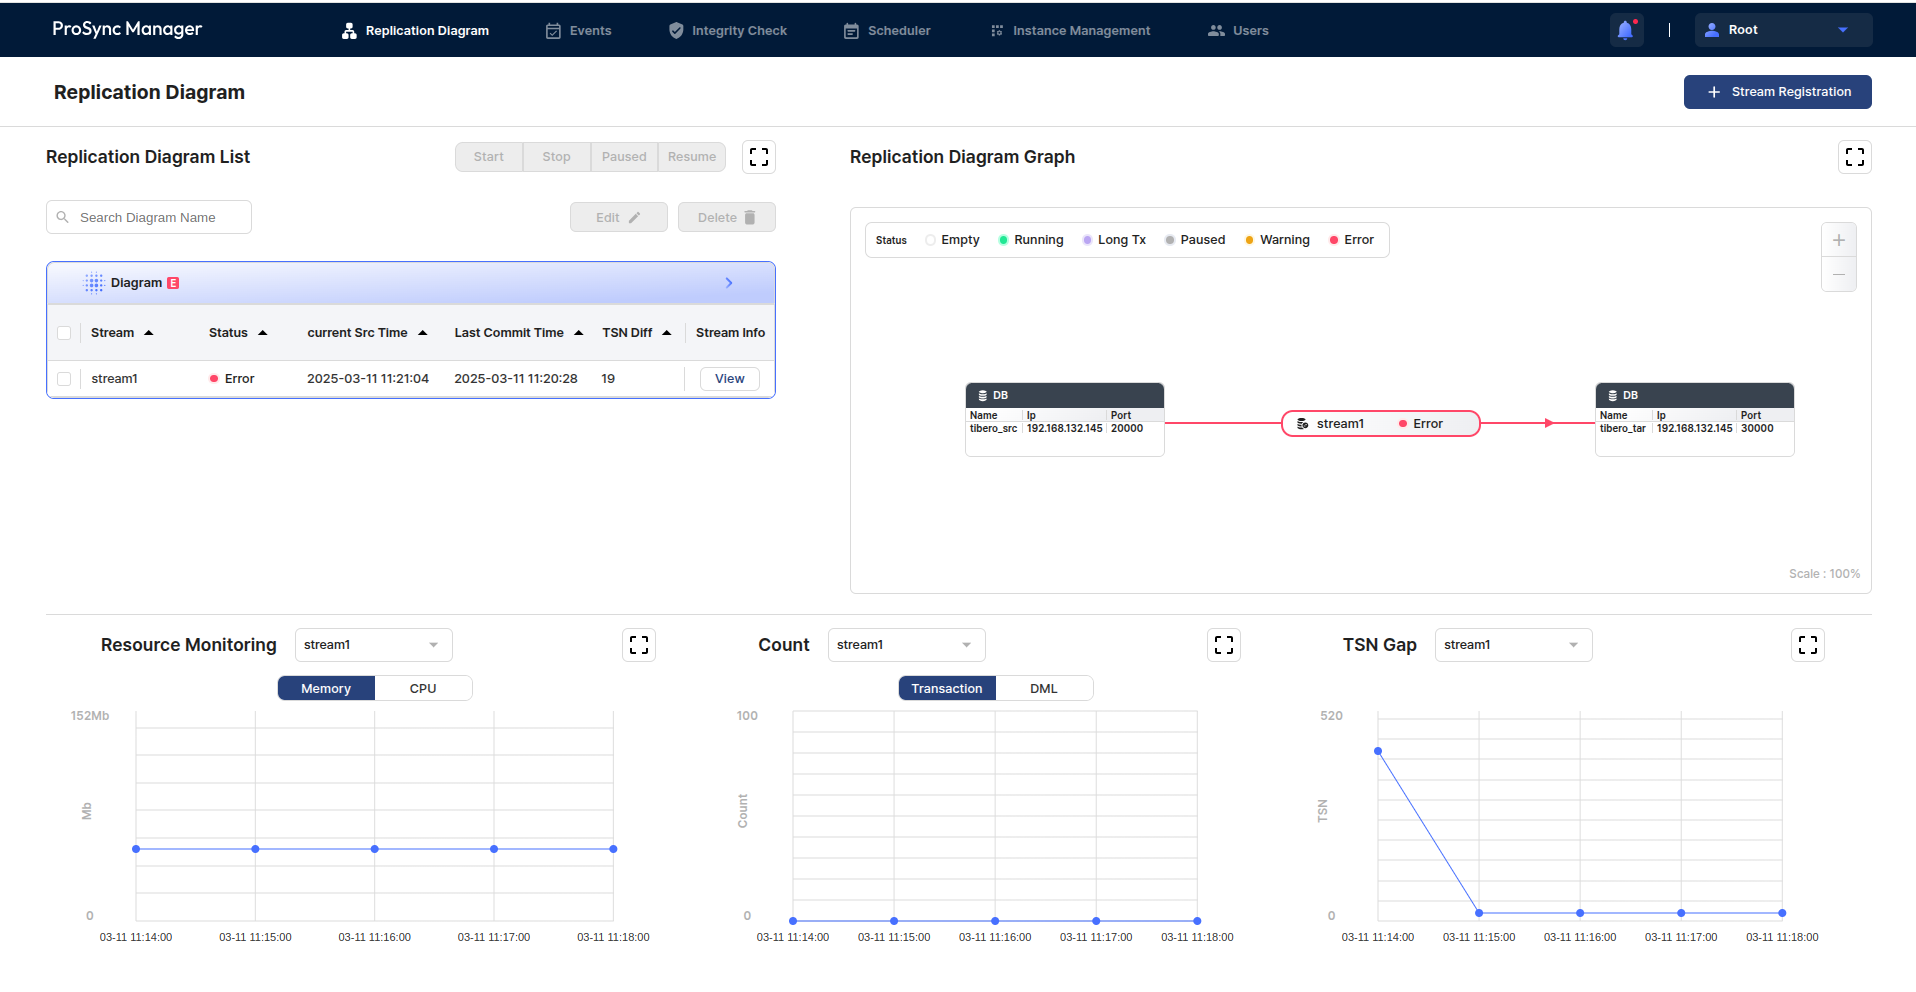
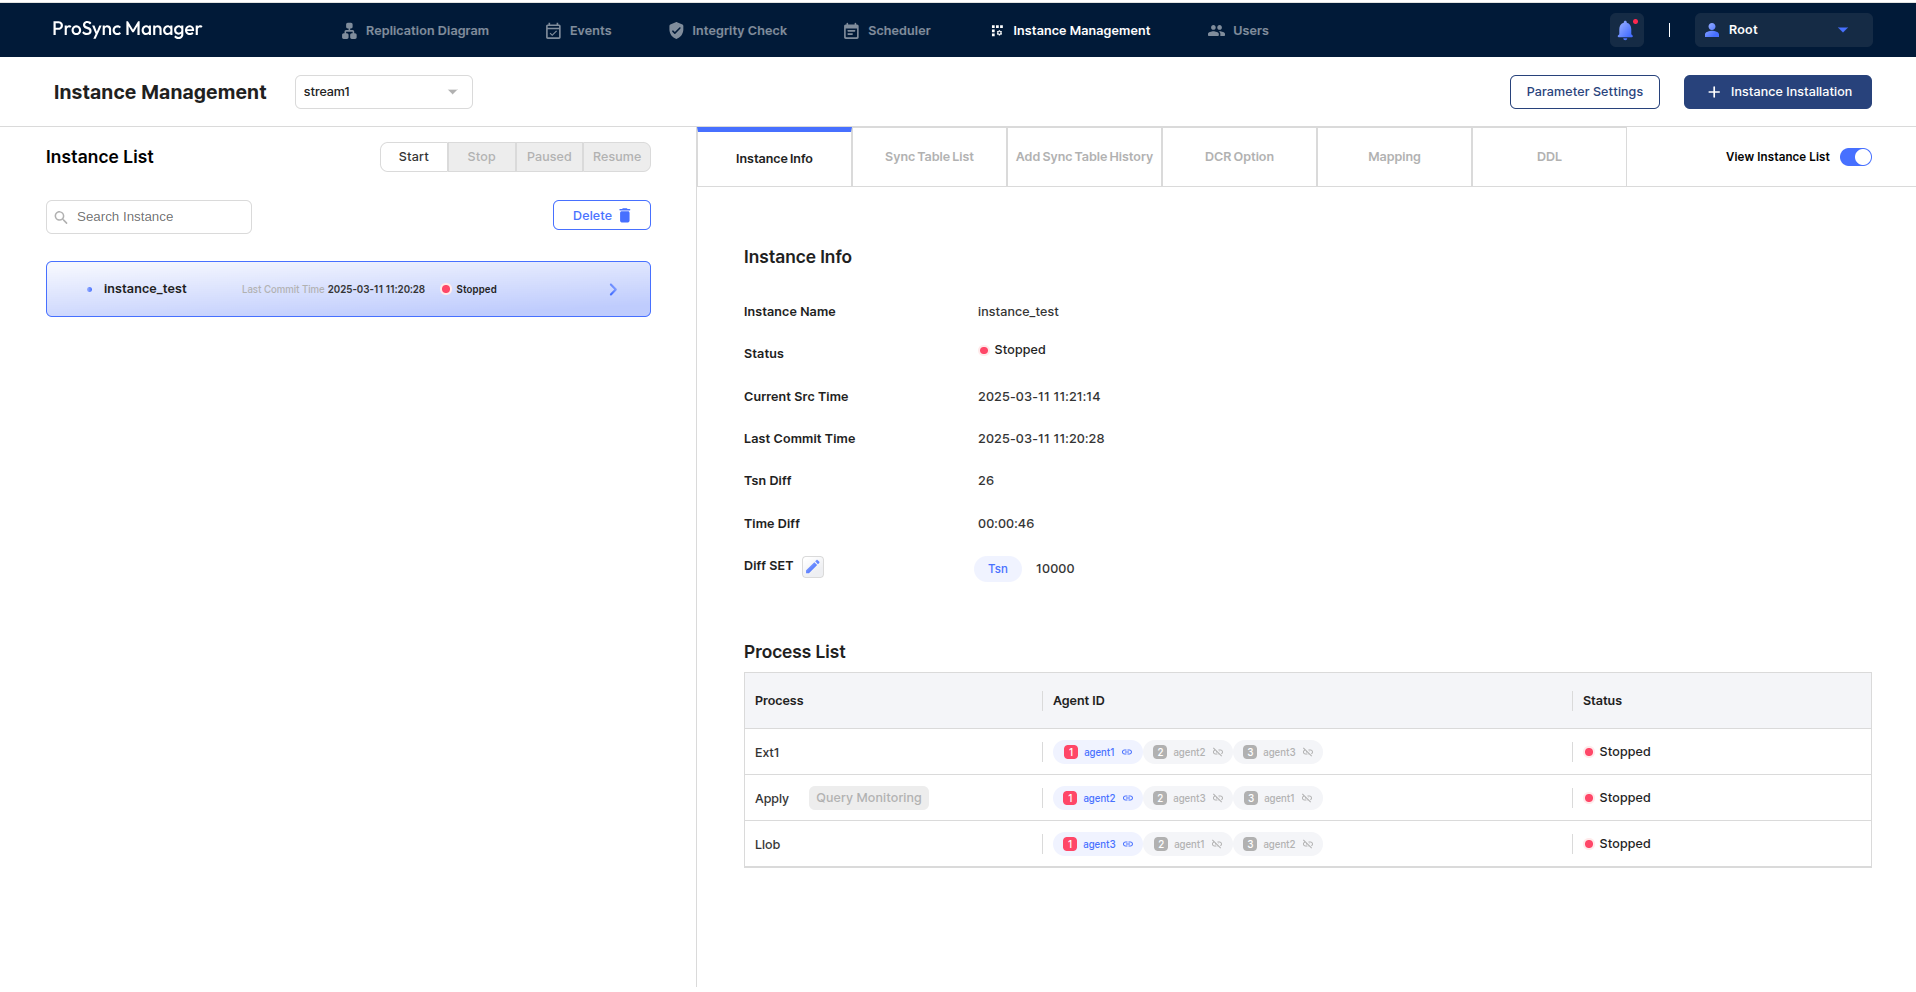
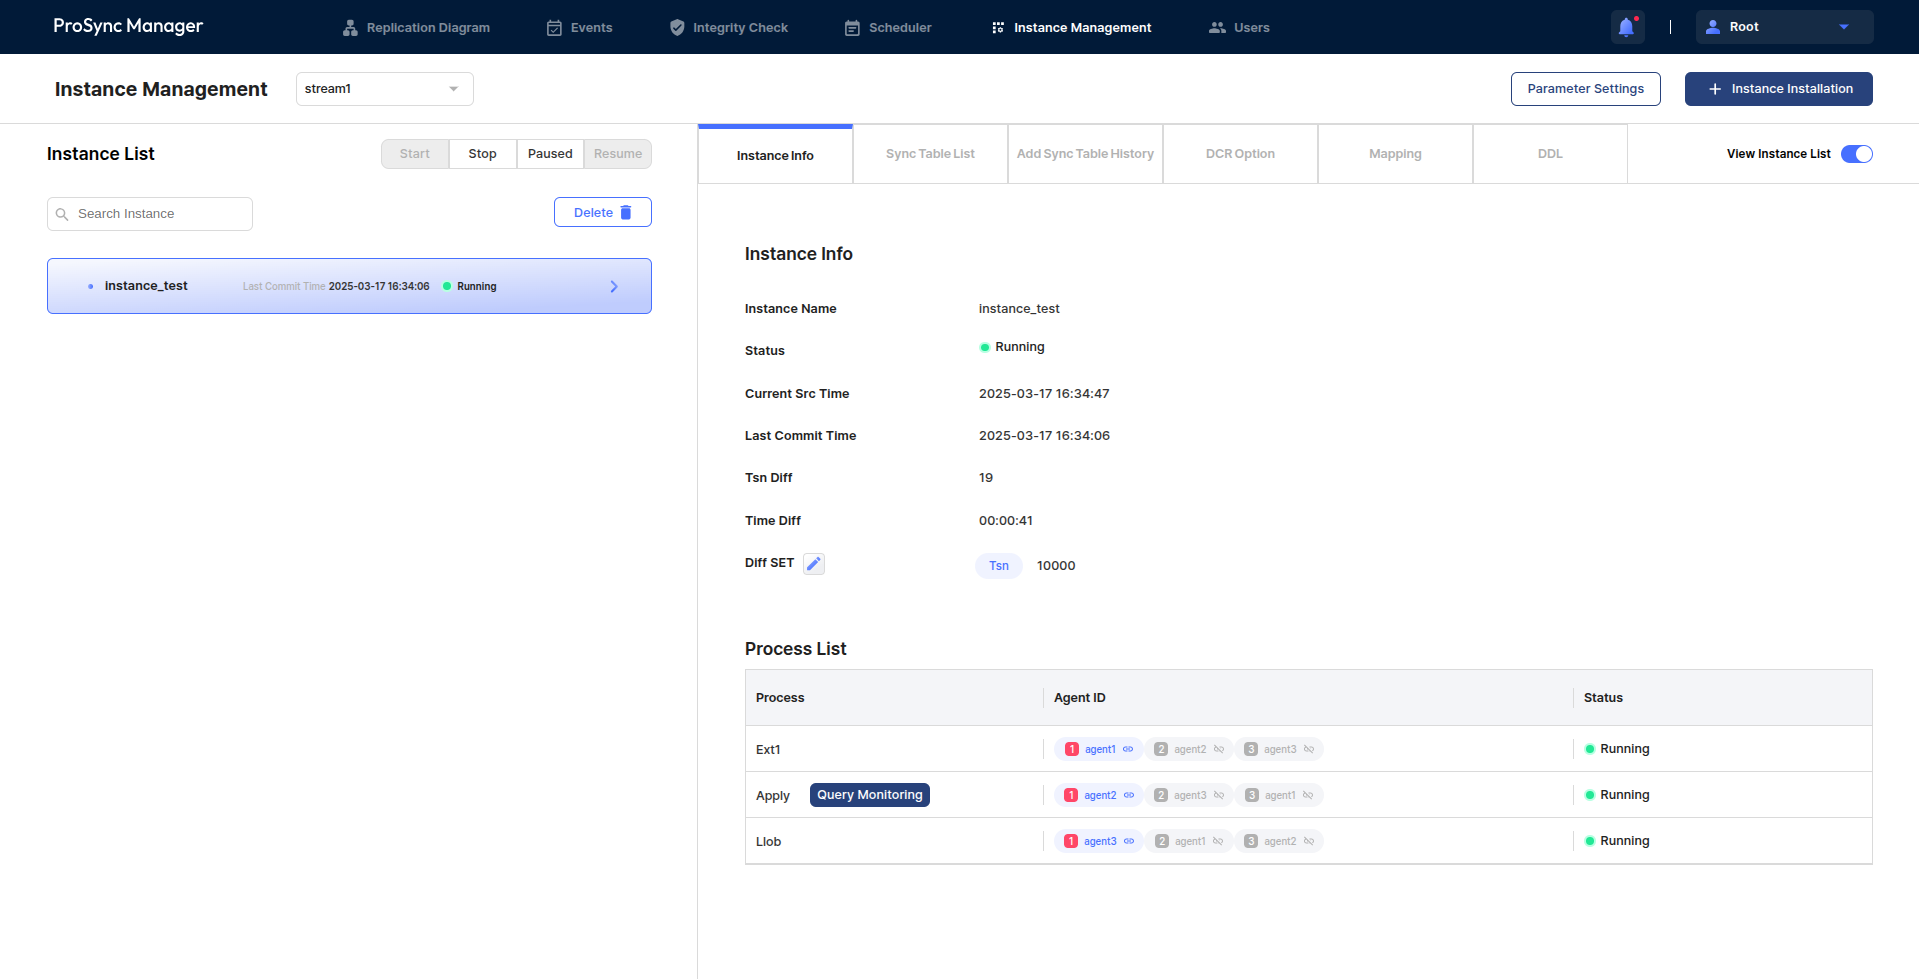
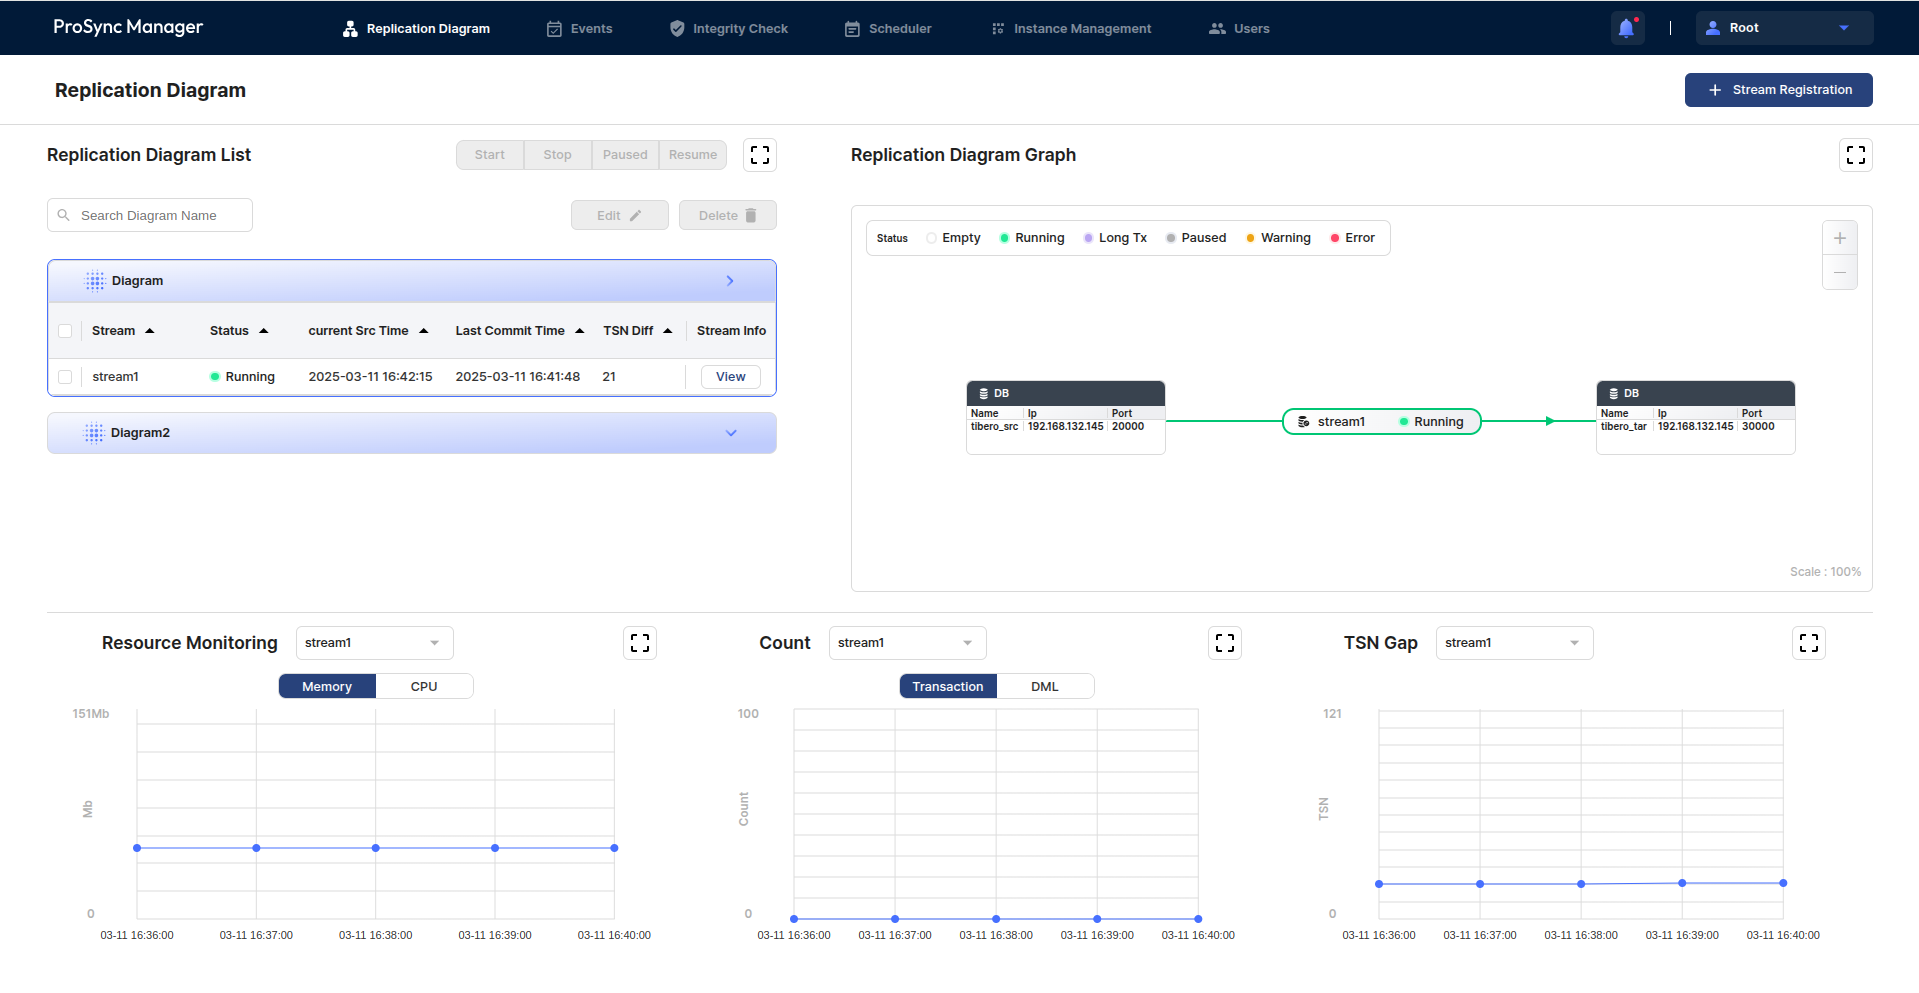
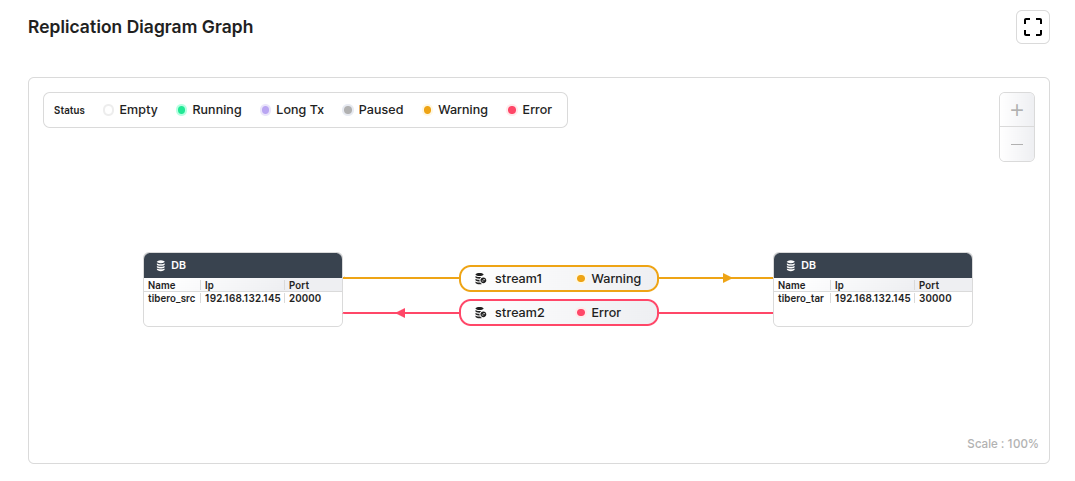
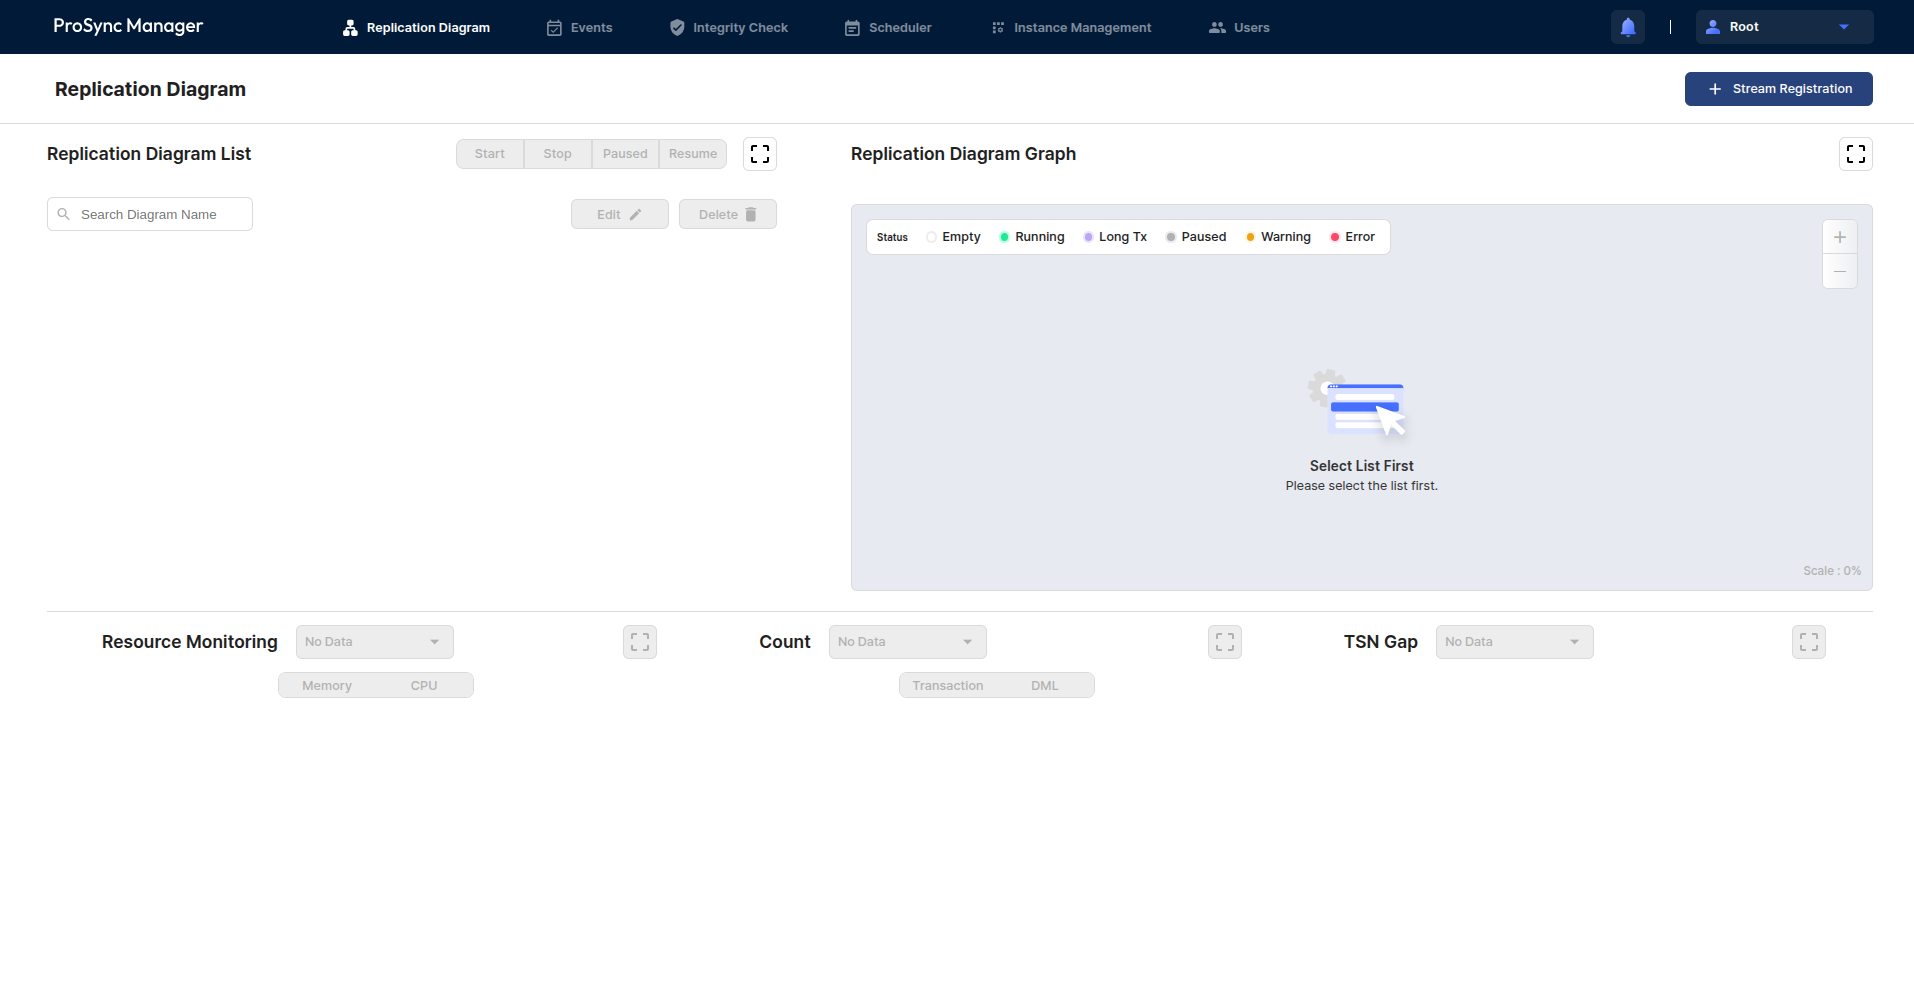
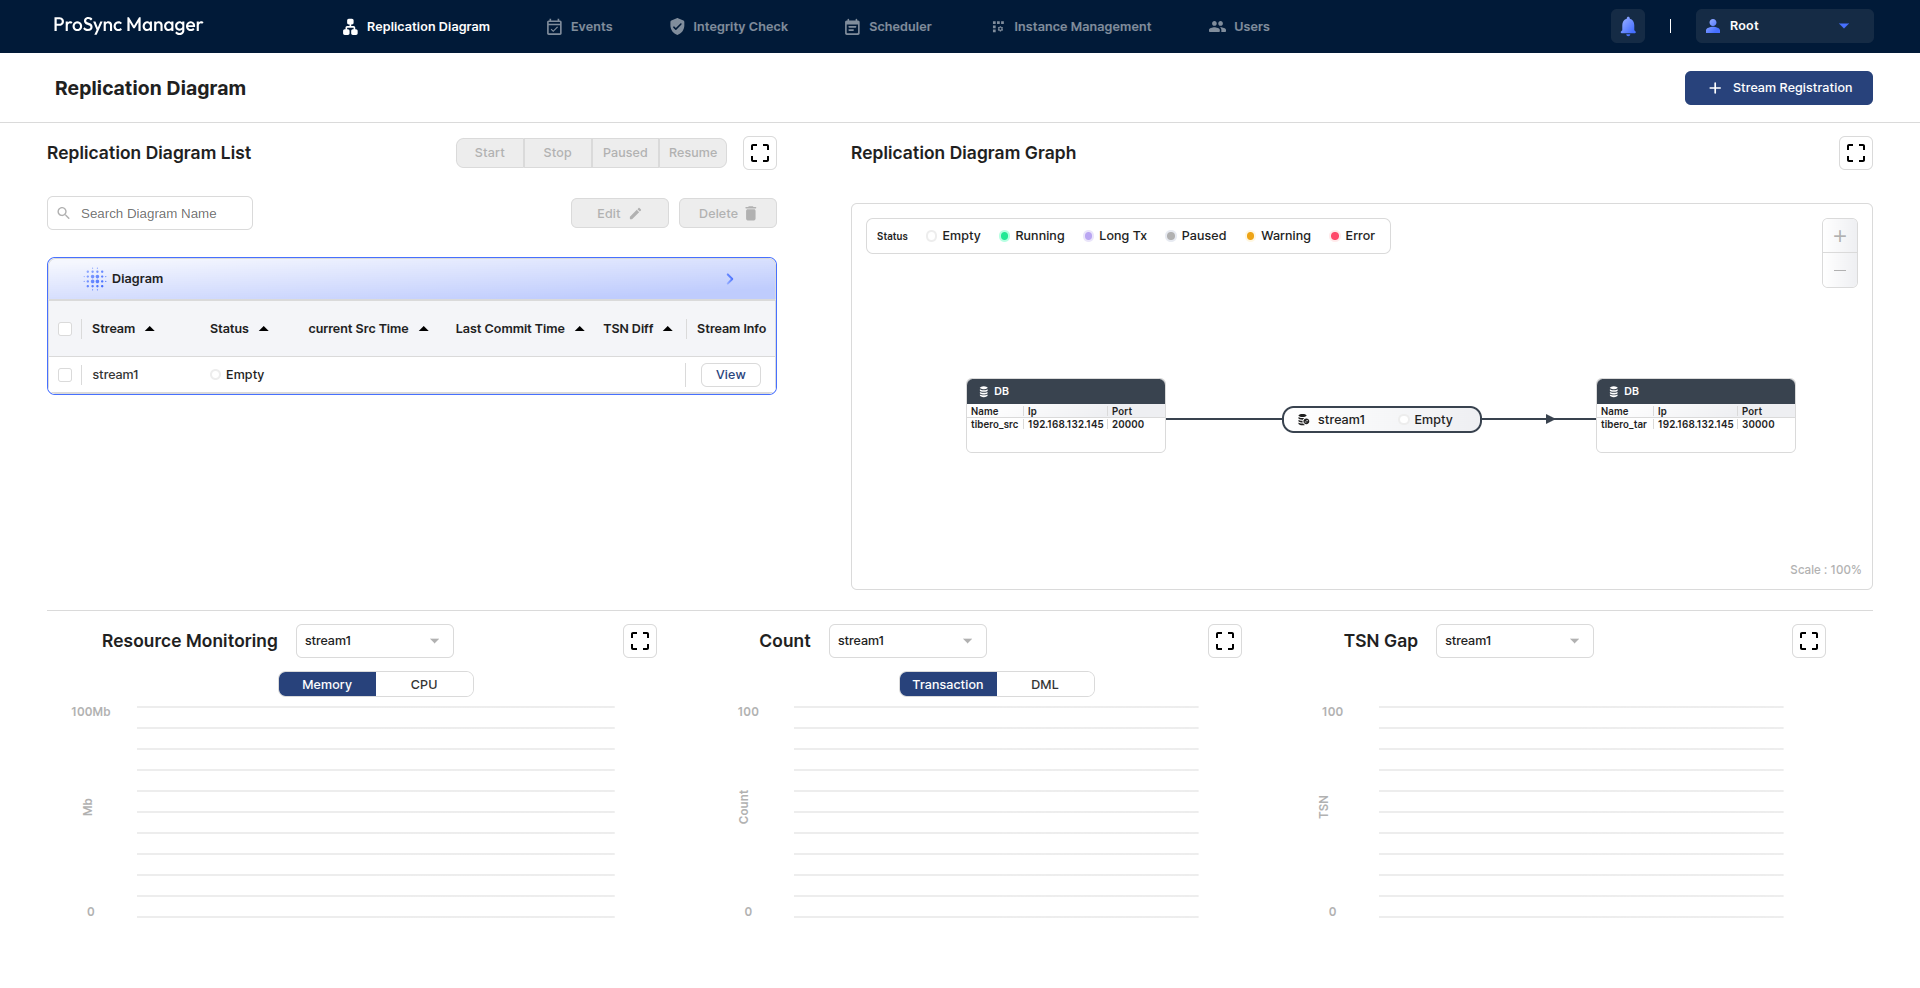
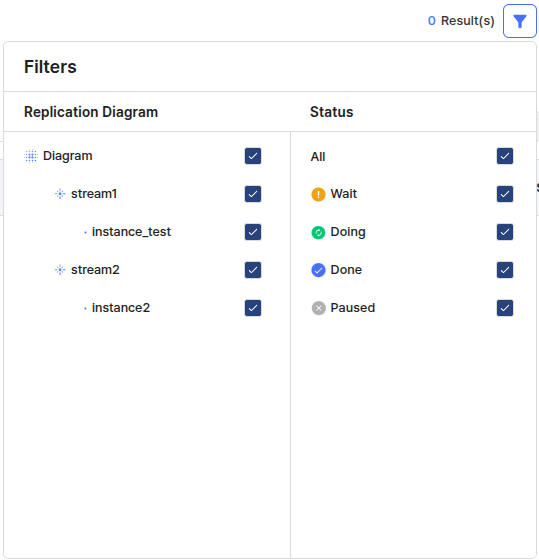
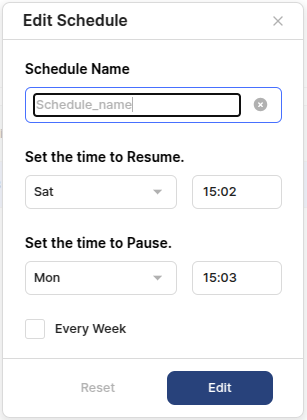
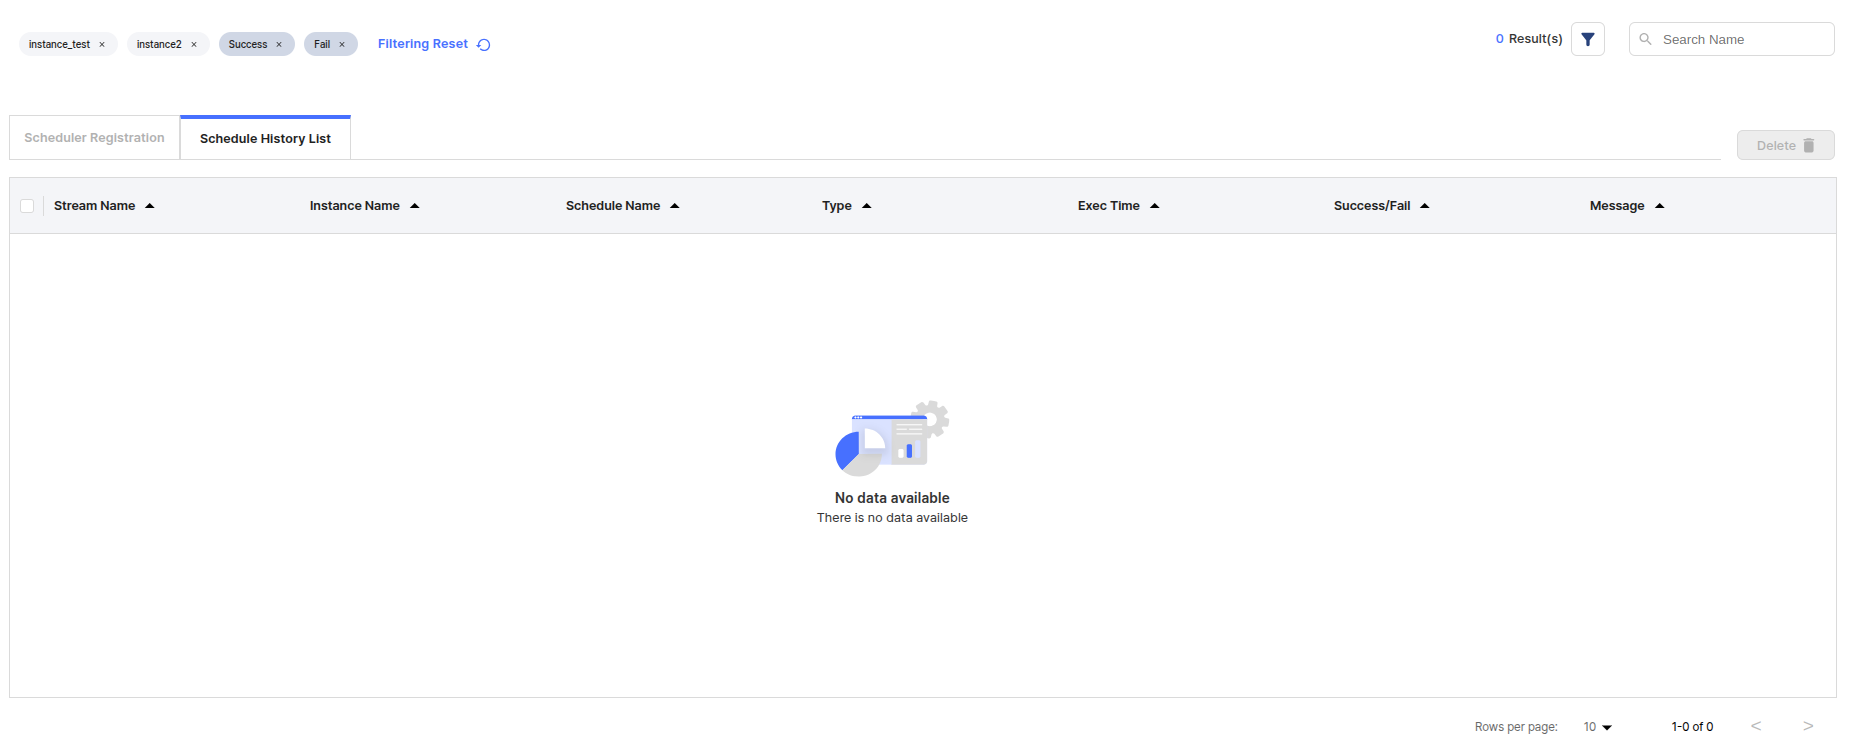
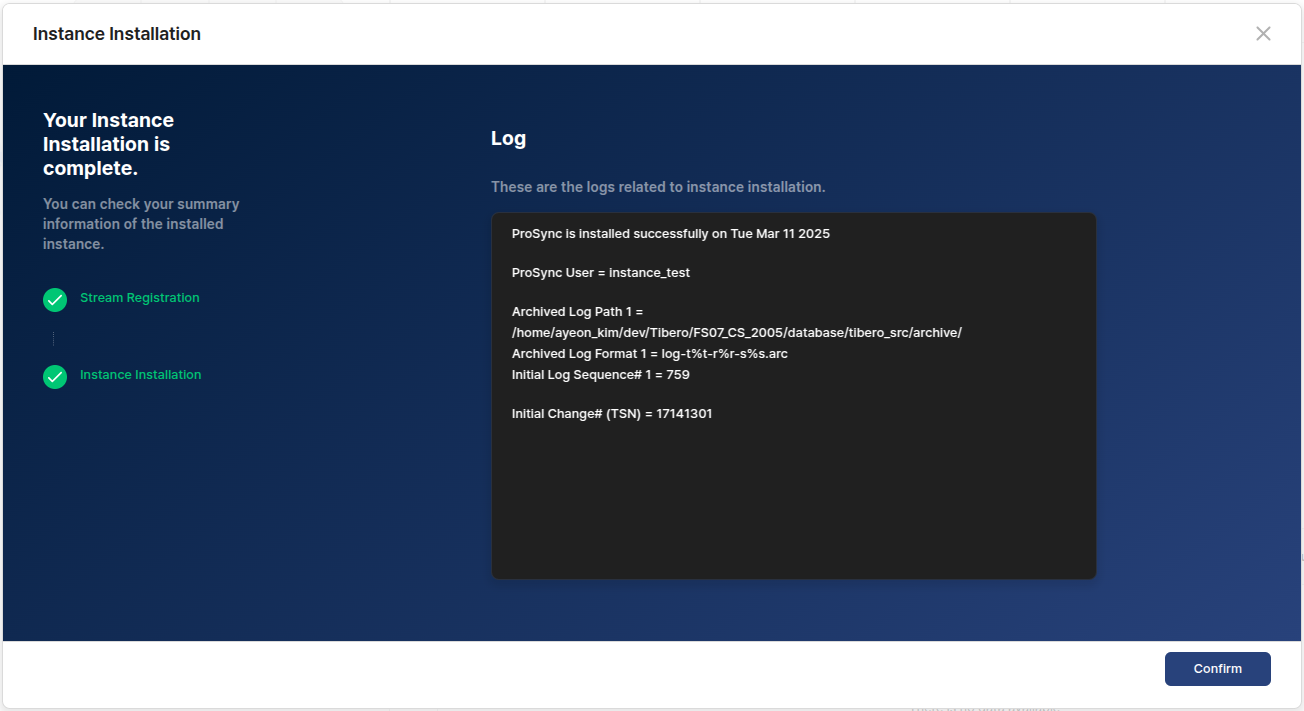
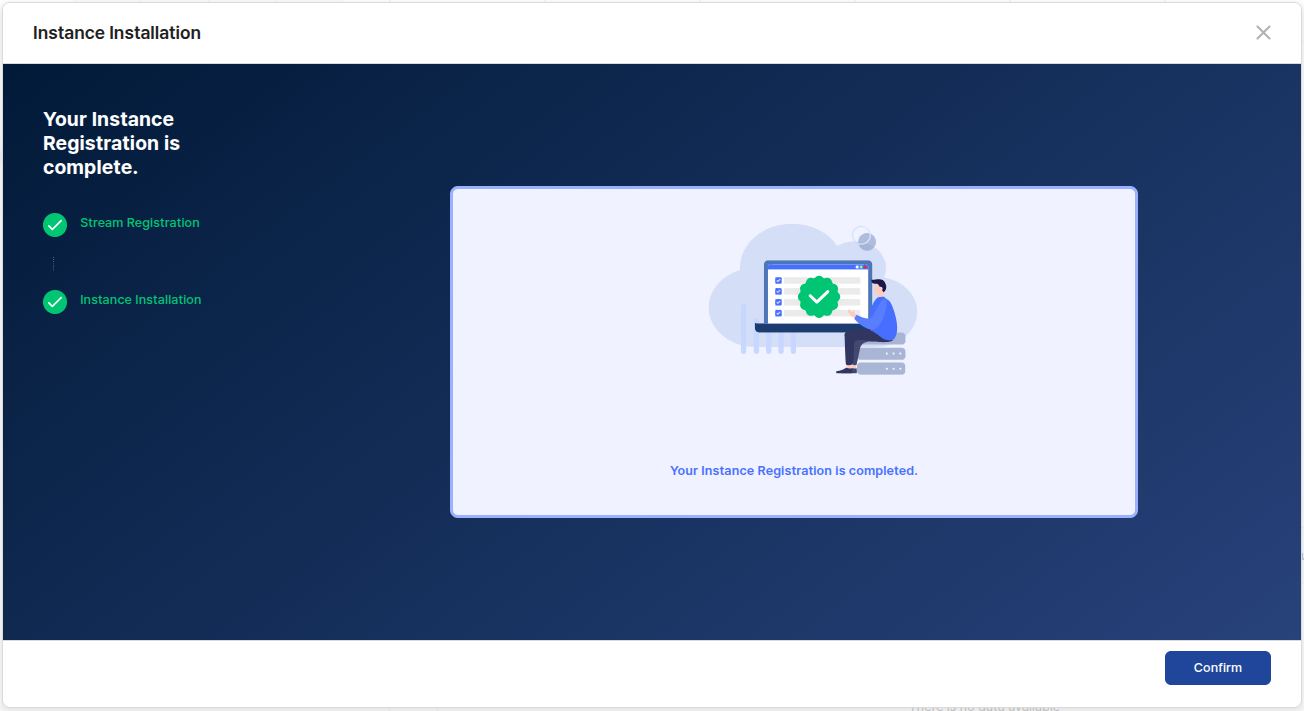
After installation and registration are complete, the Monitoring main screen looks like this
Figure 1. Check Diagram / Stream
Figure 2. Check Instance
System requirements
ProSync Manager supports the following platforms and operating systems.
Items
Product and version
Preparation for installation
The following process describes the preparation for installing ProSync Manager.
These are the required system requirements that the users must check before installing and running ProSync Manager.
This is the required environment configuration and settings the users need to make before installing ProSync Manager.
Constraints
Describes the constraints in ProSync Manager.
The ProSync Manager manages ProSync through communication with the Agent.
Therefore, when using ProSync Manager, the users must ensure that the Agent Processes of all ProSyncs the users want to manage are up and running, and that the users register the Agent Processes in the appropriate places where the users want to manage them.
Since it is a database that stores meta information of ProSync Manager, if the DB is not working properly, ProSync Manager may not be managed properly.
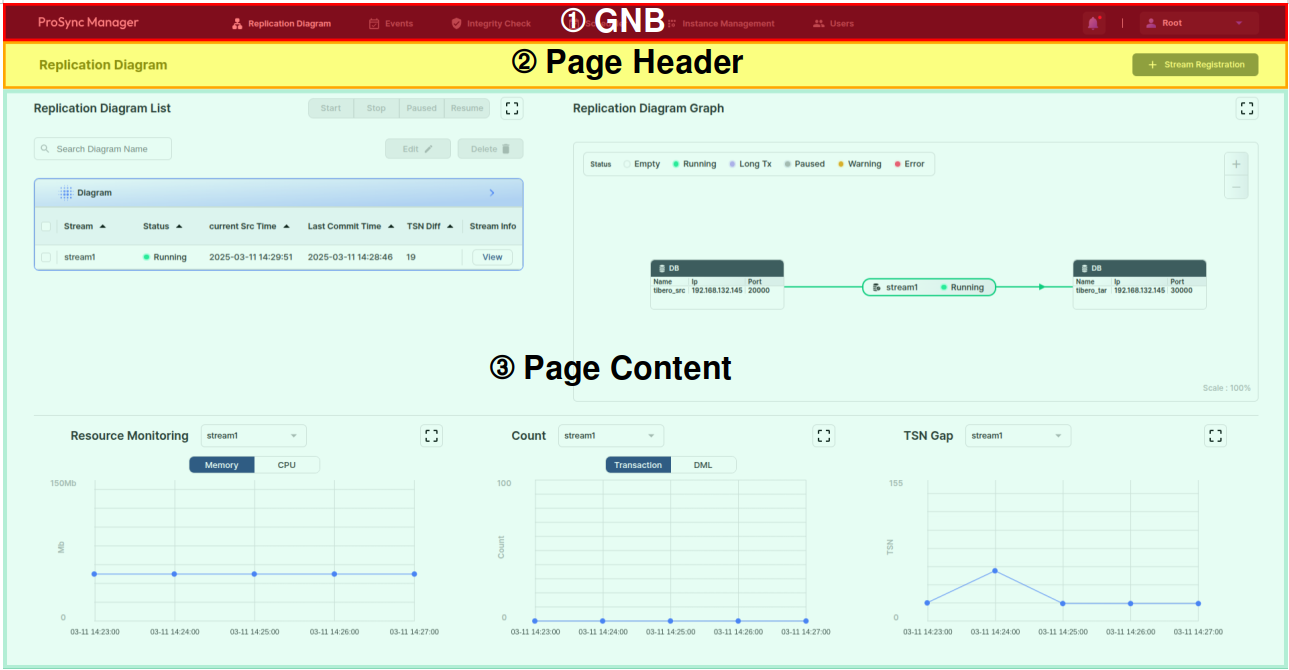
User Interface
This section introduces the overall screen organization of ProSync Manager.
It consists of a menu that provides access to all the features provided by ProSync Manager. The details are covered in the .
This is the header part of each page, where the users can see the name of the page where they are currently on and execute the functions that depend on each page.
All Pages depend on the Diagram, so use the Diagram Filter in the Page Header to change the Diagram information the users want to see on the Page.
This is the Content of each page, where the users can see the features offered by the page where they are on.
Getting started
This chapter describes features used in ProSync Manager.
Provides an overview of the terms and concepts used in ProSync Manager.
Describes the login screen.
Describes registering Diagrams and Streams.
Describes installing and registering Instance.
This section describes the Monitoring main screen after installation and registration are completed.
Overview
Describes the related concepts before using ProSync Manager.
Describes the terms used in ProSync Manager.
Describes the user used for monitoring in ProSync Manager.
Describes the constraints in ProSync Manager.
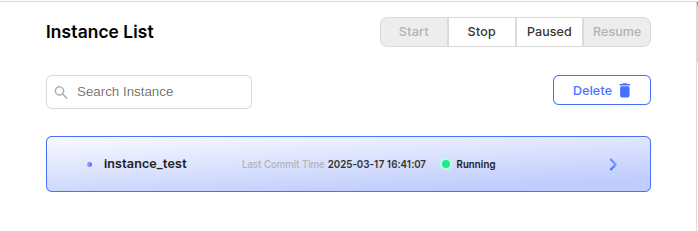
Instance List
This is the area where the users can see a list of registered Instances.
The users can intervene in the Status of the selected Instance.
Usage other scriptsDescribes the usage of the scripts available in ProSync Manager.
Instance managemet tab
Docker
v24.0.0 or later
User presence in Docker group
Control ProSync
ProSync v4.4 or later
The hardware and software requirements for installing ProSync Manager are as follows
Items
Specifications
CPU
8 Core
RAM
32 GB
Storage
6 GB or more
(Each Instance requires an additional 20 GB to store statistical information)
Operating system
Linux:
Red Hat series 7.6 ~ 9.6 supported
Installation server supports Linux series only.
JDK
Supported platforms and operating systems
v1.8.0_221 or later
Caution
When using Docker prior to 1.13.1, the file permissions were not recognized correctly when enabling selinux as a security option.
The installation may have failed due to a bug.
Hardware and software
Note
For RAM, 25% of the system memory is used by repoDB startup for data storage (which can be changed by the SHARED_BUFFERS value at installation time), and 25% of the maximum memory or 25GB, whichever is less, is used by Tomcat startup.
The recommended memory usage is 32 GB for smooth, unconfigured use of ProSyncManager.
Paused : Pauses all processes in this instance.
Resume : Resumes all processes in this instance.
This feature allows the users to search by the name of an instance.
The users can clear the selected Instances.
The default work for deletion is to remove the registration from the web, but check the box if the users want it to also be removed from the engine's prs_instance.map.
The checkbox is only active if the Instance's Status is Stopped.
This guide is for database developers who use ProSync Manager, ProSync's web monitoring program provided by TmaxTibero® (Tibero), and describes the basics of using ProSync Manager.
Note
The content of this guide is subject to change as ProSync Manager products are improved or upgraded.
Required Knowledge
Database
Understanding of the basic concepts of databases and how a Relational Database Management System (RDBMS) works
Basic Unix-based operating system command
Understanding of platform-specific usage of $SHELL and checking system requirements.
These are the copyright notices for ProSync Manager manual.
Tmax Tower, 45 Jeongjail-ro, Bundang-gu, Seongnam-si, Gyeonggi-do, Republic of Korea
Tel : +82-1544-8629
E-Mail : gitbook@tibero.com
The contents of this software (ProSync Manager) manual and the program are protected by copyright laws and international convention. The contents of this manual and the programs described herein are available only under a license agreement with TmaxTibero Co., Ltd. and may be distributed or reproduced only within the scope of the license agreement.
No part of this document may be transmitted, copied, deployed, or reproduced in any form or by any means, electronic, mechanical, or optical, without the prior written consent of TmaxTibero Co., Ltd. Nothing in this software document and agreement constitutes a transfer of intellectual property rights regardless of whether or not such rights are registered) or any rights to TmaxTibero trademarks, logos, or any other brand features.
This document is for information purposes only. The company assumes no direct or indirect responsibilities for the contents of this document, and does not guarantee that the information contained in this document satisfies certain legal or commercial conditions. The information contained in this document is subject to change without prior notice due to product upgrades or updates. The company assumes no liability for any errors in this document.
Pretendard and Roboto are applied and SIL Open Font License.
Details can be found in the following directory located within the product.
${PRSMGR_HOME}/license/LICENSE_FONT.txt
Some modules or files of this product are subject to the terms of the following licenses.
Apache License 2.0
BSD-2-Clause-FreeBSD
Common Development and Distribution License (CDDL) 1.0
Eclipse Public License (EPL) 1.0
Details can be found in the following directory located within the product.
${PRSMGR_HOME}/license/LICENSE.txt
The guide contains 9 chapters.
Monitoring User
Describes the user used for monitoring in ProSync Manager.
Monitoring User
Monitoring User is a user that must exist in both SRC DB and TAR DB in order to use synchronization monitoring and other features in ProSync Manager.
Features
Stream Registration
This is required when making a connection to ensure that the DB information entered during Stream registration is correct. This is required to check the cluster status to get additional information from the DB.
Instance Monitoring
This is required to retrieve the SRC Current Time and Last Commit Time, which are metrics that allow the users to check if synchronization is working properly on each instance.
Adding a dynamic synchronization table
This is required to retrieve Schema, Table, and Column information that exists in each DB when adding a dynamic synchronization table.
This is required when connecting to each DB and comparing data during integrity check.
The Monitoring User must be created by the user directly in each DB, and the created User must be registered when registering Stream.
The Monitoring User requires the following permissions
DB Type
Required privilege
Global Navigation Bar (GNB)
The GNB is organized into four areas.
ProSync Manager logo
This is the logo of ProSync Manager, and clicking on it will take the users to the main screen (Replication Diagram page).
Page menu
This is the menu the users can navigate to for each page. Each page is described in detail in the chapter that corresponds to that page.
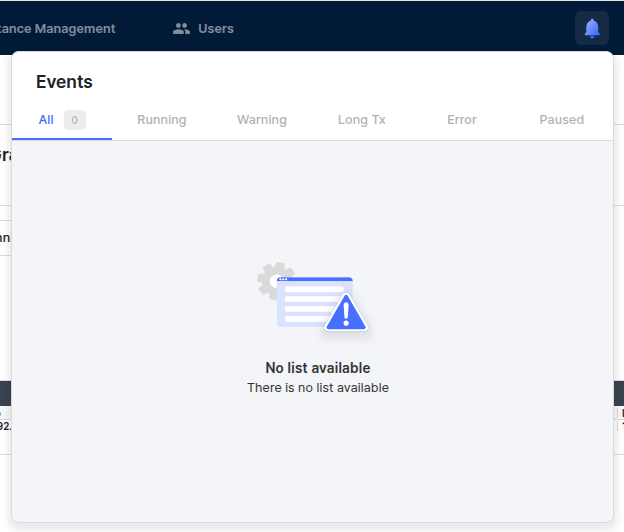
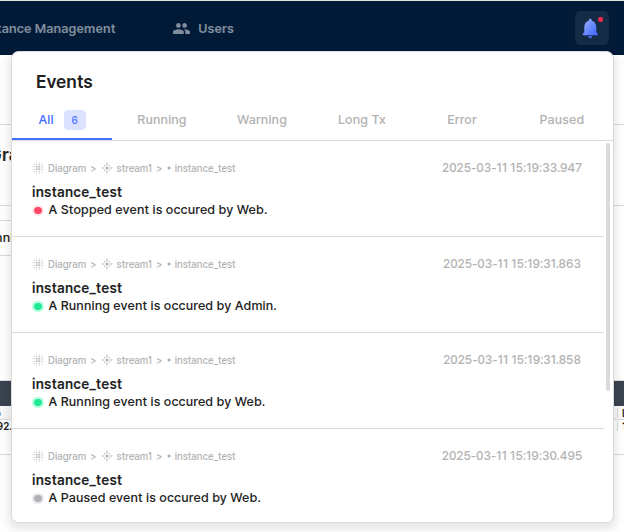
The users can check a simple event list when an event occurs for a registered diagram.
If no new events have occurred, the users'll see a bell icon and an empty list.
The users can check the Event List for new events with a red dot on the bell icon.
Depending on the status of the event, it can be categorized into All, Running, Warning, Long Tx, Error, and Paused tabs, and the number of the corresponding status appears on the tab.
Select the event the users want to view from the list and the users'll be taken to the page, where the users can view the event details.
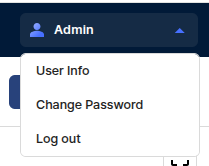
The role of the currently logged in User is displayed, and the User-specific features Drop Box appears when the area is selected.
The users can view and edit the user's information.
However, the users can change the user's role to Admin ⇒ User without the root account, but the users cannot change it to User ⇒ Admin. (Root account is assigned when installing ProSync Manager, so it cannot be changed).
The users can change the password for that user.
Log out: Logs the user out.
Glossary
Describes the terms used in ProSync Manager.
Replication Diagram
The largest logical organizational unit in ProSync Manager and is used to visually understand the ProSync synchronization configuration. A Diagram can be composed of multiple Streams.
Stream
Stream refers to the flow of data synchronization from one SRC DB to one TAR DB in ProSync.
For bidirectional synchronization, a separate Stream is configured for each direction, so a total of two Streams are used.
A Stream can be composed of multiple Instances and supports per-stream operations (Start, Stop, Resume, Pause).
Instance
The smallest unit of synchronization that ProSync Manager manages.
The users can group tables to be synchronized in one Stream and organize them into multiple Instances.
Provides the ability to monitor and manage selected instances.
Views a larger area of data if the view Instance List is inactive.
Login
Describes the login screen.
To use ProSync Manager, access a web browser and log in.
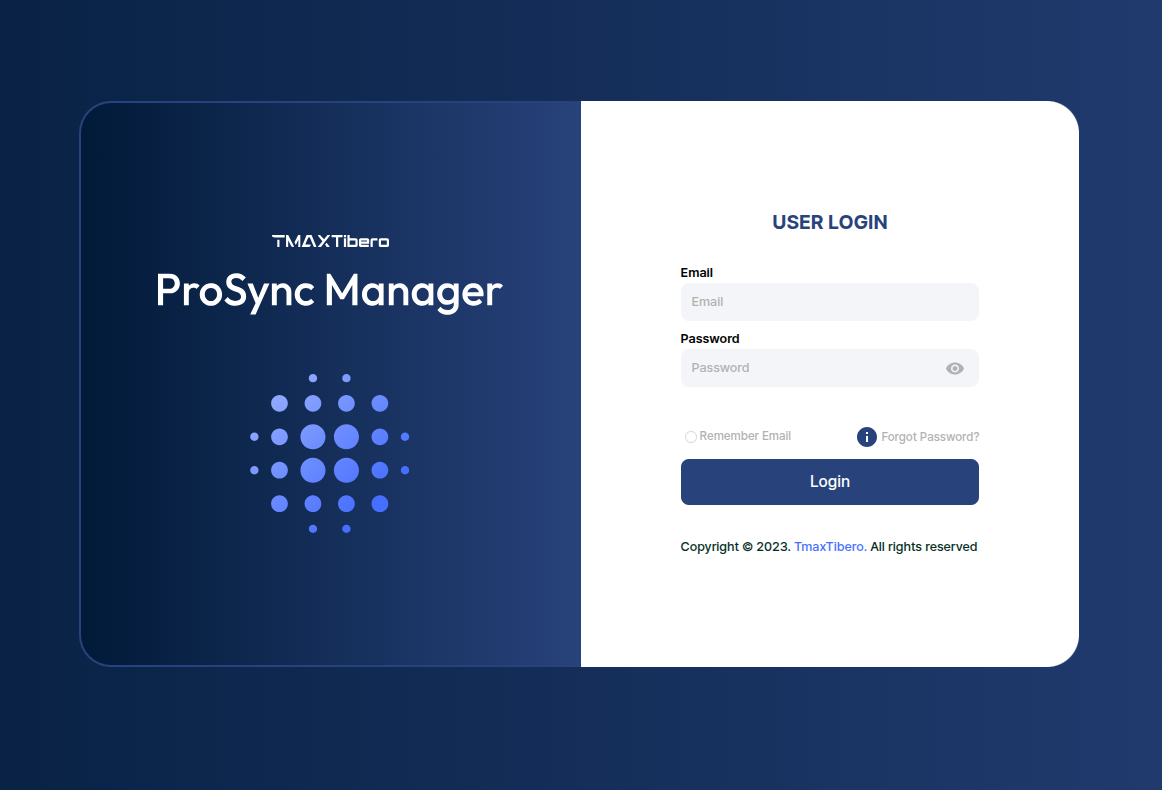
Figure 1. Prosync Manager login screen
At the login screen, enter the user ID and password, then click the Login button.
After successful login, the users will be taken to the Replication Diagram page
When ProSync Manager is installed, it creates an account with administrator privileges by default; the default username and password for the administrator account is admin/admin, which can be changed in the install.cfg during the installation process.
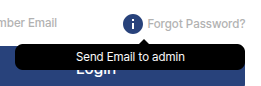
Figure 2. Screen for finding a password
If the users have forgotten the password, they can check the ID of the administrator account by placing the mouse cursor on the Info icon of Forgot Password.
As that account is authorized to change other users' passwords, contact the owner of the account to change the password.
Replication Diagram
This section describes the Replication Diagram page, which is the main page of ProSync Manager.
The users can see the visual flow of synchronization organized into one Replication Diagram.
Replication Diagram components
The Replication Diagram is organized into the following main sections.
Provides charts to visually analyze key performance metrics.
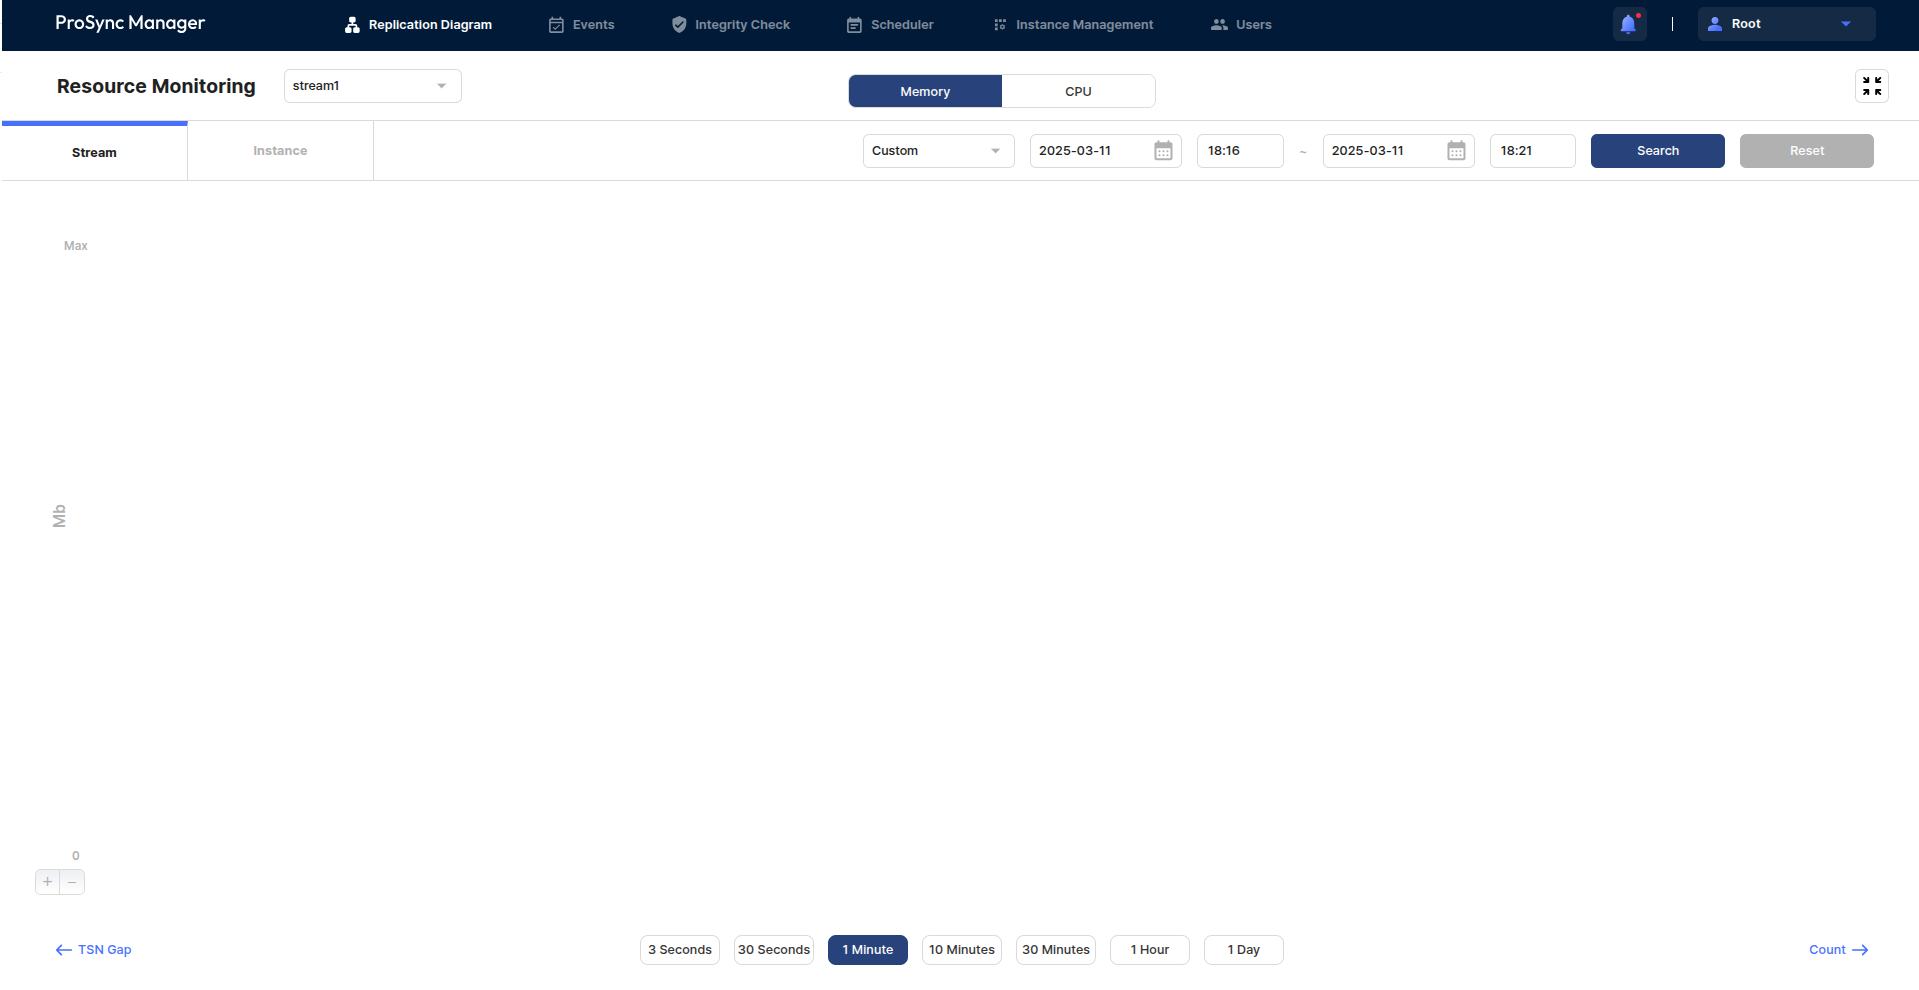
Resource Monitoring Chart
This is the area where the users can check the resource indicators used by ProSync during synchronization, such as Memory and CPU usage, Transaction and DML count, and TSN Gap accumulated as synchronization progresses, per Stream belonging to the selected Diagram.
The Replication Diagram page only shows information from {current time}-6 minutes to {current time}-2 minutes for the selected Stream, and the users can go to the detailed view area by clicking the EnLarge button in the upper right corner of each chart area.
The users can view the memory and CPU usage used by ProSync. This chart only shows information from the Apply process.
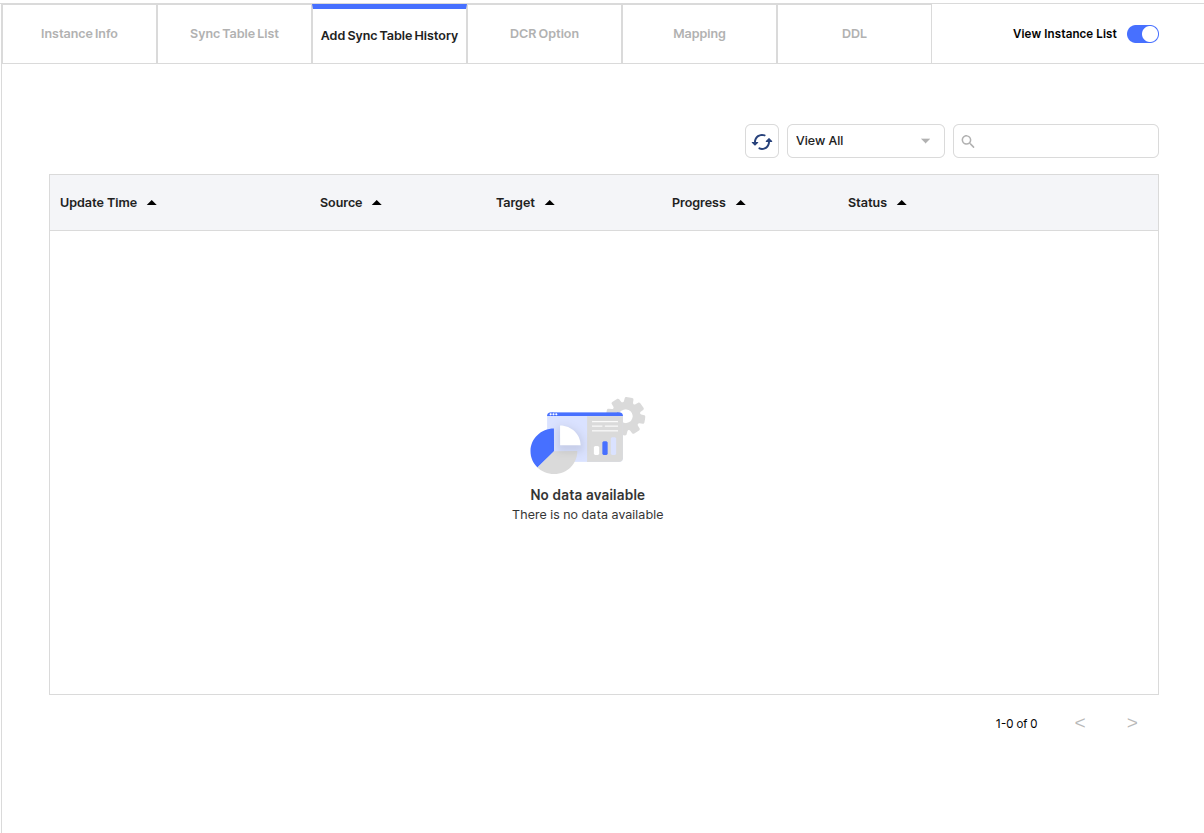
Add Sync Table History
When the users dynamically add a synchronization table from the , the users can view its progress and history on that tab.
Item
Description
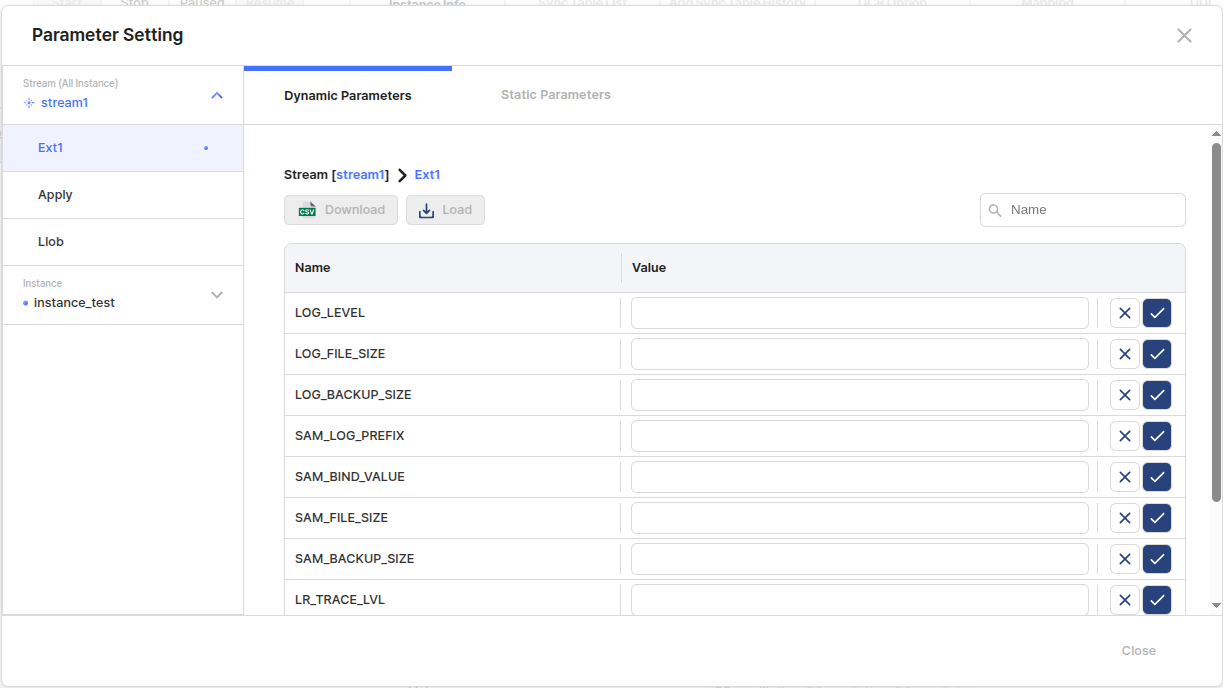
Parameter Setting
In the header of the Instance Management page, the users can set the engine parameters for the Streams that correspond to the Stream filter and the Instances that belong to it.
Select the target Stream, Instance, or Process the users want to set up.
When selecting a Stream, the value is common to all Instances under it.
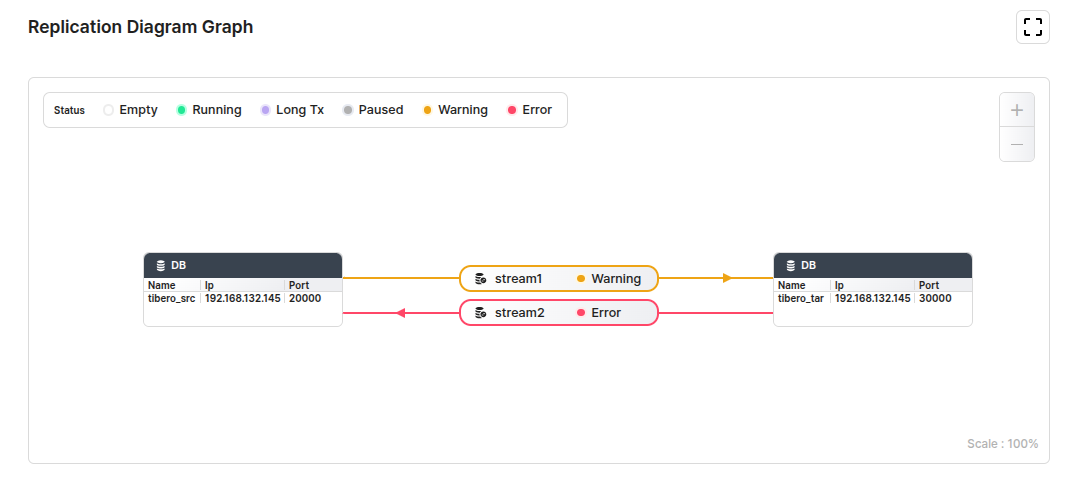
Replication Diagram Graph
The Graph area of the registered Diagram.
This button allows the users to expand the area of the Replication Diagram Graph.
The status is represented by the line color of the Stream drawn in the graph. Displays the status color information at this time.
Web browser
Chrome
(Chrome version 103 or later is recommended)
TIBERO
CONNECT
SELECT ANY TABLE
SELECT ANY SEQUENCE
SELECT ON SYS._DD_COL
SELECT ON V$DATABASE
SELECT ON V$VERSION
SELECT ON V$SESSION
SELECT ON GV$INSTANCE
ORACLE
CONNECT
SELECT ANY TABLE
SELECT ANY SEQUENCE
SELECT ANY DICTIONARY
SELECT ON V_$DATABASE
SELECT ON V_$VERSION
SELECT ON V_$SESSION
FLASHBACK ANY TABLE
SELECT ON GV_$INSTANCE
Integrity Check
Monitoring User creation
Root
tProSync Manager is the top-level privilege granted to the User created when installing Roo tProSync Manager. Users with this permission can create and manage users of the Admin/User Role.
Admin
A role that can use all the full features of ProSync Manager, and can create and
manage accounts with the User Role.
User
A role that can only view all the features in ProSync Manager, and cannot participate in synchronization behavior and function behavior. The user does not have access to the User page and can only manage their own information in GNB.
Monitoring User
Repo DB
User Role
GNU General Public License (GPL) 2.0
MIT License
GNU Lesser General Public License (LGPL) 2.1
Caution
This guide is not intended to be all-inclusive of what is required to apply or operate ProSync Manager in practice.
Copyright notice
Address
Website
Technical service center
Restricted Rights Legend
Font Copyrights
Open Source Software Notice
Document Organization
Installation Guide
This section describes the installation of ProSync Manager.
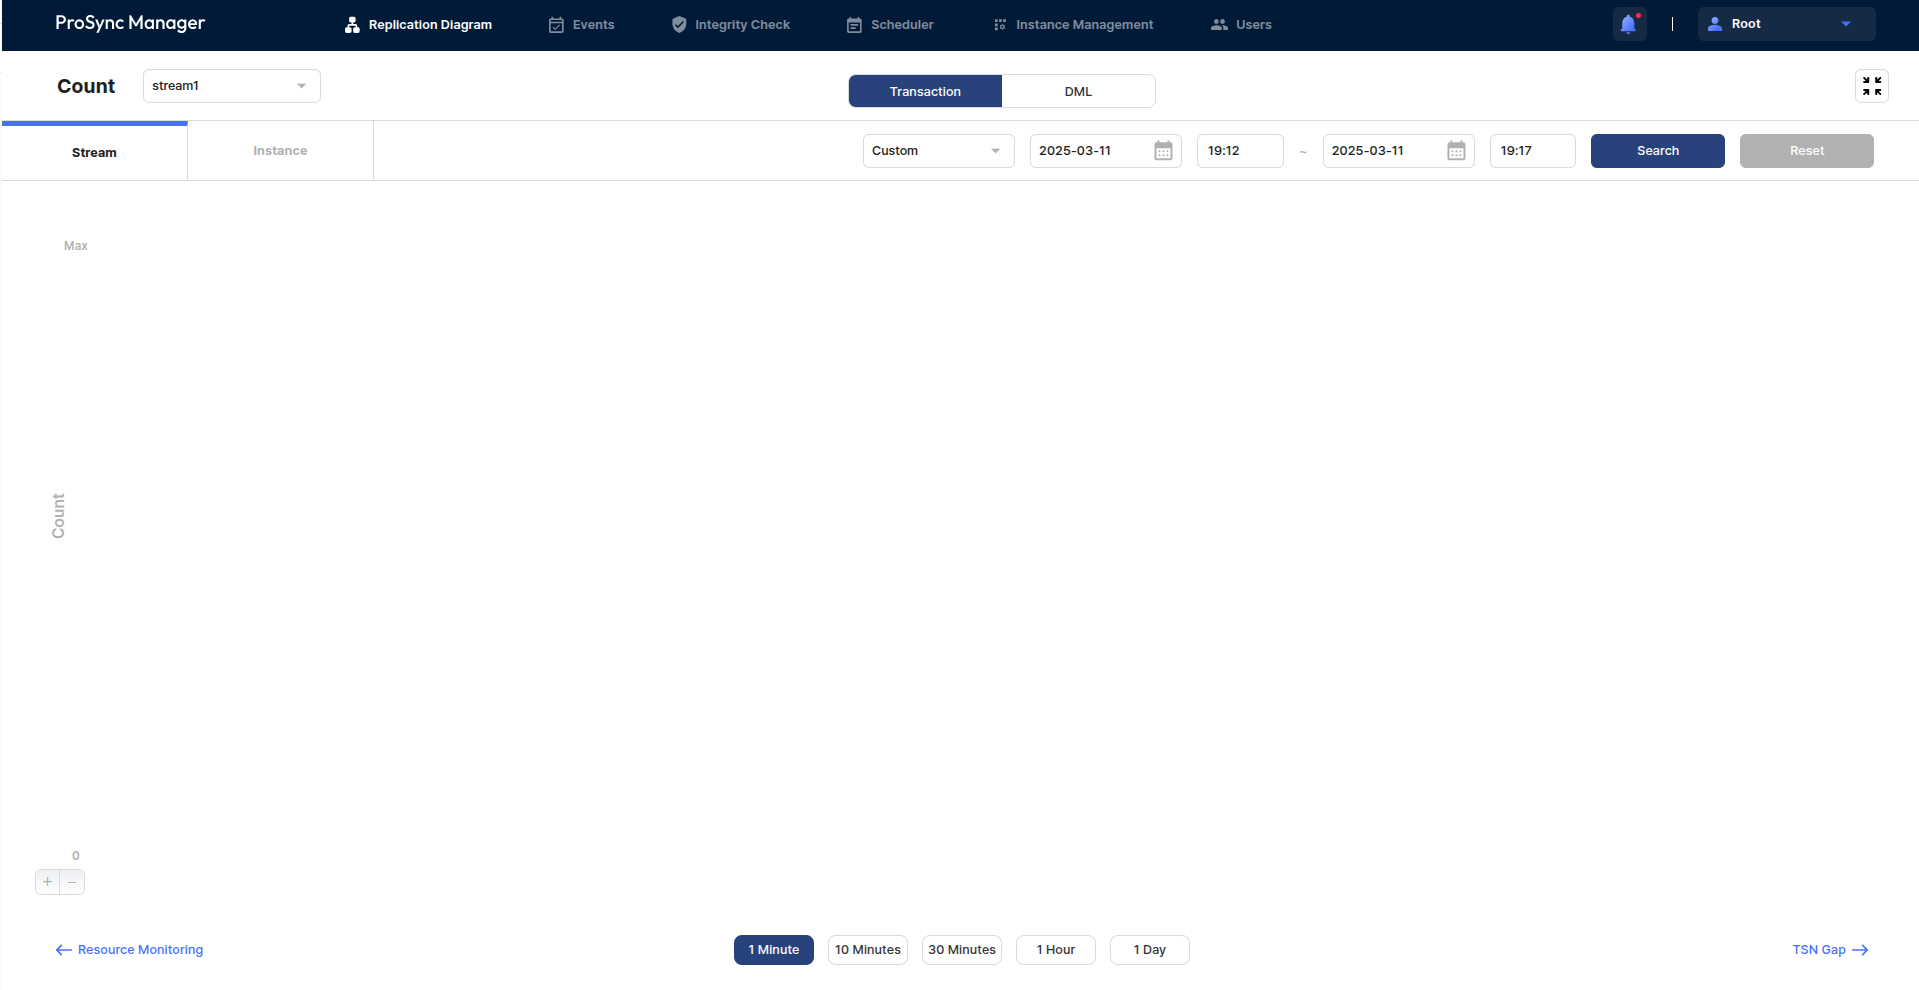
The users can see the number of transactions and DMLs that occurred during a ProSync synchronization.
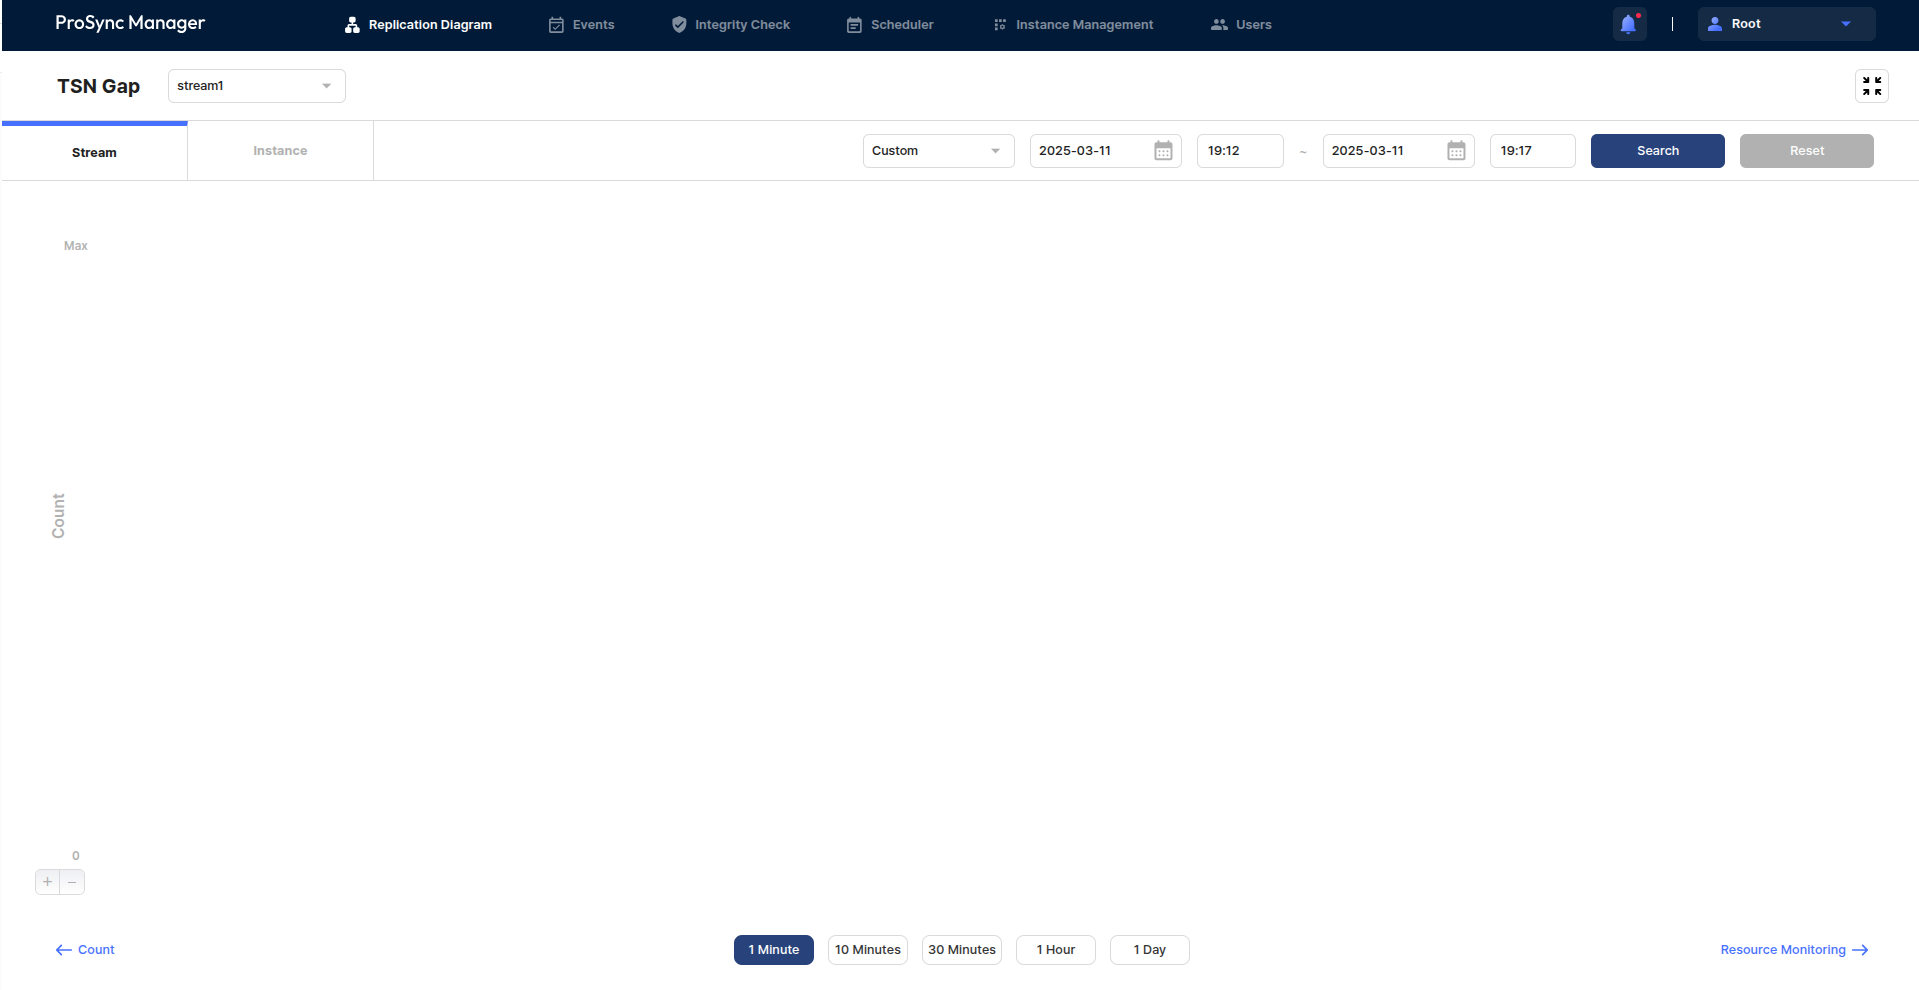
TSN Gap
The users can see the TSN Gap as ProSync progresses.
The Resource Monitoring chart is organized into the following main sections.
Select the type of resource the users want to view.
Select the unit whose resources the users want to view.
When selecting the Instance tab, the users need to select the Instance and Process type the users want to view.
Search by selecting the time period the users want to view.
The area where the Line Chart is drawn.
Select the interval Units for the x-Axis of a Line Chart.
Zoom in and out of the horizontal length of a Line Chart
The Count chart is organized into the following main sections.
Select the type of count the users want to view.
Select the unit for which the users want to view resources.
When selecting the Instance tab, the users need to select the Instance the users want to view.
Search by selecting the time period the users want to view.
The area where the Line Chart is drawn.
Select the interval Units for the x-Axis of a Line Chart.
Zoom in and out of the horizontal length of a Line Chart
The TSN Gap chart is organized into the following main sections
Select the unit for which the users want to view resources.
When selecting the Instance tab, the users need to select the Instance the users want to view.
Search by selecting the time period the users want to view.
The area where the Line Chart is drawn.
Select the interval Units for the x-Axis of a Line Chart.
Zoom in and out of the horizontal length of a Line Chart
Select the type of the parameter the users want to set.
In this case, for Static parameters, the Instance must be restarted after the value change for the changed value to take effect.
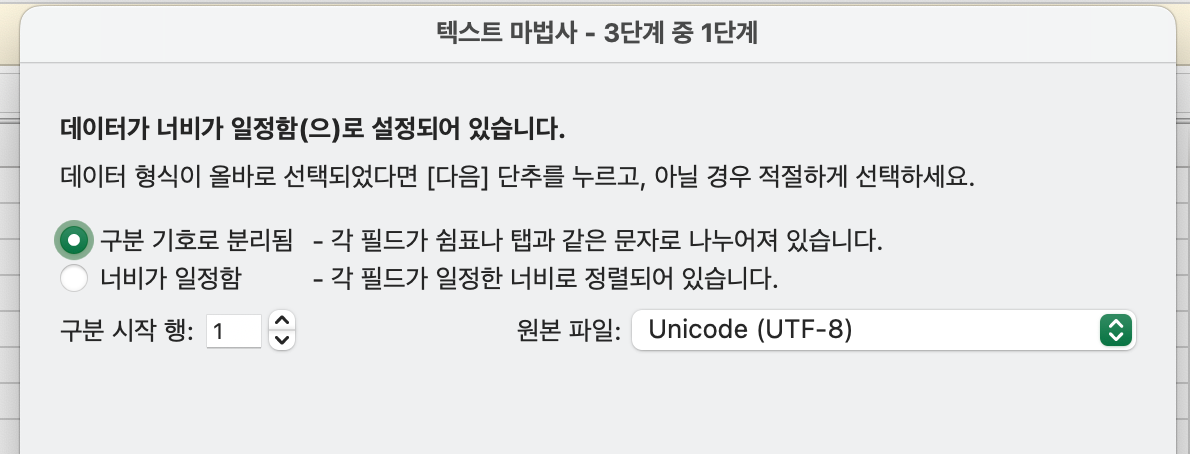
The users can save the parameter settings to a .csv file, or load a .csv file to set the values.
The users can check and set the parameter corresponding to the selected Stream / Instance, Process, and Type.
Parameter Setting modal
Select Stream or Instance, Process
Select Parameter type
Download and Load
Parameter setting area
Note
When selecting Stream, setting common values for child instances is only available.
The users can zoom in and out of the Replication Graph for easy viewing.
The users can see how much the users're zoomed in and out by using the Scale in the bottom right corner.
When the users select a diagram from the Replication Diagram List, it combines the information of all streams in the diagram and draws a graph.
Depending on the direction of the arrow, the source DB and target DB are separated, and each DB information can be viewed as a node in the graph.
One Line is matched with one Stream, and the Line color indicates the status of the Stream.
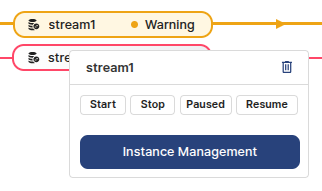
Clicking on the Stream area of a Line will bring up the Stream Box, which gives the users the ability to name, delete, and change the status of that Stream, as well as navigate to the Instance Management page.
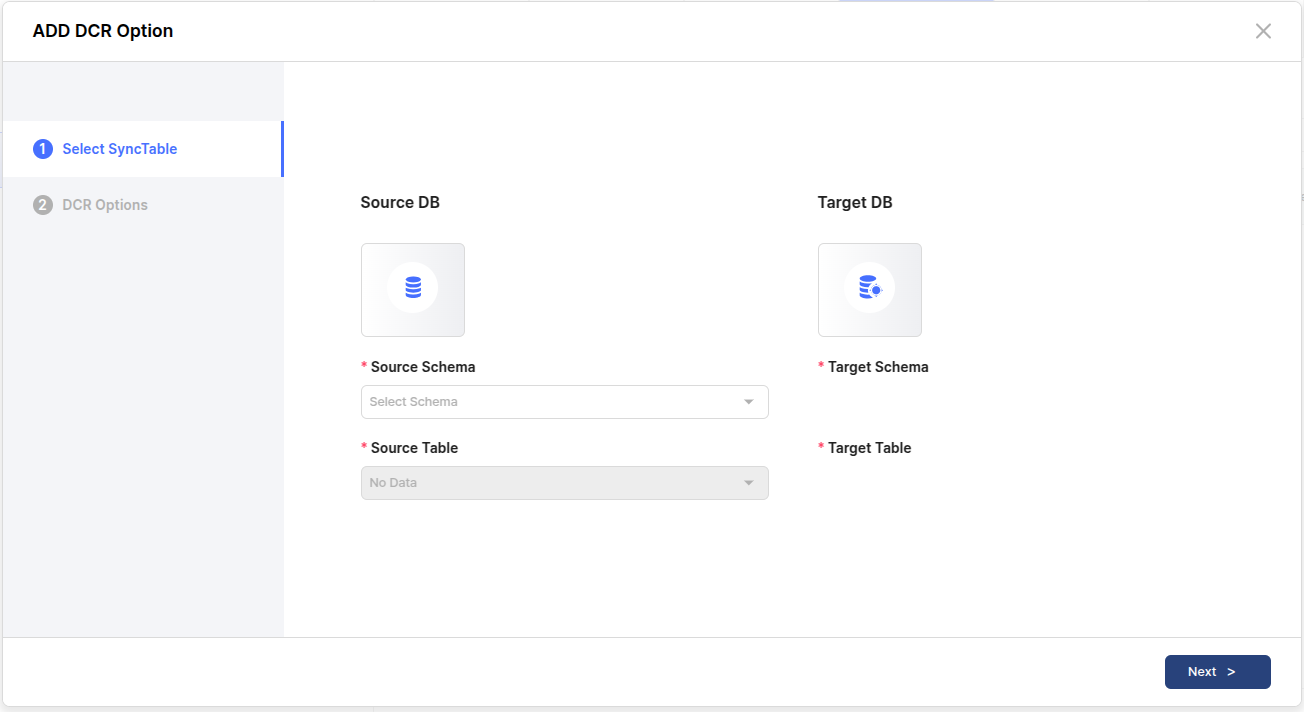
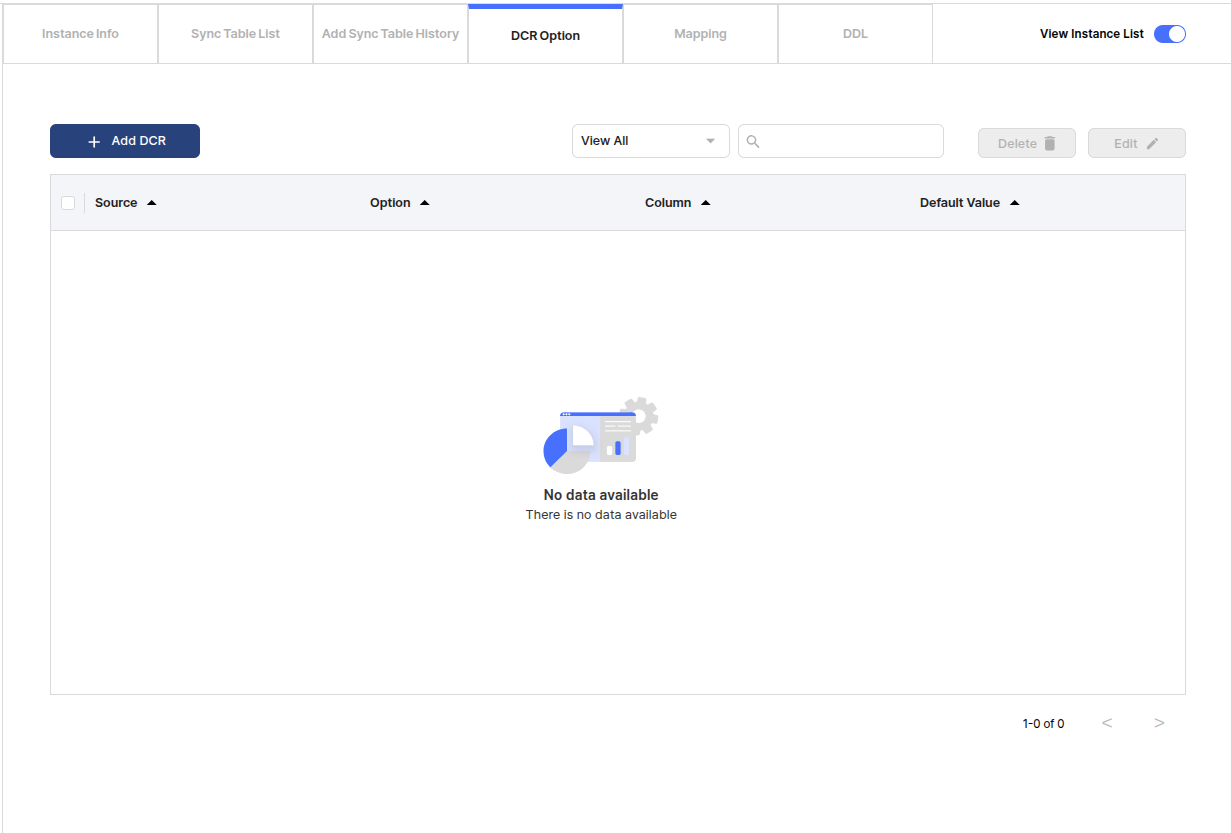
The users can see which DCR options are set for that instance.
Add DCR
The users can set additional DCR options. In this case, the target is a table that has been added to the list of synchronized tables.
Search, delete abd edit
The users can search by filtering the items the users want to search for.
The users can remove or modify the DCR option.
The users can see a list of DCR options.
Item
Description
Among the tables specified as synchronization target tables, select the table for which the users want to set DCR Option based on the Source DB.
Set DCR Options.
Item
Description
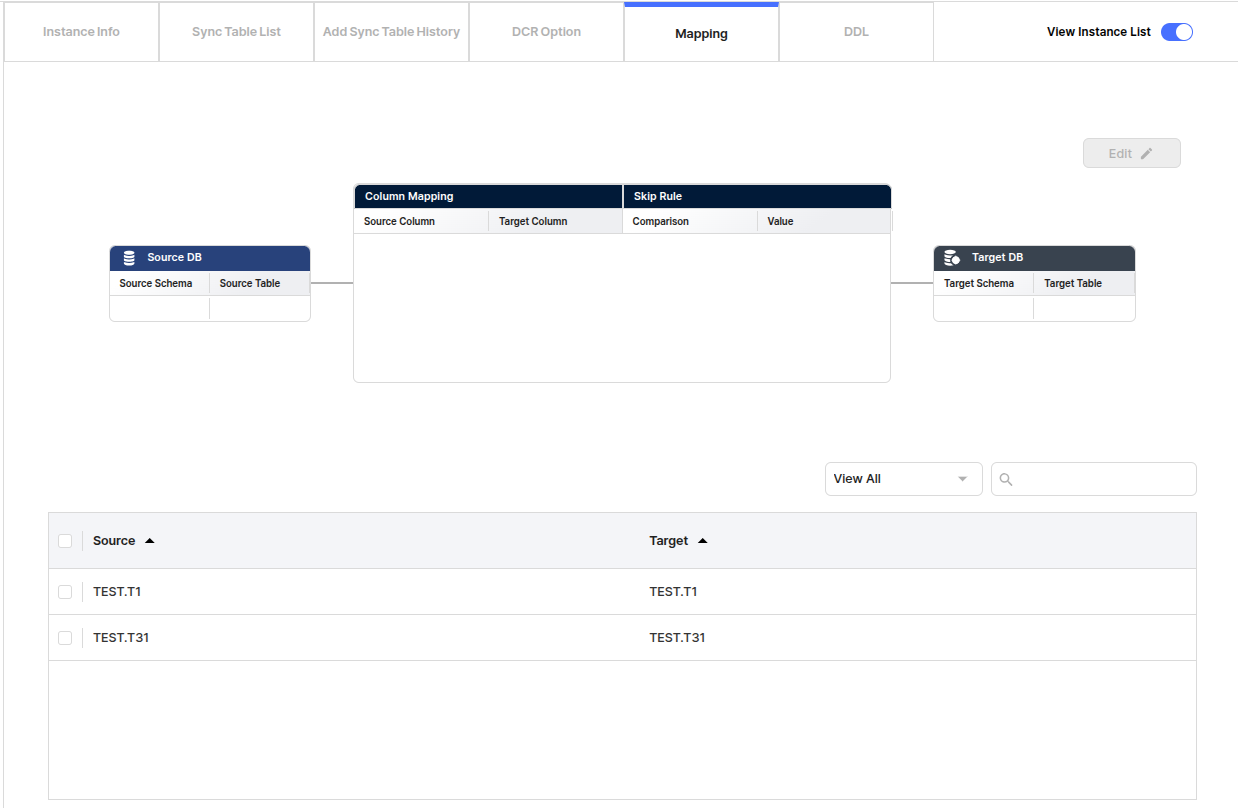
Mapping
Mapping area
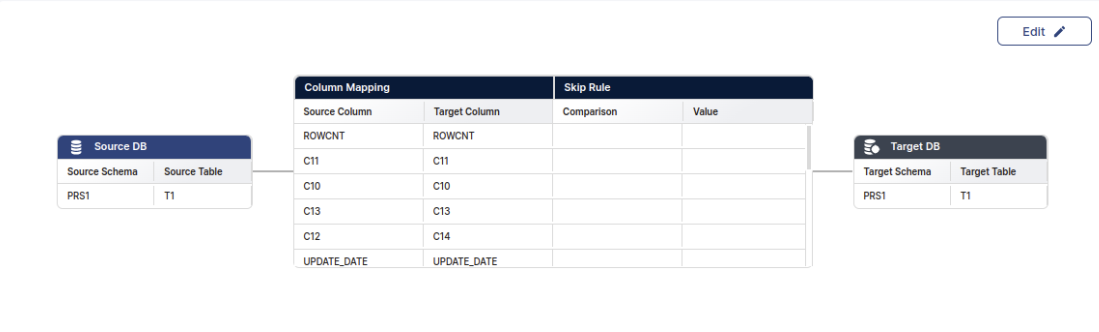
The users can check the Mapping Rule in the list of synchronization tables.
Mapping Rule confirmation area and Edit
The users can view or edit the Mapping Rule applied to the table selected from the list of synchronized tables below.
As selecting multiple tables, the users can flip through them in order.
The users can search by filtering the items the users want to search for.
This is a list of tables registered in the synchronization table, and select the one the users want to check the detailed mapping rule.
The users can check the details of the Mapping Rule settings.
Item
Description
Set up a Target Schema and Table to set up a Mapping Rule based on the Source Table.
Set up Column Mapping.
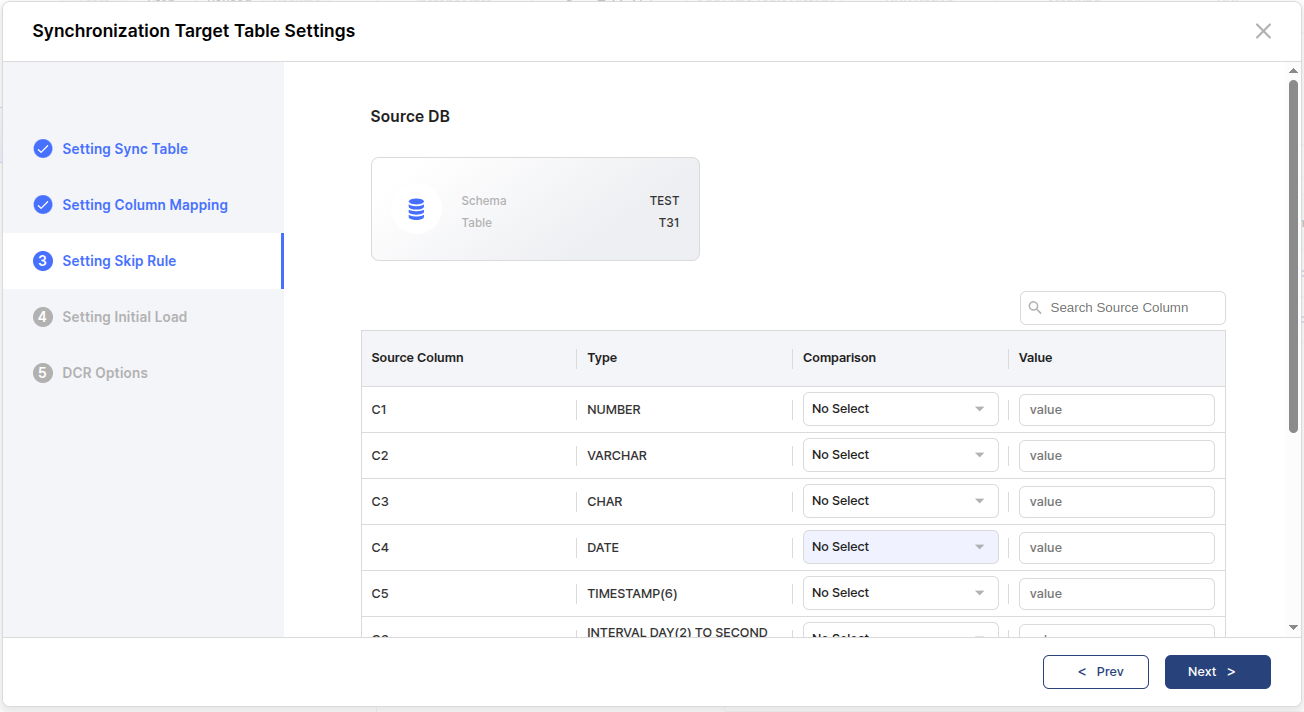
Set up Skip Rule.
Sync Table List
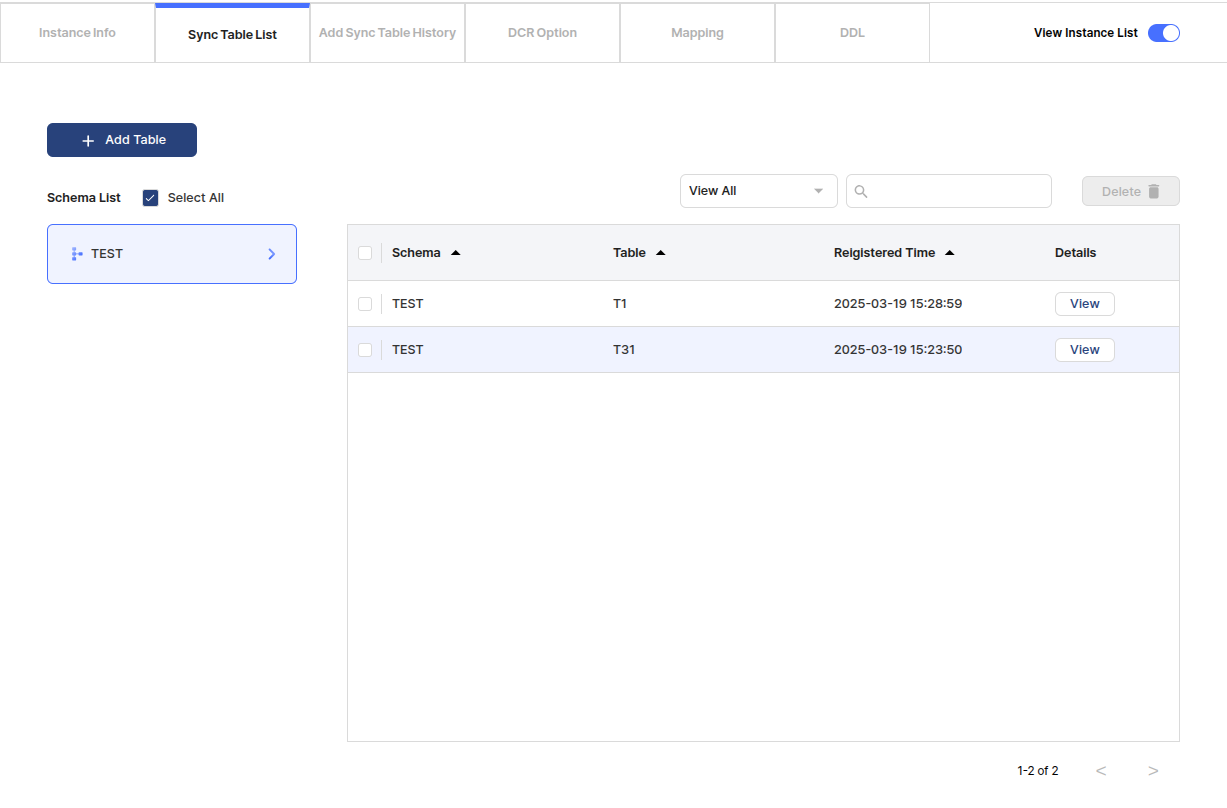
The users can check a list of tables that are synchronized for this instance.
A modal appears that allows the users to dynamically add synchronization tables.
The users can check the schema of a table that is registered as a synchronized table.
DDL
The users can set DDL synchronization options.
The users can set DDL synchronization options for synchronization tables.
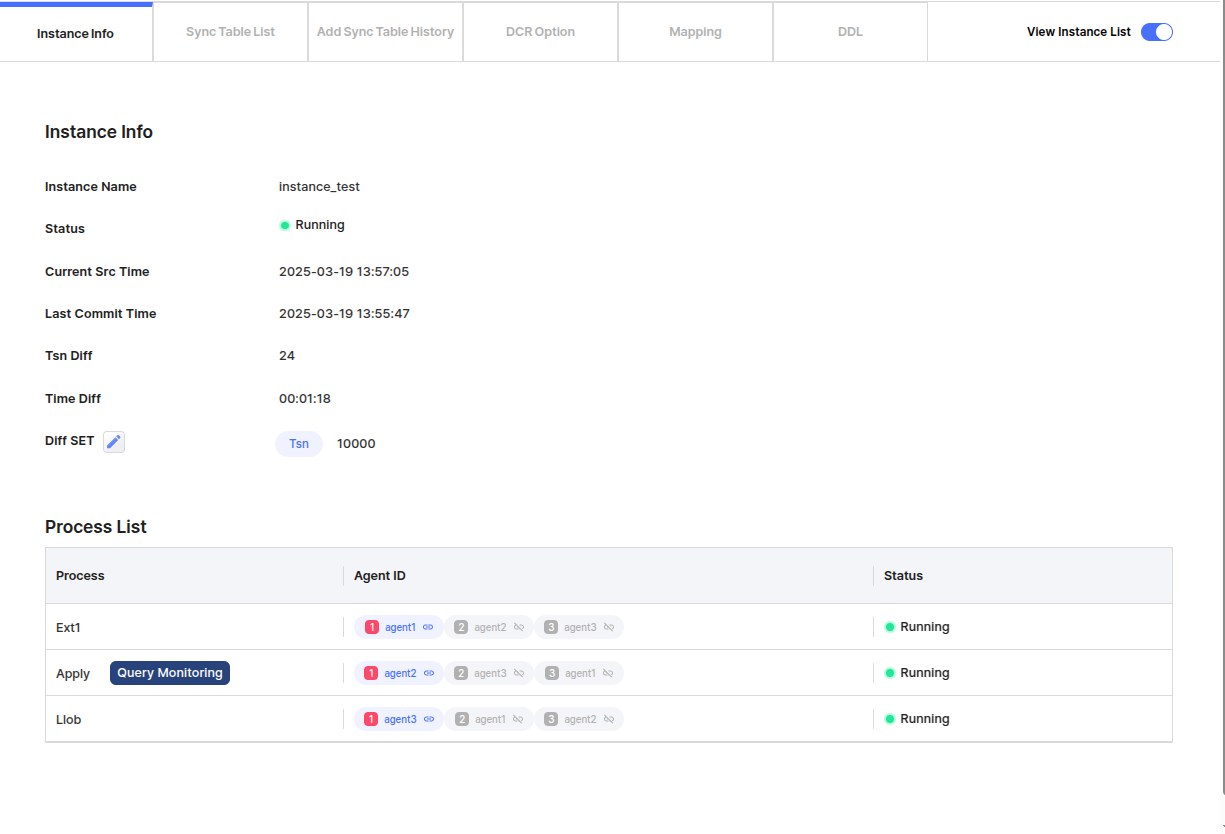
Instance Info
This is the area where the users can check the information of the selected Instance in the Instance list.
The users can view the details of that instance.
Item
Description
Default value
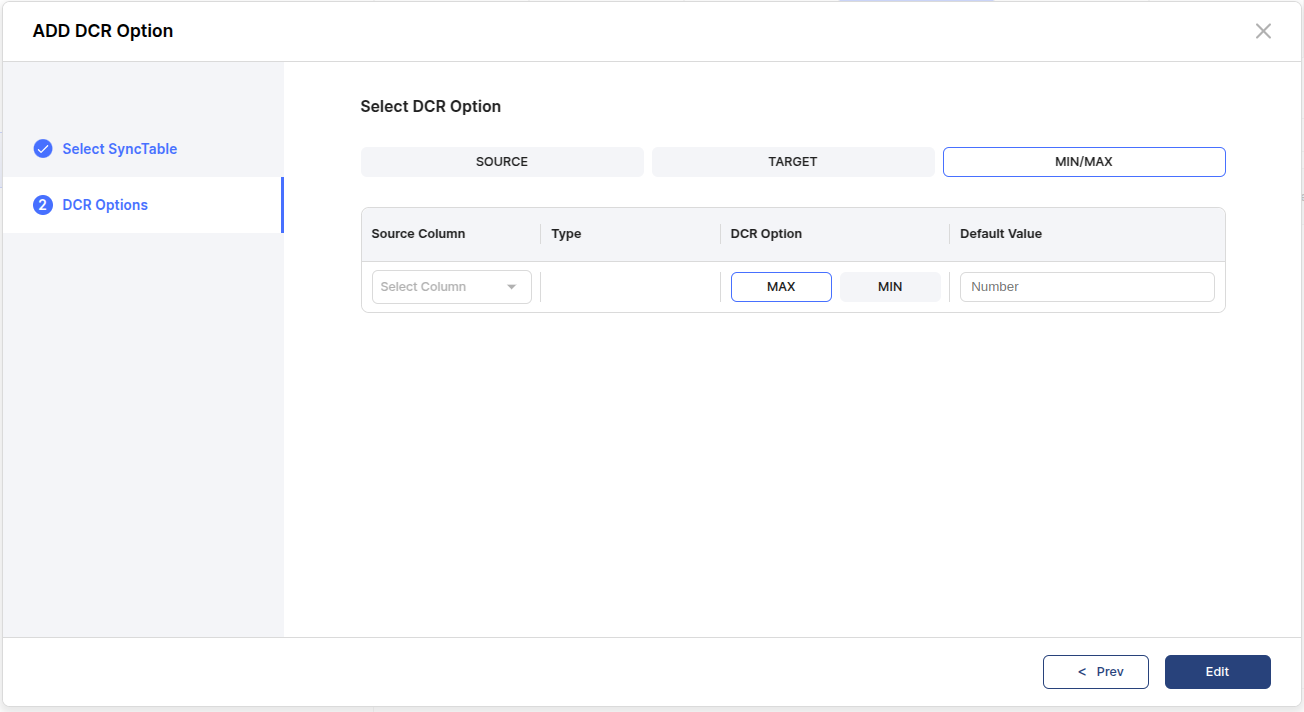
Default value set when MIN/MAX option is set.
Default Value
The value to be treated as default if the column value is Null in the row where the conflict occurs.
Source
Source Database's Schema.Table.
Option
The DCR Option that is set.
Column
DCR Option set information. SOURCE/TARGET If it is an option, it is meaningless, so nothing is described.
Source Column
Select a column of the Source table to set as DCR Option.
Type
The type of the column selected in Source Column.
DCR Option
MIN : Synchronize with the MIN value of the column value of the two rows where the conflict occurs.
MAX : Synchronize with the MAX value of the column value of the two rows where the conflict occurs.
DCR list
DCR Option example
Add DCR Option
1. Select Sync Table
Caution
If the primary key does not exist in the table to set, the users cannot set it.
2. DCR Options
MIN/MAX option selection
Target DB
Source Schema and Table.
Edit
The users can edit the corresponding Mapping Rule based on the Source Table.
Source DB
Source Schema and Table
Column Mapping
Checks the source and target column names for which Column Mapping is set.
Skip Rule
Checks the comparison and value for which Skip Rule is set.
The users can check the comparison and value for which the Skip Rule is set.
They are displayed with the column name in the Column Mapping area.
Search
Synchronization table List
Mapping example
View the detailed Mapping Rule
Mapping Edit
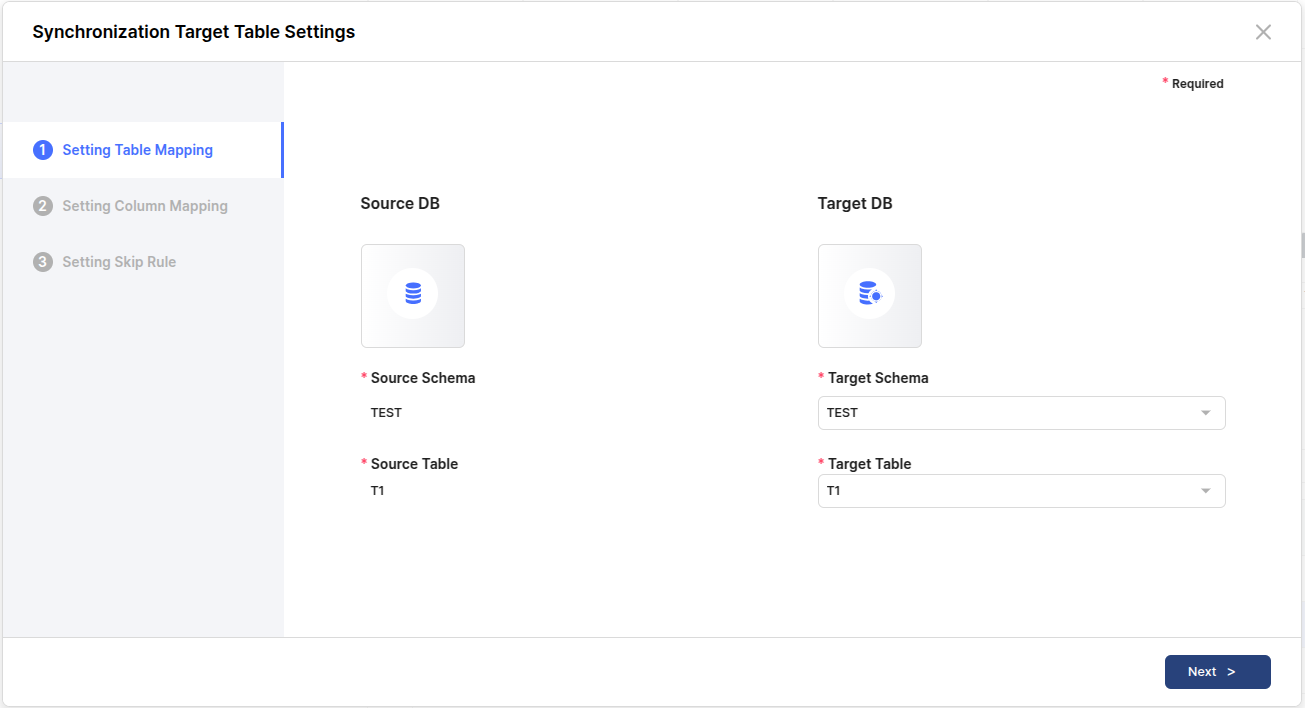
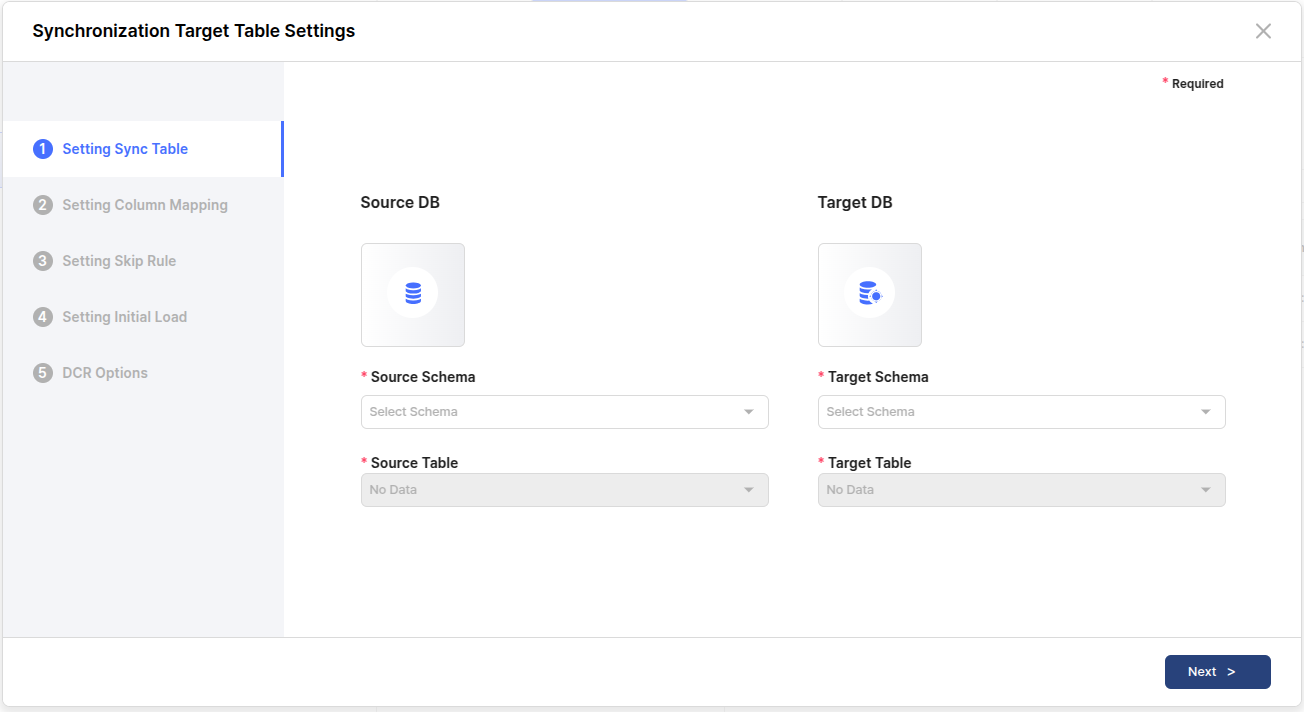
1. Setting Table Mapping
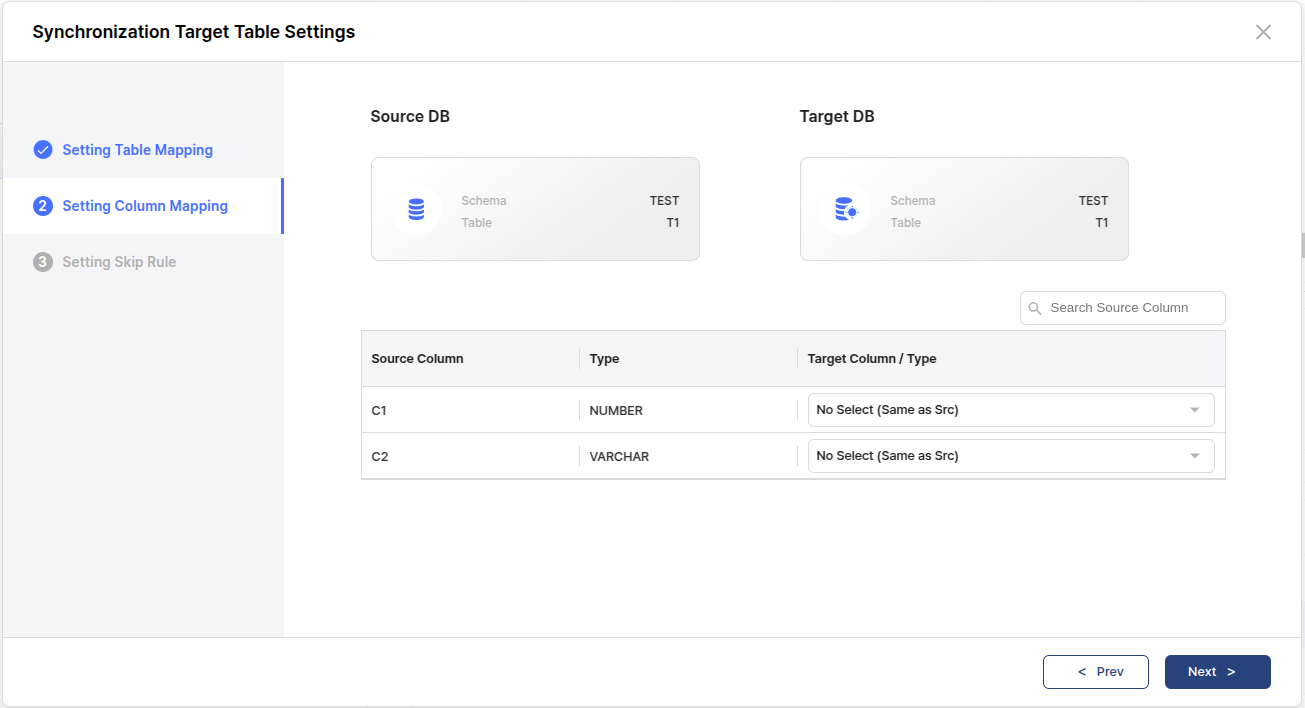
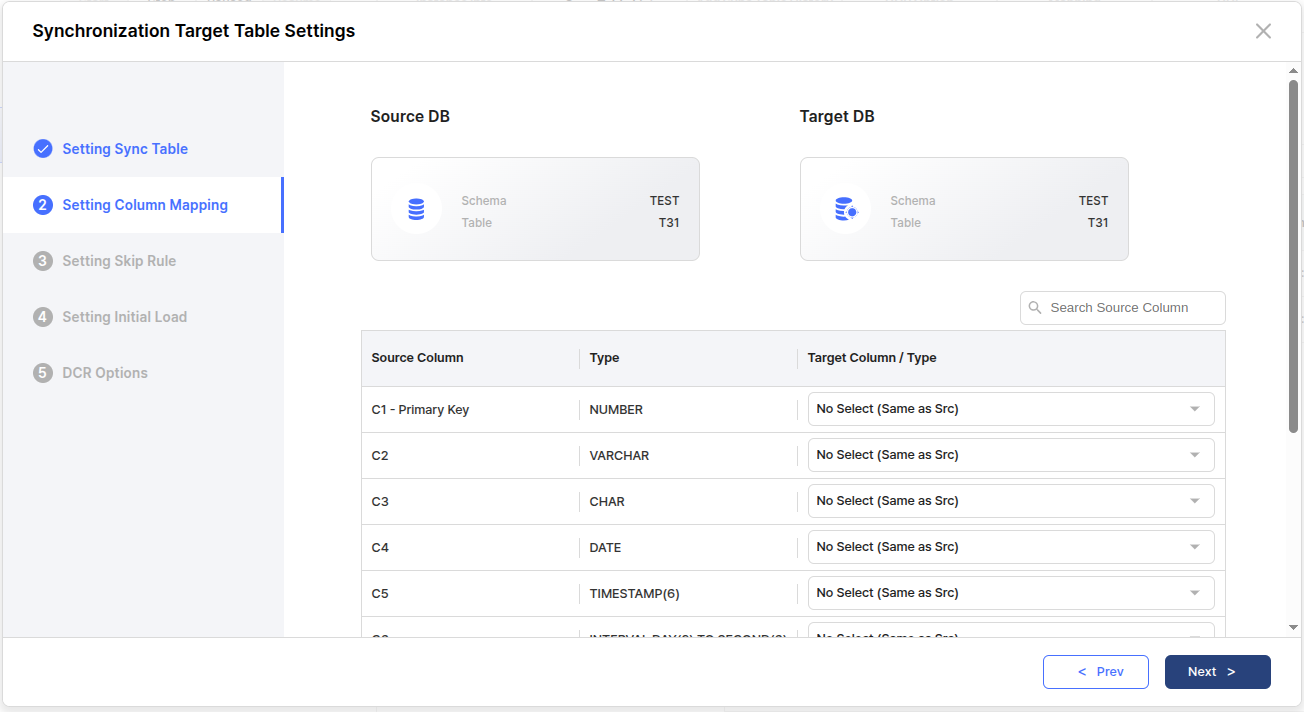
2. Setting Column Mapping
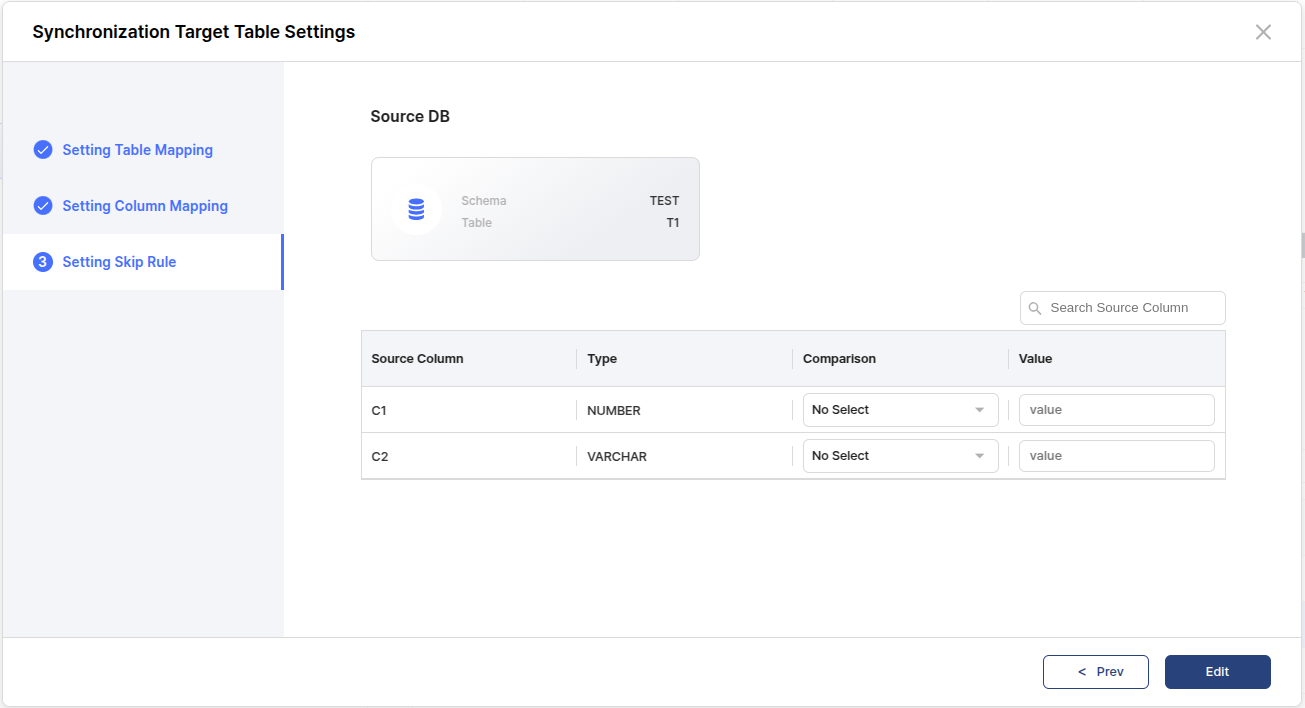
3. Setting Skip Rule
The users can filter Schema list to check a list of synchronized tables.
The users can search by filtering the items the users want to search for.
The users can remove it from the synchronization table.
The users can check a list of tables that are registered as synchronized tables.
Item
Description
Schema
The Schema of the table.
Table
The name of the table.
Registered Time
The time when the table was registered.
Select the Schema and Table in each DB that the users want to set the synchronization target table.
The users can set up Column Mapping for a synchronized table.
By default, ProSync assumes that the columns in the source table and the columns in the target table have the same properties.
If there are attributes that don't match, such as different column names, or if there are columns to exclude from synchronization, the users can specify them explicitly at that stage.
The users can set a synchronization to skip depending on the value of one of the synchronization tables.
By default, ProSync synchronizes over all column values.
If there are values to skip based on columns in the synchronization, the users can set a condition with a comparison statement at that step.
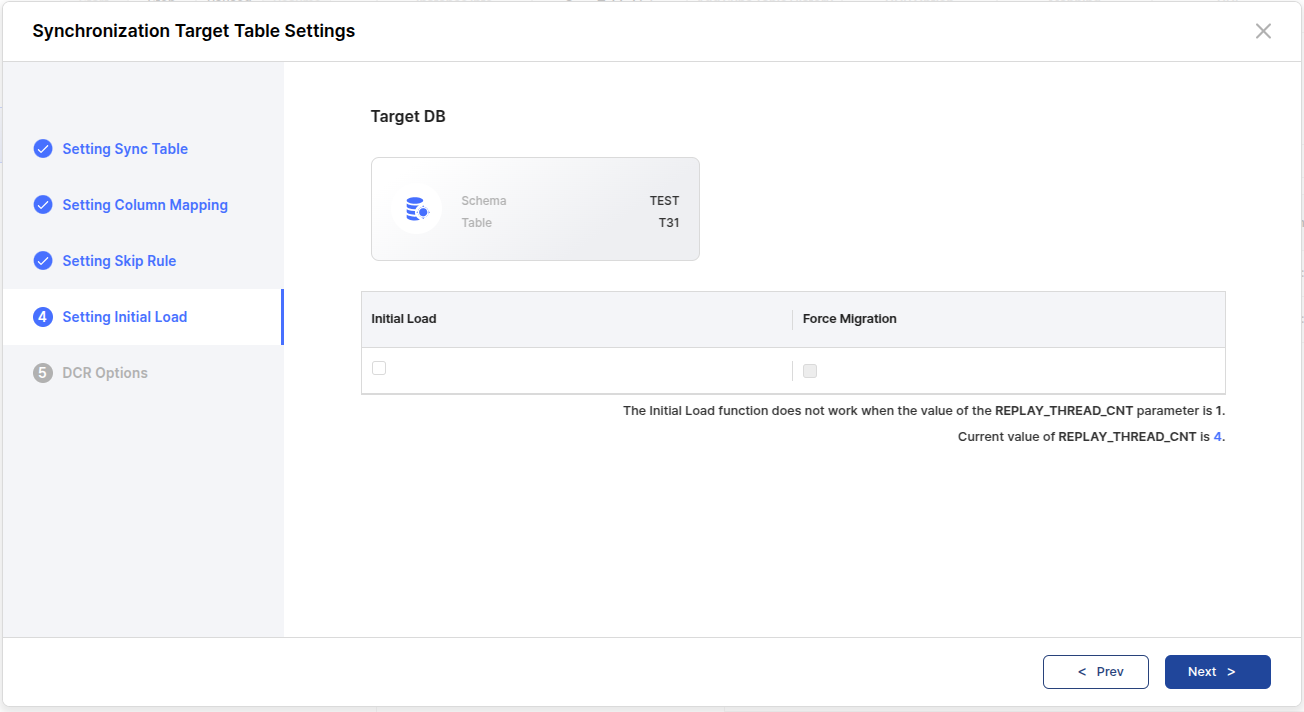
If the data exists in a table in Source, the users can set whether it is initially loaded or not.
Item
Description
Initial Load
Sets whether to initially load or not.
Force Migration
Truncates the data that exists in the Target table. Initial load requires that there is no data in the Target table, so the users should select this option if data exists in the Target table.
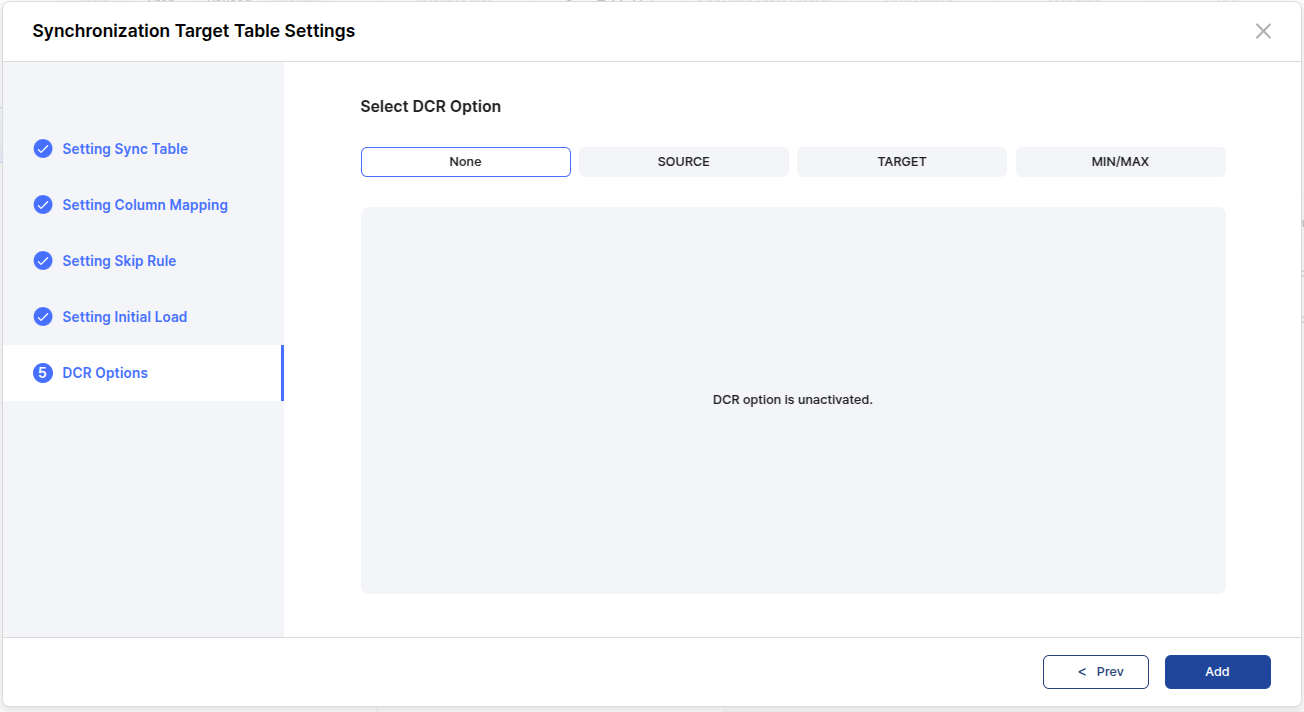
The users can set DCR options to resolve conflicts in data during ProSync two-way synchronization.
For more information, refer to the "ProSync manual".
Item
Description
None
DCR option is not set.
SOURCE
Sets the DCR option based on the Source Table.
TARGET
Sets the DCR option based on the Target Table.
Sync Table List area
Add Table button
Schema List
Search and Delete
Table List
Sync Table List example
Add Table
1. Setting Sync Table
2. Setting Column Mapping
Note
If the column is a Key Column, it cannot be specified as EXCEPT.
3. Setting Skip Rule
Note
The Comparison selection range may vary depending on the Column Type, and the users cannot set the Skip Rule if the users specified Column Mapping in the previous step.
4. Setting Initial Load
Note
Initial loading has the following limitations.
Not supported if Target DB is Oracle.
5. DCR Options
The users can search by filtering the items the users want to search for.
The users can remove and edit DDL options.
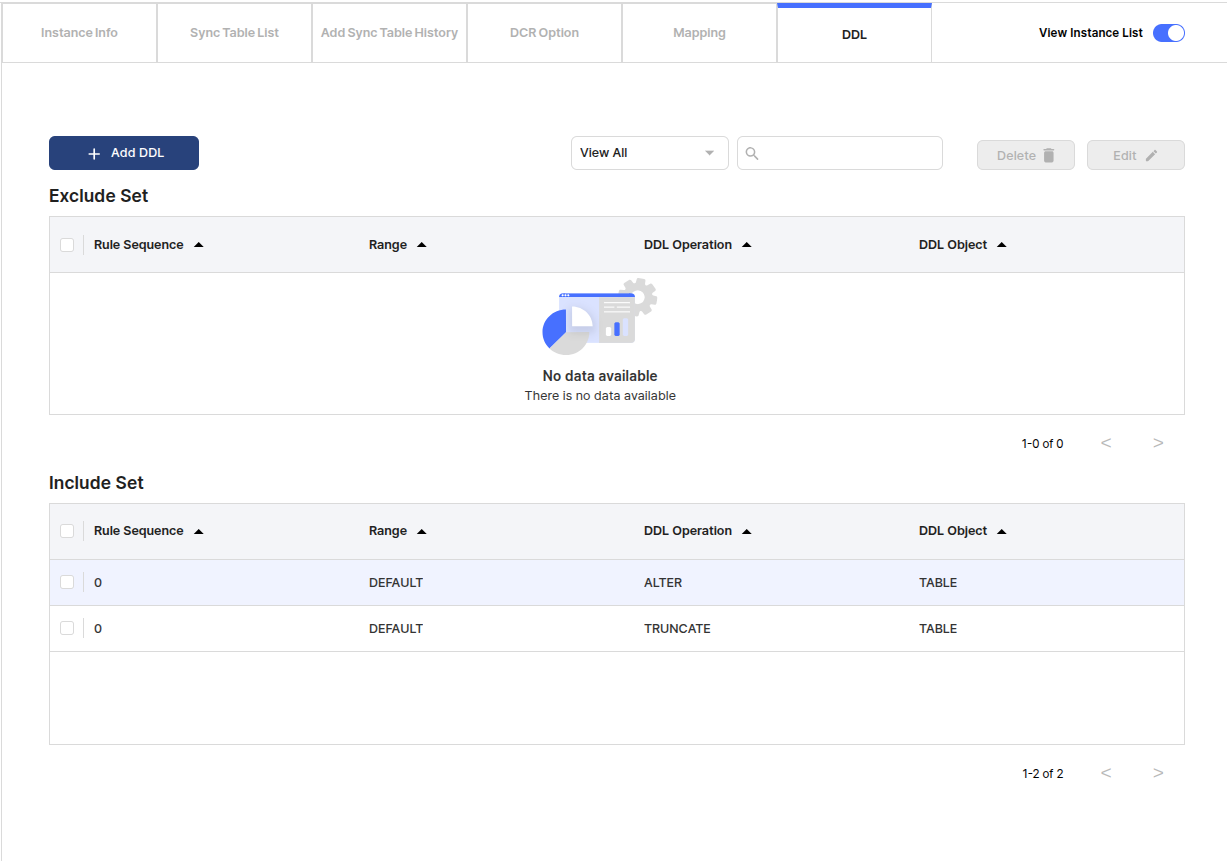
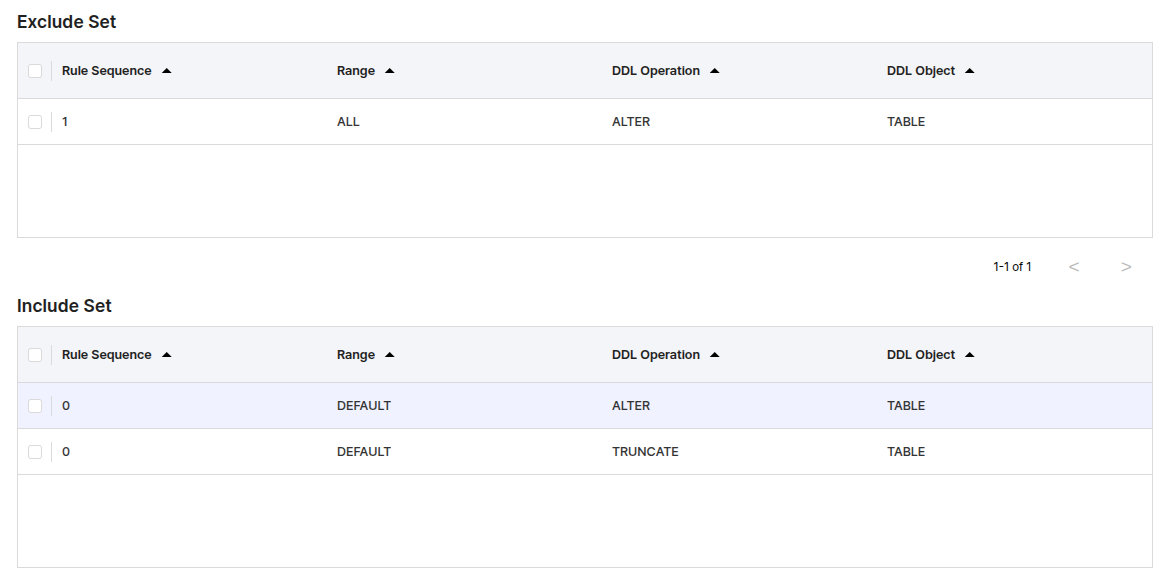
A list of options to exclude from synchronization during DDL.
A list of options to include in synchronization during DDL.
By default, ALTER TABLE, TRUNCATE TABLE DDL synchronization is performed for the synchronization table (DEFAULT).
Item
Description
Rule Sequence
The sequence number for the rule, and the DDL rule is applied in that order.
Range
The Range to which the DDL rule is applied.
ALL: Applies to all schemas and tables in the Source DB regardless of synchronization.
DEFAULT: Applies to all tables registered in the synchronization table.
CUSTOM: This option is used to specify a table directly.
DDL Operation
DDL commands such as ALTER, CREATE, and DROP
Exclude Set and Include Set appear to be separate options, but in the ProSync engine they are written as a single string and are applied in the order they are written.
Therefore, the Rule Sequence entry exists to distinguish the order in which the options are applied.
Rule Sequence example
In the above example, the ALL Range and DEFAULT Range of the Exclude Set are checked for ALTER TABLE.
In this case, the Rule Sequence has priority because the ALTER TABLE in the DEFAULT range of the Include set is lower, and the ALTER TABLE in the ALL range of the Exclude Set is not synchronized.
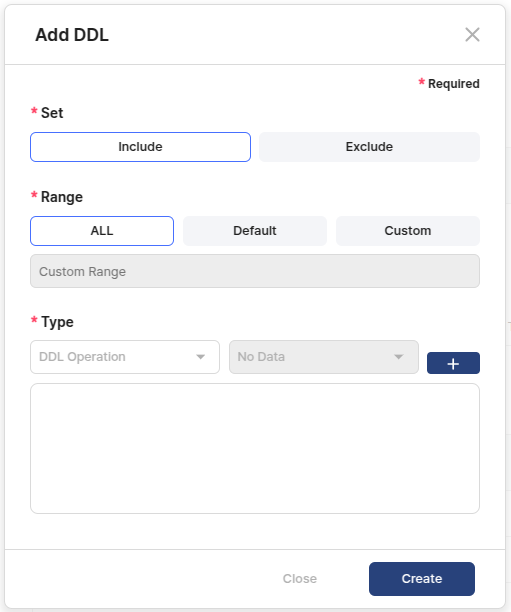
The users can set additional DDL options.
Item
Description
Set
Include or Exclude settings.
Range
Select the range of DDL occurrence.
Type
Select the type of DDL command and the target Object of the command.
The users can add multiple Types by clicking the Add button next to it.
In this case, the Rule Sequence has the same value.
DDL area
ADD DDL
Search and delete/edit
Exclude Set
Include Set
DDL example
Rule Sequence
Add DDL
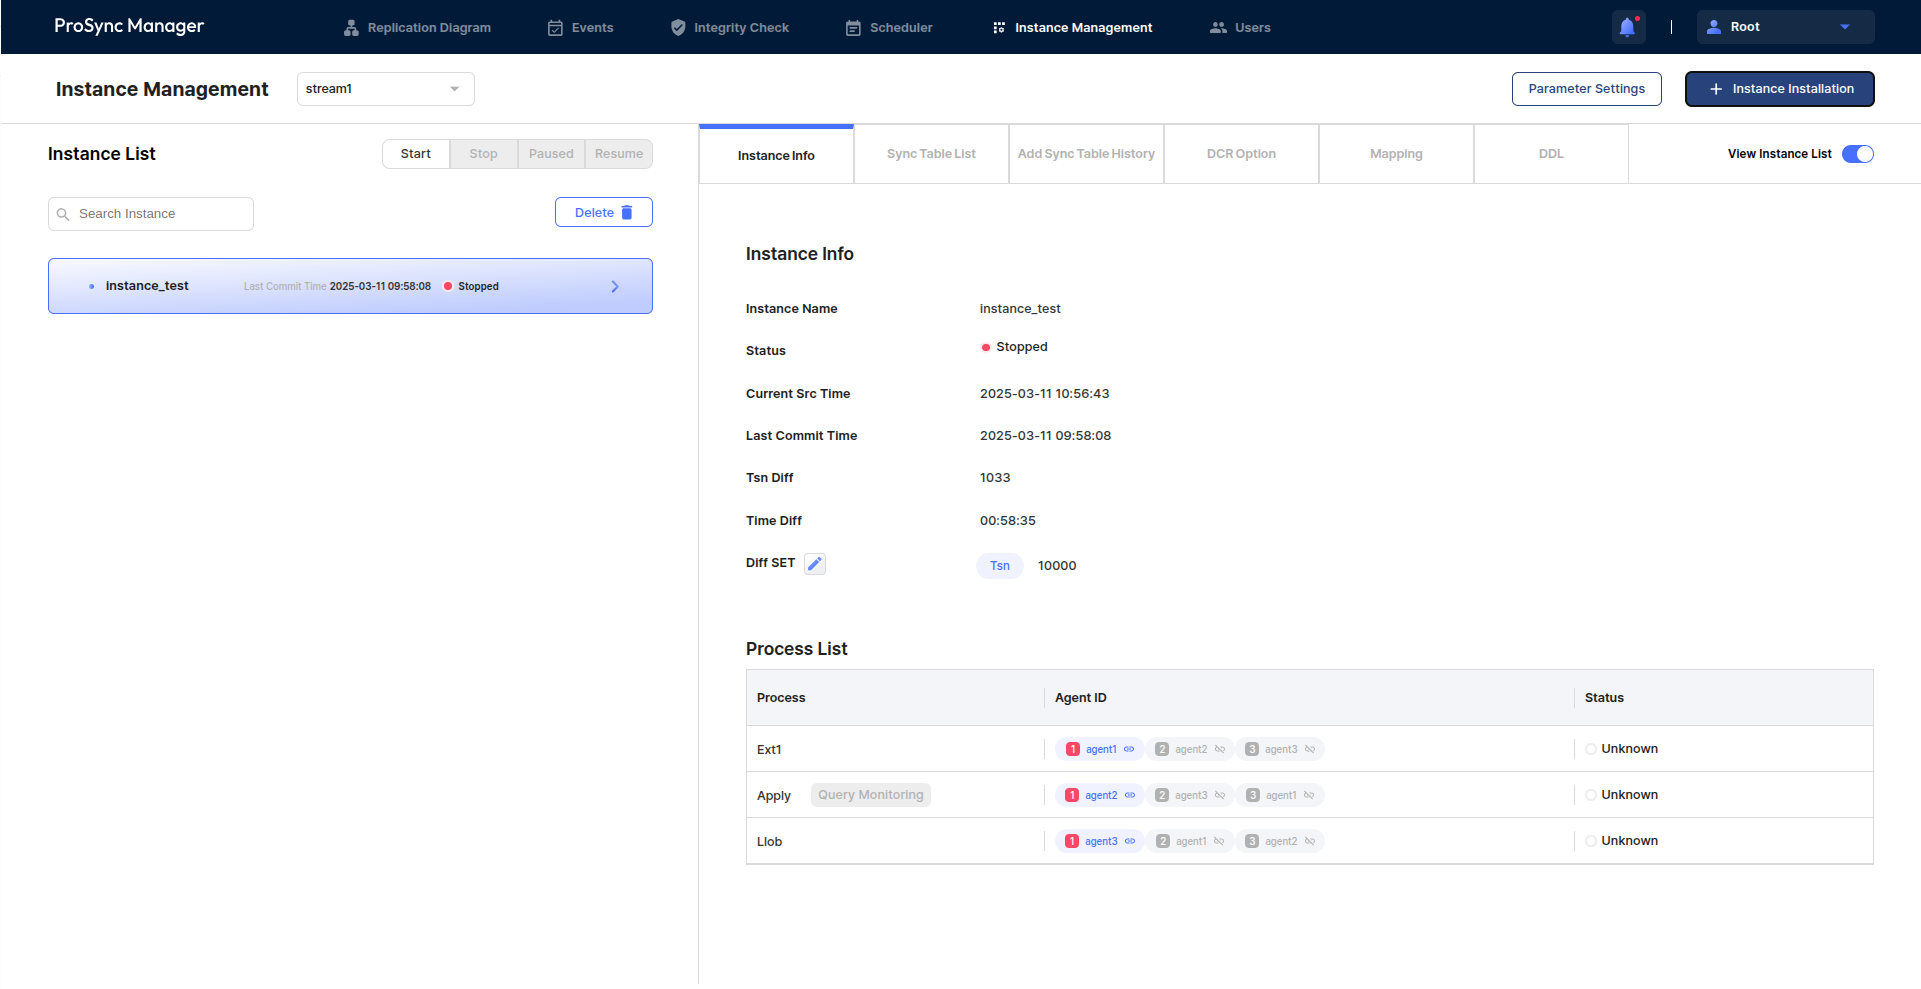
The name of the currently selected Instance.
Status
The status of the Instance.
Current Src Time
The TIMESTAMP change value for the current TSN.
Last Commit Time
The TIMESTAMP change value for the Src DB reference TSN of the transaction that was last reflected in the Target DB.
Tsn Diff
The difference between the current Src TSN and the Last Commit TSN.
Time Diff
The difference between the current Src Time and the Last Commit Time.
Diff SET
The threshold value that expresses Delay among the Status of the Instance. If the value of TSN/TIME DIFF exceeds the corresponding SET threshold, it becomes Delay status.
The users can view the processes, status, and query monitoring belonging to the instance.
Item
Description
Process
Process name.
The users can check the query that has been applied or is being applied by Query Monitoring.
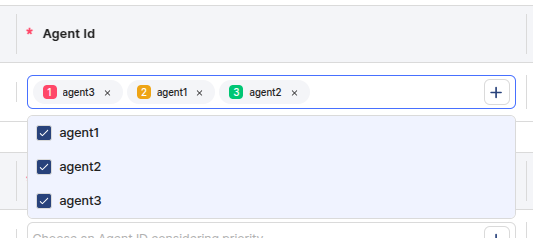
Agent ID
Indicates the agents connected to the process and candidate agents. Agents are currently connected, and if the agents cannot communicate, they are connected in the order the users set.
Status
The status of the process. Click each status to check the status of threads belonging to the process.
The users can modify the Diff SET criteria and values via the Edit button next to the Diff SET entry.
It can be set based on TSN or TIME, with values from 100 to 100000000 for TSN and from 1 Min to 100 Hours for TIME.
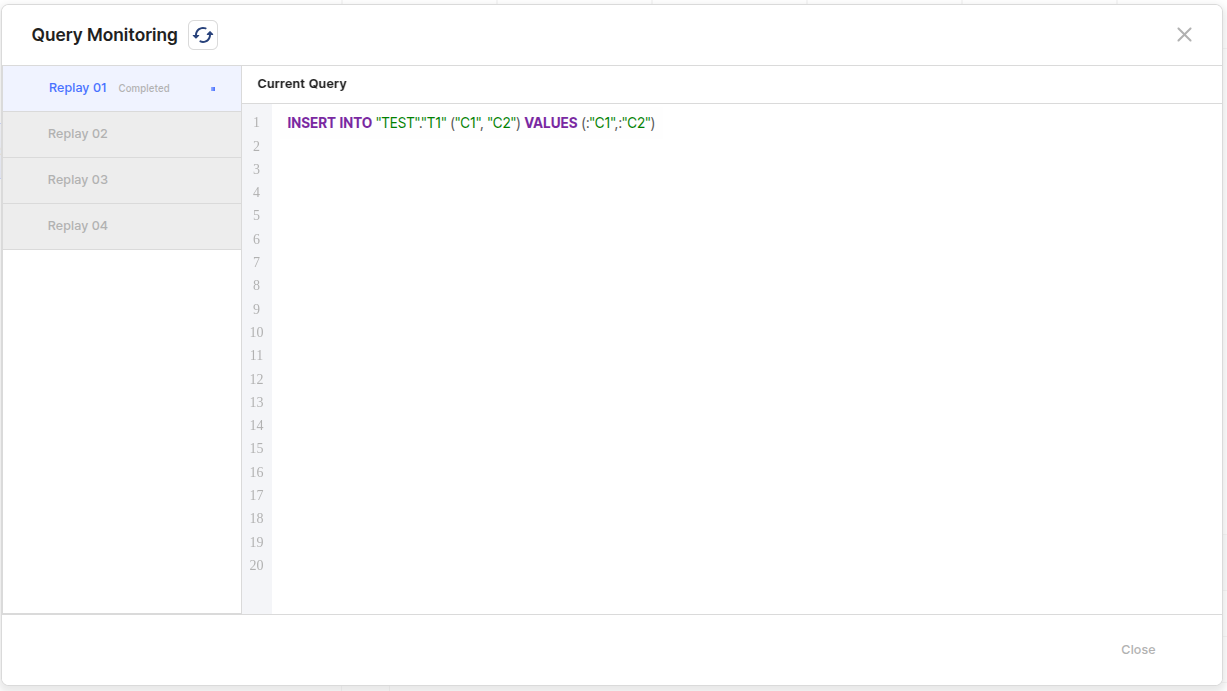
This modal allows the users to see which query statements are being applied by Apply, or have finished applying.
Item
Description
Thread name
It is a list of Replay Threads of Apply, and the list varies depending on the thread cnt setting.Thread statusIt can be checked only if the thread status is running or was running, that is, if the corresponding Replay thread has executed Query apply.
Time
Complete : The state of finishing Query apply.
HH:MM:SS : The current Query apply and the duration.
Code Block
Checks the Query statement applied by the corresponding Replay thread.
Instance Info area
Instance Info
Instance Name
Process List
Instance Info operation example
Diff SET setting
Query Monitoring
Users
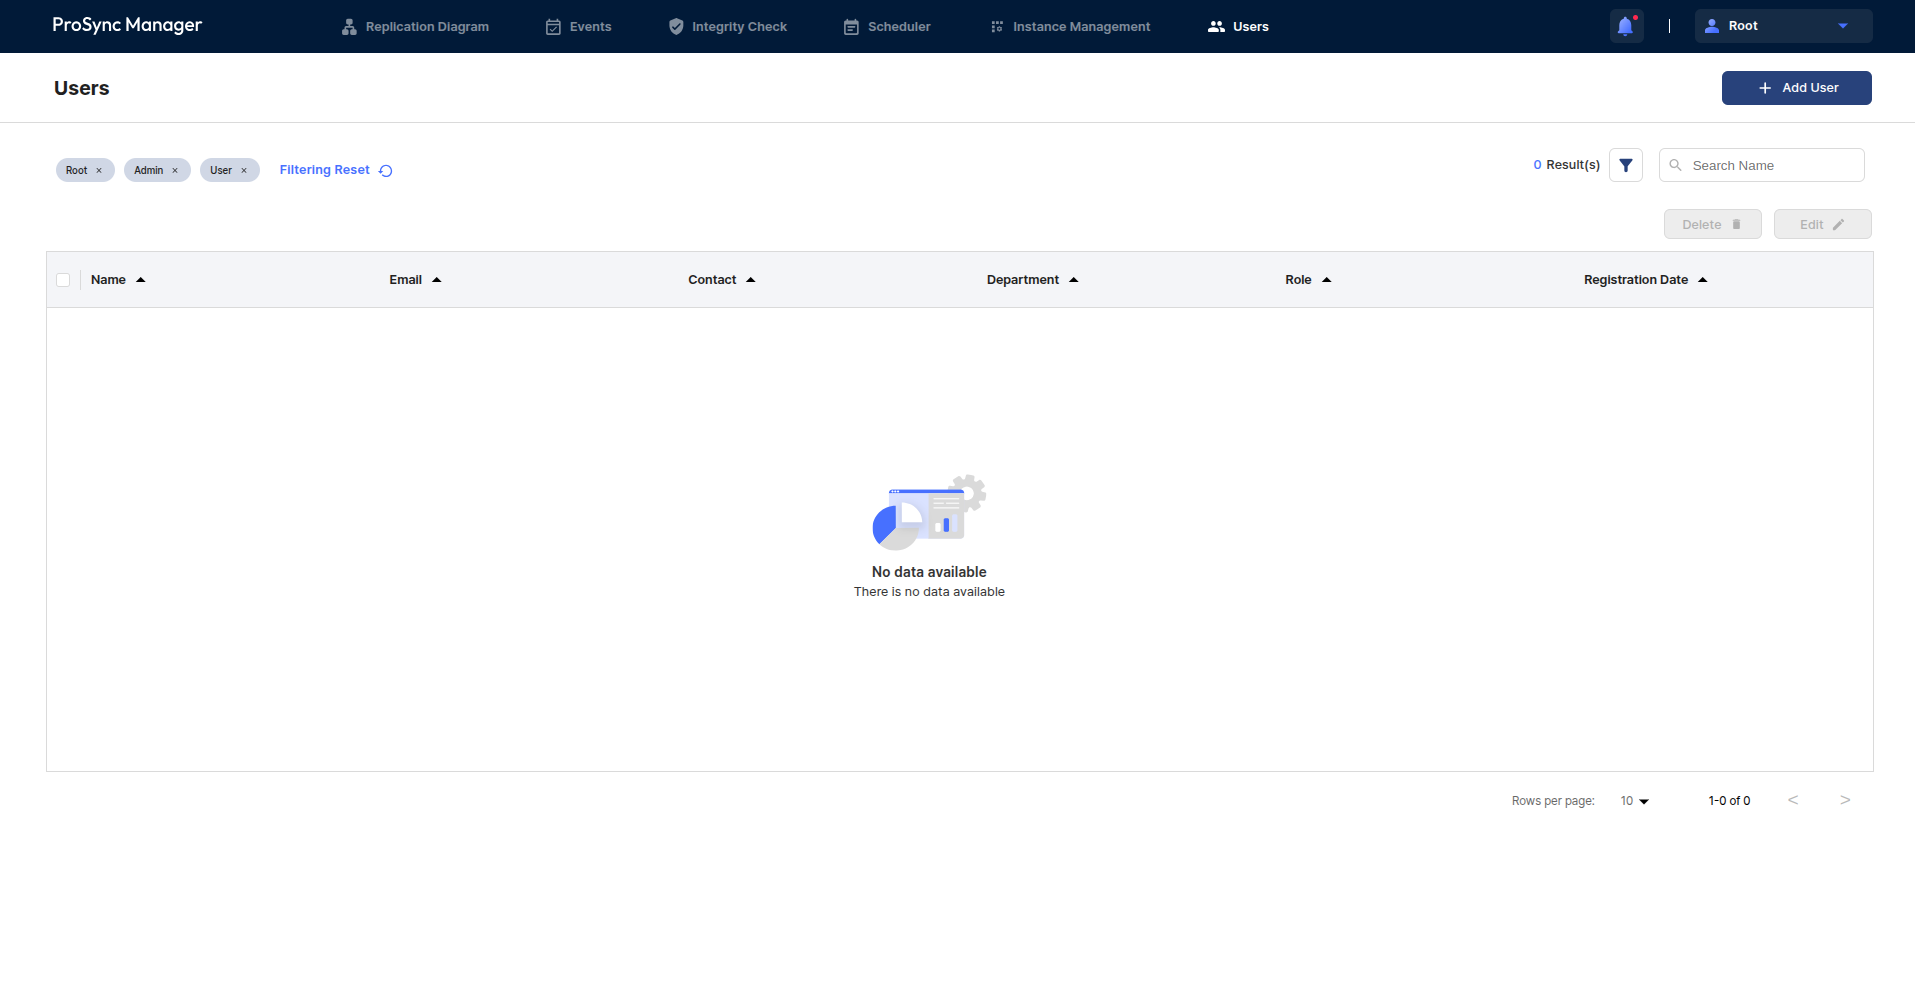
This section describes the users page, where the users can manage the users that will operate and use ProSync Manager.
The users can manage which users can run or use ProSync Manager, and this page is not accessible to users in the User Role.
The users can be added to manage and use ProSync Manager.
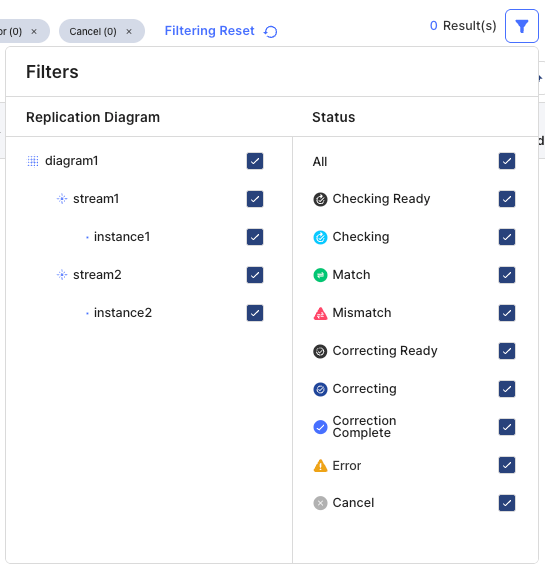
Filtering area
The users can search among the created Users by filtering by a specific Role and User Name.
The left side shows the items used for filtering, which can be removed from filtering via the x button to the right of each filter tag or reset with the Filtering Reset button. These items can be specified via the filter button on the right..
The registered users can be deleted and edited.
This is the table where the users can check the list with all filtering applied.
Item
Name
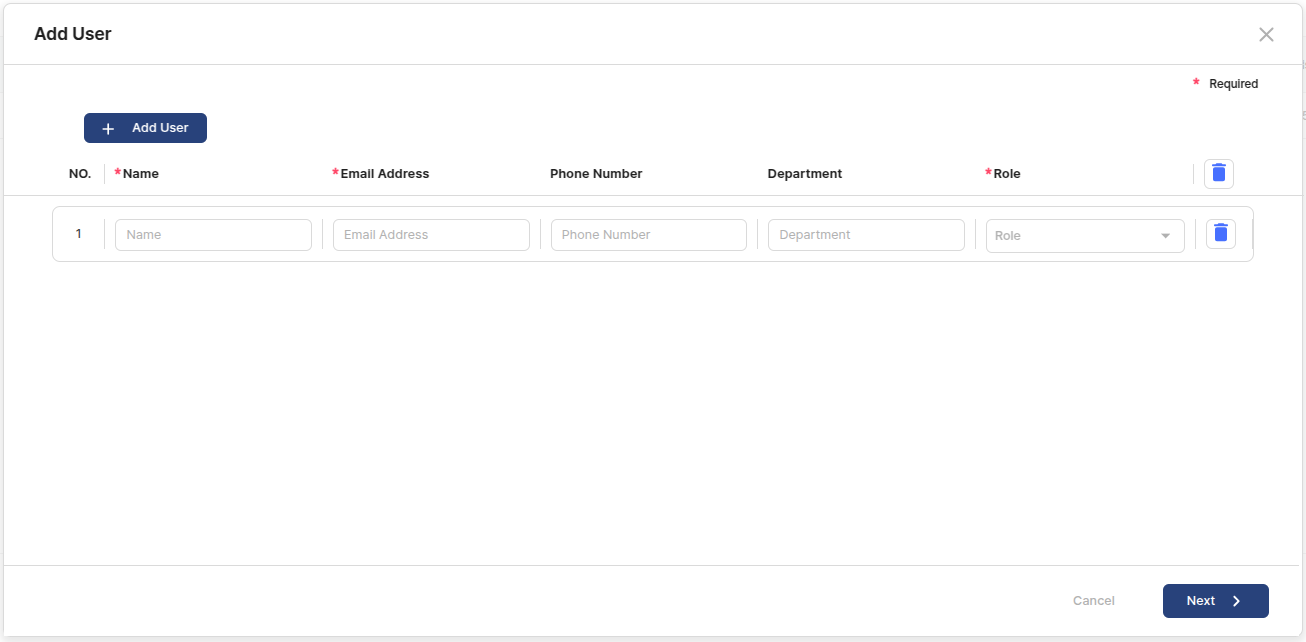
Add User
Enter the user information to register.
Item
Description
Required Item
The users can check the header of the list and the Delete button in each list.
The Delete button in the header resets the input and list count for all lists, and the Delete button in each list deletes the corresponding list.
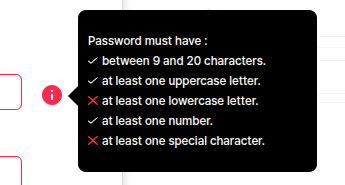
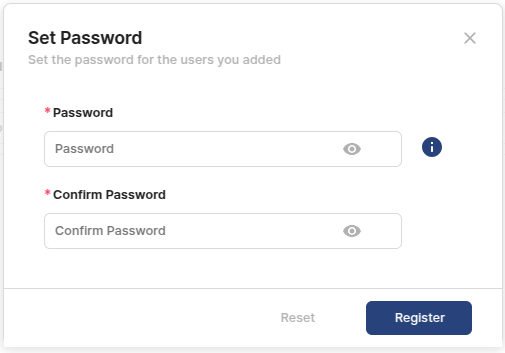
Set Password
Set the password for the user to add.
At this point, the users can check the conditions for setting the password via the info icon in the password field, and see which conditions are met and which are not.
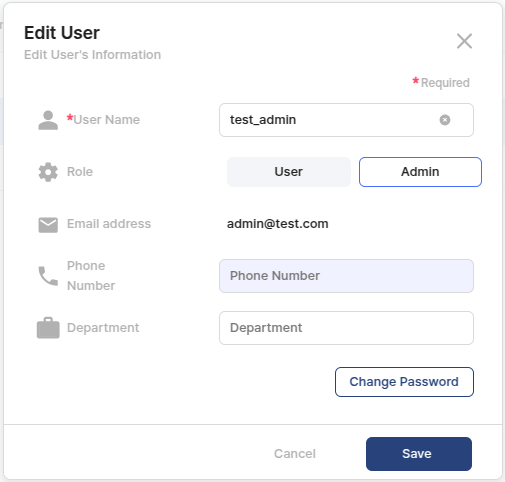
The users can edit the registered user information.
In this case, the email address cannot be editted but the user's password can be changed.
Installation requirements
1. Verify ProSync Manager configuration
When the users unzip the ProSync Manager deployment file, the following structure is shown.
Below are descriptions of the main files and directories found in the above structure.
ResetPassword.sh
This file initializes the password for the Root user used in ProSync Manager.
install.cfg
This is the configuration file used to install ProSync Manager.
install.sh
This is a shell script file for installing ProSync Manager.
logs
This is the directory where ProSync Manager leaves server logs.
prosyncmanager
File name
Description
server.xml
This is the file that defines the Connecter and Context of the Tomcat server that ProSync Manager will use.
tomcat_logs
This is the directory where Tomcat's logs used by ProSync Manager are left.
File name
Description
PRSMGR_HOME
Unzip the ProSync Manager binary and set it to the installation directory.
Registration for diagram and stream
Describes registering Diagrams and Streams.
Upon initial login, the users will see the Replication Diagram page.
At this point, the users can register a stream through the Stream Registration button in the top right corner.
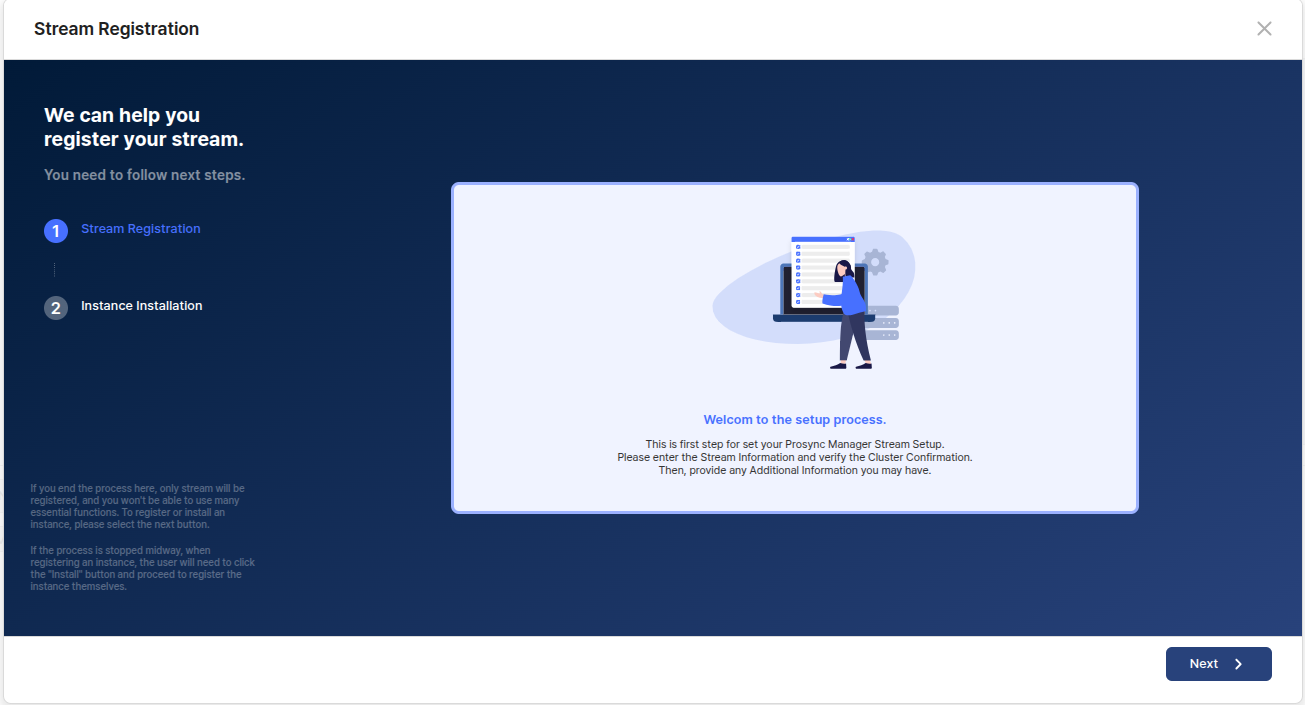
Below is the modal first screen of the Stream installation, click the Next button to proceed to the next step.
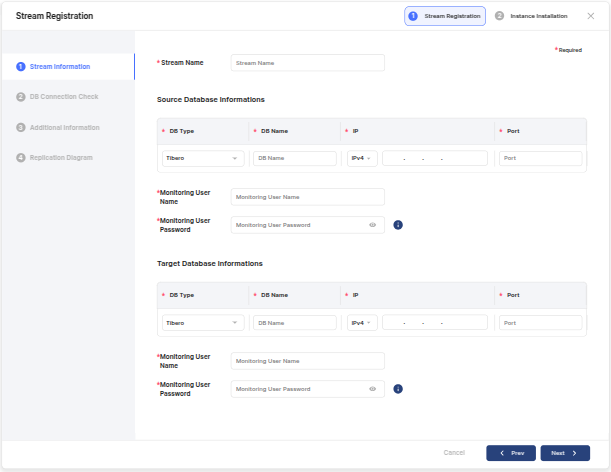
Enter the name the users want to register as a stream, the SRC DB to register, and the information of the TAR DB.
Scheduler
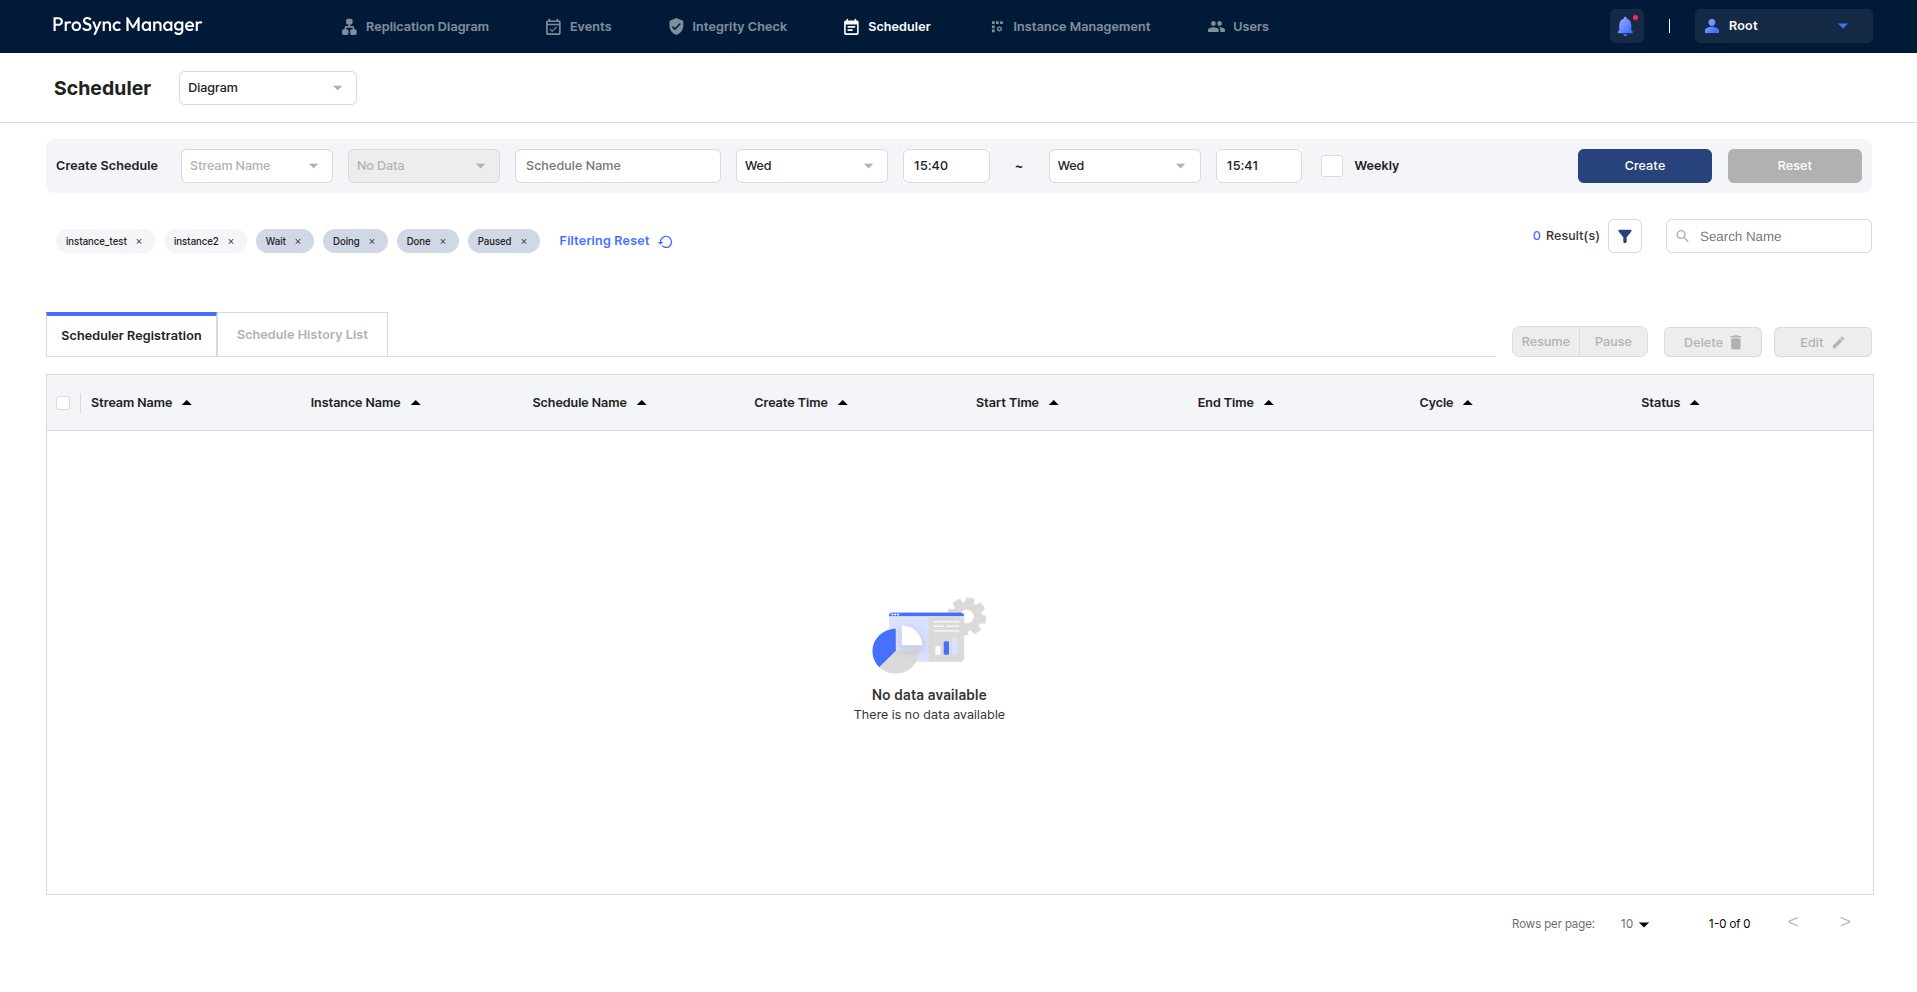
This section introduces the Scheduler page, which is related to the ability to schedule ProSync's Instance state changes.
The Schedule feature is available only in ProSync Manager and allows the users to schedule changes to the state of an instance in ProSync.
The users can set the time period from the current time up to one week, and it can be repeated on a weekly basis.
Because the Instance resumes to synchronize at the set time and pauses to pause synchronization, the Instance must be in the Pause state before the start of the schedule for the Scheduler to work properly, and if the Resume fails, the subsequent Pause actions will not be executed.
On the Scheduler page, the users'll find two tabs of information.
This is the file that performs the startup or shutdown of ProSync Manager. The users can check the usage with the --help command.
prosyncmanager.properties
This file sets the server parameters for ProSync Manager.
prsmgr_meta.sql
This file contains schema information that is installed in the repo DB of ProSync Manager.
repodb
This is the directory where the files required to install ProSync Manager's repo DB are located.
repodb_image.tar.*
The openSQL image file
vars.yml
The file used for the openSQL installation.
wars
This is the directory where the binary files for ProSync Manager are located.
Encryptor.jar
The file used to encrypt the password of the ROOT user in the repo DB.
Resetter.jar
The file used to initialize the password of the ROOT user in the repo DB.
install_repo.sh
The shell script file for installing repoDB
server.war
The back-end binary file for ProSync Manager.
prsmgr_web.war
The Front-end binary file for ProSync Manager.
2. Configuration of system environment variables
Department
The department of each user.
Role
The role of each user.
Registration Time
The time when the each user is registered.
Email Address
The email address of users to be registered.
Y
Phone Number
The phone number of users to be registered.
N
Department
The department of users to be registered.
N
Role
The role of users to be registered.
At this time, only roles with a lower rank than the currently logged in User Role can be created.
Y
Name
The name of each user.
Email
The email address of each user.
Contact
The contact of each user.
Add User
The button to add the list of user information.
-
Name
The name of users to be registered.
Y
Delete and edit users
User Table
Users example
Add User
Note
The password must meet the following conditions.
Set within 9 to 20 characters
Requires at least one capitalization
Contains at least one lowercase letter
Contains at least one number
Contains at least one special character
User Edit
Delete button
Unable to register if REPLAY_THREAD_CNT in Apply is 1 or less.
Cannot register if Column Mapping is enabled (Except processing or mapping different column names).
Initialization is not affected by Skip Rule even if Skip Rule is specified.
Details
The Description and Index information of the table.
MIN/MAX
Sets the DCR option with the MAX/MIN value of the column by specifying one column. When a conflict occurs, it is a setting for whether to reflect the MAX/MIN criteria in the column, and a Default Value is required if the Column Value is NULL.
Figure 4. Enter Stream information
Item
Description
Stream Name
Stream name
DB Type
Type of each DB (Tibero / Oracle)
DB Name
Connection name of each DB
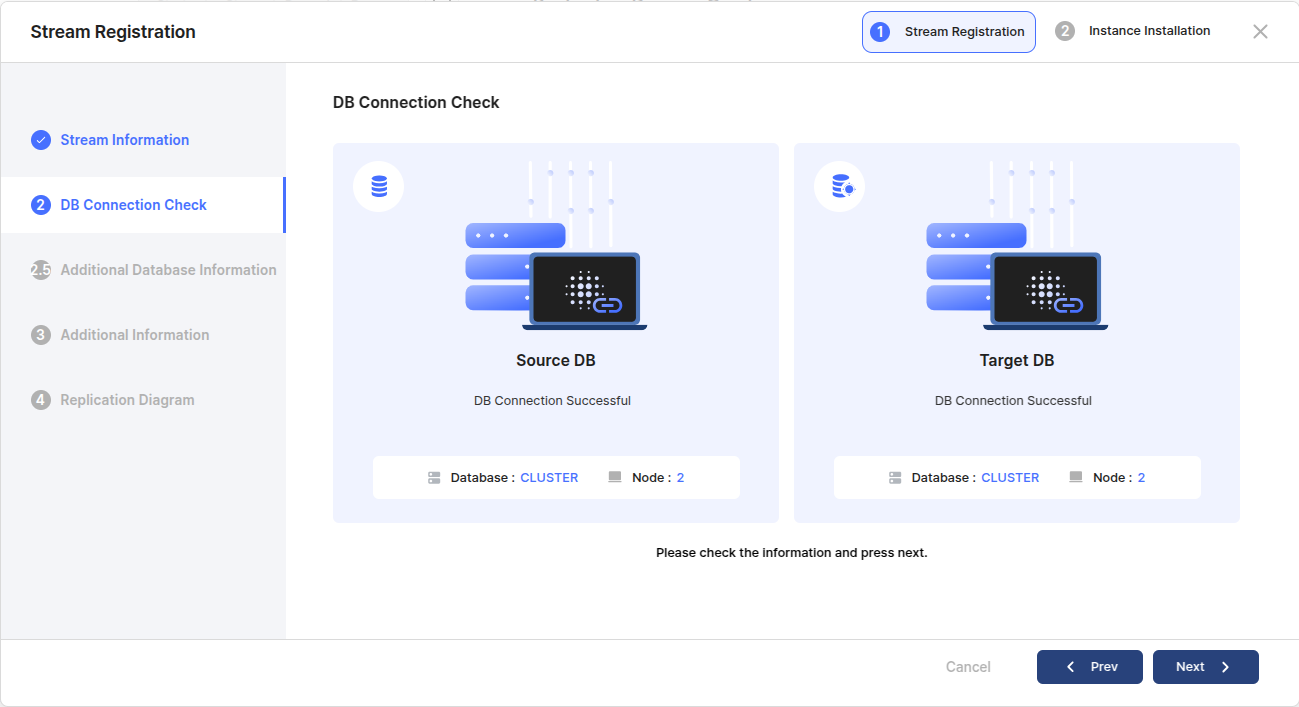
Figure 5. DB Connection Check
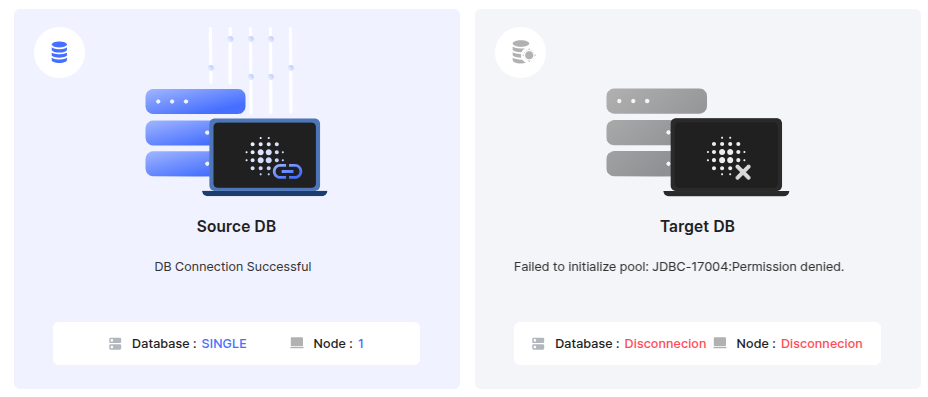
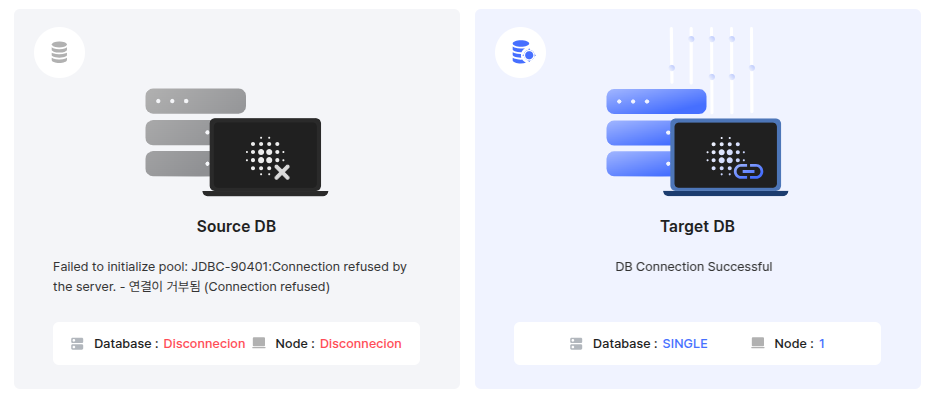
Check the connection of each DB based on the information created in Stream Information, and check the cluster status and number of nodes.
If any DB fails to connect, the users cannot proceed to the next step.
Figure 6. SRC DB connection failure
Figure 7. TAR DB connection failure
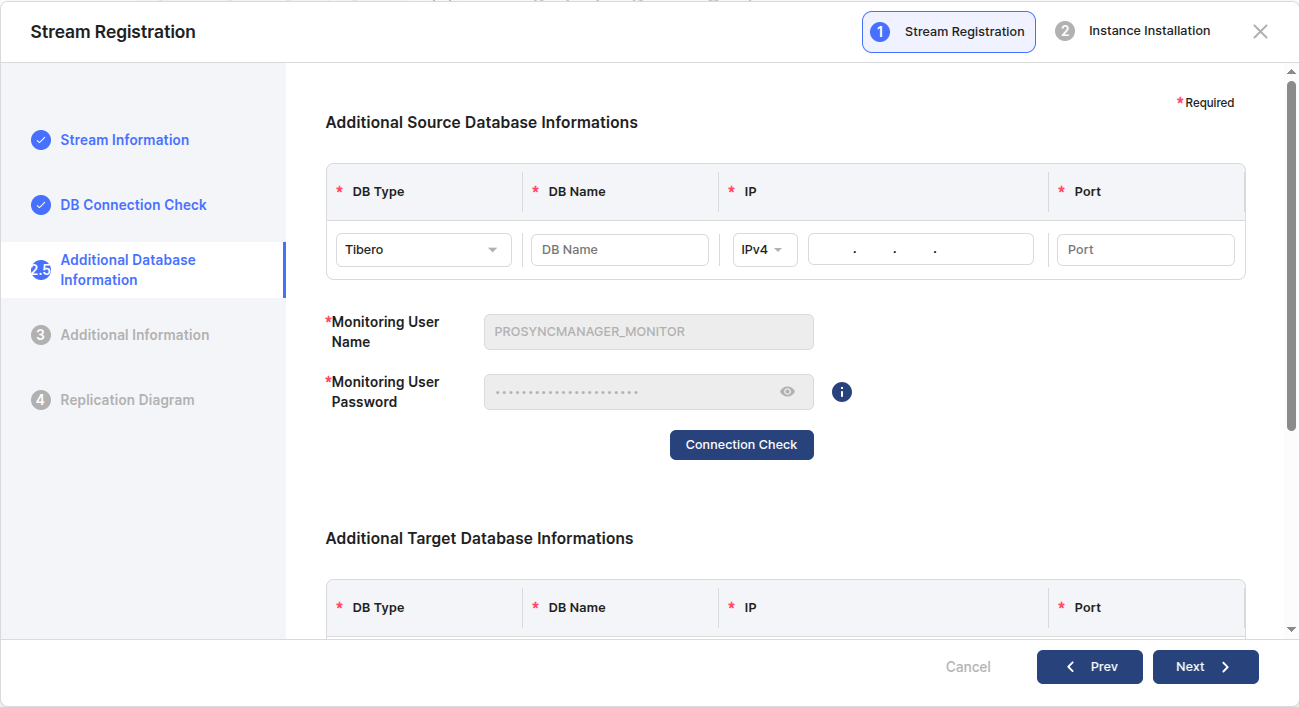
Figure 8. Enter Additional Database Information
If each SRC/TAR DB is a cluster, the users need to enter additional information because the information about the remaining nodes are required. At this point, the users don't need to enter the Monitoring User Name and Password again, as the previously entered information is fixed.
And it is mandatory to perform a Connection Check for each Node.
Figure 9. Connection Check button
When the users press the Connection Check button, the users should see a green Confirm text to indicate success, and all Connection Checks should be executed and successful for each Node.
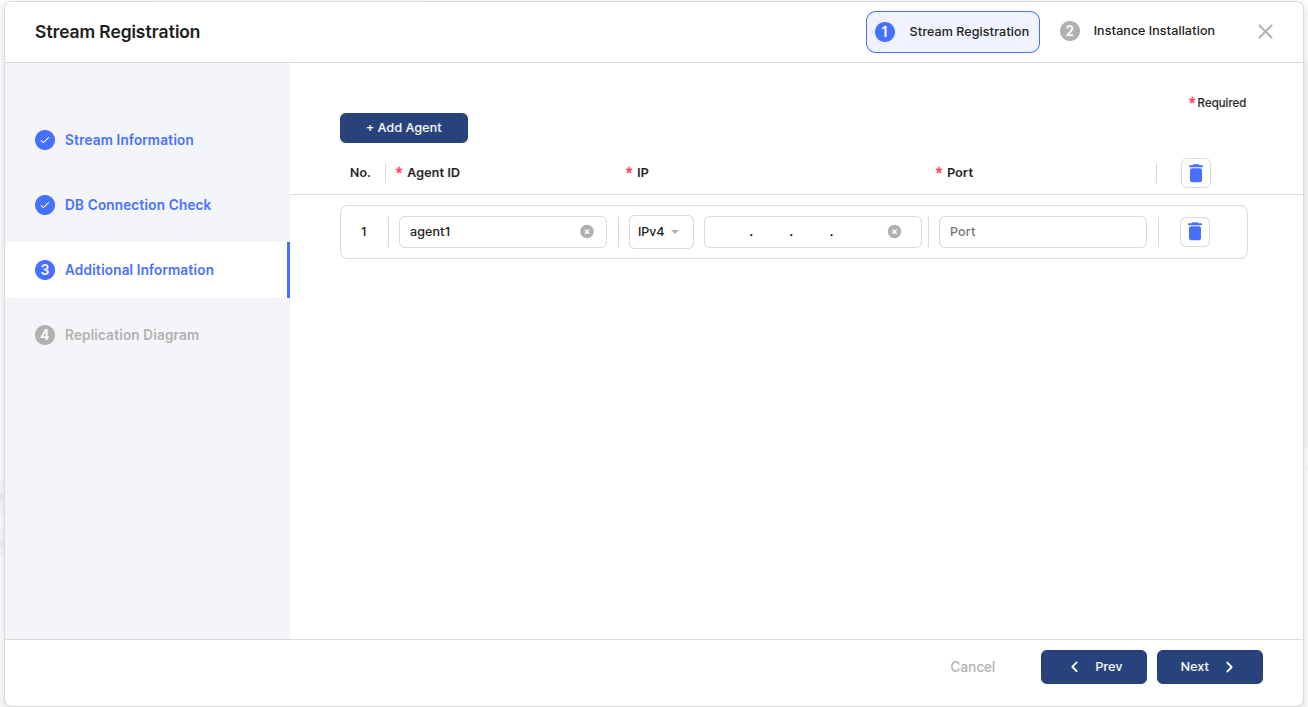
Enter the Agent Process information that the users want to connect to the Stream the users want to register.
Information about the installed agents can be found in the prs_instance.map file in the $PRS_HOME/config path.
Figure 10. Enter Agent Process Information
Item
Description
Add Agent
tA button to add an agent information input list.
Agent Id
Agent id of the agent that the users want to register with the stream
IP
Agent ip of the agent that the users want to register with the stream.
Figure 11. Delete button
The users can see the header of the list and the Delete button in each list.
The Delete button in the header resets the input and list count for all lists, and the Delete button in each list deletes the corresponding list.
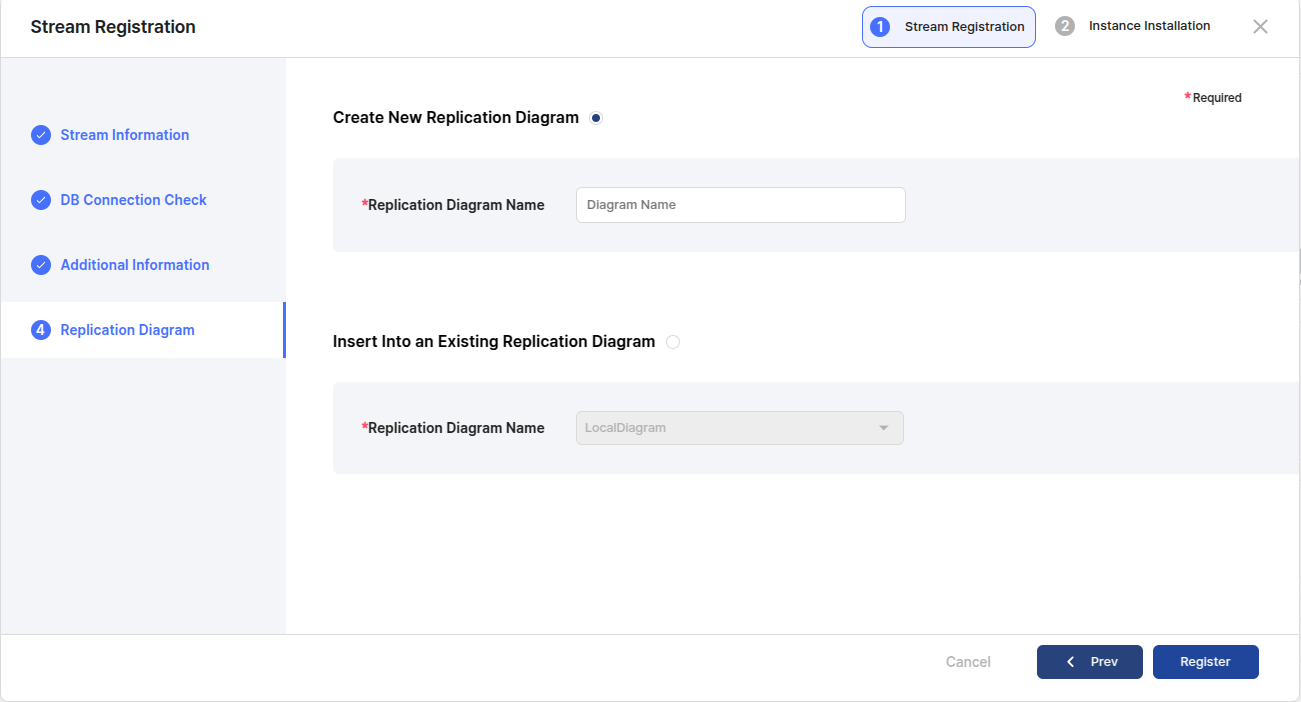
Figure 12. Replication Diagram
Select the Diagram for which the users want to register the Stream.
Create New Replication Diagram
Select when the users want to create a new diagram.
Enter the name of the diagram the users want to create.
Insert into an Existing Replication Diagram
Select to select a diagram that is already registered.
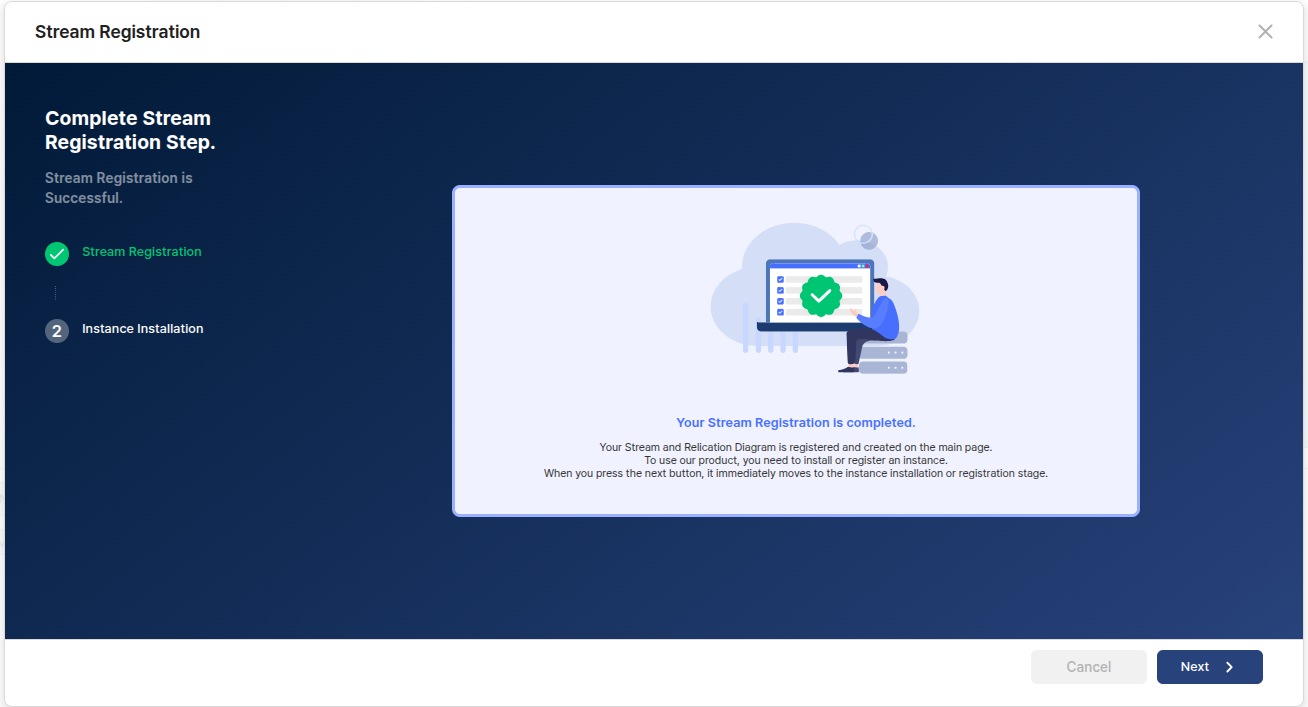
If Stream registration was successful, the users'll see this screen.
Click the Next button to proceed with the Instance installation and registration. If the users don't want to, they can stop the step by clicking Cancel or the modal's top-right X button, but since the basic unit of synchronization in ProSync is the Instance, it is recommended that the users complete the Instance installation (registration) after registering the Stream.
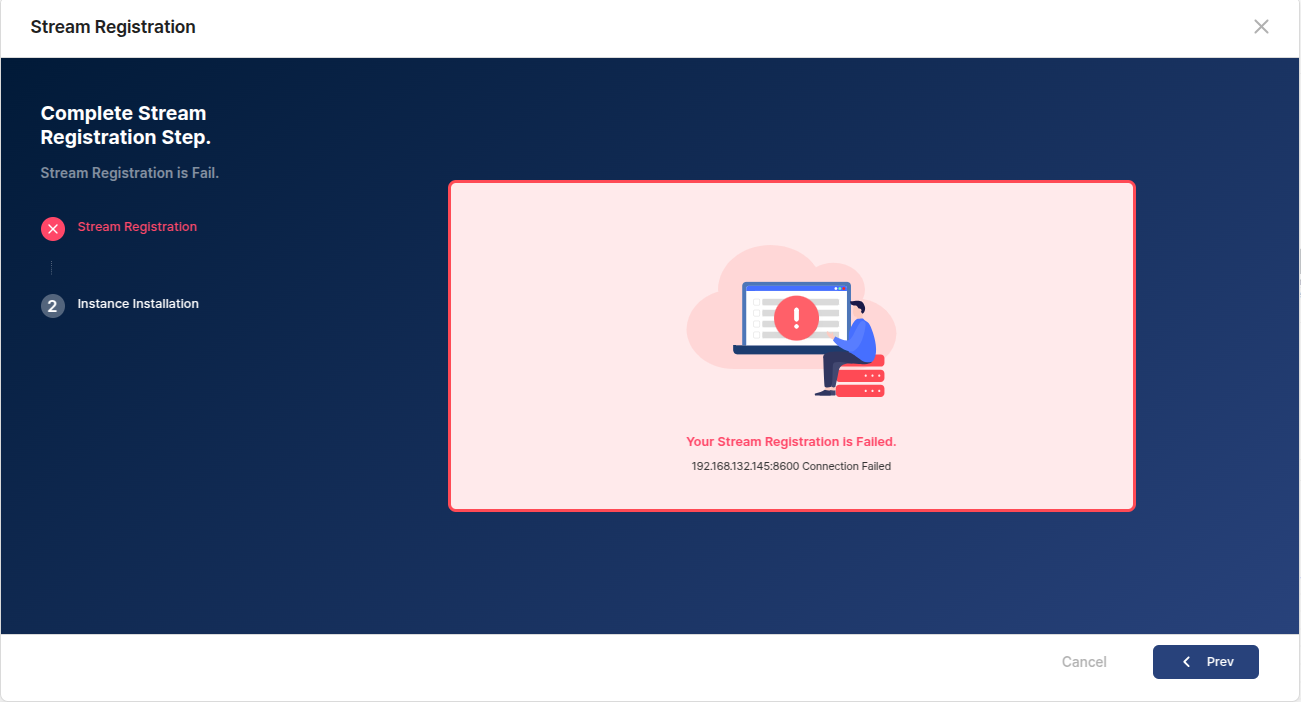
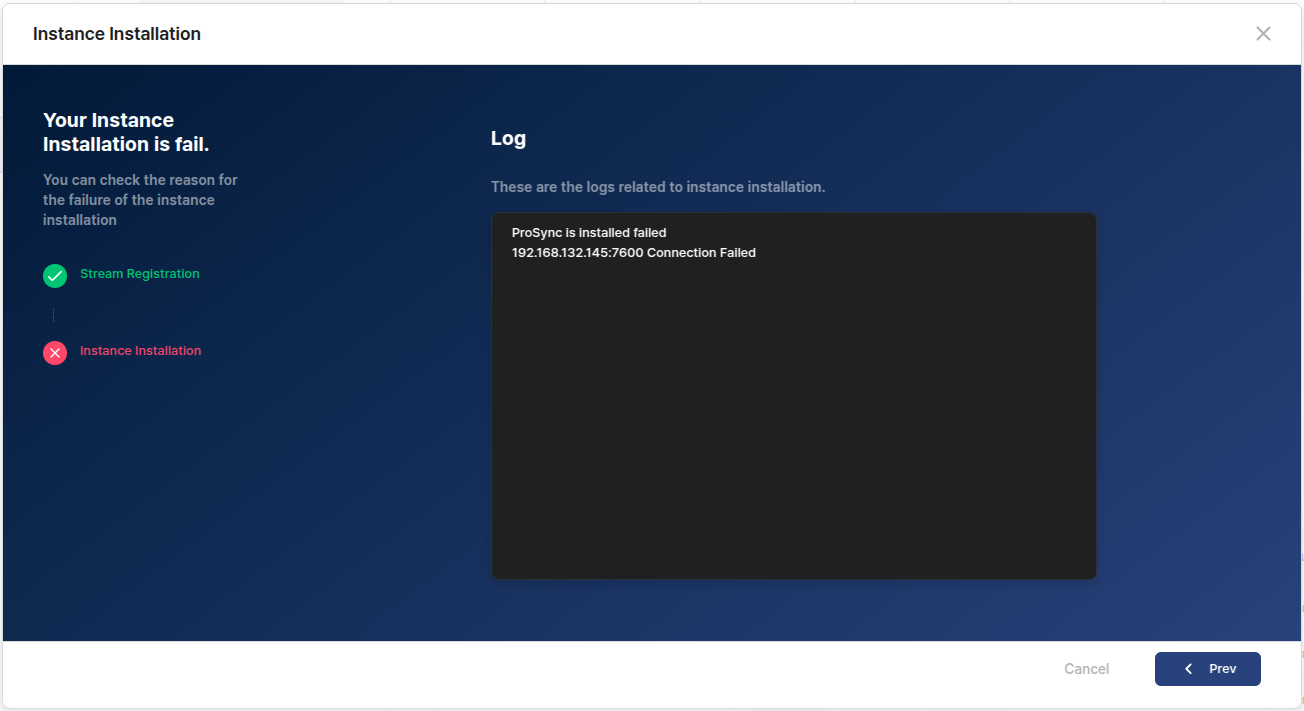
If the Stream registration fails, the users can go back to the previous step via the Prev button and edit the information to register again.
Below is an example of a Stream registration failure.
Figure 13. Main screen (after Stream and Diagram registration is complete)
After successful Stream registration, the users can see the successful registration on the main screen as shown below.
However, Diagram and Stream exist to understand the configuration and flow of synchronization, so if the users do not install and register an instance, the Status is Empty and synchronization does not proceed.
Instances must be installed in order for the synchronization to proceed and the status to be known.
1. Stream registration entry points
2. Stream registration modal screen
3. Enter stream information
Figure 1. Replication Diagram page screen
Figure 2. Stream Registration button
Figure 3. Stream registration modal screen
4. DB Connection Check
4.1. Additional Database Information
5. Additional Information
6. Replication Diagram
7. Complete Stream Registration
8. Main screen after completing Stream and Diagram registration
Caution
There can only be one Stream in the same direction with the same Source - Target Database combination.
In other words, if a Stream with DB A as the source and DB B as the target already exists, the users cannot configure another Stream in the same direction (DB A → DB B).
Scheduler History List: Tab where the users can check the execution history of registered schedules.
The users can set up a Schedule to schedule state changes for the users Instances.
Item
Description
Stream Name
The name of the Stream to which the Instance the users want to create a Schedule belongs.
Instance Name
The name of the Instance the users want to create a Schedule for. If the users select the All option, a schedule is created for all Instances.
Schedule Name
The unique name of the Schedule. The same name cannot exist within the same Instance.
The users can search among the created schedules by filtering by specific Instance, Scheduler status, and Schedule name.
The left side shows the items used for filtering, which can be removed from filtering via the x button to the right of each filter tag or reset with the Filtering Reset button. These items can be specified via the filter button on the right.
Resume / Pause: Allows the users to resume/pause the schedule.
Delete and edit: Deletes and edits registered schedules.
This is the table where the users can see the list with all filtering applied.
If the users want to change the behavior of the schedule, or delete or edit it, select the desired item in the table.
Item
Description
Stream Name
The name of the Stream to which the Instance that the users want to create the Schedule belongs.
Instance Name
The name of the Instance that the users want to create the Schedule.
Schedule Name
The unique name of the Schedule. The same name cannot exist in the same Instance.
The users can utilize these filters when searching the Event table for more sophisticated searches.
Replication Diagram area
The users can check a list of Streams - Instances that belong to the Diagram specified in the Diagram Filter in the header of the page.
Select the Instances the users want to select/clear by the filtering criteria.
Select Stream if the users want to select/clear all instances in a Stream, or Diagram if the users want to select/clear all instances in the current Diagram.
Schedule Status area
All the status types available on the Scheduler registration tab.
Item
Description
Wait
The schedule is waiting because it has not yet reached the specified time.
Doing
The schedule is in progress because it has reached the Resume time of the specified time.
Done
The schedule is complete because it has reached both the Resume and Pause times of the specified time.
Select the schedule the users want to edit to edit it. The editable items are Schedule Name, Resume Time, Pause Time, and whether to repeat.
The users can search the schedule history by filtering by specific instance, scheduler status, and schedule name.
The left side shows the items used for filtering, which can be removed from filtering via the x button to the right of each filter tag or reset with the Filtering Reset button. These items can be specified via the filter button on the right.
This is the table where the users can see the list with all filtering applied.
If the users want to delete a schedule history, select the desired item in the table.
Item
Description
Stream Name
The name of the Stream to which the Instance in which the Scheduler History occurred belongs.
Instance Name
The name of the Instance in which the Scheduler History occurred.
Schedule Name
The name of the Schedule in which the Scheduler History occurred.
Schedule
Scheduler Registration
Create Schedule
Filtering area
Schedule action buttons and delete, edit
Scheduler Table
Schedule Filtering
Scheduler Edit
Scheduler History List
Filtering area
Scheduler Table
DDL Object
The type of object targeted by DDL commands such as TABLE, VIEW, and INDEX.
Usage of Other scripts
Describes the usage pf scripts of ProSync Manager.
1. Start/Shutdown ProSync Manager
The prosyncmanager script can start, stop, and check the status and version of ProSync Manager.
Caution
The PRSMGR_HOME environment variable must be set to the directory path where prosyncmanager.properties is located.
Usage
$ prosyncmanager [COMMAND] [OPTION]
COMMAND
Description
help
Displays the required pre-requisites and commands and usage examples.
start
The prosyncmanager help shows the users how to use the script
Starts ProSync Manager. When adding the with-docker OPTION, start the repoDB container if it was installed via the install script.
Stops ProSyncManager. When adding the with-docker OPTION, terminate the container if repoDB was installed via the install script.
Get the status of ProSyncManager's backend/frontend server and repoDB.
Retrieves the version of the ProSyncManager's backend/frontend server.
The users can use the ResetPassword.sh provided by ProSyncManager to reset the password for a specific account.
The tool must perform with java 8 as the environment.
The following describes each parameter.
Parameters
Description
Describes the process of changing the user and password of REPO DB.
For shutdown-related commands, refer to .
Connect to the REPO DB and perform the password change alter syntax.
The users can access it through the command below, and enter the value of REPODB_PASSWORD set in install.cfg in the password field when entering the command.
The SQL to change the password is as follows. Enter a new password {REPODB_PASSWORD}
The prosyncmanager.properties file contains the user and password information of the REPO DB that ProSyncManager will use. The users need to modify this information to match the changed password.
For startup-related commands, refer to .
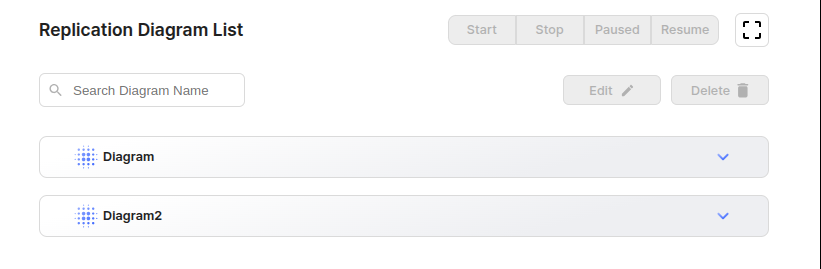
Replication Diagram List
Replication Diagram List area
This is where the users can see a list of registered Diagrams.
Chage Status
The users can intervene in the Status of Streams that are part of a Replication Diagram.
Start: Starts all ProSync processes on a per-stream basis.
Stop: Stops all ProSync processes on a per-stream basis.
Paused: Pauses all ProSync processes on a per-stream basis.
Resume: Resumes all ProSync processes on a per-stream basis.
This button allows the users to expand the area of the Replication Diagram List.
This feature allows the users to search by the name of a Replication Diagram.
Edit : The users can modify the information of one selected Stream. The information that can be modified is the Stream name, agent information, and the Diagram to which it belongs. If there is any Instance in the Stream, the users cannot edit it.
Delete: The users can delete a Stream that belongs to a Replication Diagram. In this case, if no Streams exist in the Replication Diagram, the Diagram is also deleted.
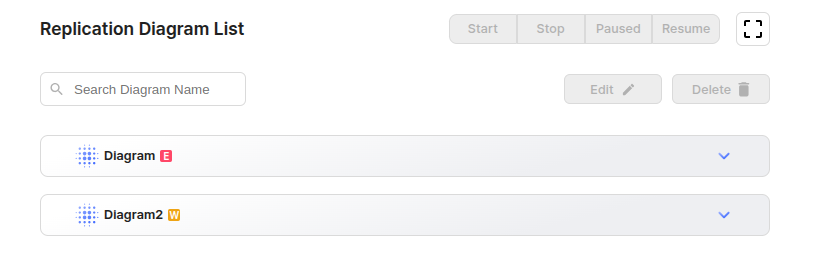
The users can check the summarized status in the Diagram List, and there are three types of statuses, which are displayed in order of priority.
Status Label
Description
Priority
Select a Diagram in one of the lists to see a list of Streams that belong to the Diagram, and select the Stream the users want to operate if the users want the feature to work.
Item
Description
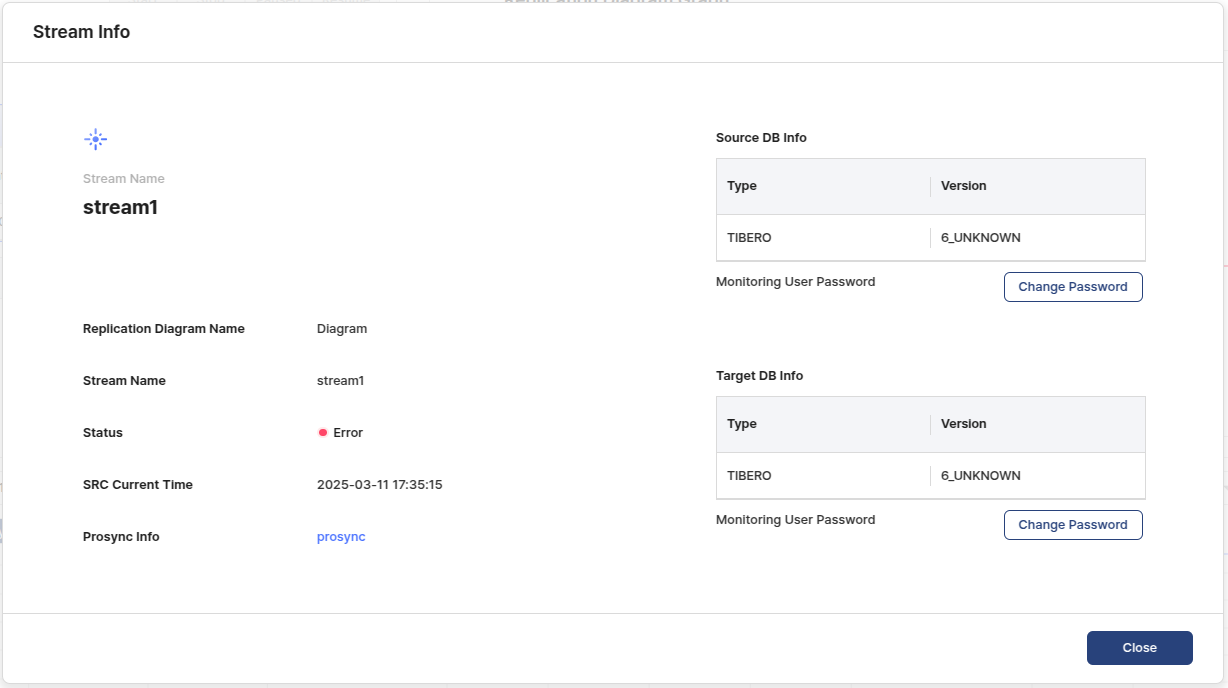
This is the modal the users see when the users click the View Stream Info button.
Item
Description
Displays information about the Prosync binary being used by this Stream.
Item
Description
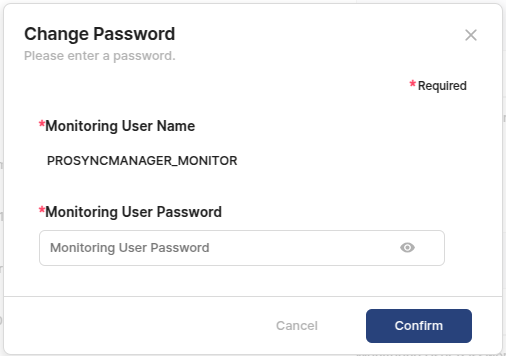
ProSync Manager does not allow the users to change the Monitoring User's password directly, so the users must use the following procedure to change the password.
Change the password directly on the controlled DB
Register the changed password in the UI
This section shows the screens for step 2 of the above procedure, how to register the changed password in the UI.
host
The ip of the repoDB to connect to, the REPODB_IP value of install.cfg used during installation.
port
The port of the repoDB to connect to, the REPODB_PORT value of install.cfg used during installation.
target
The ID of the user the users want to initialize.
Starts the ProSyncManager. Starts the container in case of adding the with-docker option if repoDB is installed through the install script.
stop
Stops the ProSyncManager. Stops the container in case of adding the with-docker option if repoDB is installed through the install script.
status
Get the status of ProSyncManager's backend/frontend server and repoDB.
version
Get the version of ProSyncManager's backend/frontend server.
dbuser
DBuser of the repoDB, the REPODB_USERNAME value of install.cfg used during installation.
dbpassword
Password required to connect to the repoDB, the REPODB_PASSWORD value of install.cfg used during installation.
dbname
repoDB's dbname, the REPODB_DBNAME value of install.cfg used during installation.
Usage example
help
start
stop
status
version
2. Reset the users password
Caution
Only users with superuser/administrator privileges on the host machine can use the Password Reset Tool to reset passwords for regular and administrator accounts.
Usage
Usage example (reset password for user named 'admin')
Caution
It is recommended that the users change the password to a new one after resetting it, as the reset password is only provided once.
$ ./prosyncmanager help
###############################
pre-requisite:
1. PRSMGR_HOME
ex) export PRSMGR_HOME=`pwd`
2. intall.cfg
will use repoDB_dockername for starting docker container
###############################
commands:
help - show commands
prosyncmanager help
start - start prosyncmanager
prosyncmanager start [with-docker]
stop - stop prosyncmanager
prosyncmanager stop [with-docker]
status - check BE/FE/RepoDB status
prosyncmanager status
version - get BE/FE version
prosyncmanager version
###############################
$ ./prosyncmanager start
Using CATALINA_BASE: /path/to/prsmgr_home/installation/apache-tomcat
Using CATALINA_HOME: /path/to/prsmgr_home/installation/apache-tomcat
Using CATALINA_TMPDIR: /path/to/prsmgr_home/installation/apache-tomcat/temp
Using JRE_HOME: /usr/lib/jvm/jdk1.8.0_311
Using CLASSPATH: /path/to/prsmgr_home/installation/apache-tomcat/conf:/path/to/prsmgr_home/installation/apache-tomcat/lib/*:/path/to/prsmgr_home/installation/apache-tomcat/bin/bootstrap.jar:/path/to/prsmgr_home/installation/apache-tomcat/bin/tomcat-juli.jar
Using CATALINA_OPTS:
Using CATALINA_PID: /path/to/prsmgr_home/installation/apache-tomcat/temp/tomcat.pid
Tomcat started.
prosyncmanager started
$ ./prosyncmanager stop
Using CATALINA_BASE: /path/to/prsmgr_home/installation/apache-tomcat
Using CATALINA_HOME: /path/to/prsmgr_home/installation/apache-tomcat
Using CATALINA_TMPDIR: /path/to/prsmgr_home/installation/apache-tomcat/temp
Using JRE_HOME: /usr/lib/jvm/jdk1.8.0_311
Using CLASSPATH: /path/to/prsmgr_home/installation/apache-tomcat/conf:/path/to/prsmgr_home/installation/apache-tomcat/lib/*:/path/to/prsmgr_home/installation/apache-tomcat/bin/bootstrap.jar:/path/to/prsmgr_home/installation/apache-tomcat/bin/tomcat-juli.jar
Using CATALINA_OPTS:
Using CATALINA_PID: /path/to/prsmgr_home/installation/apache-tomcat/temp/tomcat.pid
Tomcat stopped.
prosyncmanager stopped
$ ./prosyncmanager status
server ... not ok
prsmgr_web ... not ok
repoDB ... ok
Shown when Long Tx status occurs among the streams belonging to the diagram.
3
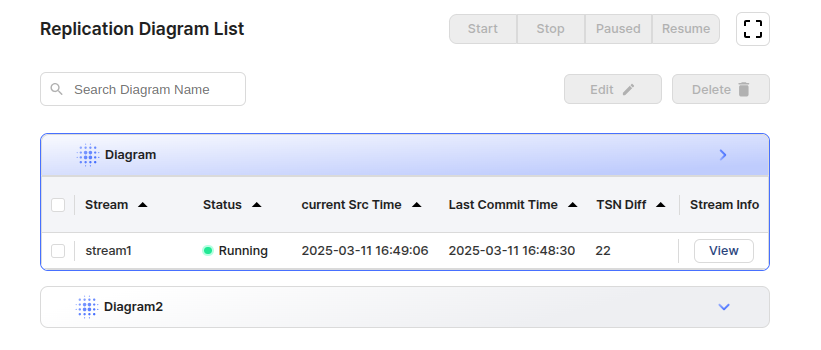
Last Commit Time
The TIMESTAMP change value of the TSN based on the SRC DB of the transaction that was last reflected in the Target DB of the corresponding Stream.
TSN Diff
The difference between the Last Commit TSN and the Current SRC TSN of the corresponding Stream.
Stream Info
A modal button to view the information of the corresponding Stream.
SRC Current Time
Stream shows the current TSN of the SRC DB belonging to the stream.
Prosync Info
Shows the information of the Prosync binary used in the stream.
Source DB Info
Shows the type and version of the SRC DB belonging to the stream.The users can change the password for the monitoring user through the Change Password button.
Target DB Info
Shows the type and version of the TAR DB belonging to the stream.The users can change the password for the monitoring user through the Change Password button.
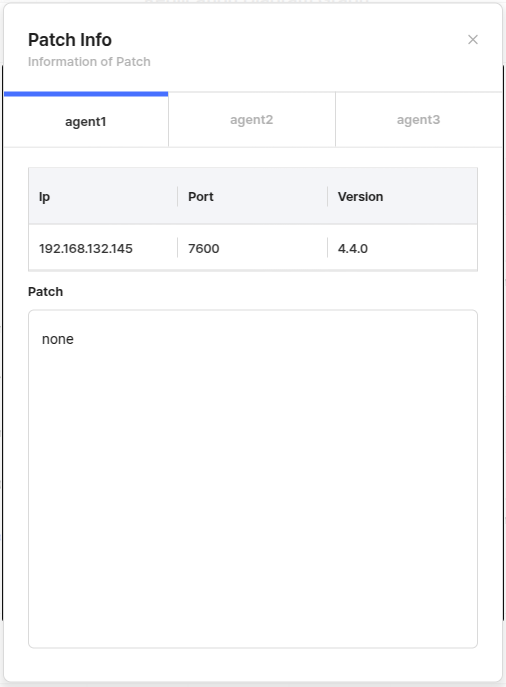
Version
ProSync binary version of the selected agent.
Patch
Patch list of ProSync binary patches belonging to the selected agent.
: Error
Shown when Error status occurs among the streams belonging to the diagram.
1
: Warning
Shown when Warning status occurs among the streams belonging to the diagram.
2
Stream
Indicates the name of the Stream.
Status
Indicates the status of all instances belonging to the Stream in the form of Error / Warning / Paused / Running. The priority is the same as the order listed.
Current Src Time
The TIMESTAMP change value of the current TSN of the SRC DB of the corresponding Stream.
Replication Diagram Name
The name of the Replication Diagram to which the Stream belongs.
Stream Name
The name of the Stream.
Status
The status of all instances in the Stream, which are summarized and displayed as Error / Warning / Paused / Running status.
Agent ID(s)
ID of the Agent belonging to the Stream. The users can check as many agents as the users want.
IP
IP of the selected agent.
Port
Port number of the selected agent.
EnLarge button
Replication Diagram Search
Edit and Delete
Note
Diagrams are the logical unit for understanding synchronization configurations, so to operate the feature, the users must select the Diagram the users want to operate on and operate on the Streams within it.
Replication Diagram List status example
Diagram Status
Check the stream list
Caution
The information above summarizes the values per Instance to Stream, so it is recommended that the users check the Instance Management page to see the exact values.
Check stream info
ProSync Info
Change Password
Caution
If the users perform only step 1 and omit step 2, the Monitoring feature may not work properly.
However, Streams in the opposite direction (DB B → DB A) can be configured separately.
IP
Connection ip of each DB
Port
Connection port of each DB
Monitoring User Name
Username of the Monitoring User created in each DB
Monitoring User Password
User password of Monitoring User created in each DB
Port
Agent port of the agent that the users want to register with the stream.
Resume Time
The time to resume.
Pause Time
The time to pause.
Weekly
The button to repeat the schedule weekly.
Create Time
The time when the schedule is created.
Start Time
The time when the resume action of the schedule is performed.
End Time
The time when the pause action of the schedule is performed.
Cycle
The weekly recurrence of the schedule.
Status
The progress status of the schedule.
Paused
The schedule is disabled.
Type
The type of the Schedule in which the Scheduler History occurred, which consists of Resume and Pause.
Exec Time
The time at which the Schedule occurred.
Success/Fail
The success or failure of the Schedule.
Message
The message that occurred when the Schedule occurred.
Installation and configuration of parameter
Describes the process of installing ProSync Manager.
1. Installation parameter configuration
Open the install.cfg file in $PRSMGR_HOME to set the parameter values required to install ProSync Manager.
Each parameter is separated by a newline, and only one equals sign (=) is entered between the parameter name and the value, with no spaces.
ROOT_ID=admin
ROOT_PW=admin
SERVER_IP=localhost
SERVER_PORT=8080
REPODB_IP=localhost
REPODB_PORT=13852
REPODB_USERNAME=repo_user
REPODB_PASSWORD=password
REPODB_DBNAME=prosyncmanager
REPODB_DOCKERNAME=prosyncmanager
# set at the same time when mounting the repodb volume
#REPODB_PATH=$PRSMGR_HOME/repodb/data
#REPODB_LOG_PATH=$PRSMGR_HOME/repodb/log
# for repoDB management
REPODB_SUPERUSER_NAME=prsmgr_superuser
REPODB_SUPERUSER_PASSWORD=prsmgr_password
# for repoDB shared buffers(B, kB, MB, GB, TB)
# 0 is the setting that makes it determined based on the value according to the system memory.
REPODB_SHARED_BUFFERS=0
# if you need, enable and type the path to jar
# JDBC_ORACLE=/path/to/ojdbc.jar
# Optional: if the Oracle database uses a character set not included in the JDBC driver, add orai18n jar (e.g., KO16MSWIN949)
# JDBC_ORACLE_I18N=/path/to/orai18n.jar
The following describes each parameter.
Parameters
Description
Default value
After setting the parameters, execute the install.sh script to perform the installation.
The install.sh script can be executed as below.
The following describes the procedure for selecting options during installation.
Options
Description
Here's an example of the installation.
If an error occurs during installation, it prints the part or statement where the error occurred and the associated error message to a log file for debugging purposes and aborts the installation.
Details about the error can be found in the install.log file.
Connect to the URL resolved at the bottom of the install log and verify that the users are prompted with a , and that the users are logged in with the ID/PW the users set in install.cfg.
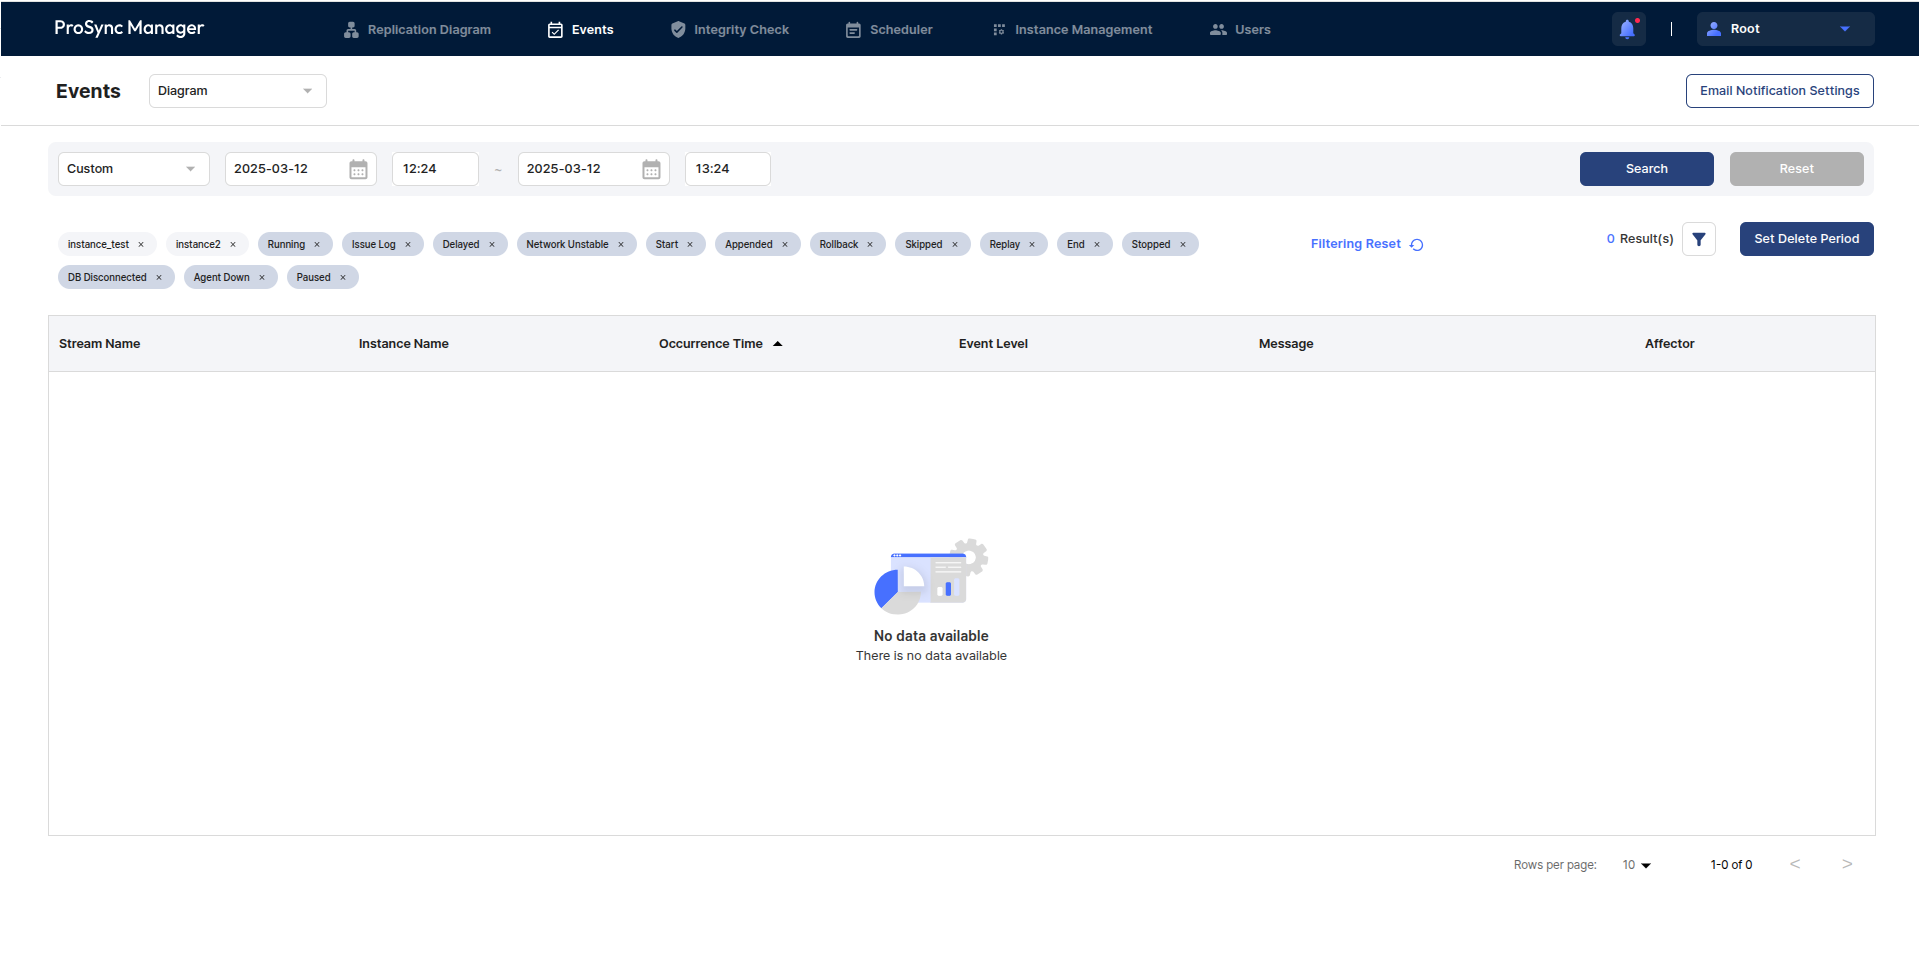
Events
This section introduces the Events page where the users can check the event status of ProSync.
The users can check the event status of ProSync events that occurred on a per-diagram basis.
Events area
Setting Email Notification
The users can set up email alerts for events that occur.
Event notifications are based on notifications via email, and the protocol used is the SMTP protocol.
The users can set a time period to see events that occurred during that time period.
Custom allows users to set the time period they want to search for, and in addition to the current time period, users can choose from 1 day, 1 week, 2 weeks, 1 month, 3 months, 6 months, and 1 year ago.
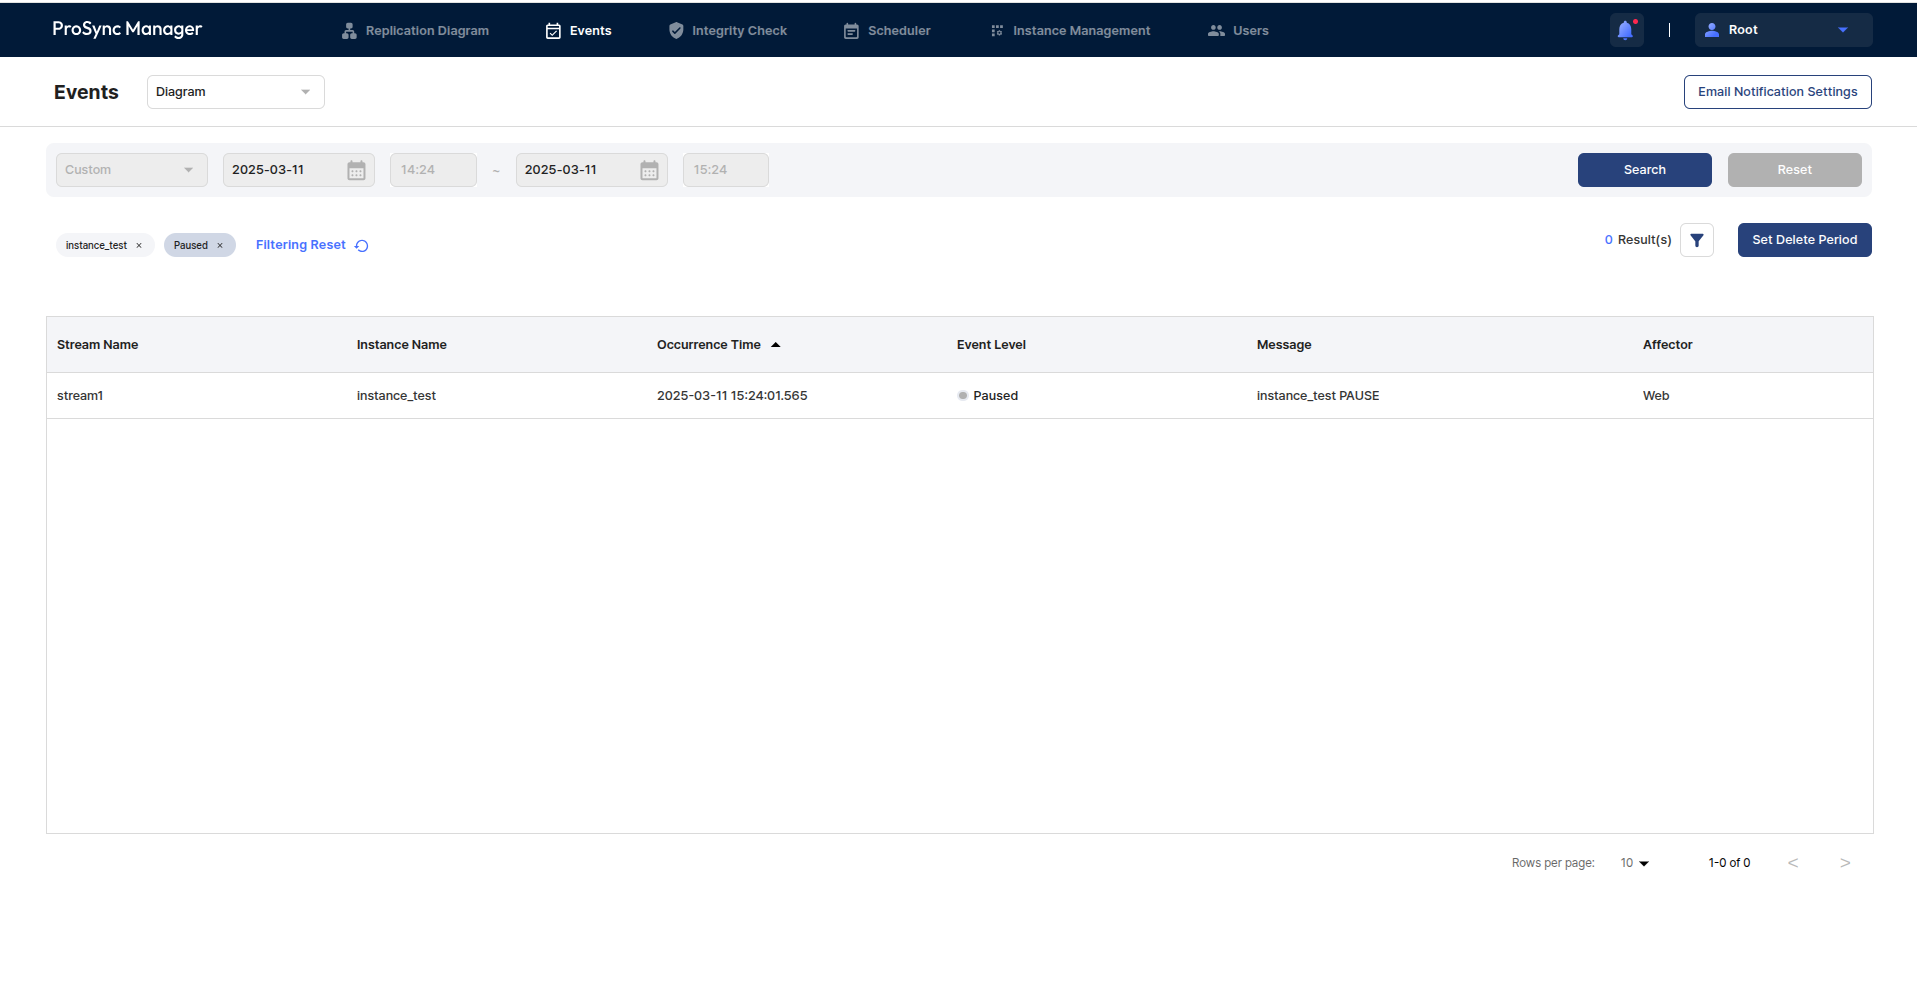
The users can search for events that have occurred by filtering by specific Instance and Event Status.
The left side shows the items used for filtering, which can be removed from filtering via the x button to the right of each filter tag or reset with the Filtering Reset button. These items can be specified via the filter button on the right.
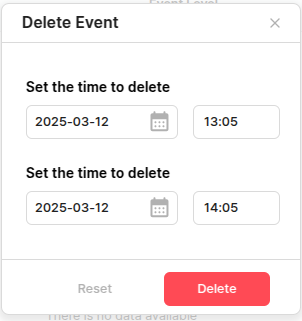
The users can control the history of an event by deleting it by setting the interval in which the users want to delete it.
This is a table where the users can see a list of events with both the Event Search period and filtering applied.
Item
Description
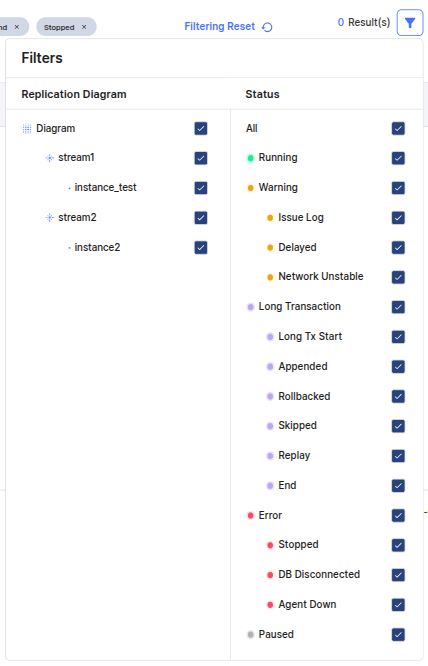
The users can utilize these filters when searching the Event table for more sophisticated searches.
The users can see a list of Streams - Instances that belong to the Diagram specified in the Diagram Filter in the header of the page.
Select the Instances the users want to select/clear by the filtering criteria. Select Stream if the users want to select/clear all instances in a Stream, or Diagram if the users want to select/clear all instances in the current Diagram.
All of the status types available on the Events page.
The Label, which is resolved to a level such as 'All', is the parent status for common grouping of statuses, and the Intended Status is the status that is actually checked and used.
Status
Description
Parents status
The users can set the time period for which the users want to delete event history.
ProSync Manager requires the users to set up the settings for SMTP in the UI and then send emails through that server.
The users should contact the mail server administrator for SMTP configuration details, as they may vary depending on the environment in which ProSync Manager is running. In particular, if the users want to send mail via SSL/TLS protocol, the server must be able to communicate in both directions.
Before setting up Email Notification, the users need to set up the SMTP protocol.
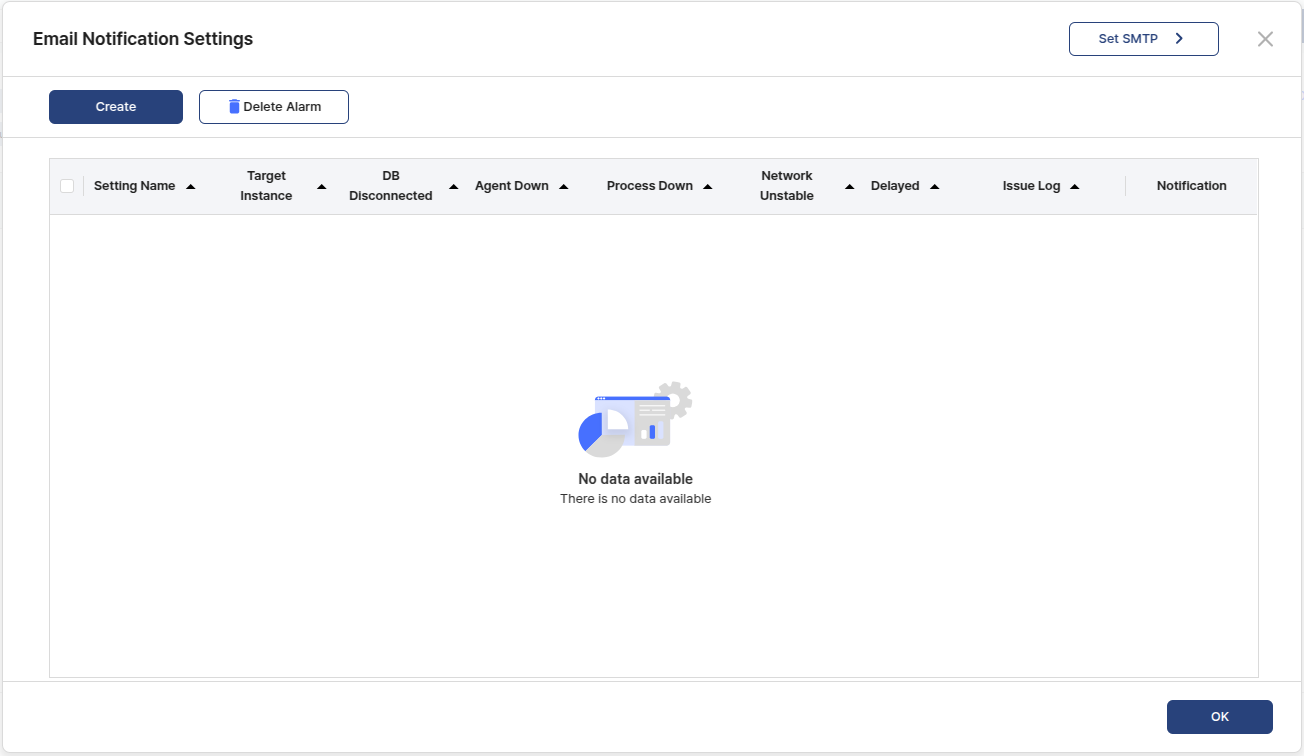
Set and delete event alarms via email.
Item
Description
Item
Description
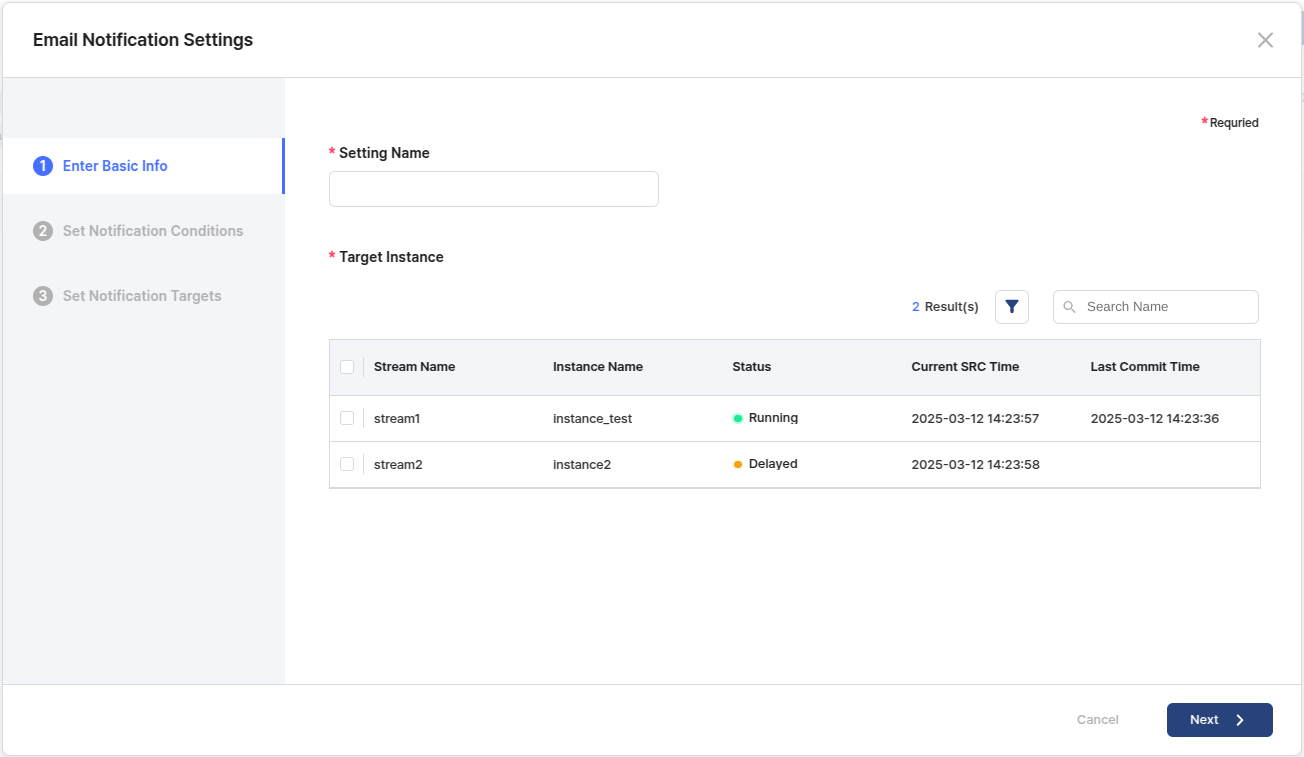
A. Enter Basic Info
Item
Description
Required Item
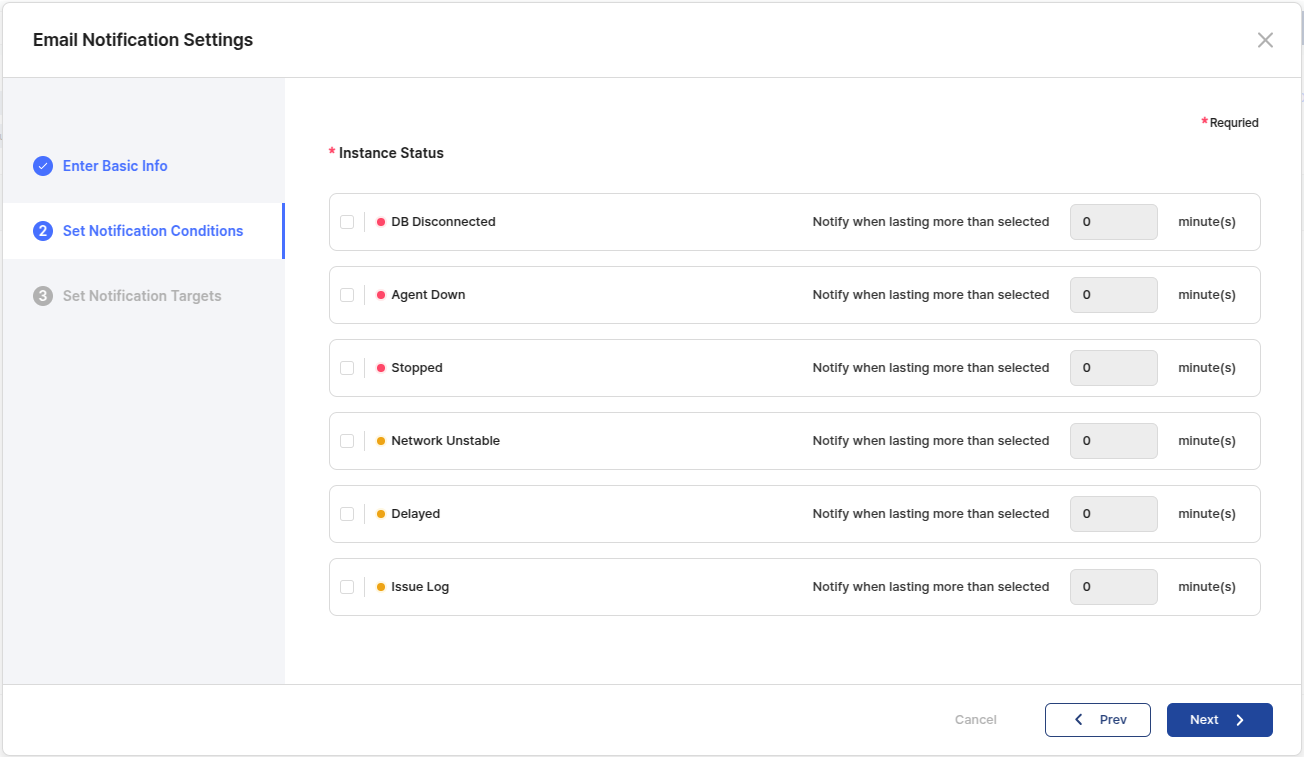
B. Set Notification Conditions
Set the status the users want to track with Email Alarm and the duration of the status.
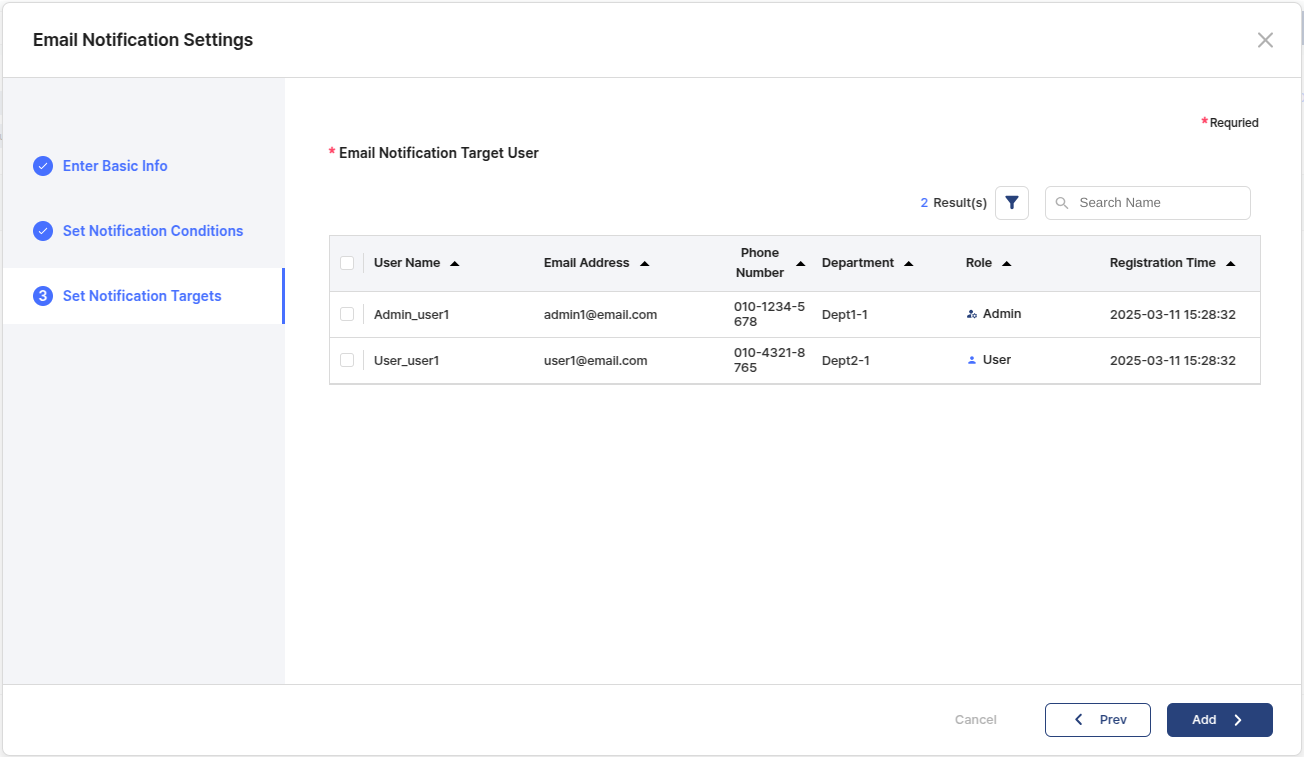
C. Set Notification Targets
Set the users the users want to receive this email alert.
REPODB_USERNAME's password of ProSync Manager repoDB
password
REPODB_DBNAME
DB name of ProSync Manager repoDB
(Range: 0 - 63Byte)
prosyncmanager
REPODB_DOCKERNAME
Docker container name of ProSync Manager repoDB
prosyncmanager
REPODB_PATH
Path where the ProSync Manager repoDB's data will be stored in. If not specified, it is stored in the default path managed by docker.
$PRSMGR_HOME/repodb/data
REPODB_LOG_PATH
Path where the ProSync Manager repoDB' logs are stored. If not specified, it is stored in the default path managed by docker.
$PRSMGR_HOME/repodb/log
REPODB_SUPERUSER_NAME
Superuser name of ProSync Manager repoDB
prsmgr_superuser
REPODB_SUPERUSER_PASSWORD
Superuser's password of ProSync Manager repoDB
prsmgr_passsword
REPODB_SHARED_BUFFERS
ProSync Manager repoDB uses shared_buffers as a percentage of total memory for optimization, so repoDB startup will fail if memory is insufficient. Therefore, this parameter allows the user to force its size, and if it is 0 (default), it is based on the system's calculation.(0, 128kB - ... )
0
JDBC_ORACLE
The path to the Oracle JDBC to be used by ProSync Manager, and should be set if Oracle is included in the ProSync configuration. In a typical environment with Oracle installed, it is located in $ORACLE_HOME/jdbc/lib/ojdbc.jar.
null
JDBC_ORACLE_I18N
If the character set of the Oracle server is not included in the Oracle JDBC (e.g., KO16MSWIN949), the users must set the path to the jar file corresponding to i18n. In a typical environment where Oracle is installed, it is located in $ORACLE_HOME/jlib/orai18n.jar .
null
start server?
The server installation is complete and asks if the users want to start the server, enter y if the users want to start the server.
ROOT_ID
Root account ID of ProSync Manager
admin
ROOT_PW
Root account password of ProSync Manager
admin
SERVER_IP
Connection IP of ProSyncManager
localhost
SERVER_PORT
want to clean previously deployed application?
This is the procedure that appears if a previously deployed application exists; enter y if the users want to remove the existing deployed application.
install repoDB?
This procedure asks if the users want to install a new REPO DB, enter y if the users want to install the existing REPO DB.
want remove container?
This is the procedure that appears if a docker container named 'prosyncmanager' already exists, enter y if the users want to remove the existing docker container.
$ . $PRSMGR_HOME/install.sh
want to clean previously deployed application? (y/n): y
**********************************************************************
* clean webapps directory
**********************************************************************
clean webapps directory complete
install repoDB? (y/n): y
**********************************************************************
* install repoDB
**********************************************************************
there's container whose name is 'prosyncmanager'
want remove container (y/n): y
8288a8287696
8288a8287696
container whose name is 'prosyncmanager' removed
container prosyncmanager created
==============================DOCKER LOG==============================
...
repoDB created
...
============================DOCKER LOG END============================
repoDB restarted
**********************************************************************
* create meta tables
**********************************************************************
meta tables created
**********************************************************************
* create superuser
**********************************************************************
superuser created
**********************************************************************
* restart repoDB
**********************************************************************
repoDB started
**********************************************************************
* repoDB install finished
**********************************************************************
repoDB install complete
**********************************************************************
* Extract Tomcat
**********************************************************************
Applying SERVER_PORT to tomcat server.xml...
Copying WAR files to the webapps directory...
**********************************************************************
* Configure Tomcat
**********************************************************************
PRSMGR_HOME=/path/to/prsmgr_home
CATALINA_BASE=/path/to/prsmgr_home/apache-tomcat
CATALINA_HOME=/path/to/prsmgr_home/apache-tomcat
CATALINA_PID=/path/to/prsmgr_home/apache-tomcat/temp/tomcat.pid
start server? (y/n): y
Starting Tomcat...
Using CATALINA_BASE: /path/to/prsmgr_home/apache-tomcat
Using CATALINA_HOME: /path/to/prsmgr_home/apache-tomcat
Using CATALINA_TMPDIR: /path/to/prsmgr_home/apache-tomcat/temp
Using JRE_HOME: /usr/lib/jvm/jdk1.8.0_311
Using CLASSPATH: /path/to/prsmgr_home/apache-tomcat/conf:/path/to/prsmgr_home/apache-tomcat/lib/*:/path/to/prsmgr_home/apache-tomcat/bin/bootstrap.jar:/path/to/prsmgr_home/apache-tomcat/bin/tomcat-juli.jar
Using CATALINA_OPTS:
Using CATALINA_PID: /path/to/prsmgr_home/apache-tomcat/temp/tomcat.pid
Tomcat started.
prosyncmanager started
**********************************************************************
* Install Done.
* URL : http://localhost:8080/
* ID / PW : admin/admin
**********************************************************************
Event Level
The Status of the event.
Message
The message about the event.
Affector
The entity that caused the event, such as Admin, Web, or Scheduler.
Delayed
The synchronization is delayed, and the delay criteria is the Diff set specified by the user in each Instance.
Warning
Network Unstable
The connection between the ProSync and the ProSync Manager is unstable.
Warning
Long Tx Start
The time when a transaction comes in and the ProSync creates a Part File. If this condition occurs, the users can check the detailed log through the Long Tx modal with the +more button in the Message item.
Long Transaction
Appended
Additional Long Transaction information has been appended to the created Part File.
Long Transaction
Rollbakced
A problem occurred during the reflection of a Long Transaction and it was rolled back.
Long Transaction
Skipped
A Transaction with a value before the Last Committed TSN was received and skipped.
Long Transaction
Replay
Long Transaction has been transferred to the replay thread and is being reflected.
Long Transaction
End
Long Transaction has ended.
Long Transaction
Stopped
Processes in the ProSync are stopped.
Error
DB Disconnected
The connection between each SRC and TAR DB in the ProSync Manager is disconnected.
Error
Agent Down
The Agent process in the ProSync is down.
Error
Paused
The Ext process in the ProSync is paused.
Paused
Notification
Enable/disable button for the created alarm.
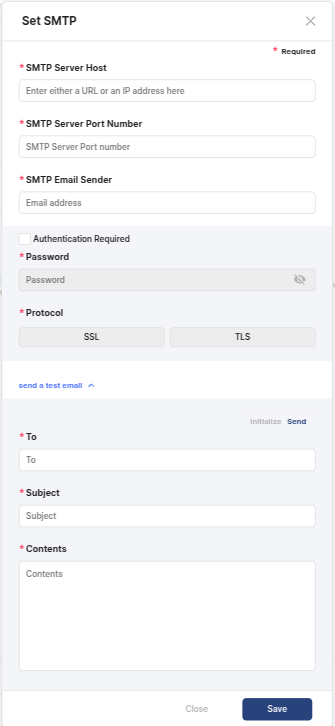
Athenticatation Required
This is the part where the users can enter the authentication related to SMTP Email. If authentication is required, check the appropriate item and enter it.
- Password: The password of the SMTP account to be set up.
- Protocol: Select the protocol to be used for secure communication.
[Caution]
Since this is an account used for SMTP servers that require authentication, mail will not be sent if an account that does not actually exist is used.
Send a Test Email
Available to send a test email to check if the account you want to send SMTP from is set up properly.
- To: Enter the email address of the person to receive the test email. (Required)
- Subject: Enter the subject of the test email. (Required)
- Contents: Enter a brief description of the test email. (Required)
- Initialize/Send: Click the Initialize/Send button to initialize or send the entered test email value.
Stream Name
The name of the Stream that the Instance in which the event occurred belongs to.
Instance Name
The name of the Instance in which the event occurred.
Occurence Time
The time at which the event occurred.
Running
Instance is synchronizing normally.
Running
Issue Log
Status that [E]/[F] logs are generated in the proxy. If this status occurs, the users can check the detailed logs through the Issue Log modal with the +more button in the Message item.
Warning
Setting Name
The name that identifies the Email Alarm.
Target instance
The number of Instances that are set to receive event alarms.
DB Disconnected
Agent Down
Process Down
Nework Unstable
Delayed
Issue Log
The time, in minutes, that the users set for each state to receive an email alert.
SMTP Server Host
Enter the HOST address of the server on which the users are setting up SMTP. (Required)
SMTP Server Port Number
Enter the port number of the SMTP server. (Required)
SMTP Email Sender
Enter the email address of the sender. The name of the actual email sender is displayed as ProsyncManager. (Required)
Setting Name
Teh name to identify the email alarm.
Y
Target Instance
Select the target instance to track events through the email alarm.
Y
Setting Event Search duration
Filtering area
Setting Event Delete interval
Event Table
Event Filtering
Replication Diagram area
Event Status area
Event Delete
Email Notification Setting
1. Set SMTP
2. Set Email Notification
3. Email Notification table
Note
If the users have a Mail Transfer Agent (MTA) running on port 25 on their local host (e.g., postFix), the users can send mail without authentication by entering the IP/PORT of the agent.
However, this may end up in the recipient's spam folder, so the users'll need to change this in the recipient's mail account settings.
4-1. Set SMTP
4-2. Set Email Notification
Installation and registration for instance
Describes installing and registering Instance.
1. Instance installation entry point
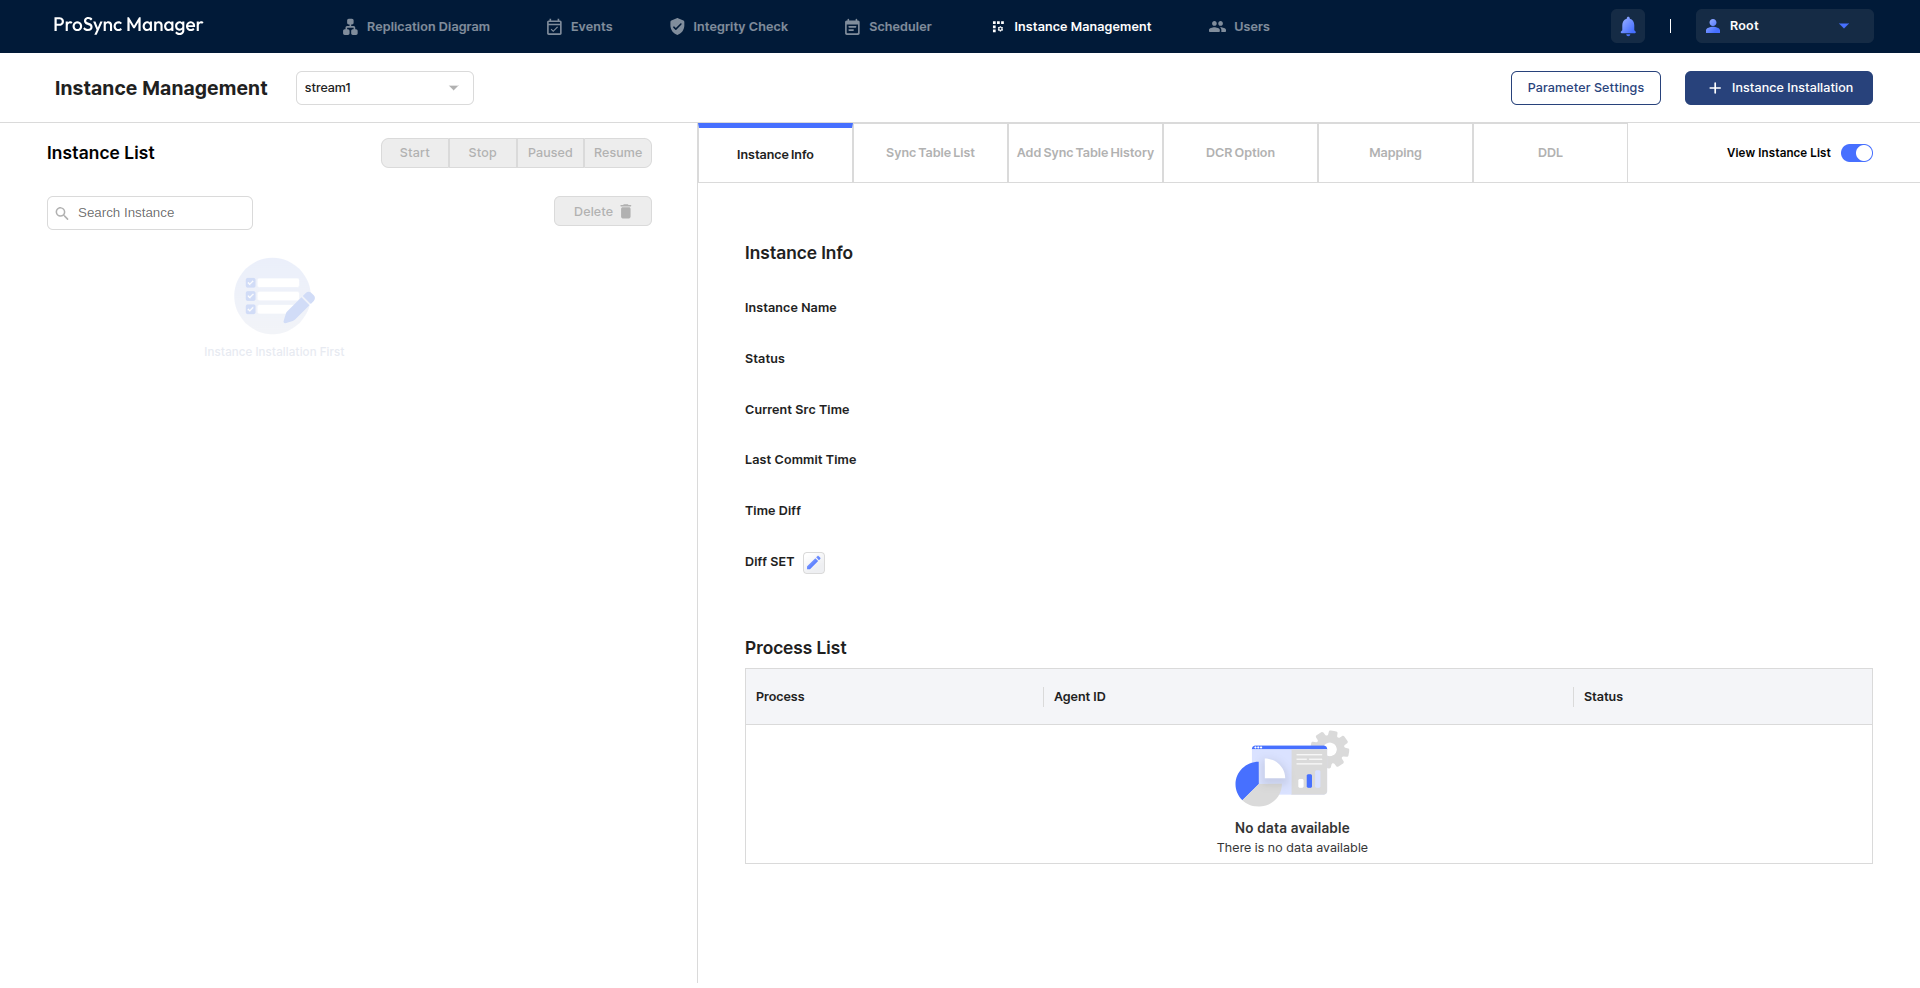
The users can view the Instance Management page by selecting the Instance Management tab.
Figure 1. Instance Management page screen
At this point, the users can install and register an instance through the Instance Installation button on the top right.
Figure 2. Instance Installation button
2. Instance installation modal screen
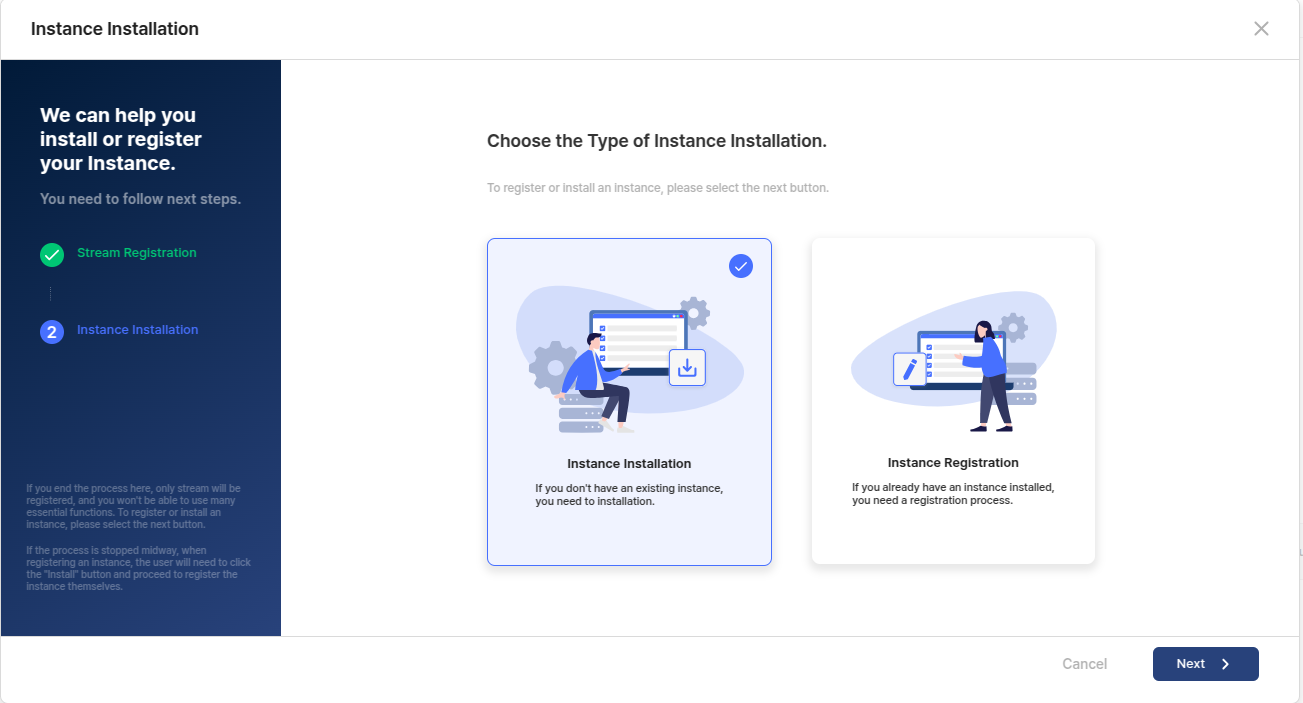
The modal first screen of the Instance installation.
Figure 3. Install Instance modal screen
The users can choose between two methods.
Instance Installation
Select when the users want to install a new instance.
Instance Registration
Select the tab that corresponds to the desired method to confirm.
Describes the instance Installation.
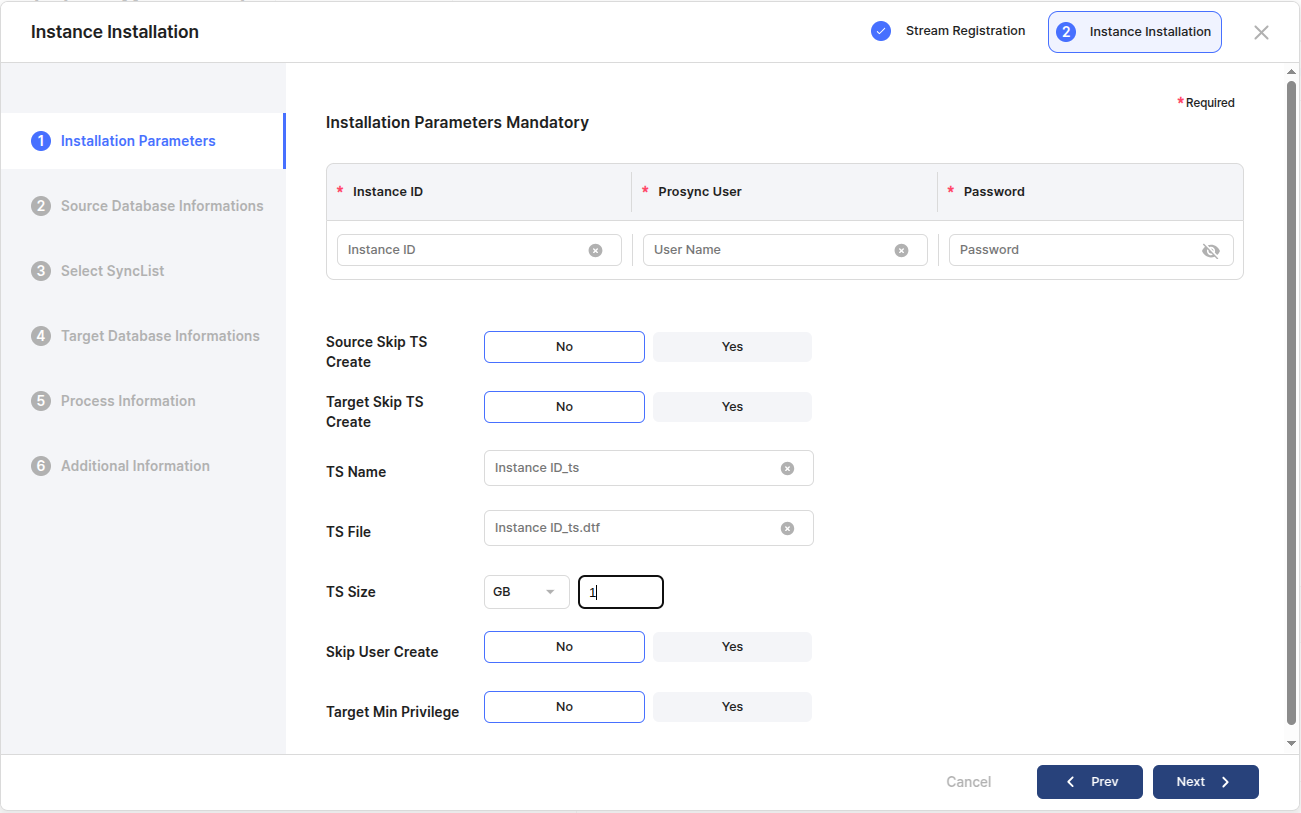
Enter basic information for installing the instance.
Item
Description
Required Item목
After successfully installing and registering the Instance, the users can see that it is registered on the main screen as shown below.
Configuration of Server parameter
Describes the configuration of server parameter of ProSync Manager.
The parameters used by the ProSync Manager server can be set in the prosyncmanager.properties file.
Each parameter is separated by a newline, and only one equals sign (=) is entered between the parameter name and the value, with no spaces.
The following describes each parameter.
Parameters
Description
Default value
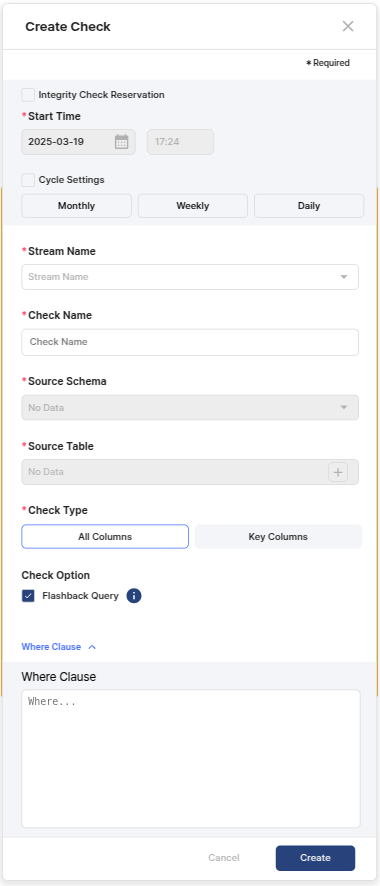
Integrity Check
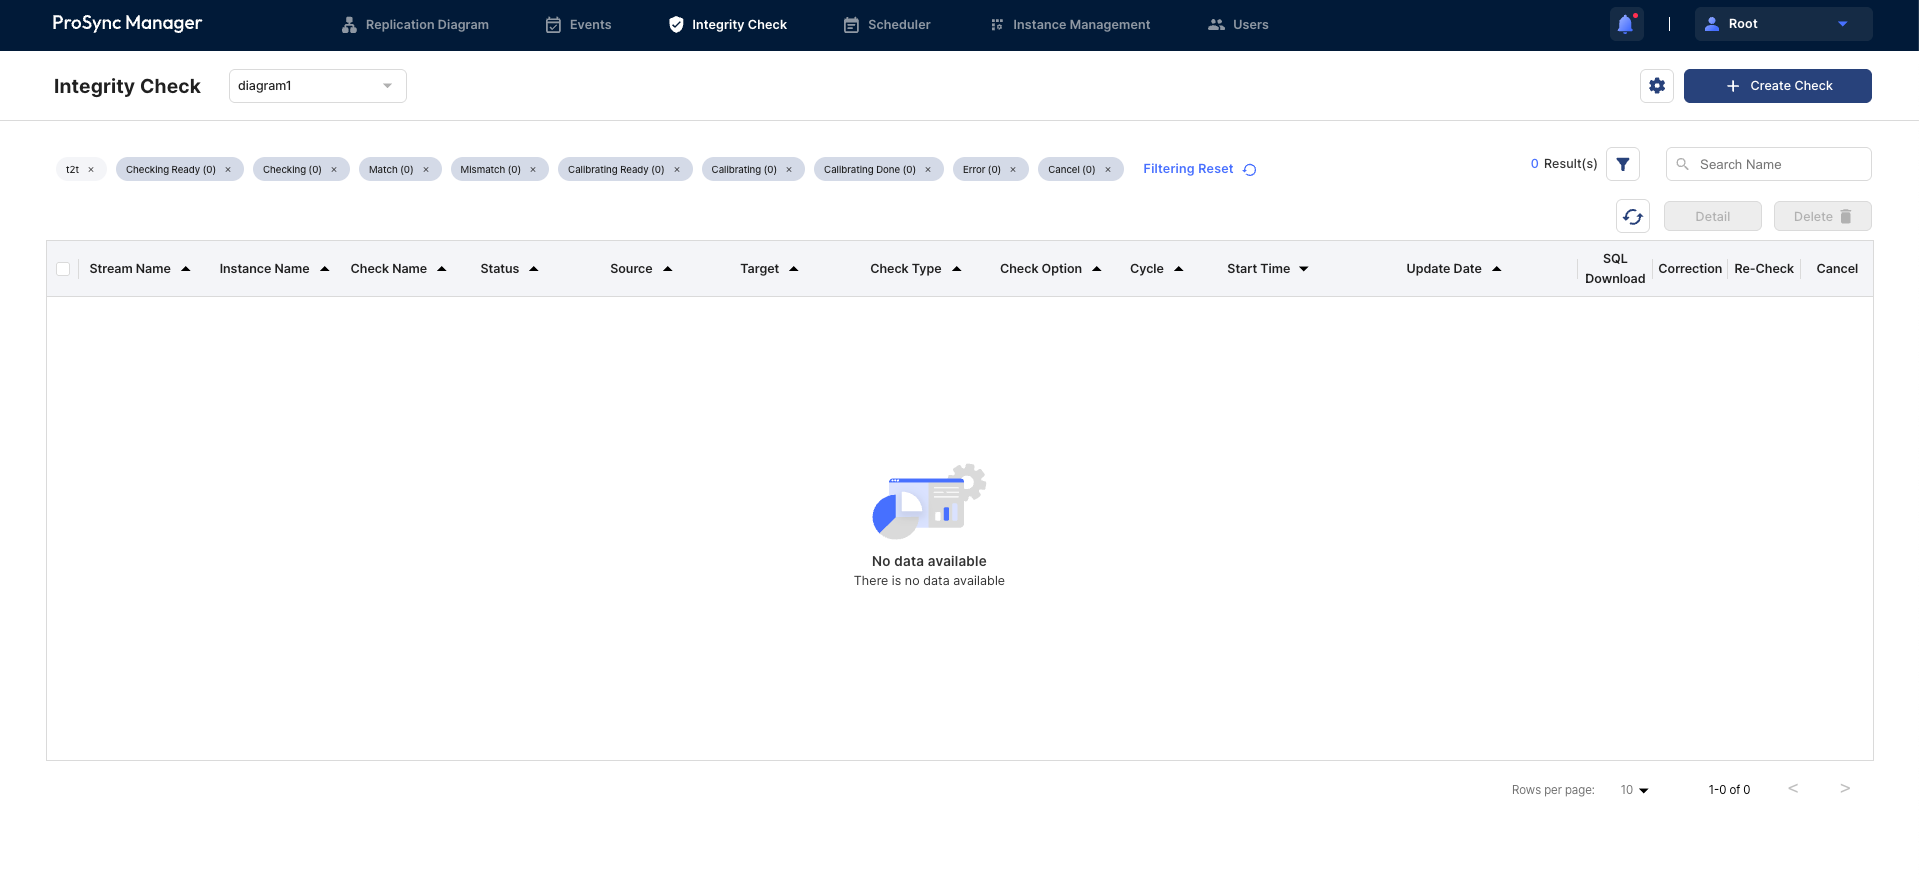
This section introduces the Integrity Check page, which is related to checking the consistency of synchronized data.
The users can perform consistency checks on synchronized data.
Integrity Check refers to ProSync's consistency check.
It checks whether data consistency matches for specific tables in the source and target DBs being synchronized, and if it does not, the users can check or correct the result of the consistency check.
The users can create a job to check for consistency, and set the thread count to be used by the job.
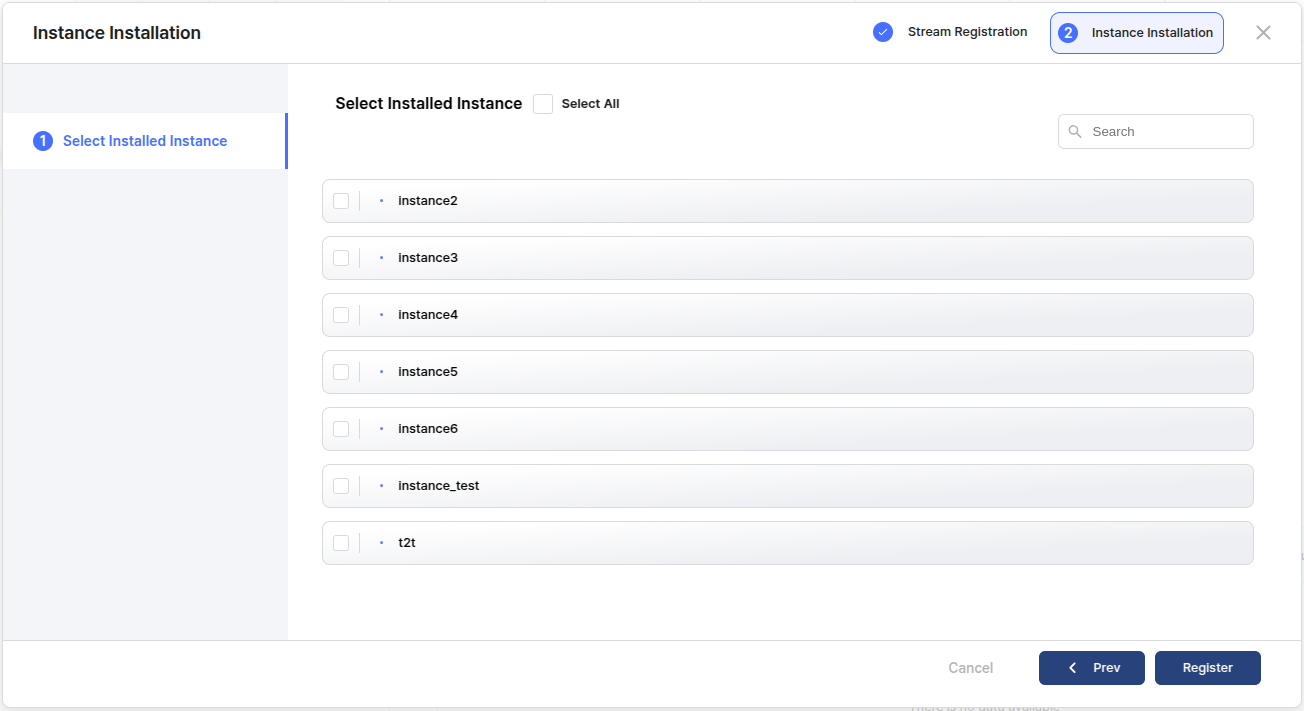
If the users already have an installed instance, select it when the users want to register it with ProSync Manager.
Y
ProSync User
Sets the user name to be created in the Source and Target DB for ProSync operation.If Skip User Create is set to Y, the users must enter the user information the users want to designate as a ProSync user.
Y
Password
Sets the password for ProSync User.
Y
Source Skip TS Create
Does not create a tablespace in the Source DB to store data used for ProSync operation, but uses an existing tablespace. (Default: N)
N
Target Skip Ts Create
Does not create a tablespace in the Target DB to store the data used in the CreateProSync operation, but uses an existing tablespace. (Default: N)
N
TS Name
Sets the tablespace name to store the data used in the ProSync operation. (Default: [INSTANCE_ID]_ts)
N
TS File
Sets the tablespace file name to store the data used in the ProSync operation. (Default: [INSTANCE_ID]_ts.dtf)
N
TS Size
Sets the tablespace size to store the data used in the ProSync operation. (Default: 1G)
N
Skip User Create
Sets when using an existing user without creating a database user for the ProSync operation. (Default: N)
N
Target Min Privilege
Sets when performing only DML synchronization by granting minimal privileges to the Target DB user for the ProSync operation. If the users want to perform DDL synchronization, the users must grant the appropriate privileges later. (Default: N)
N
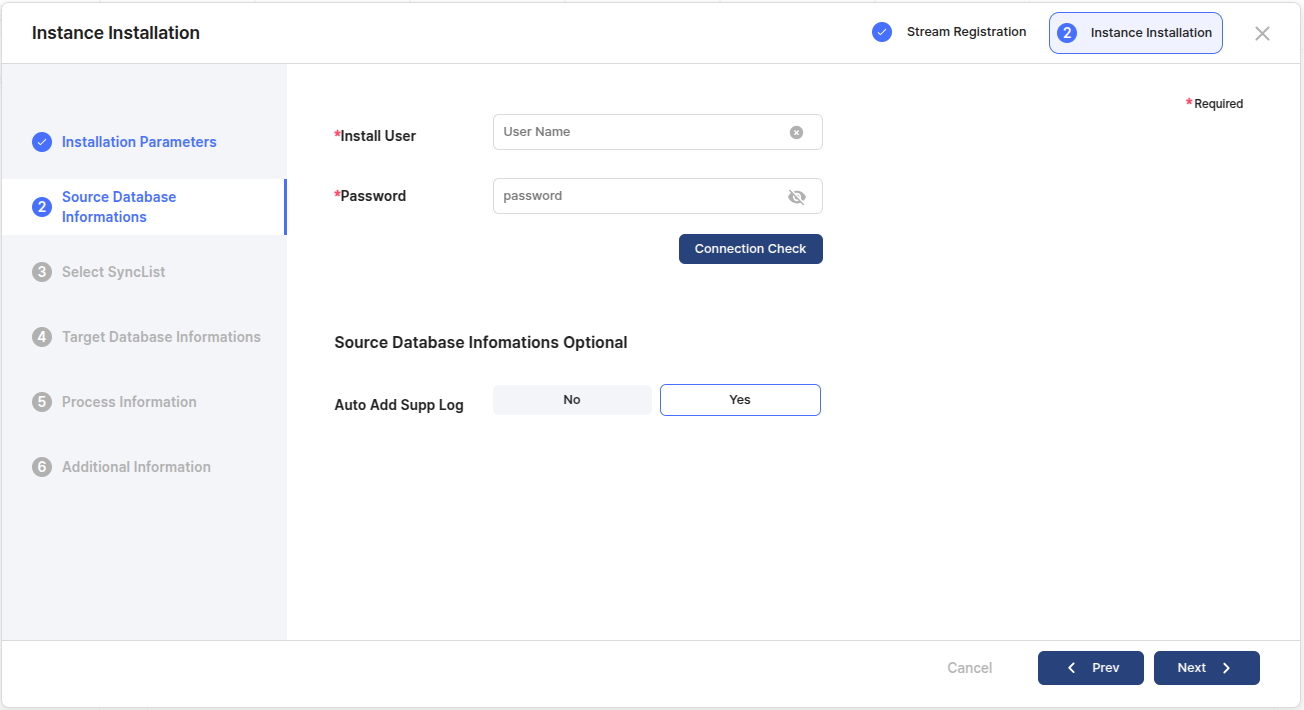
Enter the information of the Source DB required when installing an instance.
Item
Description
Required Item
Install User
This is the account used to access the Source DB for reviewing installation requirements and creating PRS_USER. It must have the required permissions for installation and is usually an account with system administrator privileges.
Y
Password
Inputs the password for Install User.
If the connection check is successful, the users'll see something like this.
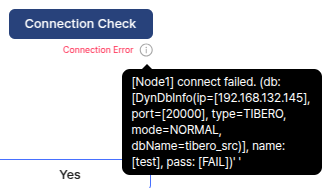
This is an example of a failed connection check, and the users can see the error message by hovering over the info icon.
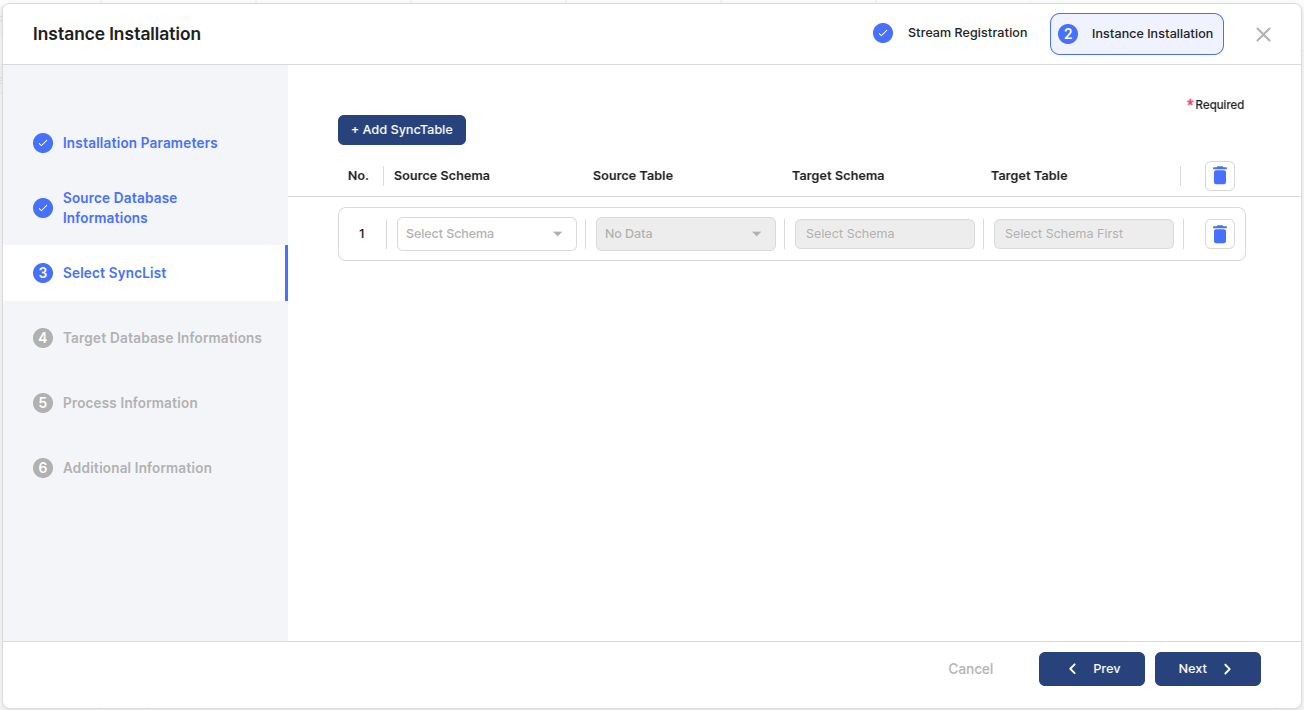
The users can set the synchronization table for an Instance.
Item
Description
Required Item
Add Sync Table
This is the button to adds list to enter synchronization table information.
N
Source Schema
Selects the schema of the source DB to be synchronized.
Delete button
The users can see the header of the list and the Delete button in each list.
The Delete button in the header resets the input and list count for all lists, and the Delete button in each list deletes the corresponding list.
In this case, the synchronization table the users specify has the same Source Schema/Table Name and Target Schema/Table Name, so Map Rules that specify different names are not applied.
So, to use a Map Rule, the users can either skip this step and not specify anything, or the users can specify it first and then modify it on the Mapping tab of the Instance Management page.
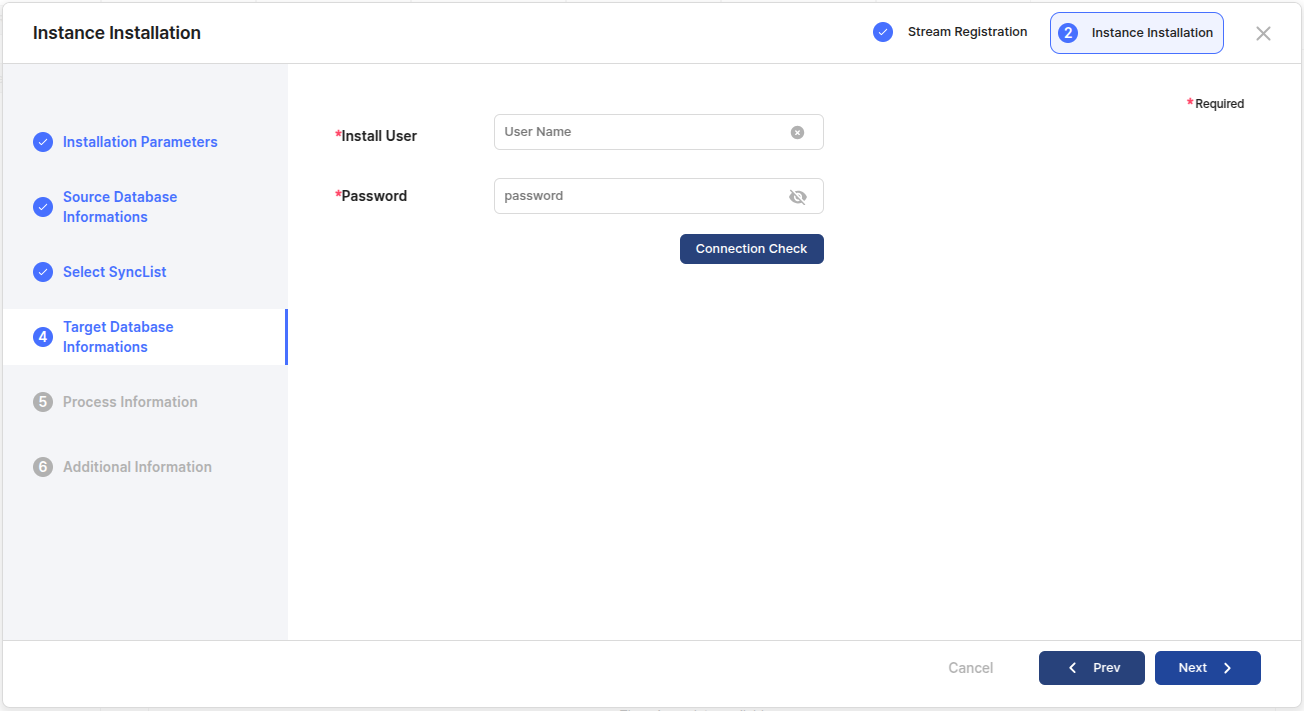
Enter the information for the Target DB that is required when installing the instance.
Item
Description
Required Item
Install User
This is the account used to access the Target DB for reviewing ProSync installation requirements and creating PRS_USER. It must have the required permissions for installation and is typically an account with system administrator privileges.
Y
Password
Inputs the password for Install User.
Enter the information for the Process that will be used in the Instance.
Item
Description
Required Item
Process
The name of the process to set.
Y
Agent Id
Selects the Agent ID to connect to the process from the Agents entered in the previous Stream registration step in order of CM-Failover.
The following is an example of setting up an Agent list.
Set for additional information during Instance installation.
Item
Description
Use TDE
A parameter to receive TDETDE_WALLET_PWD as manual input. (Default:N)
Waffle File Password
Enters TDE_WALLET_PWD to set when Use TDE is Yes.
Set LOG_DIR
A parameter to receive manual input of LOG_DIR of this instance.(Default: N)
If the installation of the Instance was successful, the users should see this screen.
The following is an example of an Instance installation failure.
Describes how to register an instance.
1. Select Installed Instance
Select the Instance the users want to enroll in this Stream from the Instances the users have installed.
2. Instance Registration Successful성공
If the registration of the instance is successful, the users can see the following screen.
Instance ID
3. Instance Installation and regstration
1. Installation Parameters
4. Main screen after completing instance registration
The ID for installing ProSync.
The value entered in this parameter must be in the form of Tablespace name and cannot start with a number.
2. Source Database Information
3. Select SyncList
4. Target Database Information
5. Process Information
6. Additional Information
7. Instance installation completed Log
LOG_LEVEL
The level of logs to be left by ProSyncManager, which can be changed dynamically.
(ERROR, WARN, INFO, DEBUG, TRACE)
INFO
LOG_DIR
The directory where ProSyncManager will leave logs.
${PRSMGR_HOME}/logs
LOG_COMPRESS
Determines whether to compress previous logs (Y, N)
Y
LOG_MAX_FILE_SIZE
# LOG
LOG_LEVEL=INFO
LOG_DIR=${PRSMGR_HOME}/logs
LOG_COMPRESS=Y
LOG_MAX_FILE_SIZE=1GB
LOG_MAX_HISTORY=30
LOG_TOTAL_SIZE_CAP=30GB
# INTEGRITY CHECK
## parallel used in SELECT during check operation
IC_SELECT_THREAD_COUNT=8
## parallel used by DML during calibration operation
IC_APPLY_THREAD_COUNT=8
IC_QUEUE_SIZE=128
IC_DOWNLOAD_PATH=${PRSMGR_HOME}/verify
IC_CONNECTION_TIMEOUT=300
IC_READ_TIMEOUT=1800
## Thread pool size for verification tasks
## Occupy maximum number of equal SRC/TAR DB connections
IC_SERVICE_THREAD_CNT=10
## Thread pool size used for downloading the result after scan
IC_SERVICE_DOWNLOAD_THREAD_CNT=5
## Thread pool size used for calibration work
## Occupy TAR DB connection up to the value * 5
IC_SERVICE_APPLY_THREAD_CNT=5
## Sorting for non-UTF DBs
IC_USE_UNICODE_ORDER=false
# INITIAL LOAD
IL_EXTRACT_PARALLEL=N
IL_INSERT_PARALLEL=N
IL_LOCK_TIMEOUT=10
IL_LOG_PATH=${PRSMGR_HOME}/etl
# REPO DB
REPODB_USERNAME=repo_user
REPODB_PASSWORD=password
REPODB_IP=localhost
REPODB_PORT=13852
REPODB_DBNAME=prosyncmanager
# JWT 90days - 360days
JWT_VALID_TIME_MILLIS=7776000000
JWT_REFRESH_TIME_MILLIS=31104000000
# DB
DB_TIMEOUT_SECONDS=5
# TOMCAT LOG
TOMCAT_LOG_LEVEL=INFO
TOMCAT_LOG_DIR=${PRSMGR_HOME}/tomcat_logs
TOMCAT_LOG_COMPRESS=Y
TOMCAT_LOG_MAX_FILE_SIZE=1GB
TOMCAT_LOG_MAX_HISTORY=30
TOMCAT_LOG_TOTAL_SIZE_CAP=30GB
# HIST RETENTION
RETENTION_JOB_TIME=1
RETENTION_EVENT=30
RETENTION_ERROR=30
RETENTION_LONG_TX=30
RETENTION_RESOURCE=30
RETENTION_STATISTICS=30
RETENTION_TSN_DIFF=30
# TSN TIME MAP RETENTION
RETENTION_SRC_TIME_MAP=30
1. Server parameter configuration
The users can search among the created jobs by filtering by specific instance, check status, and check name.
The left side shows the items used for filtering, which can be removed from filtering via the x button to the right of each filter tag or reset with the Filtering Reset button. These items can be specified via the filter button on the right.
The numbers to the right of the filtering item indicate the number of jobs of that status.
Refresh: Updates the status as the job progresses.
Delete details: Checks and deletes the details of a registered job.
This is the table where the users can see the list with all filtering applied.
Select the desired entry in the table for the Job's behavior, or for deleting and editing.
Item
Description
Stream Name
The name of the stream to perform the consistency check.
Instance Name
The name of the instance to perform the consistency check.
Check Name
The name of the consistency check.
Item
Description
Required Item
Schedule Setting
The users can set the schedule of the integrity check.
Integrity Check Reservation: Specify whether to use scheduling.
Start Time: Specify the time when the integrity check is performed.
Cycle Settings: Specify whether to perform the integrity check repeatedly. The users can set the cycle in Monthly / Weekly / Daily units.
N
Stream Name
Select a stream to perform the consistency check.
Y
When searching the Integrity Check table, the users can utilize these filters to perform more sophisticated searches.
The users can see a list of Streams - Instances that belong to the Diagram specified in the Diagram Filter in the header of the page.
Select the Instances the users want to select/clear by the filtering criteria. Select Stream if the users want to select/clear all instances in a Stream, or Diagram if the users want to select/clear all instances in the current Diagram.
All of the status types available on the Integrity Check page.
Item
Description
Checking Ready
The job is waiting to be checked.
Checking
The job is in the checking state.
Match
The job has finished checking and the match is a match.
This feature allows the users to check the result of the Integrity Check execution. The users can check and download the Result Report item when the users right-click the mouse by selecting multiple jobs to check.
The name of each job for which the users want to view the Result Report.
The users can download each Result Report as a csv file and manage it.
It has a name like Integrity_Report_[Job Name].csv.
Item
Description
Check Start Time
The time when the check of the job started.
Check End Time
The time when the check of the job ended.
Check Error Msg
The message checked when an error occurred during the check of the job.
The users can download and manage the Result Report, which has a name like Integrity_Report_[Job Name].csv.
Start the Excel Program
File > Import at the top of the menu
Select a CSV file and open the file
Select Delimited and UTF-8
Delimiters - Select Treat commas, spaces, and consecutive delimiters as one \
Text qualifiers - select '"' (double quotes)
Finish
The above steps should be followed to open the file so that the users can check the data without any corruption or delimiters.
Integrity Check
Integrity Check area
Setting Create Check and Thread
Filtering area
Refresh and delete details
Integrity Check Table
Note
These actions can be executed with a right-click after multiple selections of the table.
The items that appear depend on the status of the selected Job, and the job is executed according to its status.
Create Check
Integrity Check Filtering
Replication Diagram area
Integrity Check Status area
Integrity Result Report
Integrity Result Report
Integrity Job Tab
Result CSV download
Result Report table
Integrity Result Report Download
Note
It is recommended using Microsoft's Excel program to open it, and described it based on that.
How to open a CSV file
The maximum size of individual log files.
It is in bytes and can be set using GB/MB/KB.
1GB
LOG_MAX_HISTORY
The number of days between log files to keep, with older files deleted.
30
LOG_TOTAL_SIZE_CAP
The upper limit for the sum of the total size of all log files, with older files deleted. It is in bytes and can be set using GB/MB/KB.
30GB
IC_SELECT_THREAD_COUNT
The number of threads used for data comparison during the consistency check operation.
8
IC_APPLY_THREAD_COUNT
The number of threads used for data correction during the consistency check operation.
8
IC_QUEUE_SIZE
The parameter for memory management of the consistency check and means the maximum value of statements to be held in the stream that reads/writes the sql file. If the users allow a value that is too large, it will affect the performance (resources) of the ProSync Manager by increasing the number of statements accumulated in memory when SQL file creation is slow, so set the appropriate value according to the environment. (1 - 2147483647)
128
IC_DOWNLOAD_PATH
The parameter of the verification function, where the sql file of the verification result will be saved.
${PRSMGR_HOME]/verify
IC_CONNECTION_TIMEOUT
The connection timeout for trying to connect to JDBC.(0 - 2147483647 seconds) If set to 0 seconds, the connection wait is performed without timeout.
300
IC_READ_TIMEOUT
Query Timeout to wait for a response when a query is sent to the server. (-1 - 2147483647 seconds) If set to a positive integer, it will wait for timeout (seconds). If it is 0 or a negative value, it will wait indefinitely for the query response.
1800
IC_SERVICE_THREAD_CNT
The number of threads to perform consistency checks simultaneously. All values greater than 0 are allowed, but allowing too many threads affects the performance (speed and resources) of the ProSync Manager, so set the appropriate value according to the users environment.
10
IC_SERVICE_DOWNLOAD_THREAD_CNT
The thread pool size used for downloading SQL files after the consistency result.0All larger values are allowed, but allowing too many threads affects the performance (speed and resources) of the ProSync Manager, so set the appropriate value according to the environment.
5
IC_SERVICE_APPLY_THREAD_CNT
The thread pool size used for the matching correction operation.Maximum {setting value} * 5 occupies the TAR DB Connection. All values greater than 0 are allowed, but allowing too many threads may affect the performance (speed and resources) of the ProSync Manager, so set the appropriate value according to the users environment.
5
IC_USE_UNICODE_ORDER
If the charset is not UTF, the sort order of special characters such as Chinese characters may be different. If this option is true, it changes the sort order to unicode when sorting by columns that are interpreted as Strings, such as char/varchar, in non-UTF environments.(This has an effect if the KEY contains a char/varchar column or if the table contains such a column without a KEY)
false
IL_EXTRACT_PARALLEL
The Parameter of the initial load function, which determines whether to parallelize extraction.(Y|N)
N
IL_INSERT_PARALLEL
The parameter of the initial load function, which determines whether to parallelize insertion.(Y|N)
N
IL_LOCK_TIMEOUT
The parameter of the initialization function, the time to try to lock the table in srcDB during initialization.(1 - 2147483647 seconds)
10
IL_LOG_PATH
The parameter of the initialization function, the location to save the log file of the initialization.(1 - 2147483644 seconds)
${PRSMGR_HOME}/etl
PEPODB_USERNAME
The user name to connect to repoDB
repo_user
REPODB_PASSWORD
The password of PEPODB_USERNAME to connect to repoDB.
password
REPODB_IP
The iP to connect to repoDB.
localhost
REPODB_PORT
The port to connect to repoDB. (0 - 65535)
13852
REPODB_DBNAME
The DB name to connect to repoDB.
prosyncmanager
JWT_VALID_TIME_MILLIS
jwt Token-related parameter, the valid time of the token. (1 - 9223372036854775807 milliseconds)
7776000000
JWT_REFRESH_TIME_MILLIS
jwt Token-specific parameter, the validity time of the refresh token. (1 - 9223372036854775807 milliseconds)
31104000000
DB_TIMEOUT_SECONDS
Timeout setting for query response to the control DB.(0:Infinite wait, 0 - 2147483647 seconds)
5
TOMCAT_LOG_LEVEL
Level of tomcat logs to deploy ProSyncManager.(ERROR, WARN, INFO, DEBUG, TRACE)
INFO
TOMCAT_LOG_DIR
Directory where tomcat logs will be located.
${PRSMGR_HOME}/tomcat_logs
TOMCAT_LOG_COMPRESS
COMPRESSDetermines whether to compress old tomcat logs.(Y, N)
Y
TOMCAT_LOG_MAX_FILE_SIZE
Maximum size of individual tomcat log files in bytes and can be set using GB/MB/KB.
1GB
TOMCAT_LOG_MAX_HISTORY
The number of days between tomcat log files to be retained. Older files will be deleted.
30
TOMCAT_LOG_TOTAL_SIZE_CAP
The upper limit for the total size of all tomcat log files. Older files will be deleted.
30GB
RETENTION_JOB_TIME
Time to execute to remove the partition saving log data. (0 - 23)
1
RETENTION_EVENT
The event information to store for a period of time (-1: never, 0: only store information for the day, max 365)
30
RETENTION_ERROR
The error information to store for a period of time (-1: Never, 0: Save only today's information, max 365)
30
RETENTION_LONG_TX
The long tx Information to save (-1: Never, 0: Save only today's information, max 365)
30
RETENTION_RESOURCE
cpu/mem Usage information to save (-1: Disabled, 0: Saves only the current day's information, max 365)
30
RETENTION_STATISTICS
The number of synchronized dml/ddl information (-1: Disabled, 0: Saves only the current day's information, max 365)
30
RETENTION_TSN_DIFF
Time information to save the tsn Diff information.
(-1: Disabled, 0: Saves only the current day's information, max 365)
30
RETENTION_SRC_TIME_MAP
Time information mapped to the tns.
(-1: Disabled, 0: Saves only the current day's information, max 365)
30
Y
Connection Check
Performs a connection check based on the information entered. Only if the connection is successful can the users perform the next step.
Y
Auto Add Sup Log
Sets whether ProSync automatically adds supplemental logs to the synchronization target table during the installation process. (Default: Y)
N
N
Source Table
Selects the table of the source DB to be synchronized.At this time, if the table is already specified in another instance belonging to the same Stream, it cannot be specified as a synchronization table, but if 'ALL' option is selected, it is specified as all tables belonging to that schema regardless of the synchronization tables of other instances.
N
Target Schema
The same applies to the schema of the selected source.
N
Target Table
The same applies to the table of the selected source.
N
Y
Connection Check
Performs a connection check based on the information entered. The users can only perform the next step if the connection is successful.
Y
Y
Process Port
Enters the port of the process to set.
Y (Except Ext)
LOG_DIR
Sets LOG_DIR If LOG_DIR is Yes, enter the LOG_DIR the users want to set. In this case, all processes (Ext and Apply, Llob) must share the same file path because the logs of all processes (Ext and Apply, Llob) are left in the location of this setting.
Set LOG_BACKUP_DIR
A parameter to receive manual input of the LOG_BACKUP_DIR of the instance.(Default:N)
LOG_BACKUP_DIR
Sets LOG_BACKUP_DIR If LOG_BACKUP_DIR is Yes, enter the LOG_BACKUP_DIR to set. At this time, backup logs of all processes (Ext and Apply, Llob) are left in the location of the corresponding setting value, so they must all share the same file path.
Status
The status of the consistency check.
Source
The table information of the source DB to perform the consistency check.
Target
The table information of the target DB to perform the consistency check.
Check Type
Type of the type to perform the consistency check.
Check Option
Option to perform the consistency check.
Cycle
Indicates whether to schedule.
Monthly: Runs the job at the specified time every month.
Weekly: Runs the job at the specified time every week.
Daily: Runs the job at the specified time every day.
None: This is a one-time job that is not scheduled.
Start Time
The start time of the consistency check.
Update Time
The last time the Status of the consistency check was changed.
SQL Download
This button downloads the correction SQL file if there is a consistency mismatch.The generated SQL file has the same name as verify_[ID]_[Check Name].sql, and the contents of the sql file are written based on the Source Table and reflected in the Target Table when reflected.
Correction
If there is a mismatch, this button reflects the correction sql file to the DB.
Re-Check
This button reexecutes the consistency check.
Cancel
This button cancels the consistency check or correction.
Check Name
Enter a name for the consistency check except Korean characters.
Y
Source Schema
Select the schema of the source DB to perform the consistency check.If the users select All, a job is created for the entire schema of the synchronization table.
Y
Source Table
Select the table of the source DB to perform the consistency check.If the users select All, a job is created for the entire table of the synchronization table.
Y
Check Type
Select the type of consistency check to be performed.
All column: Compares all columns to check consistency.
Key column: Compares only the primary key to check consistency.
Y
Check Option
Check the consistency check with Flashback Query as an option. If the users disable this option, the check is performed at the current time, and if synchronization is in progress, the consistency is not guaranteed.If the users select this option and the check cannot be performed because there is no snapshot at that time, the check is automatically disabled and the check is performed at the current time.
N
Where Clause
Enter a where clause to be used for the consistency check. The users do not need to enter a 'WHERE' condition, only the conditional statement the users want to check, and the users can specify the range to check for a specific column, etc.
N
Mismatch
The job has finished checking and the match is a mismatch.
Correcting Ready
The job is waiting to be corrected.
Correcting
The job is in the correcting state.
Correction Complete
The job is in the correction state. Correction Complete means that the correction of the job is complete.
Error
An error occurred during the inspection/correction of the job.
Click the Info icon of the status to check the detailed message.
Cancel
The job was canceled during the inspection/correction.
Mismatch Rows
The total number of mismatched rows when the job was in Mismatch status.
Insert Rows
The number of rows corresponding to Insert during the correction operation.
Update Rows
The number of rows corresponding to Update during the correction operation.
Delete Rows
The number of rows corresponding to Delete in a correction operation.
Correction Start Time
The time when the correction of the job started.
Correction End Time
The time when the correction of the job ended.
Correction Error Msg
The message checked when an error occurred during the correction of the job.